 MyBatis-Plus
# MyBatis-Plus
官网 (opens new window) MyBatis-Plus (opens new window)(简称 MP)是一个 MyBatis (opens new window) 的增强工具,在 MyBatis 的基础上只做增强不做改变,为简化开发、提高效率而生。
# 环境配置
在 pom.xml 文件导入依赖
    <!--mybatis-plus-->
    <dependency>
        <groupId>com.baomidou</groupId>
        <artifactId>mybatis-plus-boot-starter</artifactId>
        <version>3.3.1</version>
    </dependency>

    <!--mysql-->
    <dependency>
        <groupId>mysql</groupId>
        <artifactId>mysql-connector-java</artifactId>
    </dependency>
2
3
4
5
6
7
8
9
10
11
12
创建 application 配置文件
mysql5
#mysql数据库连接
spring.datasource.driver-class-name=com.mysql.jdbc.Driver
spring.datasource.url=jdbc:mysql://localhost:3306/mybatis_plus
spring.datasource.username=root
spring.datasource.password=123456
2
3
4
5
mysql8 以上(spring boot 2.1)注意:driver 和 url 的变化
spring.datasource.driver-class-name=com.mysql.cj.jdbc.Driver
spring.datasource.url=jdbc:mysql://localhost:3306/mybatis_plus?serverTimezone=GMT%2B8
spring.datasource.username=root
spring.datasource.password=123456
2
3
4
注意:
1、这里的 url 使用了?serverTimezone=GMT%2B8 后缀,因为 Spring Boot 2.1 集成了 8.0 版本的 jdbc 驱动,这个版本的 jdbc 驱动需要添加这个后缀,否则运行测试用例报告如下错误:
java.sql.SQLException: The server time zone value 'Öйú±ê׼ʱ¼ä' is unrecognized or represents more
2、这里的 driver-class-name 使用了 com.mysql.cj.jdbc.Driver ,在 jdbc 8 中 建议使用这个驱动,之前的 com.mysql.jdbc.Driver 已经被废弃,否则运行测试用例的时候会有 WARN 信息
# 编写代码
创建启动类
在 Spring Boot 启动类中添加 @MapperScan 注解,扫描 Mapper 文件夹
@SpringBootApplication
@MapperScan("com.atguigu.mybatisplus.mapper")
public class MybatisPlusApplication {
    ......
}
2
3
4
5
创建实体类
@Data
public class User {
    private Long id;
    private String name;
    private Integer age;
    private String email;
}
2
3
4
5
6
7
创建 Mapper 继承 BaseMapper
public interface UserMapper extends BaseMapper<User> {

}
2
3
查询全部
public class MybatisPlusApplicationTests {

    @Autowired
    private UserMapper userMapper;

    @Test
    public void testSelectList() {
        //UserMapper 中的 selectList() 方法的参数为 MP 内置的条件封装器 Wrapper
        //所以不填写就是无任何条件
        List<User> users = userMapper.selectList(null);
        users.forEach(System.out::println);
    }
}
2
3
4
5
6
7
8
9
10
11
12
13
注意:
IDEA 在 userMapper 处报错,因为找不到注入的对象,因为类是动态创建的,但是程序可以正确的执行。
为了避免报错,可以在 dao 层 的接口上添加 @Repository 注解
# 实现 CRUD
# 插入操作
public class CRUDTests {
    @Autowired
    private UserMapper userMapper;
    @Test
    public void testInsert(){
        User user = new User();
        user.setName("mary");
        user.setAge(18);
        user.setEmail("[email protected]");
        int result = userMapper.insert(user);
        System.out.println(result); //影响的行数
        System.out.println(user); //id自动回填
    }
}
2
3
4
5
6
7
8
9
10
11
12
13
14
查看 sql 输出日志
#mybatis日志
mybatis-plus.configuration.log-impl=org.apache.ibatis.logging.stdout.StdOutImpl
2
# 主键策略
| AUTO | 数据库 ID 自增 |
| NONE | 无状态,该类型为未设置主键类型(注解里等于跟随全局,全局里约等于 INPUT) |
| INPUT | insert 前自行 set 主键值 |
| ASSIGN_ID | 分配 ID (主键类型为 Number (Long 和 Integer) 或 String)(since 3.3.0), 使用接口 IdentifierGenerator 的方法 nextId (默认实现类为 DefaultIdentifierGenerator 雪花算法) |
| ASSIGN_UUID | 分配 UUID, 主键类型为 String (since 3.3.0), 使用接口 IdentifierGenerator 的方法 nextUUID (默认 default 方法) |
分布式全局唯一 ID 长整型类型 (please use ASSIGN_ID ) | |
32 位 UUID 字符串 (please use ASSIGN_UUID ) | |
分布式全局唯一 ID 字符串类型 (please use ASSIGN_ID ) |
(1)ID_WORKER
MyBatis-Plus 默认的主键策略是:ID_WORKER 全局唯一 ID
(2)自增策略
要想主键自增需要配置如下主键策略
- 需要在创建数据表的时候设置主键自增
- 实体字段中配置 @TableId (type = IdType.AUTO)
@TableId(type = IdType.AUTO)
private Long id;
2
其它主键策略:分析 IdType 源码可知
public enum IdType {
     /**
     * 数据库ID自增
     */
    AUTO(0),

    /**
     * 该类型为未设置主键类型
     */
    NONE(1),

    /**
     * 用户输入ID
     * 该类型可以通过自己注册自动填充插件进行填充
     */
    INPUT(2),

    /**
     * 全局唯一ID
     */
    ASSIGN_ID(3),

    /**
     * 全局唯一ID (UUID)
     */
    ASSIGN_UUID(4),

    /** @deprecated */
    @Deprecated
    ID_WORKER(3),
    /** @deprecated */
    @Deprecated
    ID_WORKER_STR(3),
    /** @deprecated */
    @Deprecated
    UUID(4);
    private final int key;
    private IdType(int key) {
        this.key = key;
    }
    public int getKey() {
        return this.key;
    }
}
2
3
4
5
6
7
8
9
10
11
12
13
14
15
16
17
18
19
20
21
22
23
24
25
26
27
28
29
30
31
32
33
34
35
36
37
38
39
40
41
42
43
44
# 根据 ID 更新
** 注意:**update 时生成的 sql 自动是动态 sql:UPDATE user SET age=? WHERE id=?
    @Test
    public void testUpdateById(){
        //1 根据id查询记录
        User user = userMapper.selectById(1L);
        //2 设置修改的值
        user.setAge(50);
        //3 调用方法修改
        int result = userMapper.updateById(user);
        System.out.println(result);
    }
2
3
4
5
6
7
8
9
10
# 分页查询
MyBatis Plus 自带分页插件,只要简单的配置即可实现分页功能
创建配置类
/**
 * 分页插件
 */
@Bean
public PaginationInterceptor paginationInterceptor() {
    return new PaginationInterceptor();
}
2
3
4
5
6
7
测试 selectPage 分页
@Test
public void testSelectPage() {
    Page<User> page = new Page<>(1,5);
    userMapper.selectPage(page, null);
    page.getRecords().forEach(System.out::println);
    System.out.println(page.getCurrent());
    System.out.println(page.getPages());
    System.out.println(page.getSize());
    System.out.println(page.getTotal());
    System.out.println(page.hasNext());
    System.out.println(page.hasPrevious());
}
2
3
4
5
6
7
8
9
10
11
12
控制台 sql 语句打印:SELECT id,name,age,email,create_time,update_time FROM user LIMIT 0,5
# 根据 ID 删除
@Test
public void testDeleteById(){
    int result = userMapper.deleteById(8L);
    System.out.println(result);
}
2
3
4
5
# 批量删除
@Test
public void testDeleteBatchIds() {
    int result = userMapper.deleteBatchIds(Arrays.asList(8, 9, 10));
    System.out.println(result);
}
2
3
4
5
# 逻辑删除
- 物理删除:真实删除,将对应数据从数据库中删除,之后查询不到此条被删除数据
- 逻辑删除:假删除,将对应数据中代表是否被删除字段状态修改为 “被删除状态”,之后在数据库中仍旧能看到此条数据记录
(1)数据库中添加 deleted 字段
ALTER TABLE `user` ADD COLUMN `deleted` boolean
(2)实体类添加 deleted 字段
并加上 @TableLogic 注解
@TableLogic
private Integer deleted;
2
(3)application.properties 加入配置
此为默认值,如果你的默认值和 mp 默认的一样,该配置可无
mybatis-plus.global-config.db-config.logic-delete-value=1
mybatis-plus.global-config.db-config.logic-not-delete-value=0
2
(5)测试逻辑删除
- 测试后发现,数据并没有被删除,deleted 字段的值由 0 变成了 1
- 测试后分析打印的 sql 语句,是一条 update
- ** 注意:** 被删除数据的 deleted 字段的值必须是 0,才能被选取出来执行逻辑删除的操作
/**
 * 测试 逻辑删除
 */
@Test
public void testLogicDelete() {
    int result = userMapper.deleteById(1L);
    System.out.println(result);
}
2
3
4
5
6
7
8
(7)测试逻辑删除后的查询
MyBatis Plus 中查询操作也会自动添加逻辑删除字段的判断
/**
 * 测试 逻辑删除后的查询:
 * 不包括被逻辑删除的记录
 */
@Test
public void testLogicDeleteSelect() {
    User user = new User();
    List<User> users = userMapper.selectList(null);
    users.forEach(System.out::println);
}
2
3
4
5
6
7
8
9
10
测试后分析打印的 sql 语句,包含 WHERE deleted=0
SELECT id,name,age,email,create_time,update_time,deleted FROM user WHERE deleted=0
# MyBatisPlus 条件构造器
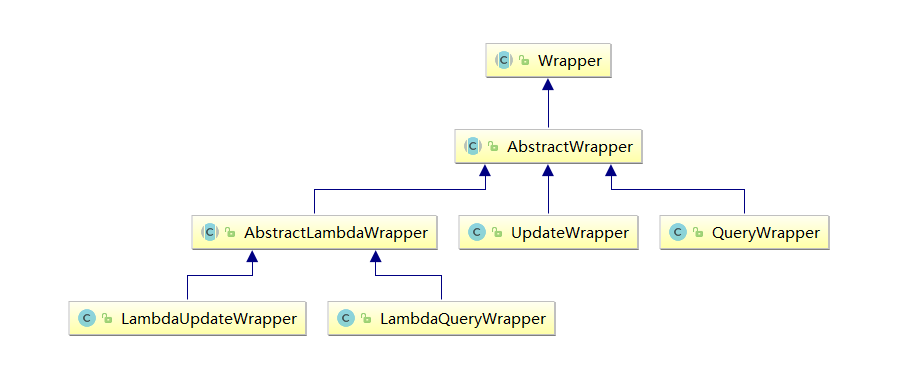
Wrapper : 条件构造抽象类,最顶端父类
AbstractWrapper : 用于查询条件封装,生成 sql 的 where 条件
QueryWrapper : Entity 对象封装操作类,不是用 lambda 语法
UpdateWrapper : Update 条件封装,用于 Entity 对象更新操作
AbstractLambdaWrapper : Lambda 语法使用 Wrapper 统一处理解析 lambda 获取 column。
LambdaQueryWrapper :看名称也能明白就是用于 Lambda 语法使用的查询 Wrapper
LambdaUpdateWrapper : Lambda 更新封装 Wrapper
注意:以下条件构造器的方法入参中的 column 均表示数据库字段
# MyBatisPlus 封装 Service 层
创建 service 继承 MyBatisPlus 提供给我们的 IService 类
public interface UserService extends IService<User> {

}
2
3
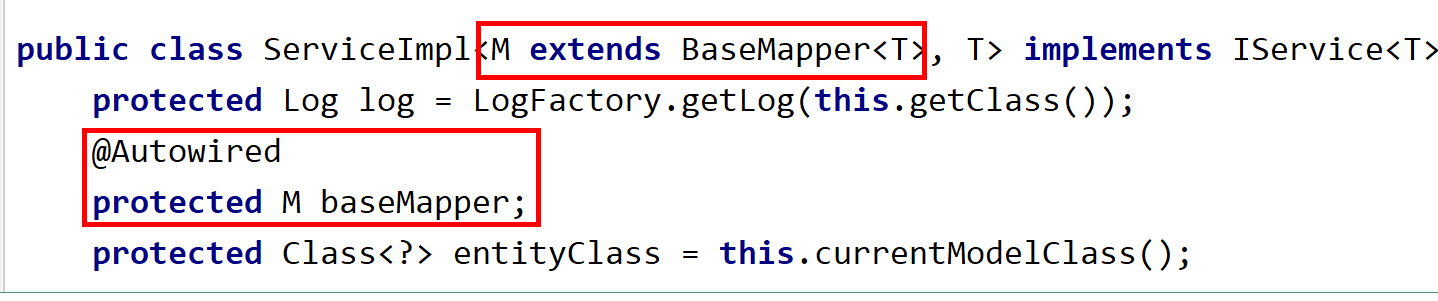
创建 service 实现类
@Service
public class UserServiceImpl extends ServiceImpl<UserMapper, User> implements UserService {
}
2
3
底层封装了注入 Mapper 过程
方法调用测试
@SpringBootTest
class TestApplicationTests {

    //注入service
    @Autowired
    private UserService userService;

    //查询表所有数据
    @Test
    public void findAll() {
        List<User> userList = userService.list();
        for (User user:userList) {
            System.out.println(user);
        }
    }
}
2
3
4
5
6
7
8
9
10
11
12
13
14
15
16