 Day06 监听数据库更新广告缓存
# Day06 监听数据库更新广告缓存
# canal
canal 可以用来监控数据库数据的变化,从而获得新增数据,或者修改的数据。
canal 是应对阿里巴巴存在杭州和美国的双机房部署,存在跨机房同步的业务需求而提出的。
阿里系公司开始逐步的尝试基于数据库的日志解析,获取增量变更进行同步,由此衍生出了增量订阅 & 消费的业务。

- canal 模拟 mysql slave 的交互协议,伪装自己为 mysql slave,向 mysql master 发送 dump 协议
- mysql master 收到 dump 请求,开始推送 binary log 给 slave (也就是 canal)
- canal 解析 binary log 对象 (原始为 byte 流)
# 环境部署
# mysql 开启 binlog 模式
SHOW VARIABLES LIKE '%log_bin%'; -- 查看当前mysql是否开启binlog模式
如果 log_bin 的值为 OFF 是未开启,为 ON 是已开启。
修改 /etc/my.cnf 需要开启 binlog 模式。
vim /etc/my.cnf
[mysqld]
log-bin=mysql-bin
binlog-format=ROW
server_id=1
2
3
4
给 root 用户授权
create user canal@'%' IDENTIFIED by 'canal';
GRANT SELECT, REPLICATION SLAVE, REPLICATION CLIENT,SUPER ON *.* TO 'canal'@'%';
FLUSH PRIVILEGES;
2
3
# canal 服务端安装配置
https://github.com/alibaba/canal/
上传到 /usr/local/canal 中
修改配置文件
vi conf/example/instance.properties
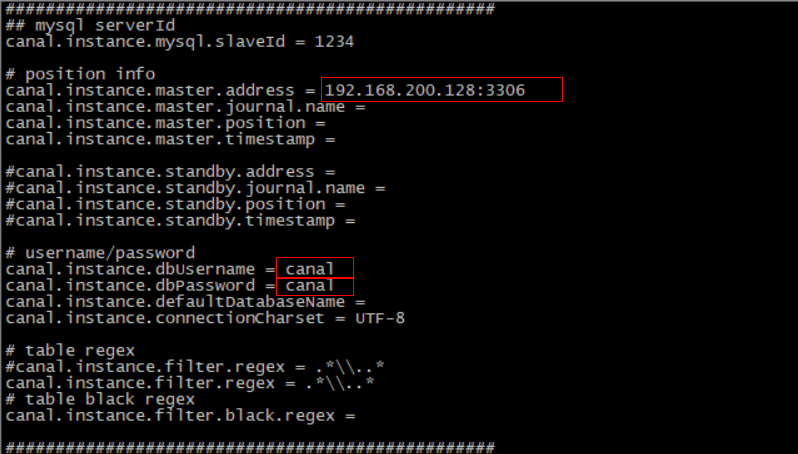
修改指定读取位置
show master status; -- 查询file和Position的值
如果 file 中的 binlog 文件不为 mysql-bin.000001 可以重置 mysql
reset master;
修改 meta.data 配置文件
vim /usr/local/canal/conf/example/meta.dat
#找到以下字段并修改
"journalName":"mysql-bin.000001","position":120,"
2
3
启动服务
cd /usr/local/canal
./bin/startup.sh
cat /usr/local/canal/logs/canal/canal.log #如果显示server is running now 则启动成功
2
3
# 数据监控微服务
当用户执行数据库的操作的时候,binlog 日志会被 canal 捕获到,并解析出数据。我们就可以将解析出来的数据进行相应的逻辑处理。
我们这里使用的一个开源的项目,它实现了 springboot 与 canal 的集成。比原生的 canal 更加优雅。
https://github.com/chenqian56131/spring-boot-starter-canal
# 微服务搭建
创建 changgou_canal 项目 导入依赖 sa
        <dependency>
            <groupId>com.xpand</groupId>
            <artifactId>starter-canal</artifactId>
            <version>0.0.1-SNAPSHOT</version>
        </dependency>
2
3
4
5
启动类
package com.itheima.canal;

import com.xpand.starter.canal.annotation.EnableCanalClient;
import org.springframework.boot.SpringApplication;
import org.springframework.boot.autoconfigure.SpringBootApplication;


@SpringBootApplication
@EnableCanalClient //声明当前服务是canal客户端
public class CanalApplication {
    public static void main(String[] args) {
        SpringApplication.run(CanalApplication.class, args);
    }

}
2
3
4
5
6
7
8
9
10
11
12
13
14
15
application
canal.client.instances.example.host=192.168.130.128
canal.client.instances.example.port=11111
canal.client.instances.example.batchSize=1000
2
3
Canal 监听类
package com.itheima.canal.listener;

import com.alibaba.otter.canal.protocol.CanalEntry;
import com.xpand.starter.canal.annotation.CanalEventListener;
import com.xpand.starter.canal.annotation.ListenPoint;


@CanalEventListener  //声明当前类为canal的监听类
public class BusinessListener {

    /**
     * @param entryType 当前操作数据库的类型
     * @param rowData   当前操作数据库的数据
     */
    @ListenPoint(schema = "changgou_business", table = "tb_ad") //监听哪一个数据库 哪张表 当表中发生变化 执行此方法
    public void adUpdate(CanalEntry.EntryType entryType, CanalEntry.RowData rowData) {
        System.out.println("广告表数据发生变化");
        //获取改变之前的数据
        rowData.getBeforeColumnsList().forEach((c) -> System.out.println("改变前的数据" + c.getName() + ":" + c.getValue()));
        //获取改变之后的数据
        rowData.getAfterColumnsList().forEach((c) -> System.out.println("改变后的数据"+c.getName()+":"+c.getValue()));

    }
}
2
3
4
5
6
7
8
9
10
11
12
13
14
15
16
17
18
19
20
21
22
23
24
去数据库中更改 tb_ad 表中任意一行数据的字段 查看控制台是否有对应内容输出
# 首页广告缓存更新
当 tb_ad(广告)表的数据发生变化时,更新 redis 中的广告数据。
- 修改数据监控微服务,监控 tb_ad 表,当发生增删改操作时,提取 position 值(广告位置 key),发送到 rabbitmq
- 从 rabbitmq 中提取消息,通过 OkHttpClient 调用 ad_update 来实现对广告缓存数据的更新。
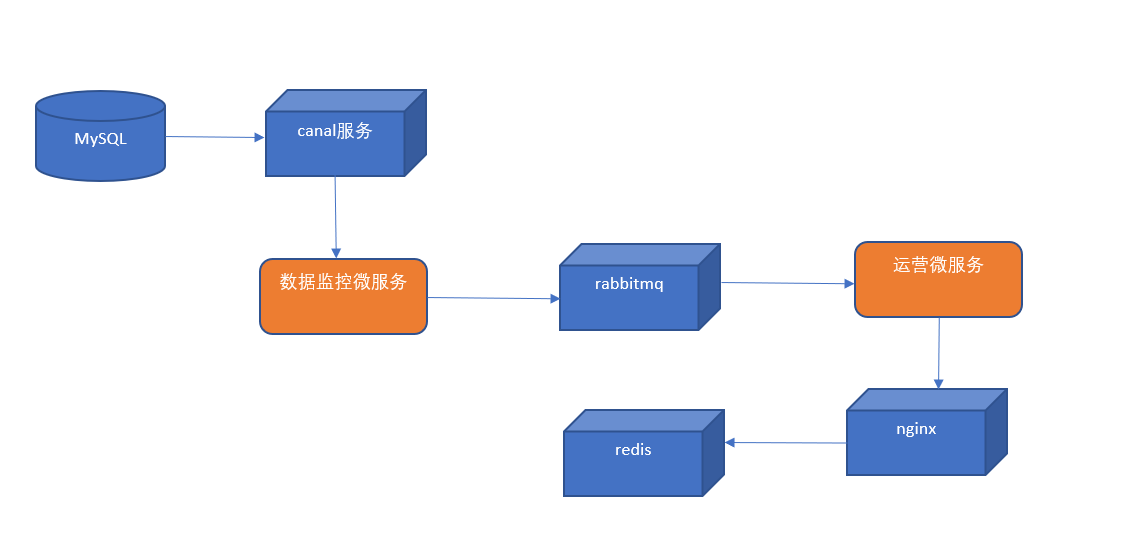
# 发送消息到 MQ
修改数据监控微服务,监控 tb_ad 表,当发生增删改操作时,提取 position 值(广告位置 key),发送到 rabbitmq
导入 mq 依赖
<dependency>
    <groupId>org.springframework.amqp</groupId>
    <artifactId>spring-rabbit</artifactId>
</dependency>
2
3
4
application 添加
spring.rabbitmq.host=192.168.130.128
新建 rqbbitmq 配置类
package com.itheima.canal.config;

import org.springframework.amqp.core.Queue;
import org.springframework.context.annotation.Bean;
import org.springframework.context.annotation.Configuration;


@Configuration
public class RabbitMQConfig {

    //定义队列名称
    public static final String AD_UPDATE_QUEUE="ad_update_queue";

    //声明队列
    @Bean
    public Queue queue(){
        return new Queue(AD_UPDATE_QUEUE);
    }


}
2
3
4
5
6
7
8
9
10
11
12
13
14
15
16
17
18
19
20
21
修改 BusinessListener 类
package com.itheima.canal.listener;

import com.alibaba.otter.canal.protocol.CanalEntry;
import com.itheima.canal.config.RabbitMQConfig;
import com.xpand.starter.canal.annotation.CanalEventListener;
import com.xpand.starter.canal.annotation.ListenPoint;
import org.springframework.amqp.rabbit.core.RabbitTemplate;
import org.springframework.beans.factory.annotation.Autowired;


@CanalEventListener  //声明当前类为canal的监听类
public class BusinessListener {

    @Autowired
    private RabbitTemplate rabbitTemplate;

    /**
     * @param entryType 当前操作数据库的类型
     * @param rowData   当前操作数据库的数据
     */
    @ListenPoint(schema = "changgou_business", table = "tb_ad") //监听哪一个数据库 哪张表 当表中发生变化 执行此方法
    public void adUpdate(CanalEntry.EntryType entryType, CanalEntry.RowData rowData) {
        System.out.println("广告表数据发生变化");
        //获取改变之前的数据
        //rowData.getBeforeColumnsList().forEach((c) -> System.out.println("改变前的数据" + c.getName() + ":" + c.getValue()));
        //获取改变之后的数据
        //rowData.getAfterColumnsList().forEach((c) -> System.out.println("改变后的数据"+c.getName()+":"+c.getValue()));

        for (CanalEntry.Column column : rowData.getAfterColumnsList()) {
            if ("position".equals(column.getName())){
                System.out.println("发送最新的消息给MQ"+column.getValue());
                //发送消息
                rabbitTemplate.convertAndSend("", RabbitMQConfig.AD_UPDATE_QUEUE,column.getValue());
            }
        }

    }
}
2
3
4
5
6
7
8
9
10
11
12
13
14
15
16
17
18
19
20
21
22
23
24
25
26
27
28
29
30
31
32
33
34
35
36
37
38
访问 http://192.168.130.128:15672 mq 后台 账号密码 guest
更新 tb_ad 数据库的任意一条数据 AD_UPDATE_QUEUE 队列是否有消息
# 消费 mq 消息执行更新
通过消费 mq 队列中的消息 执行指定地址 触发 nginx 中 lua 脚本 更新广告内容
在 changgou_service_business 工程 pom.xml 引入依赖
<dependency>
    <groupId>org.springframework.boot</groupId>
    <artifactId>spring-boot-starter-amqp</artifactId>
</dependency>
<dependency>
    <groupId>com.squareup.okhttp3</groupId>
    <artifactId>okhttp</artifactId>
    <version>3.9.0</version>
</dependency>
2
3
4
5
6
7
8
9
application 在 spring 节点添加
  rabbitmq:
    host: 192.168.130.128
2
com.changgou.business 包下创建 listener 包,包下创建类
package com.changgou.business.listener;

import okhttp3.*;
import org.springframework.amqp.rabbit.annotation.RabbitListener;
import org.springframework.stereotype.Component;

import java.io.IOException;

@Component
public class AdListener {
    @RabbitListener(queues = "ad_update_queue")
    public void receiverMessage(String message) {
        System.out.println("接受到消息为" + message);

        //发起远程调用
        OkHttpClient okHttpClient = new OkHttpClient();
        String url = "http://192.168.130.128/ad_update?position=" + message;
        Request request = new Request.Builder().url(url).build();
        Call call = okHttpClient.newCall(request);
        call.enqueue(new Callback() {
            //请求失败
            @Override
            public void onFailure(Call call, IOException e) {
                e.printStackTrace();
            }

            //请求成功
            @Override
            public void onResponse(Call call, Response response) throws IOException {
                System.out.println("请求成功" + response.message());
            }
        });
    }
}
2
3
4
5
6
7
8
9
10
11
12
13
14
15
16
17
18
19
20
21
22
23
24
25
26
27
28
29
30
31
32
33
34
启动启动类 查看控制台输出 消费者已经从队列中消费了消息 队列目前消息为 0
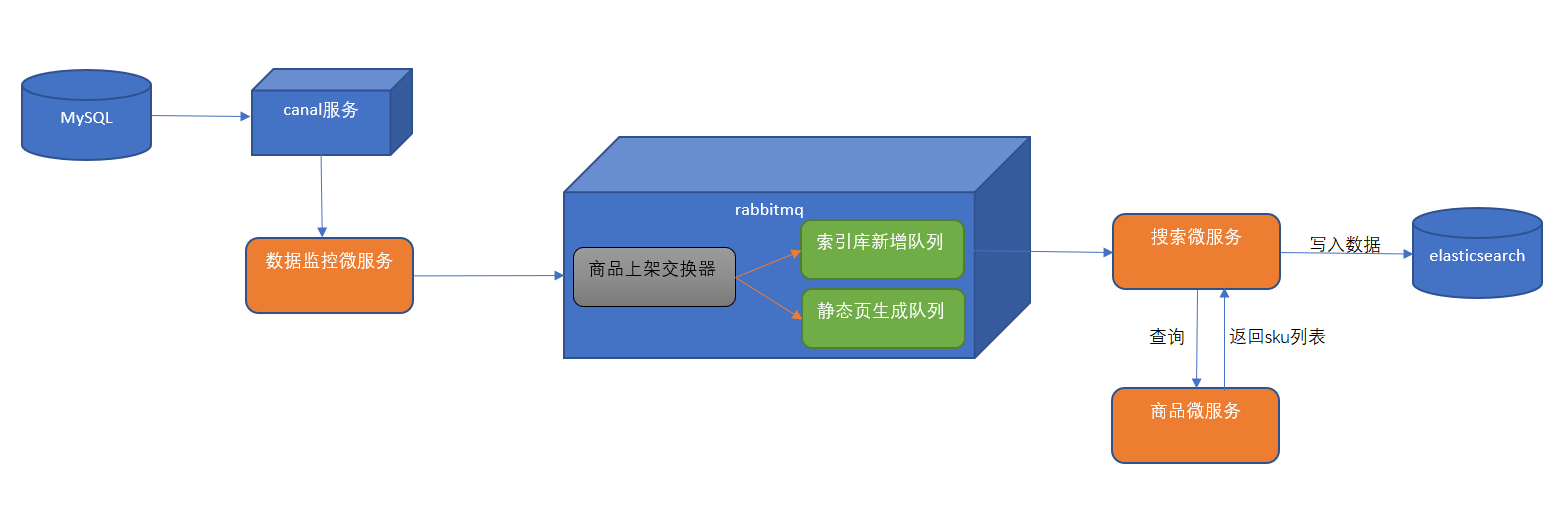
# 商品上架索引库导入数据
- 在数据监控微服务中监控 tb_spu 表的数据,当 tb_spu 发生更改且 is_marketable 为 1 时,表示商品上架,将 spu 的 id 发送到 rabbitmq。
- 在 rabbitmq 管理后台创建商品上架交换器(fanout)。使用分列模式的交换器是考虑商品上架会有很多种逻辑需要处理,导入索引库只是其中一项,另外还有商品详细页静态化等操作。这样我们可以创建导入索引库的队列和商品详细页静态化队列并与商品上架交换器进行绑定。
- 搜索微服务从 rabbitmq 的导入索引库的队列中提取 spu 的 id,通过 feign 调用商品微服务得到 sku 的列表,并且通过调用 elasticsearch 的高级 restAPI 将 sku 列表导入到索引库。
# 声明队列和交换机
更新 rabbitmq 配置类 创建交换器 goods_up_exchange(类型为 fanout),创建队列 search_add_queue 绑定交换器 goods_up_exchange
package com.itheima.canal.config;

import org.springframework.amqp.core.*;
import org.springframework.beans.factory.annotation.Qualifier;
import org.springframework.context.annotation.Bean;
import org.springframework.context.annotation.Configuration;


@Configuration
public class RabbitMQConfig {
    //定义交换机名称
    public static final String GOODS_UP_EXCHANGE = "goods_up_exchange";

    //定义队列名称
    public static final String AD_UPDATE_QUEUE = "ad_update_queue";
    public static final String SEARCH_ADD_QUEUE = "search_add_queue";

    //声明队列
    @Bean
    public Queue queue() {
        return new Queue(AD_UPDATE_QUEUE);
    }

    @Bean(SEARCH_ADD_QUEUE)
    public Queue SEARCH_ADD_QUEUE() {
        return new Queue(SEARCH_ADD_QUEUE);
    }

    //声明交换机
    @Bean(GOODS_UP_EXCHANGE)
    public Exchange GOODS_UP_EXCHANGE() {
        return ExchangeBuilder.fanoutExchange(GOODS_UP_EXCHANGE).durable(true).build();
    }

    //队列与交换机绑定
    @Bean()
    public Binding GOODS_UP_EXCHANGE_BINDING(@Qualifier(SEARCH_ADD_QUEUE) Queue queue, @Qualifier(GOODS_UP_EXCHANGE) Exchange exchange) {
        return BindingBuilder.bind(queue).to(exchange).with("").noargs();
    }


}
2
3
4
5
6
7
8
9
10
11
12
13
14
15
16
17
18
19
20
21
22
23
24
25
26
27
28
29
30
31
32
33
34
35
36
37
38
39
40
41
42
# 监听商品上架数据的变化
数据监微服务新增 SpuListener 如果商品是由未上架状态变成上架状态 则是最新上架的视频
将此商品的 spuid 发送到队列中
package com.itheima.canal.listener;

import com.alibaba.otter.canal.protocol.CanalEntry;
import com.itheima.canal.config.RabbitMQConfig;
import com.xpand.starter.canal.annotation.CanalEventListener;
import com.xpand.starter.canal.annotation.ListenPoint;
import org.springframework.amqp.rabbit.core.RabbitTemplate;
import org.springframework.beans.factory.annotation.Autowired;

import java.util.HashMap;
import java.util.Map;

@CanalEventListener
public class SpuListener {

    @Autowired
    private RabbitTemplate rabbitTemplate;

    @ListenPoint(schema = "changgou_goods", table = "tb_spu")
    public void goodsUp(CanalEntry.EntryType entryType, CanalEntry.RowData rowData) {
        //获取改变之前的数据 并将数据转换为map
        Map<String, String> oldData = new HashMap<>();
        rowData.getBeforeColumnsList().forEach((c) -> oldData.put(c.getName(), c.getValue()));

        //改变之前的数据 并转换为map
        Map<String, String> newData = new HashMap<>();
        rowData.getAfterColumnsList().forEach((c) -> newData.put(c.getName(), c.getValue()));

        //获取最新上架的商品 由上架状态0->1
        if ("0".equals(oldData.get("is_marketable")) && "1".equals(newData.get("is_marketable"))) {
            //将视频的spu id 发送到mq队列中
            rabbitTemplate.convertAndSend(RabbitMQConfig.GOODS_UP_EXCHANGE, "", newData.get("id"));
        }

    }
}
2
3
4
5
6
7
8
9
10
11
12
13
14
15
16
17
18
19
20
21
22
23
24
25
26
27
28
29
30
31
32
33
34
35
36
# 创建索引结构
新建 changgou_service_search_api 模块,并添加索引库实体类
<dependencies>
    <dependency>
        <groupId>com.changgou</groupId>
        <artifactId>changgou_common</artifactId>
        <version>1.0-SNAPSHOT</version>
    </dependency>
    <dependency>
        <groupId>org.springframework.boot</groupId>
        <artifactId>spring-boot-starter-data-elasticsearch</artifactId>
    </dependency>
</dependencies>
2
3
4
5
6
7
8
9
10
11
12
在 com.changgou.search.pojo 创建 SkuInfo 实体类
@Document(indexName = "skuinfo", type = "docs")
public class SkuInfo implements Serializable {
    //商品id,同时也是商品编号
    @Id
    @Field(index = true, store = true, type = FieldType.Keyword)
    private Long id;

    //SKU名称
    @Field(index = true, store = true, type = FieldType.Text, analyzer = "ik_smart")
    private String name;

    //商品价格,单位为:元
    @Field(index = true, store = true, type = FieldType.Double)
    private Long price;

    //库存数量
    @Field(index = true, store = true, type = FieldType.Integer)
    private Integer num;

    //商品图片
    @Field(index = false, store = true, type = FieldType.Text)
    private String image;

    //商品状态,1-正常,2-下架,3-删除
    @Field(index = true, store = true, type = FieldType.Keyword)
    private String status;

    //创建时间
    private Date createTime;

    //更新时间
    private Date updateTime;

    //是否默认
    @Field(index = true, store = true, type = FieldType.Keyword)
    private String isDefault;

    //SPUID
    @Field(index = true, store = true, type = FieldType.Long)
    private Long spuId;

    //类目ID
    @Field(index = true, store = true, type = FieldType.Long)
    private Long categoryId;

    //类目名称
    @Field(index = true, store = true, type = FieldType.Keyword)
    private String categoryName;

    //品牌名称
    @Field(index = true, store = true, type = FieldType.Keyword)
    private String brandName;

    //规格
    private String spec;

    //规格参数
    private Map<String, Object> specMap;

    //getter & setter略
}
2
3
4
5
6
7
8
9
10
11
12
13
14
15
16
17
18
19
20
21
22
23
24
25
26
27
28
29
30
31
32
33
34
35
36
37
38
39
40
41
42
43
44
45
46
47
48
49
50
51
52
53
54
55
56
57
58
59
60
61
注意生成 get 和 set 方法
# 搜索微服务搭建
创建 changgou_service_search 模块 导入依赖
<dependencies>
  <dependency>
    <groupId>com.changgou</groupId>
    <artifactId>changgou_common</artifactId>
    <version>1.0-SNAPSHOT</version>
  </dependency>
  <dependency>
    <groupId>org.springframework.cloud</groupId>
    <artifactId>spring-cloud-starter-netflix-eureka-client</artifactId>
  </dependency>
  <dependency>
    <groupId>org.springframework.boot</groupId>
    <artifactId>spring-boot-starter-data-elasticsearch</artifactId>
  </dependency>
  <dependency>
    <groupId>com.changgou</groupId>
    <artifactId>changgou_service_goods_api</artifactId>
    <version>1.0-SNAPSHOT</version>
  </dependency>
  <dependency>
    <groupId>com.changgou</groupId>
    <artifactId>changgou_service_search_api</artifactId>
    <version>1.0-SNAPSHOT</version>
  </dependency>
  <dependency>
    <groupId>org.springframework.boot</groupId>
    <artifactId>spring-boot-starter-amqp</artifactId>
  </dependency>
</dependencies>
2
3
4
5
6
7
8
9
10
11
12
13
14
15
16
17
18
19
20
21
22
23
24
25
26
27
28
29
application
server:
  port: 9009
spring:
  application:
    name: search
  rabbitmq:
    host: 192.168.130.128
  redis:
    host: 192.168.130.128
  main:
    allow-bean-definition-overriding: true #当遇到同样名字的时候,是否允许覆盖注册
  data:
    elasticsearch:
      cluster-name: elasticsearch
      cluster-nodes: 192.168.130.128:9300
  thymeleaf:
    cache: false
eureka:
  client:
    service-url:
      defaultZone: http://127.0.0.1:6868/eureka
  instance:
    prefer-ip-address: true
feign:
  hystrix:
    enabled: true
  client:
    config:
      default:   #配置全局的feign的调用超时时间  如果 有指定的服务配置 默认的配置不会生效
        connectTimeout: 600000 # 指定的是 消费者 连接服务提供者的连接超时时间 是否能连接  单位是毫秒
        readTimeout: 600000  # 指定的是调用服务提供者的 服务 的超时时间()  单位是毫秒
#hystrix 配置
hystrix:
  command:
    default:
      execution:
        timeout:
          #如果enabled设置为false,则请求超时交给ribbon控制
          enabled: false
        isolation:
          strategy: SEMAPHORE
2
3
4
5
6
7
8
9
10
11
12
13
14
15
16
17
18
19
20
21
22
23
24
25
26
27
28
29
30
31
32
33
34
35
36
37
38
39
40
41
在 com.changgou.search 创建启动类 SearchApplication
package com.changgou.search;

import org.springframework.boot.SpringApplication;
import org.springframework.boot.autoconfigure.SpringBootApplication;
import org.springframework.cloud.netflix.eureka.EnableEurekaClient;
import org.springframework.cloud.openfeign.EnableFeignClients;

@SpringBootApplication
@EnableEurekaClient //声明为Eureka客户端
@EnableFeignClients(basePackages = {"com.changgou.goods.feign"})  //开启Feign
public class SearchApplication {
    public static void main(String[] args) {
        SpringApplication.run(SearchApplication.class,args);
    }
}
2
3
4
5
6
7
8
9
10
11
12
13
14
15
16
创建 config 包 将 canal 中的 MQconfig 复制过来
package com.changgou.search.config;

import org.springframework.amqp.core.*;
import org.springframework.beans.factory.annotation.Qualifier;
import org.springframework.context.annotation.Bean;
import org.springframework.context.annotation.Configuration;


@Configuration
public class RabbitMQConfig {
    //定义交换机名称
    public static final String GOODS_UP_EXCHANGE = "goods_up_exchange";

    //定义队列名称
    public static final String AD_UPDATE_QUEUE = "ad_update_queue";
    public static final String SEARCH_ADD_QUEUE = "search_add_queue";

    //声明队列
    @Bean
    public Queue queue() {
        return new Queue(AD_UPDATE_QUEUE);
    }

    @Bean(SEARCH_ADD_QUEUE)
    public Queue SEARCH_ADD_QUEUE() {
        return new Queue(SEARCH_ADD_QUEUE);
    }

    //声明交换机
    @Bean(GOODS_UP_EXCHANGE)
    public Exchange GOODS_UP_EXCHANGE() {
        return ExchangeBuilder.fanoutExchange(GOODS_UP_EXCHANGE).durable(true).build();
    }

    //队列与交换机绑定
    @Bean()
    public Binding GOODS_UP_EXCHANGE_BINDING(@Qualifier(SEARCH_ADD_QUEUE) Queue queue, @Qualifier(GOODS_UP_EXCHANGE) Exchange exchange) {
        return BindingBuilder.bind(queue).to(exchange).with("").noargs();
    }


}
2
3
4
5
6
7
8
9
10
11
12
13
14
15
16
17
18
19
20
21
22
23
24
25
26
27
28
29
30
31
32
33
34
35
36
37
38
39
40
41
42
# 商品服务查询商品信息
SkuController 新增方法
@GetMapping("/spu/{spuId}")
public List<Sku> findSkuListBySpuId(@PathVariable("spuId") String spuId) {
    Map<String, Object> searchMap = new HashMap<>();
    if (!"all".equals(spuId)) {
        searchMap.put("spuId", spuId);
    }
    searchMap.put("status", "1");
    List<Sku> list = skuService.findList(searchMap);
    return list;
}
2
3
4
5
6
7
8
9
10
changgou_service_goods_api 新增 common 依赖
<dependencies>
  <dependency>
    <groupId>com.changgou</groupId>
    <artifactId>changgou_common</artifactId>
    <version>1.0-SNAPSHOT</version>
  </dependency>
</dependencies>
2
3
4
5
6
7
在 feign 包下定义 feign 接口
package com.changgou.goods.feign;

import com.changgou.goods.pojo.Sku;
import org.springframework.cloud.openfeign.FeignClient;
import org.springframework.web.bind.annotation.GetMapping;
import org.springframework.web.bind.annotation.PathVariable;

import java.util.List;

@FeignClient(name = "goods")
public interface SkuFeign {
    @GetMapping("/sku/spu/{spuId}")
    List<Sku> findSkuListBySpuId(@PathVariable("spuId") String spuId);
}
2
3
4
5
6
7
8
9
10
11
12
13
14
# 搜索微服务批量导入数据逻辑
创建 com.changgou.search.dao 包,并新增 ESManagerMapper 接口
package com.changgou.search.dao;

import com.changgou.search.pojo.SkuInfo;
import org.springframework.data.elasticsearch.repository.ElasticsearchRepository;

public interface ESManagerMapper extends ElasticsearchRepository<SkuInfo,Long> {

}
2
3
4
5
6
7
8
创建 com.changgou.search.service 包,包下创建接口 EsManagerService
package com.changgou.search.service;

public interface ESManagerService {

    //创建索引库结构
    void createMappingAndIndex();

    //导入全部数据进入es
    void importAll();

    //根据spuid查询skuList 再导入索引库
    void importDataBySpuId(String spuId);
}
2
3
4
5
6
7
8
9
10
11
12
13
创建 com.changgou.search.service.impl 包,包下创建服务实现类
package com.changgou.search.service.impl;

import com.alibaba.fastjson.JSON;
import com.changgou.goods.feign.SkuFeign;
import com.changgou.goods.pojo.Sku;
import com.changgou.search.dao.ESManagerMapper;
import com.changgou.search.pojo.SkuInfo;
import com.changgou.search.service.ESManagerService;
import org.springframework.beans.factory.annotation.Autowired;
import org.springframework.data.elasticsearch.core.ElasticsearchTemplate;
import org.springframework.stereotype.Service;

import java.util.List;
import java.util.Map;

@Service
public class ESManagerServiceImpl implements ESManagerService {

    @Autowired
    private ElasticsearchTemplate elasticsearchTemplate;

    @Autowired
    private SkuFeign skuFeign;

    @Autowired
    private ESManagerMapper esManagerMapper;

    //创建索引结构
    @Override
    public void createMappingAndIndex() {
        //创建索引
        elasticsearchTemplate.createIndex(SkuInfo.class);
        //创建映射
        elasticsearchTemplate.putMapping(SkuInfo.class);
    }


    //导入全部sku集合到索引库
    @Override
    public void importAll() {
        //查询sku集合
        List<Sku> skuList = skuFeign.findSkuListBySpuId("all");
        if (skuList == null || skuList.size() <= 0) {
            throw new RuntimeException("当前没有数据被查询到,无法导入索引库");
        }

        //将skulist转换为json
        String jsonSkulist = JSON.toJSONString(skuList);
        //将json转换为skuinfo
        List<SkuInfo> skuInfos = JSON.parseArray(jsonSkulist, SkuInfo.class);
        for (SkuInfo skuInfo : skuInfos) {
            //将规格信息转换为map
            Map map = JSON.parseObject(skuInfo.getSpec(), Map.class);
            skuInfo.setSpecMap(map);
        }
        //导入索引库
        esManagerMapper.saveAll(skuInfos);


    }

    //根据spuid查询skulist 添加到索引库
    @Override
    public void importDataBySpuId(String spuId) {
        List<Sku> skuList = skuFeign.findSkuListBySpuId(spuId);
        if (skuList == null || skuList.size() <= 0) {
            throw new RuntimeException("当前没有数据被查询到,无法导入索引库");
        }
        //将集合转换为json
        String jsonSkuList = JSON.toJSONString(skuList);
        List<SkuInfo> skuInfos = JSON.parseArray(jsonSkuList, SkuInfo.class);
        for (SkuInfo skuInfo : skuInfos) {
            //将规格信息进行这
            Map map = JSON.parseObject(skuInfo.getSpec(), Map.class);
            skuInfo.setSpecMap(map);
        }
        //添加索引库
        esManagerMapper.saveAll(skuInfos);
    }
}
2
3
4
5
6
7
8
9
10
11
12
13
14
15
16
17
18
19
20
21
22
23
24
25
26
27
28
29
30
31
32
33
34
35
36
37
38
39
40
41
42
43
44
45
46
47
48
49
50
51
52
53
54
55
56
57
58
59
60
61
62
63
64
65
66
67
68
69
70
71
72
73
74
75
76
77
78
79
80
创建 com.changgou.search.controller. 定义 ESManagerController
package com.changgou.search.controller;

import com.changgou.entity.Result;
import com.changgou.entity.StatusCode;
import com.changgou.search.service.ESManagerService;
import org.springframework.beans.factory.annotation.Autowired;
import org.springframework.web.bind.annotation.GetMapping;
import org.springframework.web.bind.annotation.RequestMapping;
import org.springframework.web.bind.annotation.RestController;

@RestController
@RequestMapping("/manager")
public class ESManagerController {
    @Autowired
    private ESManagerService esManagerService;

    //创建索引库结构
    @GetMapping("/create")
    public Result create(){
        esManagerService.createMappingAndIndex();
        return new Result(true, StatusCode.OK,"创建索引结构成功");
    }

    //导入全部数据
    @GetMapping("importAll")
    public Result importAll(){
        esManagerService.importAll();
        return new Result(true, StatusCode.OK,"导入全部数据成功");
    }
}
2
3
4
5
6
7
8
9
10
11
12
13
14
15
16
17
18
19
20
21
22
23
24
25
26
27
28
29
30
# 接受 mq 消息执行导入
changgou_service_search 工程创建 com.changgou.search.listener 包,包下创建类
package com.changgou.search.listener;

import com.changgou.search.config.RabbitMQConfig;
import com.changgou.search.service.ESManagerService;
import org.springframework.amqp.rabbit.annotation.RabbitListener;
import org.springframework.beans.factory.annotation.Autowired;
import org.springframework.stereotype.Component;

@Component
public class GoodsUpListener {

    @Autowired
    private ESManagerService esManagerService;

    @RabbitListener(queues = RabbitMQConfig.SEARCH_ADD_QUEUE)
    public void receiveMessage(String spuId) {
        System.out.println("接受到的消息为" + spuId);
        //查询skulist 并导入到索引库中
        esManagerService.importDataBySpuId(spuId);
    }
}
2
3
4
5
6
7
8
9
10
11
12
13
14
15
16
17
18
19
20
21
测试
先删除所有索引
改变 changgou_goods 库的 tb_spu 表 中任意一行数据的 is_marketable 改为 0 再改为
查看索引是否有被写入
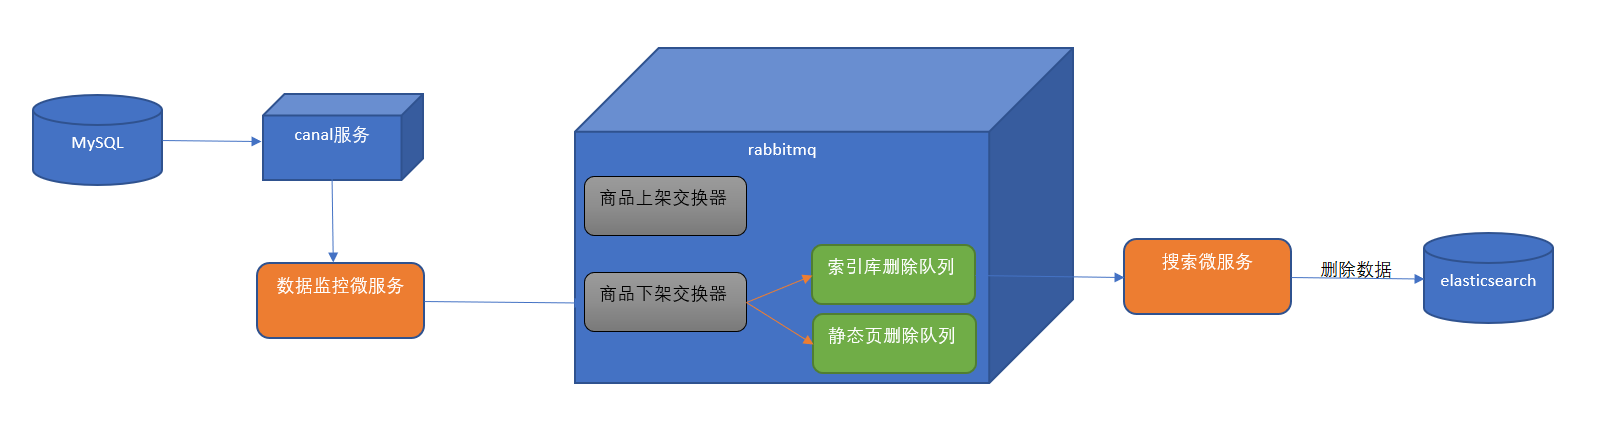
# 商品下架索引库删除数据
(1)在数据监控微服务中监控 tb_spu 表的数据,当 tb_spu 发生更改且 is_marketable 为 0 时,表示商品下架,将 spu 的 id 发送到 rabbitmq。
(2)在 rabbitmq 管理后台创建商品下架交换器(fanout)。使用分列模式的交换器是考虑商品下架会有很多种逻辑需要处理,索引库删除数据只是其中一项,另外还有删除商品详细页等操作。
(3)搜索微服务从 rabbitmq 的的队列中提取 spu 的 id,通过调用 elasticsearch 的高级 restAPI 将相关的 sku 列表从索引库删除。
# 创建交换机和队列
在 MQconifig 类中 添加交换机 goods_down_exchange 队列 search_delete_queue 并进行绑定
package com.changgou.search.config;

import org.springframework.amqp.core.*;
import org.springframework.beans.factory.annotation.Qualifier;
import org.springframework.context.annotation.Bean;
import org.springframework.context.annotation.Configuration;


@Configuration
public class RabbitMQConfig {
    //定义交换机名称
    public static final String GOODS_UP_EXCHANGE = "goods_up_exchange";
    public static final String GOODS_DOWN_EXCHANGE="goods_down_exchange";


    //定义队列名称
    public static final String AD_UPDATE_QUEUE = "ad_update_queue";
    public static final String SEARCH_ADD_QUEUE = "search_add_queue";
    public static final String SEARCH_DEL_QUEUE="search_del_queue";

    //声明队列
    @Bean
    public Queue queue() {
        return new Queue(AD_UPDATE_QUEUE);
    }

    @Bean(SEARCH_ADD_QUEUE)
    public Queue SEARCH_ADD_QUEUE() {
        return new Queue(SEARCH_ADD_QUEUE);
    }

    @Bean(SEARCH_DEL_QUEUE)
    public Queue SEARCH_DEL_QUEUE(){
        return new Queue(SEARCH_DEL_QUEUE);
    }
    //声明交换机
    @Bean(GOODS_UP_EXCHANGE)
    public Exchange GOODS_UP_EXCHANGE() {
        return ExchangeBuilder.fanoutExchange(GOODS_UP_EXCHANGE).durable(true).build();
    }

    @Bean(GOODS_DOWN_EXCHANGE)
    public Exchange GOODS_DOWN_EXCHANGE(){
        return ExchangeBuilder.fanoutExchange(GOODS_DOWN_EXCHANGE).durable(true).build();
    }


    //队列与交换机绑定
    @Bean
    public Binding GOODS_UP_EXCHANGE_BINDING(@Qualifier(SEARCH_ADD_QUEUE) Queue queue, @Qualifier(GOODS_UP_EXCHANGE) Exchange exchange) {
        return BindingBuilder.bind(queue).to(exchange).with("").noargs();
    }

    @Bean
    public Binding GOODS_DOWN_EXCHANGE_BINDING(@Qualifier(SEARCH_DEL_QUEUE)Queue queue,@Qualifier(GOODS_DOWN_EXCHANGE)Exchange exchange){
        return BindingBuilder.bind(queue).to(exchange).with("").noargs();
    }


}
2
3
4
5
6
7
8
9
10
11
12
13
14
15
16
17
18
19
20
21
22
23
24
25
26
27
28
29
30
31
32
33
34
35
36
37
38
39
40
41
42
43
44
45
46
47
48
49
50
51
52
53
54
55
56
57
58
59
60
61
62
注意 canal 下和 search 下的 MQconfig 都要添加
# canal 监听下架
在 com.itheima.canal.listener.SpuListener 添加下架逻辑判断
       //获取最新下架的商品
        if ("1".equals(oldData.get("is_marketable")) && "0".equals(newData.get("is_marketable"))) {
            //将商品的spu id 发送到mq队列中
            rabbitTemplate.convertAndSend(RabbitMQConfig.GOODS_DOWN_EXCHANGE, "", newData.get("id"));
        }
2
3
4
5
# 根据 spuId 删除索引数据
ESManagerService 新增方法定义
//根据spuid删除es索引中相关的sku数据
void delDataBySpuId(String spuId);
2
impl 实现类
//根据spuid删除指定索引
@Override
public void delDataBySpuId(String spuId) {
    List<Sku> skuList = skuFeign.findSkuListBySpuId(spuId);
    if (skuList == null || skuList.size() <= 0) {
        throw new RuntimeException("当前没有数据被查询到,无法导入索引库");
    }
    for (Sku sku : skuList) {
        esManagerMapper.deleteById(Long.parseLong(sku.getId()));
    }
}
2
3
4
5
6
7
8
9
10
11
# 接收 mq 消息,执行索引库删除
从 rabbitmq 中提取消息,调动根据 spuId 删除索引库数据的方法 changgou_service_search 新增监听类
package com.changgou.search.listener;

import com.changgou.search.config.RabbitMQConfig;
import com.changgou.search.service.ESManagerService;
import org.springframework.amqp.rabbit.annotation.RabbitListener;
import org.springframework.beans.factory.annotation.Autowired;
import org.springframework.stereotype.Component;

@Component
public class GoodsDelListener {

    @Autowired
    private ESManagerService esManagerService;

    @RabbitListener(queues = RabbitMQConfig.SEARCH_DEL_QUEUE)
    public void receiveMessage(String spuId){
        System.out.println("删除索引库id为"+spuId);

        //调用业务层完成索引库数据删除
        esManagerService.delDataBySpuId(spuId);
    }
}
2
3
4
5
6
7
8
9
10
11
12
13
14
15
16
17
18
19
20
21
22
测试 将上架状态 1 改为 0 查看索引库