 Spring Cloud
# Spring Cloud
Spring Cloud 是一系列框架的有序集合
通过 Spring Boot 风格进行再封装屏蔽掉了复杂的配置和实现原理 最终给开发者留出了一套简单易懂 易部署 易维护的分布式系统开发工具包
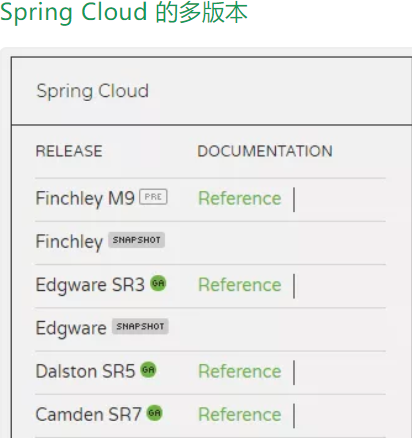
Spring Cloud 采用了英国伦敦地铁站的名称来命名,并由地铁站名称字母 A-Z 依次类推的形式来发布迭代版本
SpringCloud 是一个由许多子项目组成的综合项目,各子项目有不同的发布节奏。为了管理 SpringCloud 与各子项目的版本依赖关系,发布了一个清单,其中包括了某个 SpringCloud 版本对应的子项目版本。为了避免 SpringCloud 版本号与子项目版本号混淆,SpringCloud 版本采用了名称而非版本号的命名,这些版本的名字采用了伦敦地铁站的名字,根据字母表的顺序来对应版本时间顺序。例如 Angel 是第一个版本,Brixton 是第二个版本。
当 SpringCloud 的发布内容积累到临界点或者一个重大 BUG 被解决后,会发布一个 "service releases" 版本,简称 SRX 版本,比如 Greenwich.SR2 就是 SpringCloud 发布的 Greenwich 版本的第 2 个 SRX 版本。
# 微服务

微服务它将一个原本独立的系统 拆分成为多个小型服务 并且这些小型服务都可以独立运行 服务之间可以进行通信协作
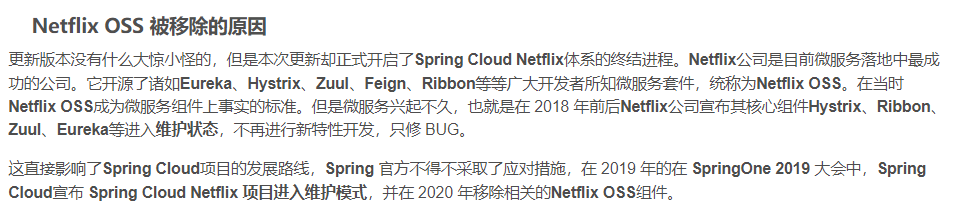
# Netflix 被移除

# Spring Cloud 与 Dubbo 对比
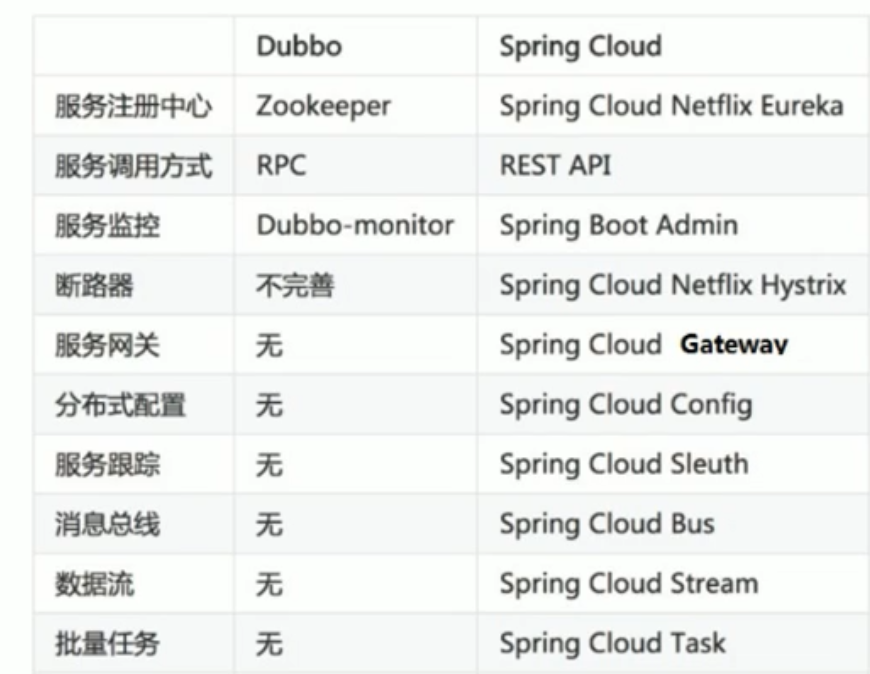
- Dubbo 只是实现了服务治理 而 spring cloud 子项目分别覆盖了微服务架构下的众多部件
- Dubbo 使用 RPC 通信协议 Spring Cloud 使用 RESTful 完成通信 Dubbo 效率略高于 Spring Cloud
# 服务治理
# Eureka
Eureka 是 Netflix 公司开源的一个服务注册与发现的组件
Eureka 和 其他 Netflix 公司的服务组件 (如负载均衡 熔断器 网关等) 一起 被 spring cloud 社区整合为 Spring-Cloud-Netflix 模块
Eureka 包含 Eueka Server (注册中心) 和 Eureka Client (服务提供者 服务器消费者)
# server
引入 eureka-server 和 spring web
<dependencies>

    <dependency>
        <groupId>org.springframework.boot</groupId>
        <artifactId>spring-boot-starter-web</artifactId>
    </dependency>

    <!-- eureka-server -->
    <dependency>
        <groupId>org.springframework.cloud</groupId>
        <artifactId>spring-cloud-starter-netflix-eureka-server</artifactId>
    </dependency>
</dependencies>
2
3
4
5
6
7
8
9
10
11
12
13
application
server:
  port: 8761

# eureka 配置
#1.dashboard  :eureka的web控制台配置
#2.server  :eureka的服务端配置
#3.client  :eureka的客户端配置
#4.instance  :eureka的实例配置
eureka:
  instance:
    hostname: localhost # 主机名

  dashboard:
    enabled: true  # 是否启用web控制台  默认为开启
    path: /  # 默认路径为/  访问http://localhost:8761/即可

  client:
    service-url:
      defaultZone: http://${eureka.instance.hostname}:${server.port}/eureka  # eureka服务端地址 客户端用于访问服务端的地址

    register-with-eureka: false # 是否将自己的路径 注册到eureka上  默认为true  一般情况下只有provider client需要
    fetch-registry: false  # 是否需要从eureka中抓取路径   默认为true  一般只有consumer client需要
2
3
4
5
6
7
8
9
10
11
12
13
14
15
16
17
18
19
20
21
22
启动类
package com.itheima.eureka;

import org.springframework.boot.SpringApplication;
import org.springframework.boot.autoconfigure.SpringBootApplication;
import org.springframework.cloud.netflix.eureka.server.EnableEurekaServer;

@SpringBootApplication
//启用EurekaServer
@EnableEurekaServer
public class EurekaApp {
    public static void main(String[] args) {
        SpringApplication.run(EurekaApp.class, args);
    }
}
2
3
4
5
6
7
8
9
10
11
12
13
14
# provider
引入 eureka-client 和 spring web
<dependencies>

    <dependency>
        <groupId>org.springframework.boot</groupId>
        <artifactId>spring-boot-starter-web</artifactId>
    </dependency>


    <!-- eureka-client -->
    <dependency>
        <groupId>org.springframework.cloud</groupId>
        <artifactId>spring-cloud-starter-netflix-eureka-client</artifactId>
    </dependency>

</dependencies>
2
3
4
5
6
7
8
9
10
11
12
13
14
15
application
server:
  port: 8000

eureka:
  instance:
    hostname: localhost # 主机名
  client:
    service-url:
      defaultZone: http://localhost:8761/eureka  # eureka服务端地址 客户端用于访问服务端的地址

spring:
  application:
    name: eureka-provider # 设置当前应用的名称 将来在eureka的web控制台Application显示为该名称  将来需要该名称来获取路径
2
3
4
5
6
7
8
9
10
11
12
13
启动类
package com.itheima.provider;

import org.springframework.boot.SpringApplication;
import org.springframework.boot.autoconfigure.SpringBootApplication;
import org.springframework.cloud.netflix.eureka.EnableEurekaClient;

@SpringBootApplication
//标记为 Eureka 客户端 在新版本中自动标记
@EnableEurekaClient
public class ProviderApp {
    public static void main(String[] args) {
        SpringApplication.run(ProviderApp.class, args);
    }
}
2
3
4
5
6
7
8
9
10
11
12
13
14
并编写对应的 dao 层 domian 对象 service 层 controller 层
并且能够远程调用获取数据 此时为了在 Eureka 上注册为应用使其他应用能够远程调用该服务
# consumer
引入 eureka-client 和 spring web
<dependencies>

    <dependency>
        <groupId>org.springframework.boot</groupId>
        <artifactId>spring-boot-starter-web</artifactId>
    </dependency>


    <!-- eureka-client -->
    <dependency>
        <groupId>org.springframework.cloud</groupId>
        <artifactId>spring-cloud-starter-netflix-eureka-client</artifactId>
    </dependency>

</dependencies>
2
3
4
5
6
7
8
9
10
11
12
13
14
15
application
server:
  port: 9000

eureka:
  instance:
    hostname: localhost # 主机名
  client:
    service-url:
      defaultZone: http://localhost:8761/eureka  # eureka服务端地址 客户端用于访问服务端的地址

spring:
  application:
    name: eureka-consumer # 设置当前应用的名称 将来在eureka的web控制台Application显示为该名称  将来需要该名称来获取路径
2
3
4
5
6
7
8
9
10
11
12
13
启动类
package com.itheima.consumer;

import org.springframework.boot.SpringApplication;
import org.springframework.boot.autoconfigure.SpringBootApplication;
import org.springframework.cloud.client.discovery.EnableDiscoveryClient;
import org.springframework.cloud.netflix.eureka.EnableEurekaClient;

@SpringBootApplication
@EnableEurekaClient
@EnableDiscoveryClient //激活DiscoveryClient 新版本可以忽略 自动激活
public class ConsumerApp {
    public static void main(String[] args) {
        SpringApplication.run(ConsumerApp.class, args);
    }
}
2
3
4
5
6
7
8
9
10
11
12
13
14
15
RestTemplateConfig 类
package com.itheima.consumer.cnfig;

import org.springframework.context.annotation.Bean;
import org.springframework.context.annotation.Configuration;
import org.springframework.web.client.RestTemplate;

@Configuration
public class RestTemplateConfig {

    @Bean
    public RestTemplate restTemplate(){
        return new RestTemplate();
    }
}
2
3
4
5
6
7
8
9
10
11
12
13
14
controller 层
package com.itheima.consumer.controller;


import com.itheima.consumer.domain.Goods;
import org.springframework.beans.factory.annotation.Autowired;
import org.springframework.cloud.client.ServiceInstance;
import org.springframework.cloud.client.discovery.DiscoveryClient;
import org.springframework.web.bind.annotation.GetMapping;
import org.springframework.web.bind.annotation.PathVariable;
import org.springframework.web.bind.annotation.RequestMapping;
import org.springframework.web.bind.annotation.RestController;
import org.springframework.web.client.RestTemplate;

import java.util.List;

@RestController
@RequestMapping("/order")
public class OrderController {

    @Autowired
    private RestTemplate restTemplate;

    @Autowired
    private DiscoveryClient discoveryClient;

    @GetMapping("/goods/{id}")
    public Goods findGoodsById(@PathVariable("id") int id) {

 /*
        远程调用goods服务中的findone接口
        使用RestTemplate
        1.定义bean
        2.注入bean
        3.调用方法
         */
        /*
        动态从 Eureka server 中获取provide 的 ip 和端口
        1. 注入 DiscoveryClient 并在启动类注解激活
        2. 调用方法
         */
        List<ServiceInstance> instances = discoveryClient.getInstances("EUREKA-PROVIDER");  //根据应用名在Eureka服务端中获取应用集合
        if (instances == null || instances.size() == 0) { //判断是否为空
            return null;
        }
        ServiceInstance instance = instances.get(0);  //此处只有一个所以使用第一个
        String host = instance.getHost();  //获取ip
        int port = instance.getPort(); //获取端口
        System.out.println(host);
        System.out.println(port);

        String url = "http://" + host + ":" + port + "goods/findOne/" + id;
        Goods goods = restTemplate.getForObject(url, Goods.class);
        return goods;
    }
}
2
3
4
5
6
7
8
9
10
11
12
13
14
15
16
17
18
19
20
21
22
23
24
25
26
27
28
29
30
31
32
33
34
35
36
37
38
39
40
41
42
43
44
45
46
47
48
49
50
51
52
53
54
55
# 配置属性
# instance

eureka:
  instance:
    hostname: localhost # 主机名
    prefer-ip-address: true  # 以ip地址形式注册到eureka server中 默认为false 注册为主机名
    instance-id: ${eureka.instance.prefer-ip-address}:${spring.application.name}:${server.port}  #设置在web控制台中应用id的名称
2
3
4
5
# server
# 高可用
每个 server 都是镜像相同的注册应用 如果其中一个宕机了 另外一个 server 仍然存活
设置多个 eureka server 相互注册
server:
  port: 8762

eureka:
  instance:
    hostname: eureka-server2 # 主机名

  dashboard:
    enabled: true  # 是否启用web控制台  默认为开启
    path: /  # 默认路径为/  访问http://localhost:8761/即可

  client:
    service-url:
      defaultZone: http://127.0.0.1:8761/eureka  # 两个eureka相互注册

    register-with-eureka: true # 是否将自己的路径 注册到eureka上  默认为true  一般情况下只有provider client需要
    fetch-registry: true  # 是否需要从eureka中抓取路径   默认为true  一般只有consumer client需要
spring:
  application:
    name: eureka-server-ha
2
3
4
5
6
7
8
9
10
11
12
13
14
15
16
17
18
19
20
在 client 中在多个 server 注册应用
server:
  port: 8000

eureka:
  instance:
    hostname: localhost # 主机名
  client:
    service-url:
      defaultZone: http://localhost:8761/eureka,http://localhost:8762/eureka  # eureka服务端地址 客户端用于访问服务端的地址

spring:
  application:
    name: eureka-provider # 设置当前应用的名称 将来在eureka的web控制台Application显示为该名称  将来需要该名称来获取路径
2
3
4
5
6
7
8
9
10
11
12
13
# Consul
Consul 是 由 HashiCorp 基于 Go 语言开发 支持多数据中心 分布式高可用的服务发布和注册服务软件
这里我们使用 windows 中的 exe 执行程序
启动
.\consul agent -dev
打开 web 管理界面
http://localhost:8500/
- 搭建 provider 和 Consumer 服务
- 并配置好 RestTemplate 完成远程调用
consul 客户端坐标 必须导入 actuator 组件
        <!-- consul-client -->
        <dependency>
            <groupId>org.springframework.cloud</groupId>
            <artifactId>spring-cloud-starter-consul-discovery</artifactId>
        </dependency>
        <dependency>
            <groupId>org.springframework.boot</groupId>
            <artifactId>spring-boot-starter-actuator</artifactId>
        </dependency>
2
3
4
5
6
7
8
9
不需要在启动类中标价
只需要在 application 配置好 consul 属性
provider 配置
server:
  port: 8000
spring:
  cloud:
    consul:
      host: localhost  # consul服务端 ip
      port: 8500  # 端口
      discovery:
        service-name: ${spring.application.name}  # 应用名称
        prefer-ip-address: true # 以ip注册
  application:
    name: consul-provider  # 应用名称
2
3
4
5
6
7
8
9
10
11
12
consumer 配置
server:
  port: 9000
spring:
  cloud:
    consul:
      host: localhost  # consul服务端 ip
      port: 8500  # 端口
      discovery:
        service-name: ${spring.application.name}  # 应用名称
        prefer-ip-address: true # 以ip注册
  application:
    name: consul-consumer  # 应用名称
2
3
4
5
6
7
8
9
10
11
12
consumer 的 controller 层还是一致
package com.itheima.consumer.controller;


import com.itheima.consumer.domain.Goods;
import org.springframework.beans.factory.annotation.Autowired;
import org.springframework.cloud.client.ServiceInstance;
import org.springframework.cloud.client.discovery.DiscoveryClient;
import org.springframework.web.bind.annotation.GetMapping;
import org.springframework.web.bind.annotation.PathVariable;
import org.springframework.web.bind.annotation.RequestMapping;
import org.springframework.web.bind.annotation.RestController;
import org.springframework.web.client.RestTemplate;

import java.util.List;

@RestController
@RequestMapping("/order")
public class OrderController {

    @Autowired
    private RestTemplate restTemplate;

    @Autowired
    private DiscoveryClient discoveryClient;

    @GetMapping("/goods/{id}")
    public Goods findGoodsById(@PathVariable("id") int id) {

 /*
        远程调用goods服务中的findone接口
        使用RestTemplate
        1.定义bean
        2.注入bean
        3.调用方法
         */
        /*
        动态从 Eureka server 中获取provide 的 ip 和端口
        1. 注入 DiscoveryClient 并在启动类注解激活
        2. 调用方法
         */
        List<ServiceInstance> instances = discoveryClient.getInstances("consul-provider");  //根据应用名在Eureka服务端中获取应用集合
        if (instances == null || instances.size() == 0) { //判断是否为空
            return null;
        }
        ServiceInstance instance = instances.get(0);  //此处只有一个所以使用第一个
        String host = instance.getHost();  //获取ip
        int port = instance.getPort(); //获取端口
        System.out.println(host);
        System.out.println(port);

        String url = "http://" + host + ":" + port + "goods/findOne/" + id;
        Goods goods = restTemplate.getForObject(url, Goods.class);
        return goods;
    }
}
2
3
4
5
6
7
8
9
10
11
12
13
14
15
16
17
18
19
20
21
22
23
24
25
26
27
28
29
30
31
32
33
34
35
36
37
38
39
40
41
42
43
44
45
46
47
48
49
50
51
52
53
54
55
consumer 的 controller 层还是一致
# SpringCloud Alibaba
主要功能
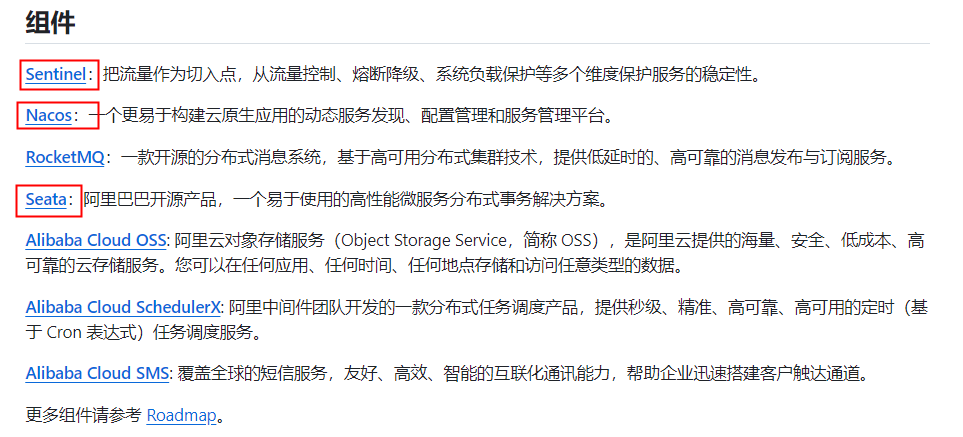
- 服务限流降级:默认支持 WebServlet、.WebFIux、OpenFeign、.RestTemplate、.Spring Cloud Gateway、Dubbo 和 RocketMQ 限流降级功能的接入,可以在运行时通过控制台实时修改限流降级规则,还支持查看限流降级 Metrics 监控。
- 服务注册与发现:适配 Spring Cloud 服务注册与发现标准,默认集成对应 Spring Cloud 版本所支持的负载均衡组件的适配。
- 分布式配置管理:支持分布式系统中的外部化配置,配置更改时自动刷新。
- 消息驱动能力:基于 Spring Cloud Stream 为微服务应用构建消息驱动能力。
- 分布式事务:使用 @GlobalTransactional 注解,高效并且对业务零侵入地解决分布式事务问题。
- 阿里云对象存储:阿里云提供的海量、安全、低成本、高可靠的云存储服务。支持在任何应用、任何时间、任何地点存储和访问任意类型的数据。
- 分布式任务调度:提供秒级、精准、高可靠、高可用的定时(基于 Cro 表达式)任务调度服务。同时提供分布式的任务执行模型,如网格任务。网格任务支持海量子任务均匀分配到所有 Worker (schedulerx-client) 上执行。
- 阿里云短信服务:覆盖全球的短信服务,友好、高效、智能的互联化通讯能力,帮助企业迅速搭建客户触达通道。
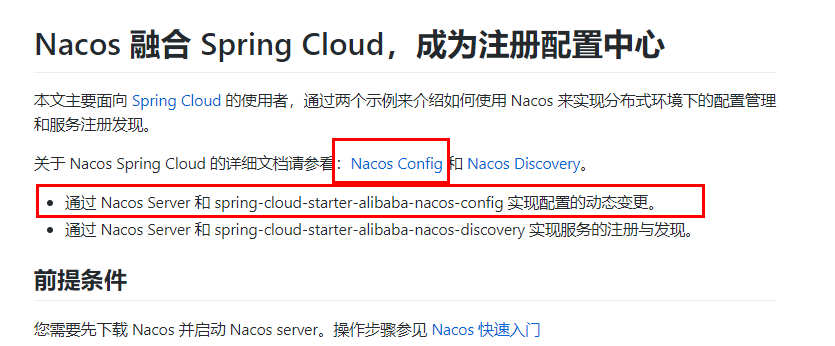
# Nacos
Nacos 是阿里巴巴的开源项目 专注于服务发现和配置管理微服务
前四个字母分别为 Naming 和 Configuration 的前两个字母,最后的 s 为 Service
Nacos = Spring Cloud 注册中心 + Spring Cloud 配置中心
https://nacos.io/zh-cn/
各个注册中心比较
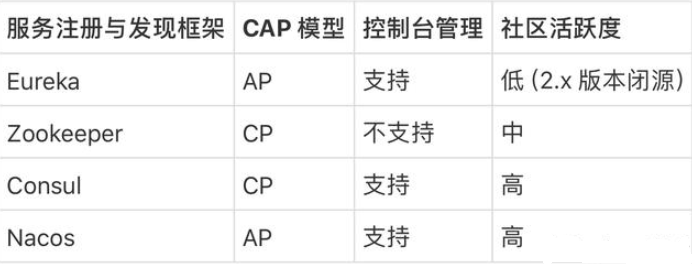
据说 Nacos 在阿里巴巴内部有超过 10 万的实例运行,已经过了类似双十一等各种大型流量的考验,Nacos 默认是 AP 模式,但也可以调整切换为 CP,我们一般用默认 AP 即可。
# 启动
在 bin 目录下 以单机形式运行
启动命令 (standalone 代表着单机模式运行,非集群模式):
startup.cmd -m standalone
web 管理页面
http://localhost:8848/nacos/
默认用户密码 为 nacos
# 入门案例
nacos 坐标
        <dependency>
            <groupId>org.springframework.cloud</groupId>
            <artifactId>spring-cloud-starter-alibaba-nacos-discovery</artifactId>
            <version>0.2.2.RELEASE</version>
        </dependency>
        <dependency>
            <groupId>com.alibaba.nacos</groupId>
            <artifactId>nacos-client</artifactId>
            <version>2.0.3</version>
        </dependency>
2
3
4
5
6
7
8
9
10
provider 配置
server:
  port: 8000
spring:
  cloud:
    nacos:
      discovery:
        server-addr: 127.0.0.1:8848  # 配置nacos服务端地址和端口

  application:
    name: nacos-provider # 服务名称
2
3
4
5
6
7
8
9
10
consumer 配置
server:
  port: 9000
spring:
  cloud:
    nacos:
      discovery:
        server-addr: 127.0.0.1:8848  # 配置nacos服务端地址和端口

  application:
    name: nacos-consumer # 服务名称
2
3
4
5
6
7
8
9
10
consumer 启动类
package com.itheima.consumer;

import org.springframework.boot.SpringApplication;
import org.springframework.boot.autoconfigure.SpringBootApplication;
import org.springframework.cloud.client.discovery.EnableDiscoveryClient;


@SpringBootApplication
@EnableDiscoveryClient
public class ConsumerApp {
    public static void main(String[] args) {
        SpringApplication.run(ConsumerApp.class, args);
    }
}
2
3
4
5
6
7
8
9
10
11
12
13
14
# 负载均衡
只需要同个服务名称设置不同端口 Nacos 自动开启负载均衡
server:
  port: 9000
spring:
  cloud:
    nacos:
      discovery:
        server-addr: 127.0.0.1:8848  # 配置nacos服务端地址和端口

  application:
    name: nacos-consumer # 服务名称
2
3
4
5
6
7
8
9
10
server:
  port: 9001
spring:
  cloud:
    nacos:
      discovery:
        server-addr: 127.0.0.1:8848  # 配置nacos服务端地址和端口

  application:
    name: nacos-consumer # 服务名称
2
3
4
5
6
7
8
9
10
# 配置中心
        <dependency>
            <groupId>org.springframework.cloud</groupId>
            <artifactId>spring-cloud-starter-bootstrap</artifactId>
        </dependency>
        <!--nacos-config-->
        <dependency>
            <groupId>com.alibaba.cloud</groupId>
            <artifactId>spring-cloud-starter-alibaba-nacos-config</artifactId>
        </dependency>
2
3
4
5
6
7
8
9
Nacos 同 Consul 一样,在项目初始化时,要保证先从配置中心进行配置拉取,
拉取配置之后,才能保证项目的正常启动,为了满足动态刷新和全局广播通知
springboot 中配置文件的加载是存在优先级顺序的,bootstrap 优先级高于 application
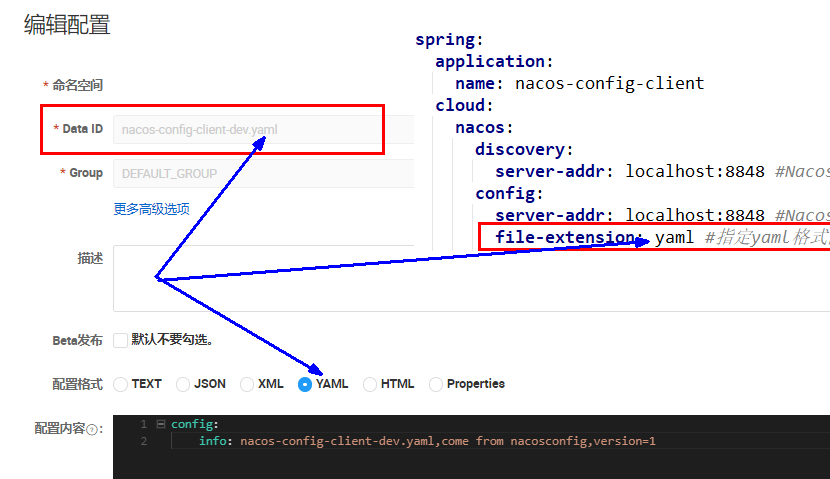
bootstrap.yaml
# nacos配置
spring:
  application:
    name: nacos-config-client
  cloud:
    nacos:
      discovery:
        server-addr: localhost:8848 #Nacos服务注册中心地址
      config:
        server-addr: localhost:8848 #Nacos作为配置中心地址
        file-extension: yaml #指定yaml格式的配置

# nacos端配置文件DataId的命名规则是:
# ${spring.application.name}-${spring.profile.active}.${spring.cloud.nacos.config.file-extension}
# 本案例的DataID是:nacos-config-client-dev.yaml
2
3
4
5
6
7
8
9
10
11
12
13
14
15
如果在网页端修改配置需要 DataId
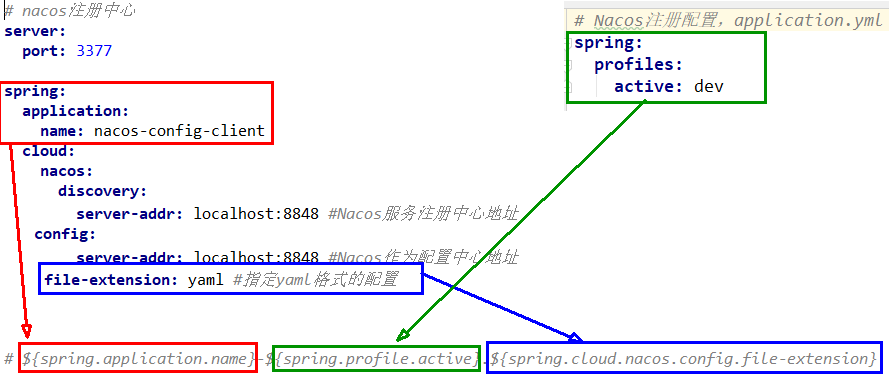
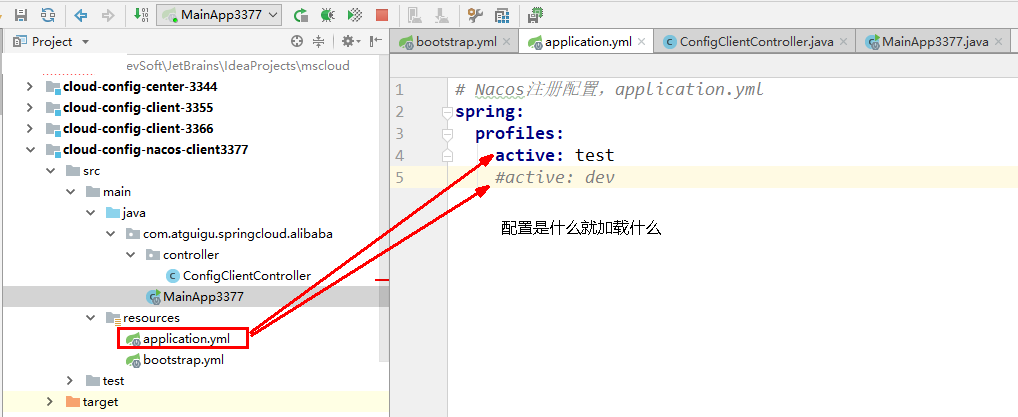
application.yaml
server:
  port: 3377

spring:
  profiles:
    active: dev # 表示开发环境
       #active: prod # 表示生产环境
       #active: test # 表示测试环境
2
3
4
5
6
7
8
启动类
@EnableDiscoveryClient
@SpringBootApplication
public class NacosConfigClient3377
{
    public static void main(String[] args)
    {
        SpringApplication.run(NacosConfigClient3377.class,args);
    }
}
2
3
4
5
6
7
8
9
业务类,通过 @RefreshScope 注解使当前类下的配置支持 Nacos 的动态刷新功能。
@RestController
@RefreshScope //在控制器类加入@RefreshScope注解使当前类下的配置支持Nacos的动态刷新功能。
public class NacosConfigClientController
{
    @Value("${config.info}")
    private String configInfo;

    @GetMapping("/config/info")
    public String getConfigInfo() {
        return configInfo;
    }
}
2
3
4
5
6
7
8
9
10
11
12
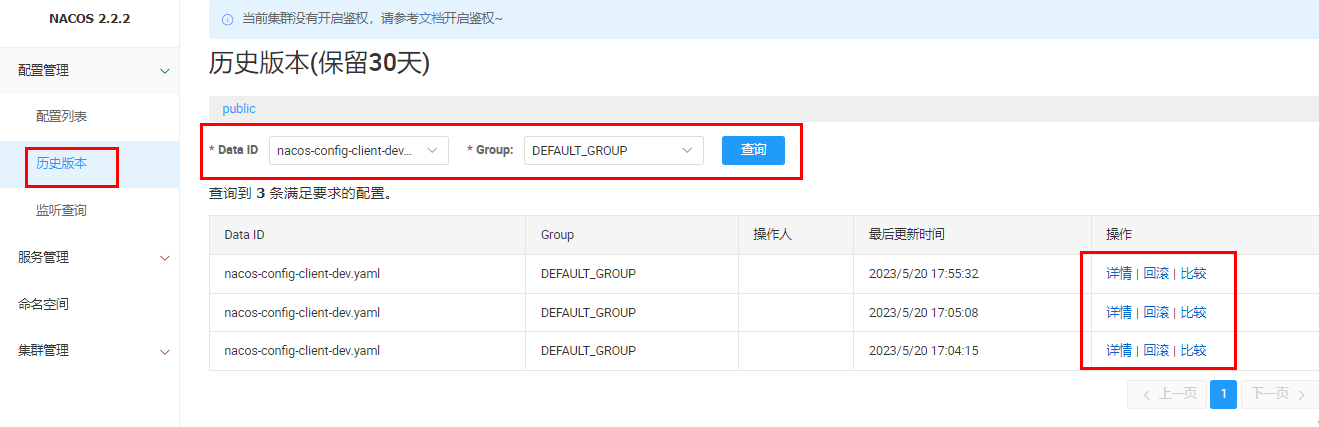
Nacos 会记录配置文件的历史版本默认保留 30 天,此外还有一键回滚功能,回滚操作将会触发配置更新
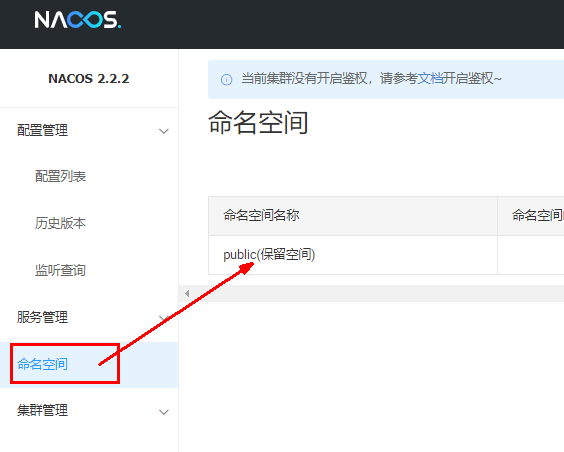
# 命名空间
问题 1:
实际开发中,通常一个系统会准备
dev 开发环境
test 测试环境
prod 生产环境。
如何保证指定环境启动时服务能正确读取到 Nacos 上相应环境的配置文件呢?
问题 2:
一个大型分布式微服务系统会有很多微服务子项目,
每个微服务项目又都会有相应的开发环境、测试环境、预发环境、正式环境......
那怎么对这些微服务配置进行分组和命名空间管理呢?
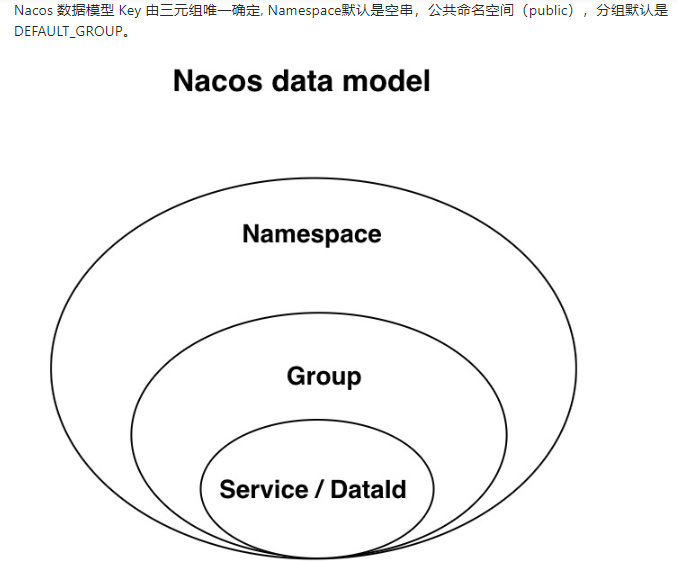
| 1 是什么 | 类似 Java 里面的 package 名和类名,最外层的 Namespace 是可以用于区分部署环境的,Group 和 DataID 逻辑上区分两个目标对象 |
|---|---|
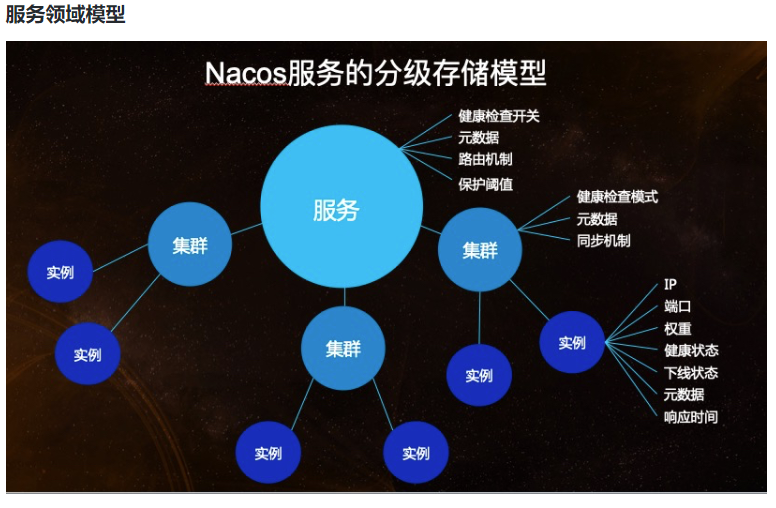
| 2 默认值 | 默认情况:Namespace=public,Group=DEFAULT_GROUPNacos 默认的命名空间是 public,Namespace 主要用来实现隔离。比方说我们现在有三个环境:开发、测试、生产环境,我们就可以创建三个 Namespace,不同的 Namespace 之间是隔离的。Group 默认是 DEFAULT_GROUP,Group 可以把不同的微服务划分到同一个分组里面去 |
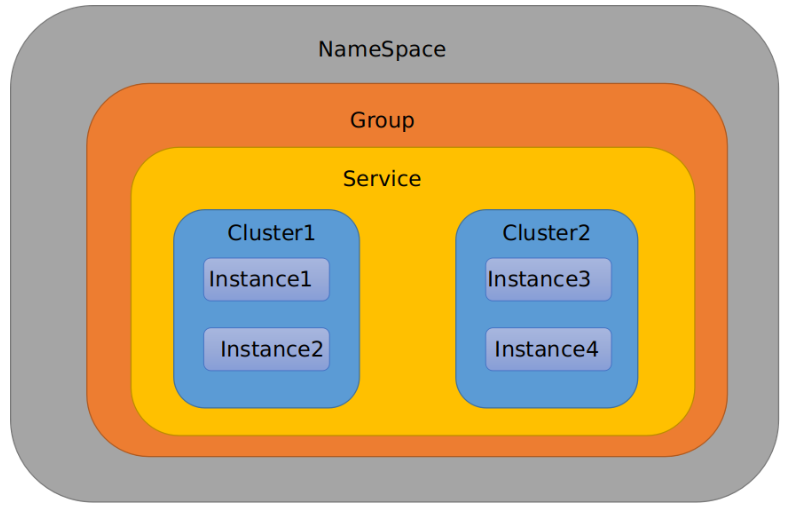
| Service 就是微服务 | 一个 Service 可以包含一个或者多个 Cluster(集群),Nacos 默认 Cluster 是 DEFAULT,Cluster 是对指定微服务的一个虚拟划分。见下图:服务领域模型 - 补充说明 |
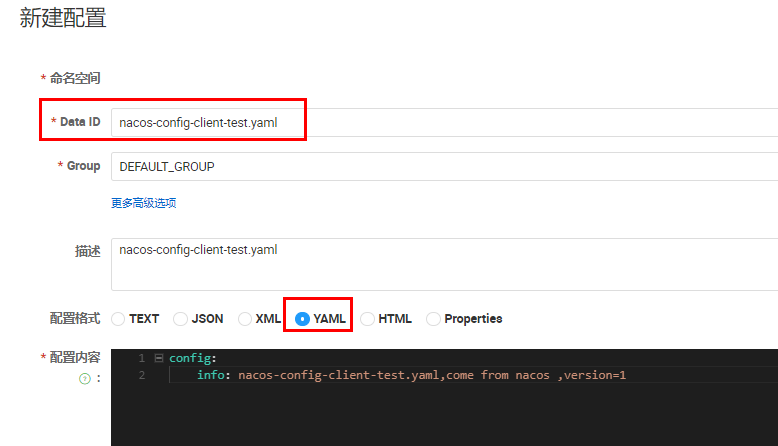
# DataId 方案
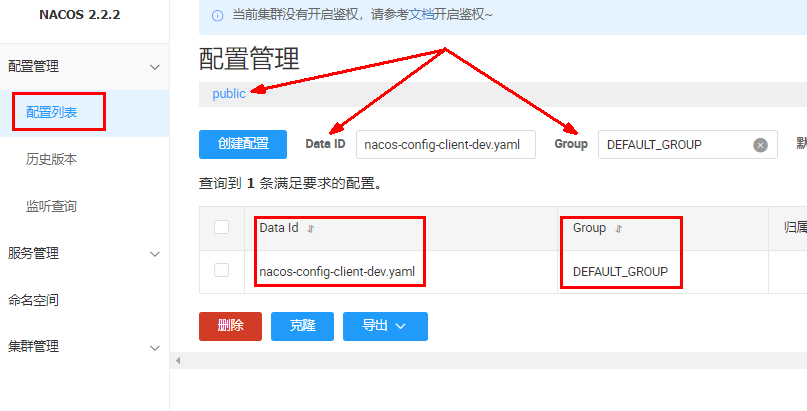
默认空间 public + 默认分组 DEFAULT_GROUP + 新建 DatalD
# nacos配置 第一种:默认空间+默认分组+新建DataID
spring:
  application:
    name: nacos-config-client
  cloud:
    nacos:
      discovery:
        server-addr: localhost:8848 #Nacos服务注册中心地址
      config:
        server-addr: localhost:8848 #Nacos作为配置中心地址
        file-extension: yaml #指定yaml格式的配置

# nacos端配置文件DataId的命名规则是:
# ${spring.application.name}-${spring.profile.active}.${spring.cloud.nacos.config.file-extension}
# 本案例的DataID是:nacos-config-client-dev.yaml
2
3
4
5
6
7
8
9
10
11
12
13
14
15
16
通过 spring.profile.active 属性就能进行多环境下配置文件的读取
server:
  port: 3377

spring:
  profiles:
    #active: dev # 表示开发环境
    active: test # 表示测试环境
    #active: prod # 表示生产环境
2
3
4
5
6
7
8
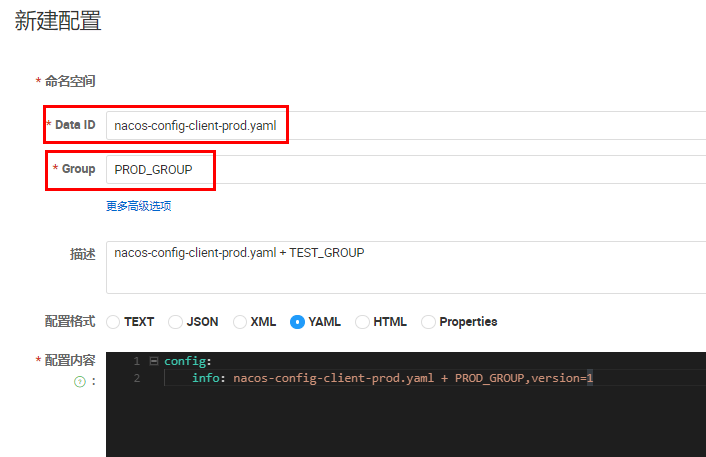
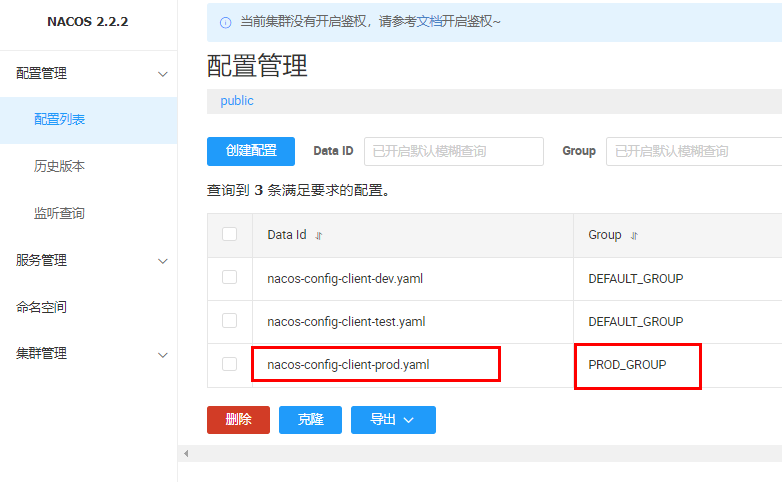
# Group 方案
默认空间 public + 新建 PROD_GROUP + 新建 DatalD
新建 Group
bootstrap.yaml
# nacos配置 第2种:默认空间+新建分组+新建DataID
spring:
  application:
    name: nacos-config-client
  cloud:
    nacos:
      discovery:
        server-addr: localhost:8848 #Nacos服务注册中心地址
      config:
        server-addr: localhost:8848 #Nacos作为配置中心地址
        file-extension: yaml #指定yaml格式的配置
        group: PROD_GROUP
2
3
4
5
6
7
8
9
10
11
12
application.yaml'
server:
  port: 3377

spring:
  profiles:
    #active: dev # 表示开发环境
    #active: test # 表示测试环境
    active: prod # 表示生产环境
2
3
4
5
6
7
8
9
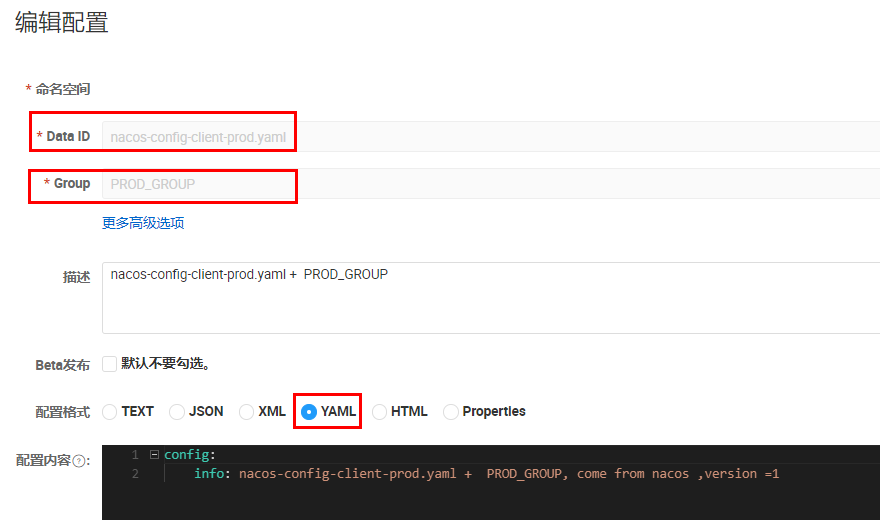
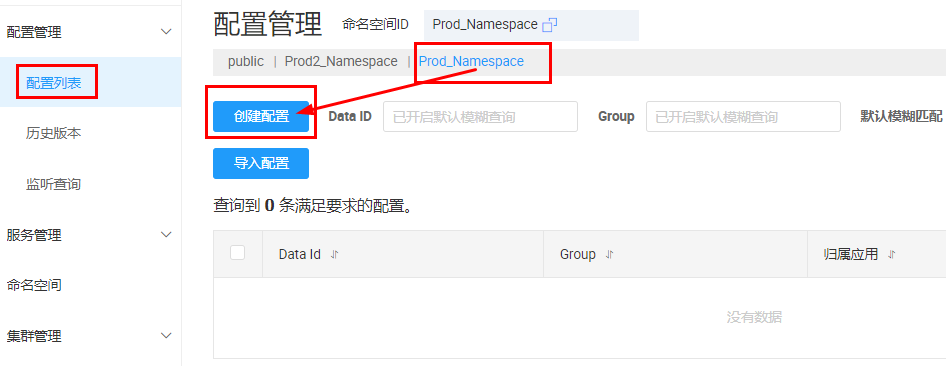
# NameSpace 方案
新建命名空间,如果不填写则为 UUID 自动生成

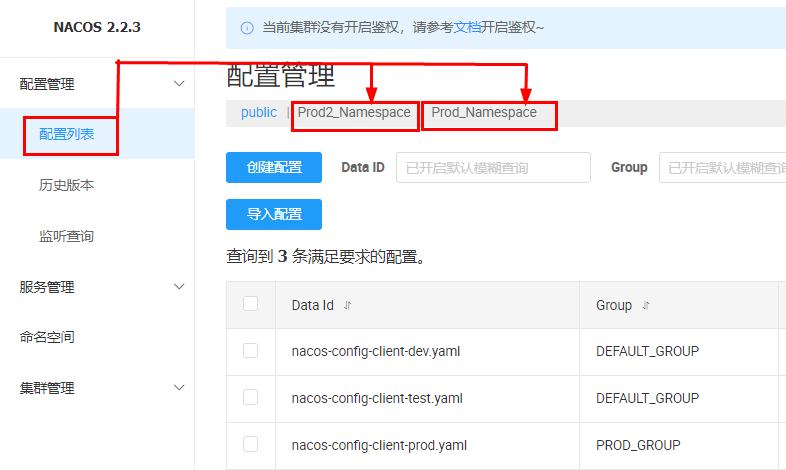
Prod_Namespace+PROD_GROUP+DatalD(nacos-config-client-prod.yaml)
bootstrap.yaml
# nacos配置 第3种:新建空间+新建分组+新建DataID
spring:
  application:
    name: nacos-config-client
  cloud:
    nacos:
      discovery:
        server-addr: localhost:8848 #Nacos服务注册中心地址
      config:
        server-addr: localhost:8848 #Nacos作为配置中心地址
        file-extension: yaml #指定yaml格式的配置
        group: PROD_GROUP
        namespace: Prod_Namespace
2
3
4
5
6
7
8
9
10
11
12
13
application.yaml
server:
  port: 3377

spring:
  profiles:
    #active: dev # 表示开发环境
    #active: test # 表示测试环境
    active: prod # 表示生产环境
2
3
4
5
6
7
8
# Sentinel
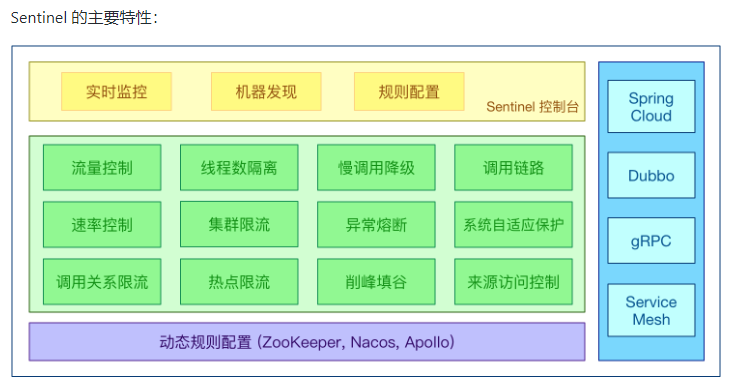
Sentinel 的特征丰富的应用场景:Sentinel 承接了阿里巴巴近 10 年的双十一大促流量的核心场景,例如秒杀(即突发流量控制在系统容量可以承受的范围)、消息削峰填谷、集群流量控制、实时熔断下游不可用应用等。
完备的实时监控:Sentinel 同时提供实时的监控功能。您可以在控制台中看到接入应用的单台机器秒级数据,甚至 500 台以下规模的集群的汇总运行情况。
广泛的开源生态:Sentinel 提供开箱即用的与其它开源框架 / 库的整合模块,例如与 Spring Cloud、Apache Dubbo、gRPC、Quarkus 的整合。您只需要引入相应的依赖并进行简单的配置即可快速地接入 Sentinel。同时 Sentinel 提供 Java/Go/C++ 等多语言的原生实现。
完善的 SPI 扩展机制:Sentinel 提供简单易用、完善的 SPI 扩展接口。您可以通过实现扩展接口来快速地定制逻辑。例如定制规则管理、适配动态数据源等。
Sentinel 的主要特性
发布地址 https://github.com/alibaba/Sentinel/releases
启动,默认为 8080 端口,该端口不能被占用
java -jar sentinel-dashboard-1.8.6.jar
账号密码都为 sentinel
引入依赖
       <dependency>
            <groupId>com.alibaba.cloud</groupId>
            <artifactId>spring-cloud-starter-alibaba-sentinel</artifactId>
        </dependency>
2
3
4
配置文件
server:
  port: 8401

spring:
  application:
    name: cloudalibaba-sentinel-service
  cloud:
    nacos:
      discovery:
        server-addr: localhost:8848         #Nacos服务注册中心地址
    sentinel:
      transport:
        dashboard: localhost:8080 #配置Sentinel dashboard控制台服务地址
        port: 8719 #默认8719端口,假如被占用会自动从8719开始依次+1扫描,直至找到未被占用的端口
2
3
4
5
6
7
8
9
10
11
12
13
14
启动类
@EnableDiscoveryClient
@SpringBootApplication
public class Main8401
{
    public static void main(String[] args)
    {
        SpringApplication.run(Main8401.class,args);
    }
}
2
3
4
5
6
7
8
9
sentinel 默认为懒加载,想使用 Sentinel 对某个接口进行限流和降级等操作,一定要先访问下接口,使 Sentinel 检测出相应的接口
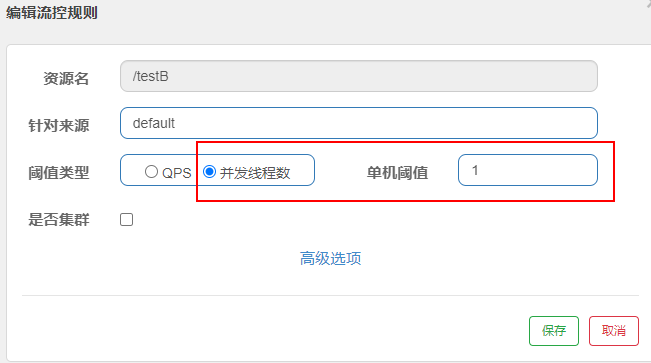
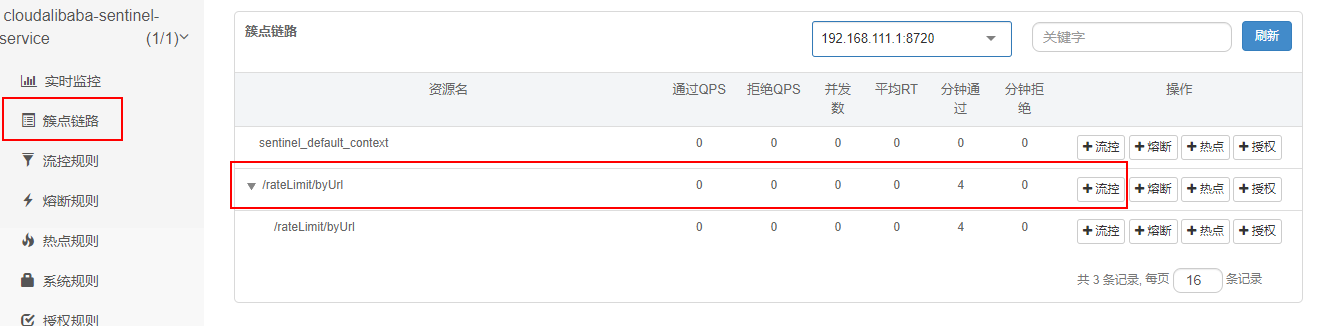
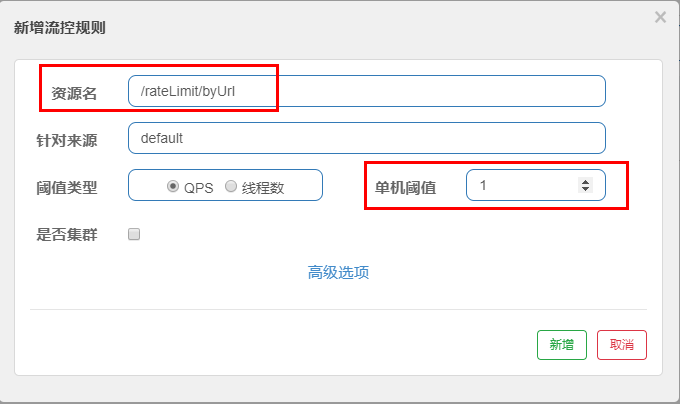
# 流控规则
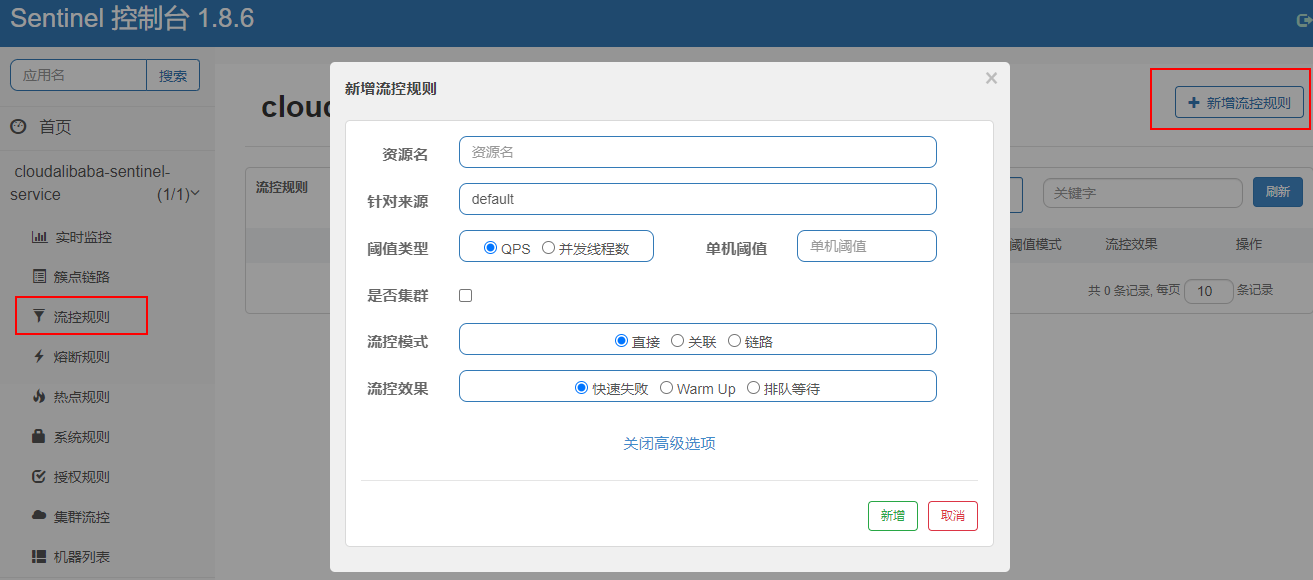
Sentinel 能够对流量进行控制,主要是监控应用的 QPS 流量或者并发线程数等指标,如果达到指定的阈值时,就会被流量进行控制,以避免服务被瞬时的高并发流量击垮,保证服务的高可靠性。参数见最下方:
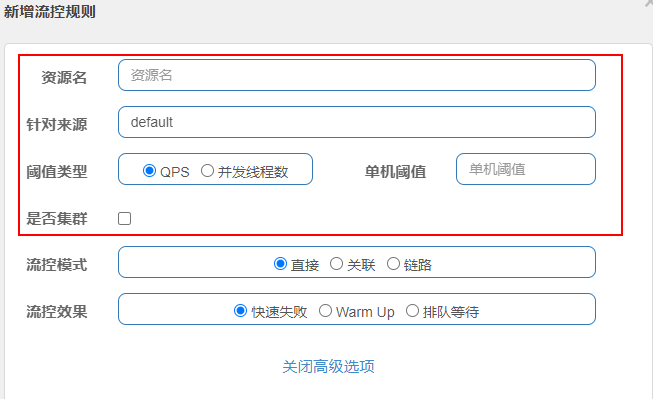
| 1 资源名 | 资源的唯一名称,默认就是请求的接口路径,可以自行修改,但是要保证唯一。 |
|---|---|
| 2 针对来源 | 具体针对某个微服务进行限流,默认值为 default,表示不区分来源,全部限流。 |
| 3 阈值类型 | QPS 表示通过 QPS 进行限流,并发线程数表示通过并发线程数限流。 |
| 4 单机阈值 | 与阈值类型组合使用。如果阈值类型选择的是 QPS,表示当调用接口的 QPS 达到阈值时,进行限流操作。如果阈值类型选择的是并发线程数,则表示当调用接口的并发线程数达到阈值时,进行限流操作。 |
| 5 是否集群 | 选中则表示集群环境,不选中则表示非集群环境 |
# 直接模式
默认的流控模式,当接口达到限流条件时,直接开启限流功能
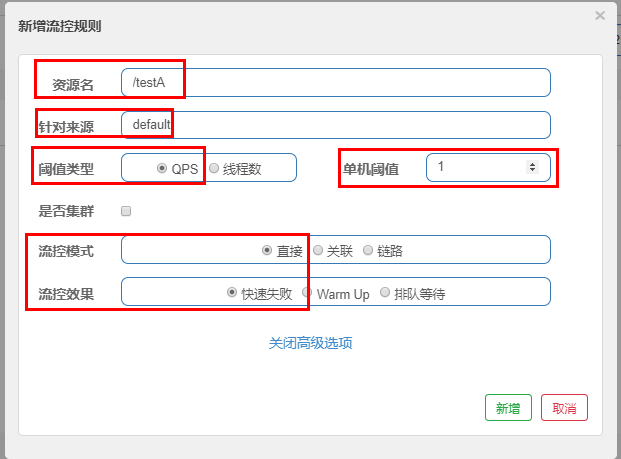
表示 1 秒钟内查询 1 次就是 OK,若超过次数 1,就直接 - 快速失败,报默认错误 Blocked by Sentinel (flow limiting)
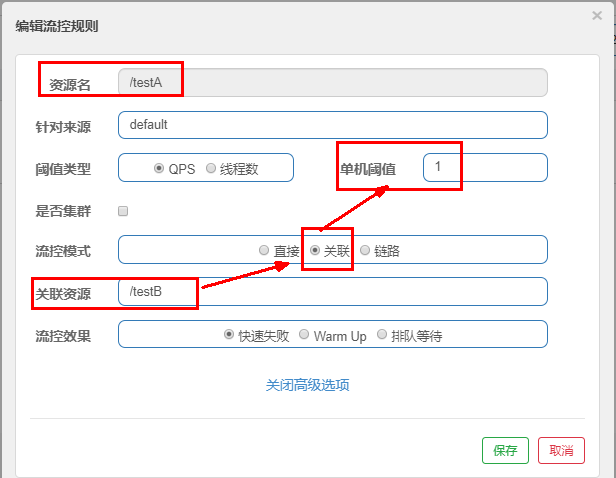
# 关联模式
当关联的资源达到阈值时,就限流自己,当与 A 关联的资源 B 达到阀值后,就限流 A 自己
当关联资源 /testB 的 qps 阀值超过 1 时,就限流 /testA 的 Rest 访问地址,当关联资源到阈值后限制配置好的资源名,B 惹事,A 挂了,报默认错误 Blocked by Sentinel (flow limiting)
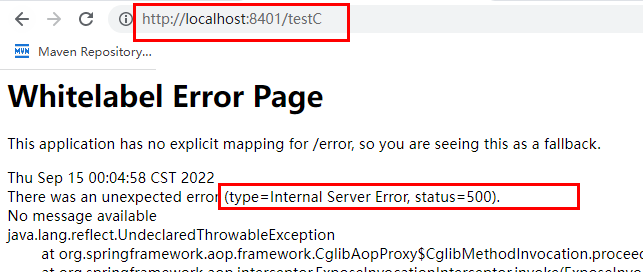
# 链路模式
server:
  port: 8401

spring:
  application:
    name: cloudalibaba-sentinel-service #8401微服务提供者后续将会被纳入阿里巴巴sentinel监管
  cloud:
    nacos:
      discovery:
        server-addr: localhost:8848         #Nacos服务注册中心地址
    sentinel:
      transport:
        dashboard: localhost:8080 #配置Sentinel dashboard控制台服务地址
                port: 8719 #默认8719端口,假如被占用会自动从8719开始依次+1扫描,直至找到未被占用的端口
            web-context-unify: false # controller层的方法对service层调用不认为是同一个根链路
2
3
4
5
6
7
8
9
10
11
12
13
14
15
业务层
@RestController
public class FlowLimitController
{

    @GetMapping("/testA")
    public String testA()
    {
        return "------testA";
    }

    @GetMapping("/testB")
    public String testB()
    {
        return "------testB";
    }

    /**流控-链路演示demo
     * C和D两个请求都访问flowLimitService.common()方法,阈值到达后对C限流,对D不管
     */
    @Resource private FlowLimitService flowLimitService;

    @GetMapping("/testC")
    public String testC()
    {
        flowLimitService.common();
        return "------testC";
    }
    @GetMapping("/testD")
    public String testD()
    {
        flowLimitService.common();
        return "------testD";
    }
}
2
3
4
5
6
7
8
9
10
11
12
13
14
15
16
17
18
19
20
21
22
23
24
25
26
27
28
29
30
31
32
33
34
服务层
@Service
public class FlowLimitService
{
    @SentinelResource(value = "common")
    public void common()
    {
        System.out.println("------FlowLimitService come in");
    }
}
2
3
4
5
6
7
8
9
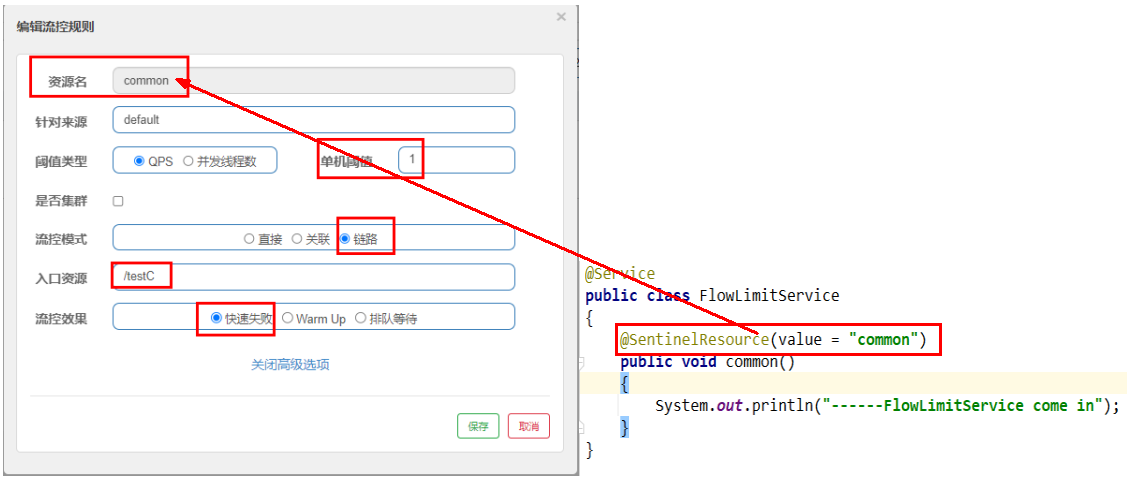
C 和 D 两个请求都访问 flowLimitService.common () 方法,对 C 限流,对 D 不管
超过一秒钟一次后,就发生限流
# 流控效果
默认流控效果为报默认错误 Blocked by Sentinel (flow limiting)
# 预热 WarmUp
当流量突然增大的时候,我们常常会希望系统从空闲状态到繁忙状态的切换的时间长一些。即如果系统在此之前长期处于空闲的状态,我们希望处理请求的数量是缓步的增多,经过预期的时间以后,到达系统处理请求个数的最大值。WmUp (冷启动,预热) 模式就是为了实现这个目的的。
这个场景主要用于启动需要额外开销的场景,例如建立数据库连接等。
公式:函值除以冷却因子 coldFactor (默认值为 3),经过预热时长后才会达到函值
默认 coldFactor 为 3,即请求 QPS 从 (threshold / 3) 开始,经多少预热时长才逐渐升至设定的 QPS 阈值。
案例,单机阈值为 10,预热时长设置 5 秒。系统初始化的阈值为 10 / 3 约等于 3, 即单机阈值刚开始为 3 (我们人工设定单机阈值是 10,sentinel 计算后 QPS 判定为 3 开始);然后过了 5 秒后阀值才慢慢升高恢复到设置的单机阈值 10,也就是说 5 秒钟内 QPS 为 3,过了保护期 5 秒后 QPS 为 10
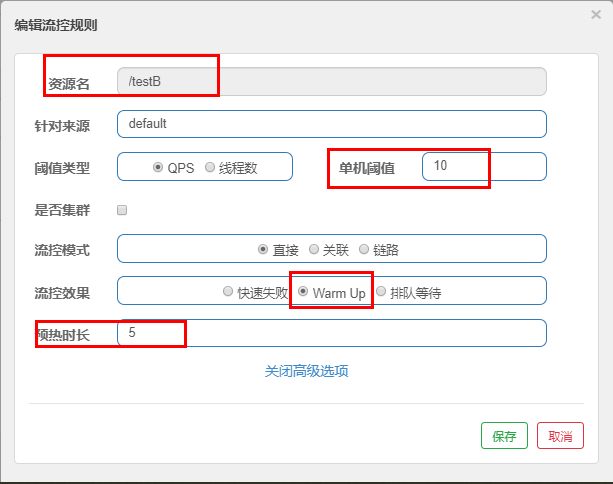
如:秒杀系统在开启的瞬间,会有很多流量上来,很有可能把系统打死,预热方式就是把为了保护系统,可慢慢的把流量放进来,慢慢的把阈值增长到设置的阈值。
# 排队等候
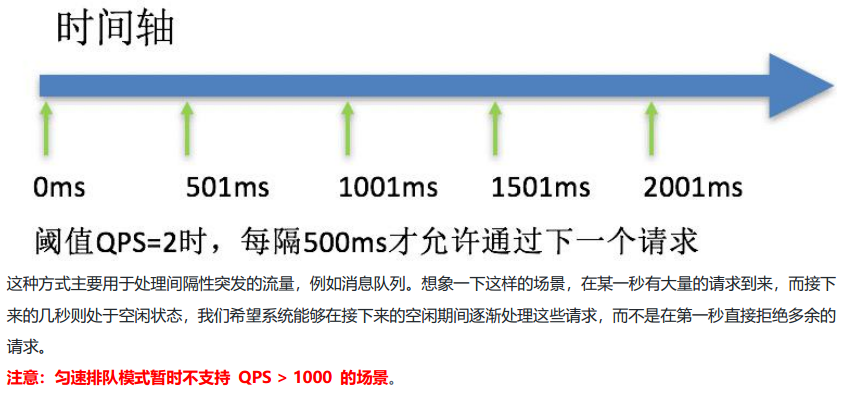
按照单机阈值,一秒钟通过一个请求,10 秒后的请求作为超时处理,放弃
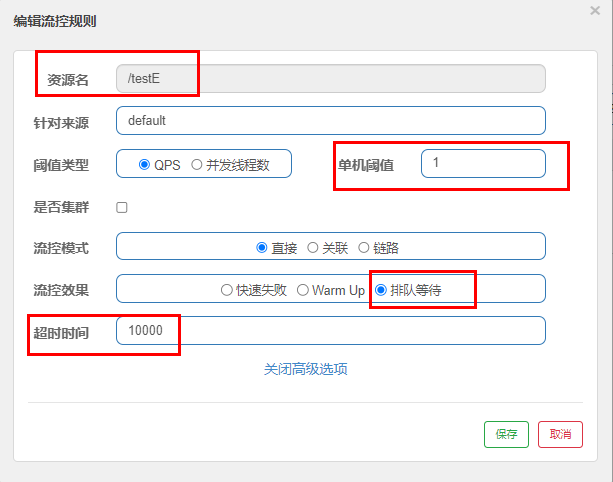
同样我们可以设置为并发数
# 熔断规则
Sentinel 熔断降级会在调用链路中某个资源出现不稳定状态时(例如调用超时或异常比例升高),对这个资源的调用进行限制,
让请求快速失败,避免影响到其它的资源而导致级联错误。当资源被降级后,在接下来的降级时间窗口之内,对该资源的调用都自动熔断(默认行为是抛出 DegradeException)。
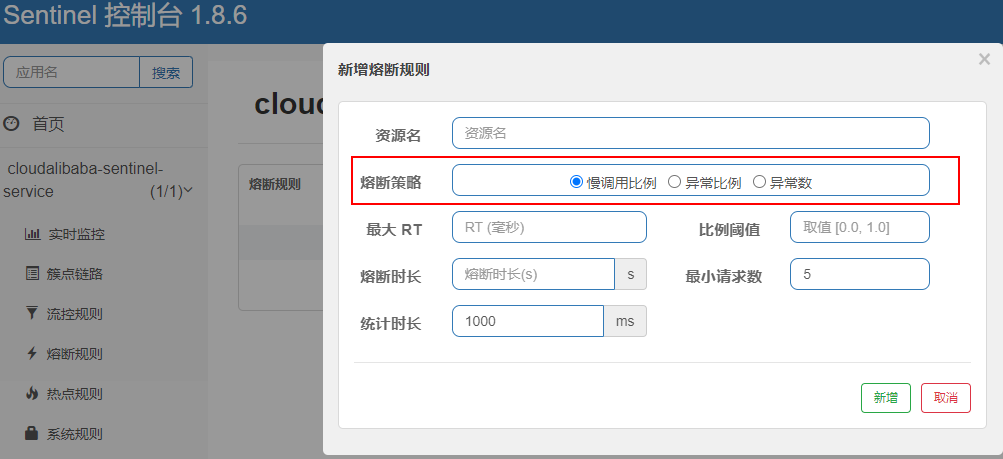
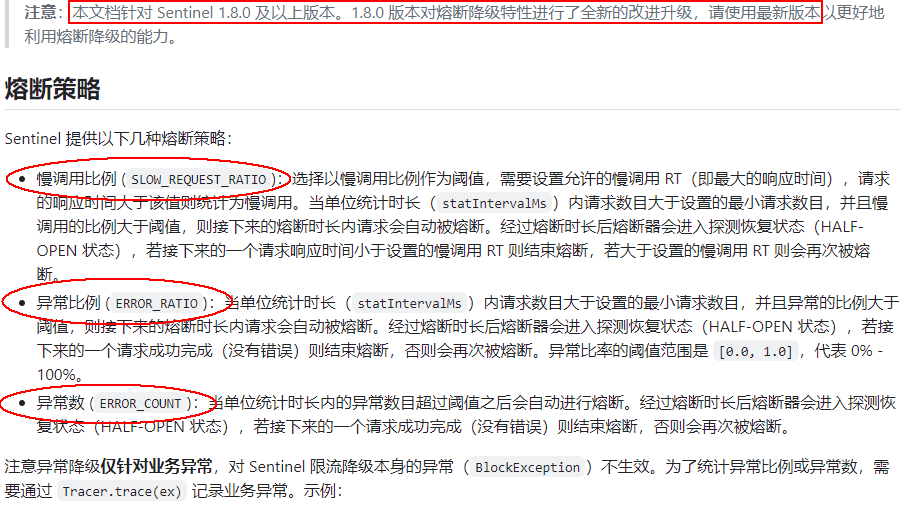
# 慢调用比例
进入熔断状态判断依据:在统计时长内,实际请求数目>设定的最小请求数 且 实际慢调用比例>比例阈值 ,进入熔断状态。
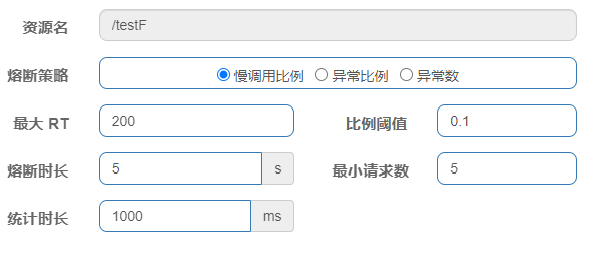
调用:一个请求发送到服务器,服务器给与响应,一个响应就是一个调用。
最大 RT:即最大的响应时间,指系统对请求作出响应的业务处理时间。
慢调用:处理业务逻辑的实际时间 > 设置的最大 RT 时间,这个调用叫做慢调用。
慢调用比例:在所以调用中,慢调用占有实际的比例=慢调用次数➗总调用次数
比例阈值:自己设定的 , 比例阈值=慢调用次数➗调用次数
统计时长:时间的判断依据
最小请求数:设置的调用最小请求数,上图比如 1 秒钟打进来 10 个线程(大于我们配置的 5 个了)调用被触发
熔断状态
- 熔断状态 (保险丝跳闸断电,不可访问):在接下来的熔断时长内请求会自动被熔断
- 探测恢复状态 (探路先锋):熔断时长结束后进入探测恢复状态
- 结束熔断 (保险丝闭合恢复,可以访问):在探测恢复状态,如果接下来的一个请求响应时间小于设置的慢调用 RT,则结束熔断,否则继续熔断。
# 异常比例
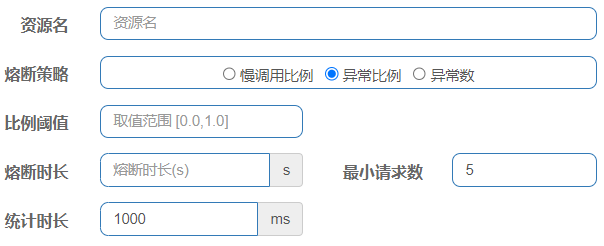
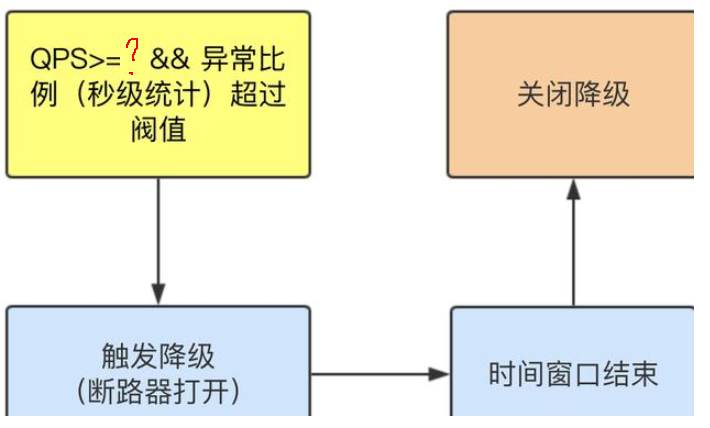
不配置 Sentinel,对于 int age=10/0,调一次错一次报错 error,页面报【Whitelabel Error Page】或全局异常
配置 Sentinel,对于 int age=10/0,如符合如下异常比例启动熔断,页面报【Blocked by Sentinel (flow limiting)】
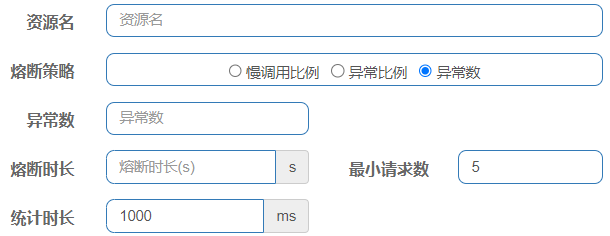
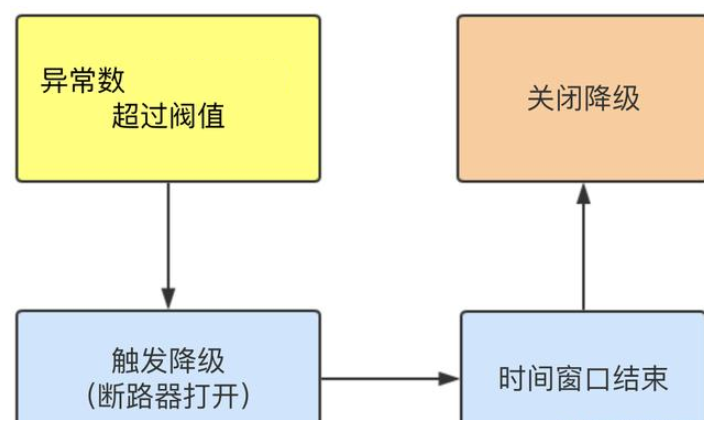
# 异常数
# @SentinelResource 注解
SentinelResource 是一个流量防卫防护组件注解,用于指定防护资源,对配置的资源进行流量控制、熔断降级等功能。
@Target({ElementType.METHOD, ElementType.TYPE})
@Retention(RetentionPolicy.RUNTIME)
@Inherited
public @interface SentinelResource {

    //资源名称
    String value() default "";

    //entry类型,标记流量的方向,取值IN/OUT,默认是OUT
    EntryType entryType() default EntryType.OUT;
    //资源分类
    int resourceType() default 0;

    //处理BlockException的函数名称,函数要求:
    //1. 必须是 public
    //2.返回类型 参数与原方法一致
    //3. 默认需和原方法在同一个类中。若希望使用其他类的函数,可配置blockHandlerClass ,并指定blockHandlerClass里面的方法。
    String blockHandler() default "";

    //存放blockHandler的类,对应的处理函数必须static修饰。
    Class<?>[] blockHandlerClass() default {};

    //用于在抛出异常的时候提供fallback处理逻辑。 fallback函数可以针对所
    //有类型的异常(除了 exceptionsToIgnore 里面排除掉的异常类型)进行处理。函数要求:
    //1. 返回类型与原方法一致
    //2. 参数类型需要和原方法相匹配
    //3. 默认需和原方法在同一个类中。若希望使用其他类的函数,可配置fallbackClass ,并指定fallbackClass里面的方法。
    String fallback() default "";

    //存放fallback的类。对应的处理函数必须static修饰。
    String defaultFallback() default "";

    //用于通用的 fallback 逻辑。默认fallback函数可以针对所有类型的异常进
    //行处理。若同时配置了 fallback 和 defaultFallback,以fallback为准。函数要求:
    //1. 返回类型与原方法一致
    //2. 方法参数列表为空,或者有一个 Throwable 类型的参数。
    //3. 默认需要和原方法在同一个类中。若希望使用其他类的函数,可配置fallbackClass ,并指定 fallbackClass 里面的方法。
    Class<?>[] fallbackClass() default {};


    //需要trace的异常
    Class<? extends Throwable>[] exceptionsToTrace() default {Throwable.class};

    //指定排除忽略掉哪些异常。排除的异常不会计入异常统计,也不会进入fallback逻辑,而是原样抛出。
    Class<? extends Throwable>[] exceptionsToIgnore() default {};
}
2
3
4
5
6
7
8
9
10
11
12
13
14
15
16
17
18
19
20
21
22
23
24
25
26
27
28
29
30
31
32
33
34
35
36
37
38
39
40
41
42
43
44
45
46
默认会返回 Sentinel 自带的限流处理结果

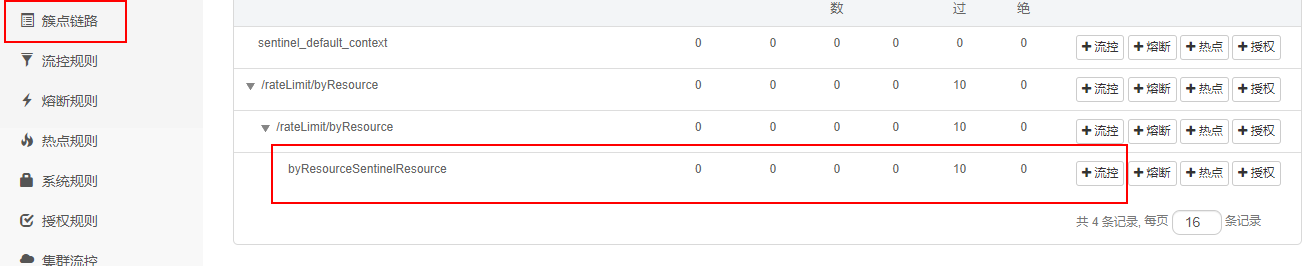
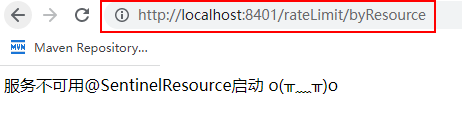
# 自定义限流提示
@RestController
@Slf4j
public class RateLimitController
{
    @GetMapping("/rateLimit/byUrl")
    public String byUrl()
    {
        return "按rest地址限流测试OK";
    }

    @GetMapping("/rateLimit/byResource")
    @SentinelResource(value = "byResourceSentinelResource",blockHandler = "handleException")
    public String byResource()
    {
        return "按资源名称SentinelResource限流测试OK";
    }
    public String handleException(BlockException exception)
    {
        return "服务不可用@SentinelResource启动"+"\t"+"o(╥﹏╥)o";
    }
}
2
3
4
5
6
7
8
9
10
11
12
13
14
15
16
17
18
19
20
21

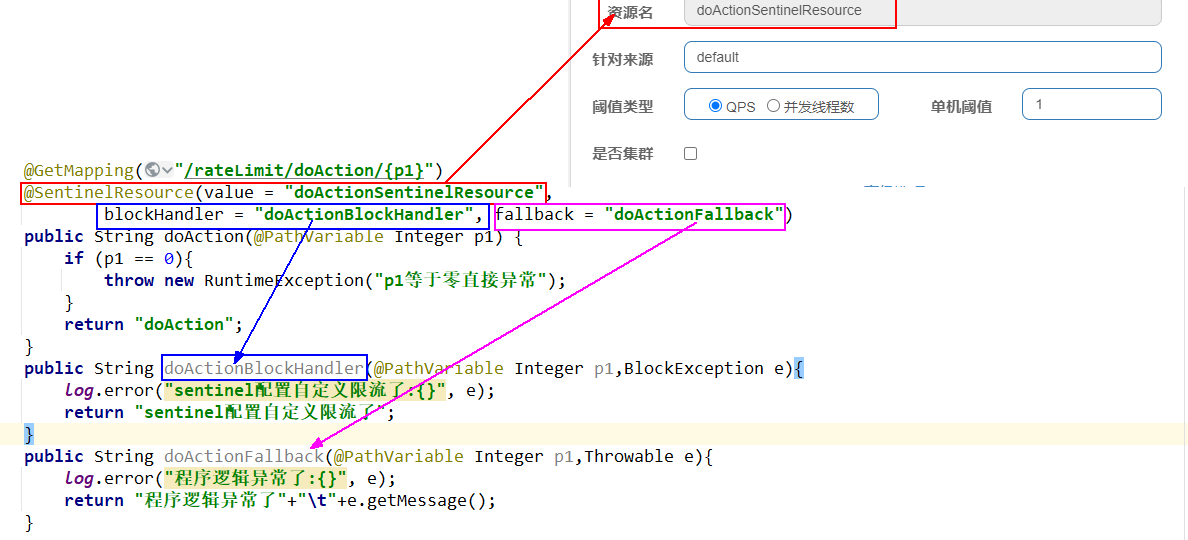
# 自定义限流返回 + 服务降级
@RestController
@Slf4j
public class RateLimitController
{
    @GetMapping("/rateLimit/byUrl")
    public String byUrl()
    {
        return "按rest地址限流测试OK";
    }

    @GetMapping("/rateLimit/byResource")
    @SentinelResource(value = "byResourceSentinelResource",blockHandler = "handleException")
    public String byResource()
    {
        return "按资源名称SentinelResource限流测试OK";
    }
    public String handleException(BlockException exception)
    {
        return "服务不可用@SentinelResource启动"+"\t"+"o(╥﹏╥)o";
    }

    @GetMapping("/rateLimit/doAction/{p1}")
    @SentinelResource(value = "doActionSentinelResource",
            blockHandler = "doActionBlockHandler", fallback = "doActionFallback")
    public String doAction(@PathVariable("p1") Integer p1) {
        if (p1 == 0){
            throw new RuntimeException("p1等于零直接异常");
        }
        return "doAction";
    }

    public String doActionBlockHandler(@PathVariable("p1") Integer p1,BlockException e){
        log.error("sentinel配置自定义限流了:{}", e);
        return "sentinel配置自定义限流了";
    }

    public String doActionFallback(@PathVariable("p1") Integer p1,Throwable e){
        log.error("程序逻辑异常了:{}", e);
        return "程序逻辑异常了"+"\t"+e.getMessage();
    }

}
2
3
4
5
6
7
8
9
10
11
12
13
14
15
16
17
18
19
20
21
22
23
24
25
26
27
28
29
30
31
32
33
34
35
36
37
38
39
40
41
42
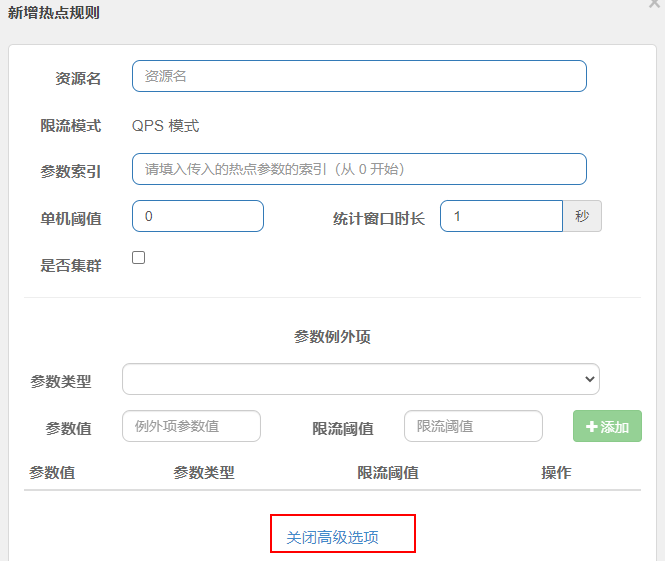
# 热点规则
热点即经常访问的数据,很多时候我们希望统计或者限制某个热点数据中访问频次最高的 TopN 数据,并对其访问进行限流或者其它操作
@GetMapping("/testHotKey")
@SentinelResource(value = "testHotKey",blockHandler = "dealHandler_testHotKey")
public String testHotKey(@RequestParam(value = "p1",required = false) String p1,

                         @RequestParam(value = "p2",required = false) String p2){
    return "------testHotKey";
}
public String dealHandler_testHotKey(String p1,String p2,BlockException exception)
{
    return "-----dealHandler_testHotKey";
}
2
3
4
5
6
7
8
9
10
11
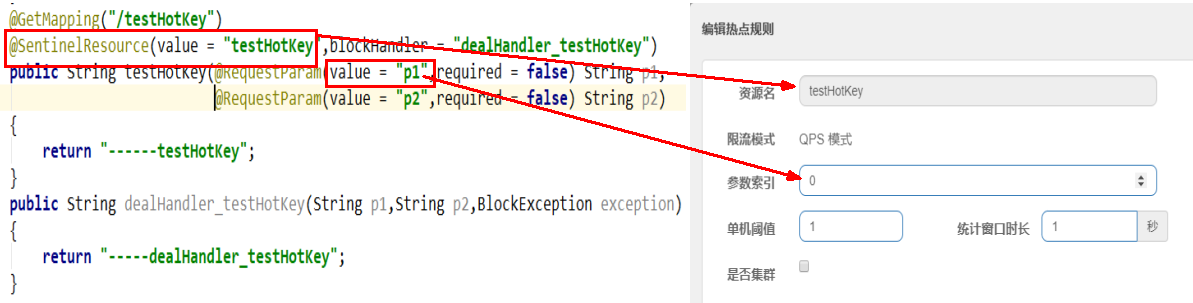
限流模式只支持 QPS 模式,固定写死了。(这才叫热点)
@SentinelResource 注解的方法参数索引,0 代表第一个参数,1 代表第二个参数,以此类推
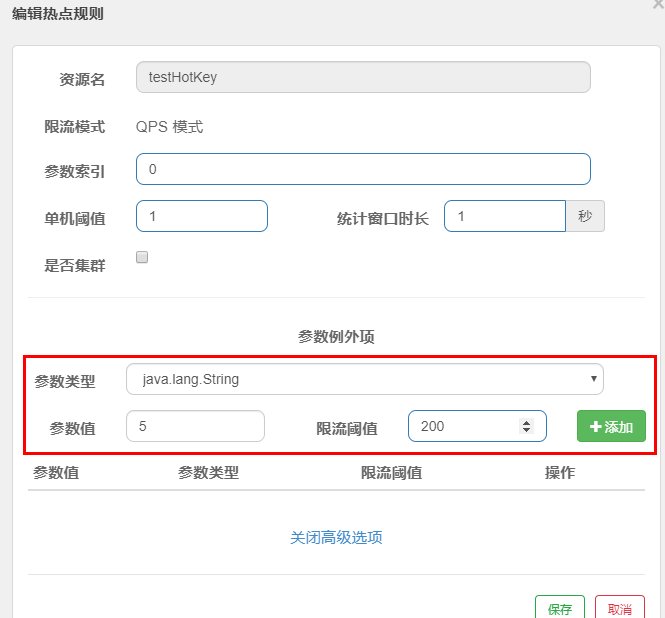
单机阀值以及统计窗口时长表示在此窗口时间超过阀值就限流。
上面的抓图就是第一个参数有值的话,1 秒的 QPS 为 1,超过就限流,限流后调用 dealHandler_testHotKey 支持方法。
sentinel 系统默认的提示:Blocked by Sentinel (flow limiting)
当然我们可以配置特殊情况,如指定的参数为对应值才触发
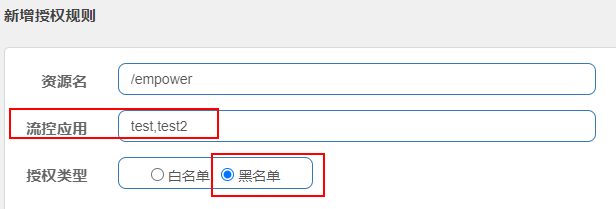
# 授权规则
在某些场景下,需要根据调用接口的来源判断是否允许执行本次请求。此时就可以使用 Sentinel 提供的授权规则来实现,Sentinel 的授权规则能够根据请求的来源判断是否允许本次请求通过。
在 Sentinel 的授权规则中,提供了 白名单与黑名单 两种授权类型。白放行、黑禁止
@Component
public class MyRequestOriginParser implements RequestOriginParser
{
    @Override
    public String parseOrigin(HttpServletRequest httpServletRequest) {
        return httpServletRequest.getParameter("serverName");
    }
}
2
3
4
5
6
7
8
业务层
@RestController
@Slf4j
public class EmpowerController //Empower授权规则,用来处理请求的来源
{
    @GetMapping(value = "/empower")
    public String requestSentinel4(){
        log.info("测试Sentinel授权规则empower");
        return "Sentinel授权规则";
    }
}
2
3
4
5
6
7
8
9
10
访问测试
curl http://localhost:8401/empower?serverName=test
curl http://localhost:8401/empower?serverName=test2
2
由于开启了黑名单模式,默认报 Blocked by Sentinel (flow limiting)
# 规则持久化
一旦我们重启微服务应用,sentinel 规则将消失,生产环境需要将配置规则进行持久化 将限流配置规则特久化进 Nacos 保存,只要刷新 8401 某个 rest 地址,sentinel 控制台的流控规则就能看到,只要 Nacos 里面的配置不删除,针对 8401 上 sentinel_上的流控规则持续有效
导入依赖
       <!--SpringCloud ailibaba sentinel-datasource-nacos -->
        <dependency>
            <groupId>com.alibaba.csp</groupId>
            <artifactId>sentinel-datasource-nacos</artifactId>
        </dependency>
2
3
4
5
配置文件
spring:
  cloud:
    sentinel:
      datasource:
        ds1:
          nacos:
            server-addr: localhost:8848
            dataId: ${spring.application.name}
            groupId: DEFAULT_GROUP
            data-type: json
            rule-type: flow
2
3
4
5
6
7
8
9
10
11
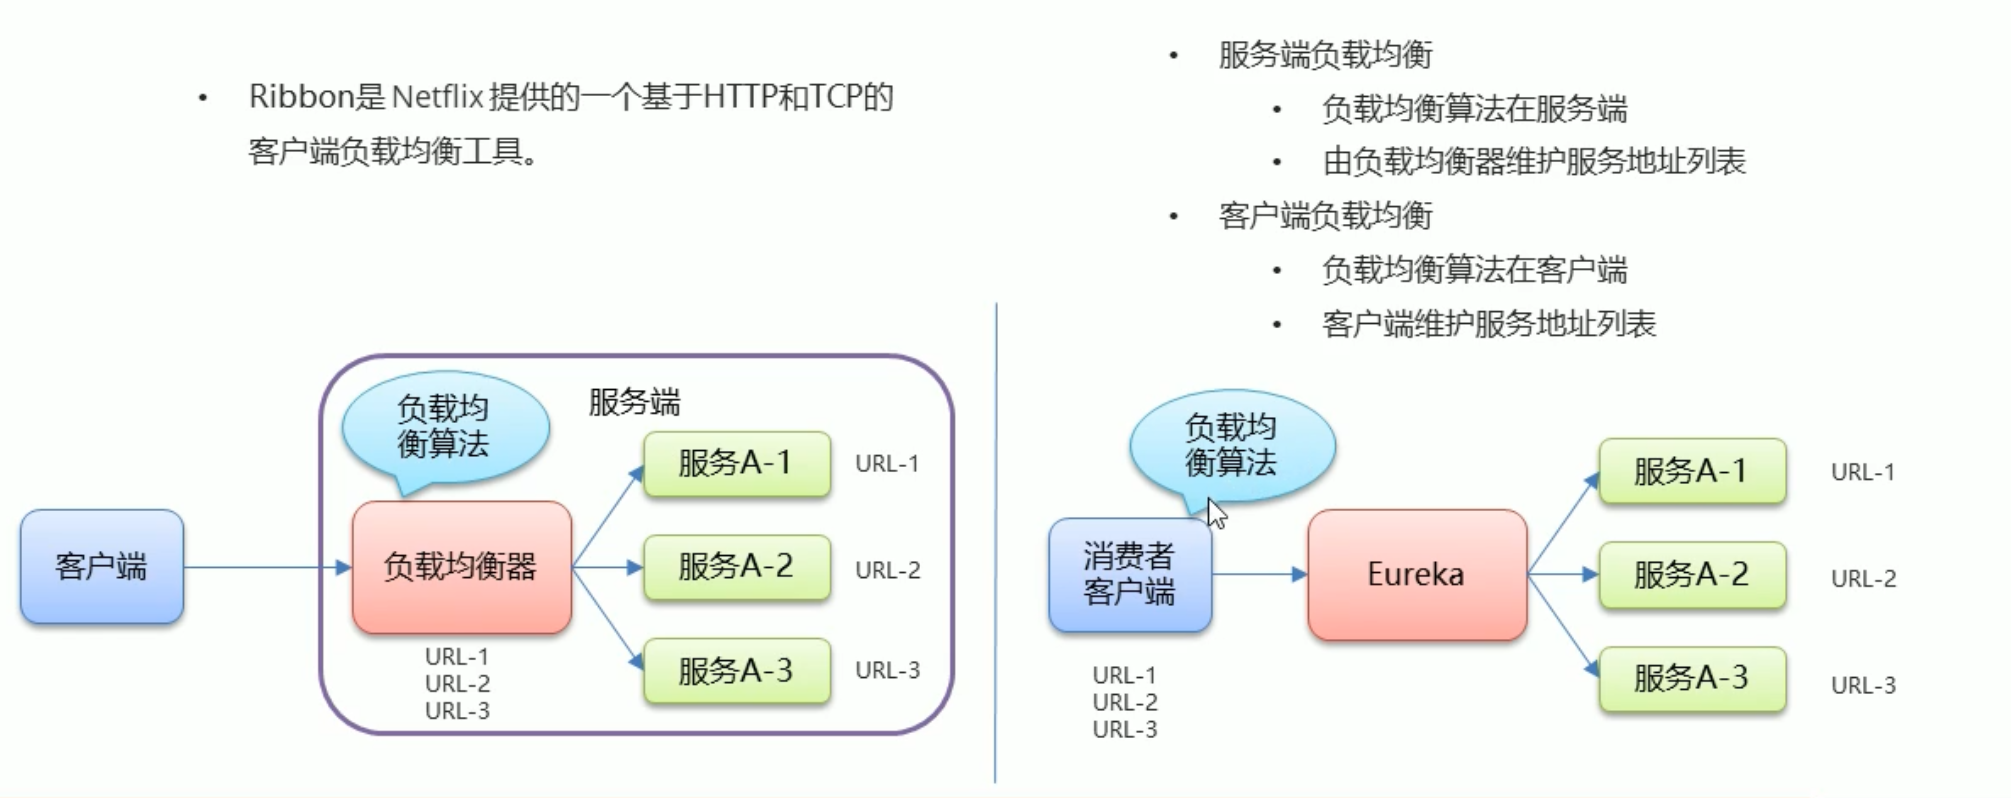
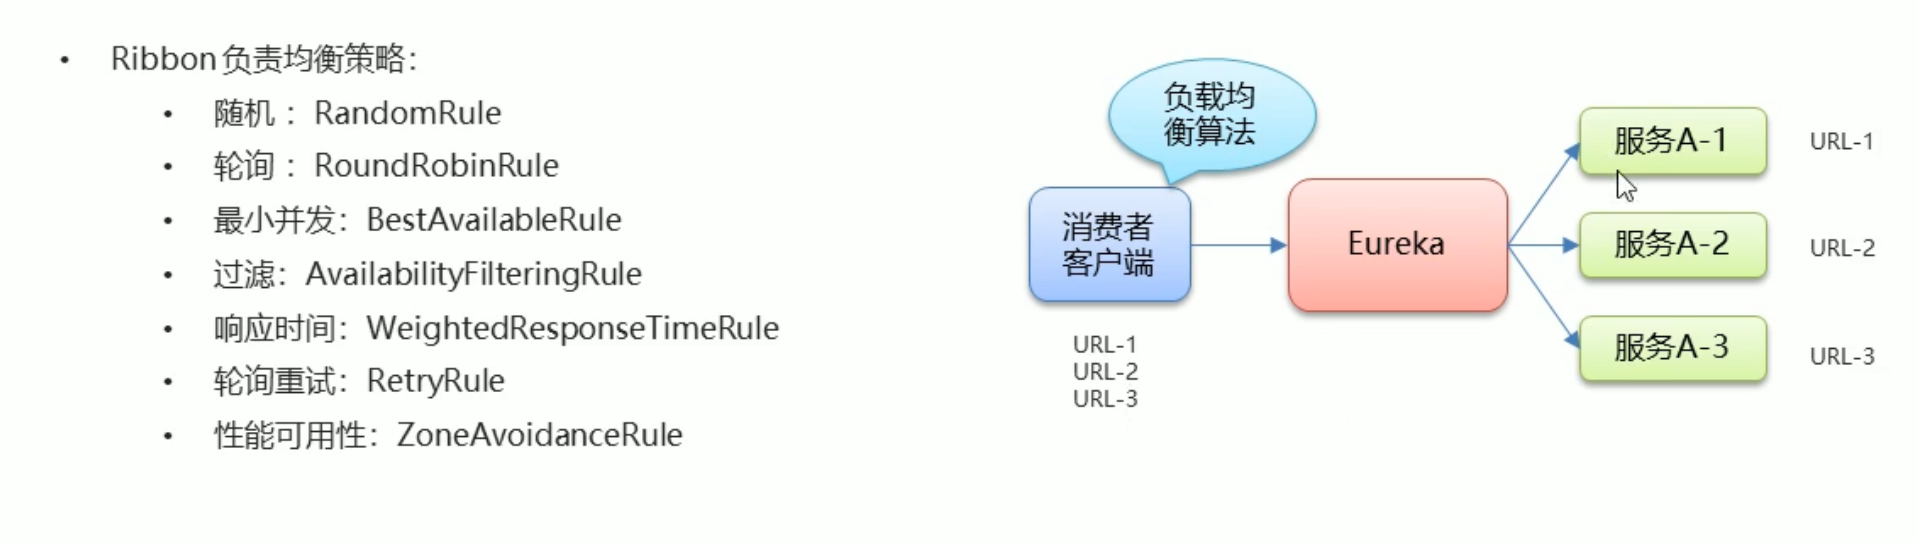
# Ribbon 负载均衡
Spring Cloud Ribbon 是基于 Netflix Ribbon 实现的一套客户端 负载均衡的工具。
简单的说,Ribbon 是 Netflix 发布的开源项目,主要功能是提供客户端的软件负载均衡算法和服务调用。Ribbon 客户端组件提供一系列完善的配置项如连接超时,重试等。简单的说,就是在配置文件中列出 Load Balancer(简称 LB)后面所有的机器,Ribbon 会自动的帮助你基于某种规则(如简单轮询,随机连接等)去连接这些机器。我们很容易使用 Ribbon 实现自定义的负载均衡算法。
# 简化 ResTemplate 调用
之前我们 Eureka 通过 ResTemplate 获取一个应用集合,获取一个应用对象 的 地址 和端口,并拼接成一个 url 调用服务方的应用 使用 Ribbon 只需要将 ip: 端口换成应用名称即可以远程调用 应用
在 ResTemplate 的 Bean 绑定中加上 @LoadBalanced 注解
package com.itheima.consumer.cnfig;

import org.springframework.cloud.client.loadbalancer.LoadBalanced;
import org.springframework.context.annotation.Bean;
import org.springframework.context.annotation.Configuration;
import org.springframework.web.client.RestTemplate;

@Configuration
public class RestTemplateConfig {

    @LoadBalanced
    @Bean
    public RestTemplate restTemplate(){
        return new RestTemplate();
    }
}
1
2
3
4
5
6
7
8
9
10
11
12
13
14
15
16将 url 中的 ip: 端口 换成应用名称
/*
使用 Ribbon 简化调用
1.在声明restTemplate的Bean时 添加一个@LoadBalanced 注解
2.在使用在声明restTemplate 发请求时 需要定义url时 host:port可以换成 服务端提供的应用名称
 */
@GetMapping("/goods2/{id}")
public Goods findGoodsById2(@PathVariable("id") int id) {

    String url = "http://EUREKA-PROVIDER/goods/findOne/" + id;
    Goods goods = restTemplate.getForObject(url, Goods.class);
    return goods;
}
1
2
3
4
5
6
7
8
9
10
11
12
# 负载均衡
通过在 ResTemplate 的 Bean 绑定中加上 @LoadBalanced 注解后,如果当前用于有个多个服务提供方,则 Ribbon 会自动帮我们负载均衡,默认为轮询策略,策略配置在消费者一端 即客户端负载均衡
# 配置类形式配置负载策略
定义配置类 使用 Bean 绑定并返回一个 IRule 接口的实现类
package com.itheima.consumer.cnfig;

import com.netflix.loadbalancer.IRule;
import com.netflix.loadbalancer.RandomRule;
import org.springframework.context.annotation.Bean;
import org.springframework.context.annotation.Configuration;

@Configuration
public class MyRule {

    @Bean
    public IRule rule(){
        return new RandomRule();
    }
}
1
2
3
4
5
6
7
8
9
10
11
12
13
14
15在启动类中 使用 @RibbonClient 定义应用名称和配置类
package com.itheima.consumer;

import com.itheima.consumer.cnfig.MyRule;
import org.springframework.boot.SpringApplication;
import org.springframework.boot.autoconfigure.SpringBootApplication;
import org.springframework.cloud.client.discovery.EnableDiscoveryClient;
import org.springframework.cloud.netflix.eureka.EnableEurekaClient;
import org.springframework.cloud.netflix.ribbon.RibbonClient;

@SpringBootApplication
@EnableEurekaClient
@EnableDiscoveryClient //激活DiscoveryClient 新版本可以忽略 自动激活
/*
    配置Ribbon 负载均衡策略
    name :设置服务提供方的 应用名称
    configuration : 设置负载均衡的Bean

 */
@RibbonClient(name ="EUREKA-PROVIDER",configuration = MyRule.class)
public class ConsumerApp {
    public static void main(String[] args) {
        SpringApplication.run(ConsumerApp.class, args);
    }
}
1
2
3
4
5
6
7
8
9
10
11
12
13
14
15
16
17
18
19
20
21
22
23
24
# 配置方式设置
在 application 中设置该属性
EUREKA-PROVIDER:  # 应用名称
  ribbon:
    NFloadBalancerRuleClassName: com.netflix.loadbalancer.RandomRule  # 负载均衡策略实现类的引用路径
2
3
# LoadBalancer 负载均衡服务调用
LB 负载均衡 (Load Balance) 是什么
简单的说就是将用户的请求平摊的分配到多个服务上,从而达到系统的 HA(高可用),常见的负载均衡有软件 Nginx,LVS,硬件 F5 等
spring-cloud-starter-loadbalancer 组件是什么
Spring Cloud LoadBalancer 是由 SpringCloud 官方提供的一个开源的、简单易用的客户端负载均衡器,它包含在 SpringCloud-commons 中用它来替换了以前的 Ribbon 组件。相比较于 Ribbon,SpringCloud LoadBalancer 不仅能够支持 RestTemplate,还支持 WebClient(WeClient 是 Spring Web Flux 中提供的功能,可以实现响应式异步请求)
<dependency>
    <groupId>org.springframework.cloud</groupId>
    <artifactId>spring-cloud-starter-loadbalancer</artifactId>
</dependency>
2
3
4
轮询
        @Resource
        private DiscoveryClient discoveryClient;
        @GetMapping("/consumer/discovery")
        public String discovery()
        {
            List<String> services = discoveryClient.getServices();
            for (String element : services) {
                System.out.println(element);
            }

            System.out.println("===================================");

            List<ServiceInstance> instances = discoveryClient.getInstances("cloud-payment-service");
            for (ServiceInstance element : instances) {
                System.out.println(element.getServiceId()+"\t"+element.getHost()+"\t"+element.getPort()+"\t"+element.getUri());
            }

            return instances.get(0).getServiceId()+":"+instances.get(0).getPort();
        }
2
3
4
5
6
7
8
9
10
11
12
13
14
15
16
17
18
19
默认算法为轮询策略,也可以切换为随机策略
@Configuration
@LoadBalancerClient(
        //下面的value值大小写一定要和consul里面的名字一样,必须一样
        value = "cloud-payment-service",configuration = RestTemplateConfig.class)
public class RestTemplateConfig
{
    @Bean
    @LoadBalanced //使用@LoadBalanced注解赋予RestTemplate负载均衡的能力
    public RestTemplate restTemplate(){
        return new RestTemplate();
    }

    @Bean
    ReactorLoadBalancer<ServiceInstance> randomLoadBalancer(Environment environment,
                                                            LoadBalancerClientFactory loadBalancerClientFactory) {
        String name = environment.getProperty(LoadBalancerClientFactory.PROPERTY_NAME);

        return new RandomLoadBalancer(loadBalancerClientFactory.getLazyProvider(name, ServiceInstanceListSupplier.class), name);
    }
}
2
3
4
5
6
7
8
9
10
11
12
13
14
15
16
17
18
19
20
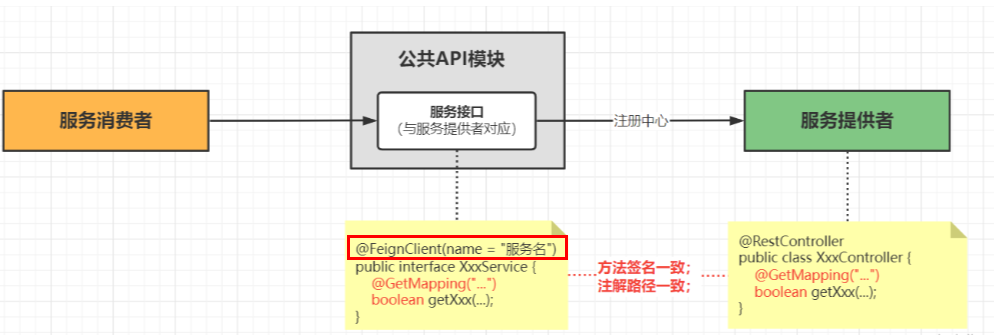
# Feign 声明式服务调用
Feign 是一个声明性 web 服务客户端。它使编写 web 服务客户端变得更容易。使用 Feign 创建一个接口并对其进行注释。它具有可插入的注释支持,包括 Feign 注释和 JAX-RS 注释。Feign 还支持可插拔编码器和解码器。Spring Cloud 添加了对 Spring MVC 注释的支持,以及对使用 Spring Web 中默认使用的 HttpMessageConverter 的支持。Spring Cloud 集成了 Eureka、Spring Cloud CircuitBreaker 以及 Spring Cloud LoadBalancer,以便在使用 Feign 时提供负载平衡的 http 客户端。
在消费者端导入坐标
<dependency>
     <groupId>org.springframework.cloud</groupId>
     <artifactId>spring-cloud-starter-openfeign</artifactId>
 </dependency>
1
2
3
4消费者启动类中加上 @EnableFeignClients 启用 Feign
package com.itheima.consumer;

import org.springframework.boot.SpringApplication;
import org.springframework.boot.autoconfigure.SpringBootApplication;
import org.springframework.cloud.client.discovery.EnableDiscoveryClient;
import org.springframework.cloud.netflix.eureka.EnableEurekaClient;
import org.springframework.cloud.openfeign.EnableFeignClients;

@EnableDiscoveryClient // 激活DiscoveryClient
@EnableEurekaClient
@SpringBootApplication

@EnableFeignClients //开启Feign的功能
public class ConsumerApp {


    public static void main(String[] args) {
        SpringApplication.run(ConsumerApp.class,args);
    }
}
1
2
3
4
5
6
7
8
9
10
11
12
13
14
15
16
17
18
19
20在消费者中定义一个 feign 声明接口
package com.itheima.consumer.feign;

import com.itheima.consumer.domain.Goods;
import org.springframework.cloud.openfeign.FeignClient;
import org.springframework.web.bind.annotation.GetMapping;
import org.springframework.web.bind.annotation.PathVariable;

/**
 * feign声明式接口  发起远程调用的
 * 1.定义接口
 * 2.接口上添加 @FeignClient value属性为 应用名称
 * 3.编写调用接口 接口的声明规则 和 提供方接口保持一致
 * 4.注入该接口对象 调用接口方法完成远程调用
 */

@FeignClient(value = "feign-provider")
public interface GoodsFeignClient {
    @GetMapping("/goods/findOne/{id}")
    Goods findGoodsById(@PathVariable("id") int id);
}
1
2
3
4
5
6
7
8
9
10
11
12
13
14
15
16
17
18
19
20注入 声明接口对象 调用接口方法
package com.itheima.consumer.controller;


import com.itheima.consumer.domain.Goods;
import com.itheima.consumer.feign.GoodsFeignClient;
import org.springframework.beans.factory.annotation.Autowired;
import org.springframework.web.bind.annotation.GetMapping;
import org.springframework.web.bind.annotation.PathVariable;
import org.springframework.web.bind.annotation.RequestMapping;
import org.springframework.web.bind.annotation.RestController;
import org.springframework.web.client.RestTemplate;

@RestController
@RequestMapping("/order")
public class OrderController {

    @Autowired
    private RestTemplate restTemplate;


    @Autowired
    private GoodsFeignClient goodsFeignClient;


    @GetMapping("/goods/{id}")
    public Goods findGoodsById(@PathVariable("id") int id){

        /*String url = "http://FEIGN-PROVIDER/goods/findOne/"+id;
        // 3. 调用方法
        Goods goods = restTemplate.getForObject(url, Goods.class);*/

        Goods goods = goodsFeignClient.findGoodsById(id);


        return goods;
    }


}
1
2
3
4
5
6
7
8
9
10
11
12
13
14
15
16
17
18
19
20
21
22
23
24
25
26
27
28
29
30
31
32
33
34
35
36
37
38
39
# 超时设置
在 Spring Cloud 微服务架构中,大部分公司都是利用 OpenFeign 进行服务间的调用,而比较简单的业务使用默认配置是不会有多大问题的,但是如果是业务比较复杂,服务要进行比较繁杂的业务计算,那后台很有可能会出现 Read Timeout 这个异常,因此定制化配置超时时间就有必要了。
Feign 底层依赖于 Ribbon 实现负载均衡和远程调用
Ribbon 默认 1 秒超时
在 consumer 的配置文件中配置
spring:
  cloud:
    openfeign:
      client:
        config:
          default:
            #连接超时时间 默认为毫秒
                      connectTimeout: 3000
            #读取超时时间 默认为毫秒
                     readTimeout: 3000
2
3
4
5
6
7
8
9
10
# 重试机制
重试机制默认是关闭,需要开启 Retryer 功能
新建配置类
@Configuration
public class FeignConfig
{
    @Bean
    public Retryer myRetryer()
    {
        //return Retryer.NEVER_RETRY; //Feign默认配置是不走重试策略的

        //最大请求次数为3(1+2),初始间隔时间为100ms,重试间最大间隔时间为1s
        return new Retryer.Default(100,1,3);
    }
}
2
3
4
5
6
7
8
9
10
11
12
# HttpClient
OpenFeign 中 http client 如果不做特殊配置,OpenFeign 默认使用 JDK 自带的 HttpURLConnection 发送 HTTP 请求, 由于默认 HttpURLConnection 没有连接池、性能和效率比较低,如果采用默认,性能上不是太好,所以加到最大。
引入 httpclient5 依赖
<!-- httpclient5-->
<dependency>
    <groupId>org.apache.httpcomponents.client5</groupId>
    <artifactId>httpclient5</artifactId>
    <version>5.3</version>
</dependency>
<!-- feign-hc5-->
<dependency>
    <groupId>io.github.openfeign</groupId>
    <artifactId>feign-hc5</artifactId>
    <version>13.1</version>
</dependency>
2
3
4
5
6
7
8
9
10
11
12
开启 OpenFeign 中 httpclient5 的
#  Apache HttpClient5 配置开启
spring:
  cloud:
    openfeign:
      httpclient:
        hc5:
          enabled: true
2
3
4
5
6
7
# 请求 / 响应压缩
对请求和响应进行 GZIP 压缩
Spring Cloud OpenFeign 支持对请求和响应进行 GZIP 压缩,以减少通信过程中的性能损耗。
通过下面的两个参数设置,就能开启请求与相应的压缩功能:
spring.cloud.openfeign.compression.request.enabled=true

spring.cloud.openfeign.compression.response.enabled=true
2
3
细粒度化设置
对请求压缩做一些更细致的设置,比如下面的配置内容指定压缩的请求数据类型并设置了请求压缩的大小下限,
只有超过这个大小的请求才会进行压缩:
spring.cloud.openfeign.compression.request.enabled=true

spring.cloud.openfeign.compression.request.mime-types=text/xml,application/xml,application/json #触发压缩数据类型

spring.cloud.openfeign.compression.request.min-request-size=2048 #最小触发压缩的大小
2
3
4
5
# 日志记录
Feign 提供了日志打印功能,我们可以通过配置来调整日志级别,
从而了解 Feign 中 Http 请求的细节,
说白了就是对 Feign 接口的调用情况进行监控和输出
Feign 只能记录 debug 级别的日志信息
Feign 为我们提供了以下 4 种级别的日志
- NONE:默认的,不显示任何日志;
- BASIC:仅记录请求方法、URL、响应状态码及执行时间;
- HEADERS:除了 BASIC 中定义的信息之外,还有请求和响应的头信息;
- FULL:除了 HEADERS 中定义的信息之外,还有请求和响应的正文及元数据。
设置 consumer 的日志级别 为该路径下所有的类为 debug 级别
logging:
  level:
    com.itheima: debug # 键位类路径
1
2
3在 consumer 中定义配置类
package com.itheima.consumer.config;

import feign.Logger;
import org.springframework.context.annotation.Bean;
import org.springframework.context.annotation.Configuration;

@Configuration
public class FeignLogConfig {

    @Bean
    public Logger.Level level(){
        /**
         * NONE 不记录
         * BASIC 记录基本的请求行 响应状态码数据
         * HEADERS 记录基本的请求行 响应状态码数据  响应头信息
         * FULL 记录完整的信息
         */
        return Logger.Level.FULL;
    }
}
1
2
3
4
5
6
7
8
9
10
11
12
13
14
15
16
17
18
19
20在声明式接口中的 @FeignClient 注解 引入配置类
package com.itheima.consumer.feign;

import com.itheima.consumer.config.FeignLogConfig;
import com.itheima.consumer.domain.Goods;
import org.springframework.cloud.openfeign.FeignClient;
import org.springframework.web.bind.annotation.GetMapping;
import org.springframework.web.bind.annotation.PathVariable;

/**
 * feign声明式接口  发起远程调用的
 * 1.定义接口
 * 2.接口上添加 @FeignClient value属性为 应用名称   configuration 为日志配置类
 * 3.编写调用接口 接口的声明规则 和 提供方接口保持一致
 * 4.注入该接口对象 调用接口方法完成远程调用
 */

@FeignClient(value = "feign-provider",configuration = FeignLogConfig.class)
public interface GoodsFeignClient {
    @GetMapping("/goods/findOne/{id}")
    Goods findGoodsById(@PathVariable("id") int id);
}
1
2
3
4
5
6
7
8
9
10
11
12
13
14
15
16
17
18
19
20
21
# Hystrix 熔断器
Hystrix 是 Netflix 开源的一个延迟和容错库 用于隔离访问远程服务 第三方库 防止出现级联失败 (雪崩)
Hystrix 是一个用于处理分布式系统的延迟和容错的开源库,在分布式系统里,许多依赖不可避免的会调用失败,比如超时、异常等,Hystrix 能够保证在一个依赖出问题的情况下,不会导致整体服务失败,避免级联故障,以提高分布式系统的弹性。
雪崩:一个服务失败 导致整条链路的服务都失败的情况
- 隔离
- 线程池隔离 默认值
- 信号量隔离
- 降级
- 熔断
- 限流
# 服务方降级
当服务发生异常或调用超时,返回默认数据
在服务方导入坐标
<dependency>
    <groupId>org.springframework.cloud</groupId>
    <artifactId>spring-cloud-starter-netflix-hystrix</artifactId>
</dependency>
1
2
3
4在服务方启动类中加上 @EnableCircuitBreaker 注解
package com.itheima.provider;

import org.springframework.boot.SpringApplication;
import org.springframework.boot.autoconfigure.SpringBootApplication;
import org.springframework.cloud.client.circuitbreaker.EnableCircuitBreaker;
import org.springframework.cloud.netflix.eureka.EnableEurekaClient;

/**
 * 启动类
 */

@EnableEurekaClient //该注解 在新版本中可以省略
@SpringBootApplication

@EnableCircuitBreaker //开启Hystrix功能
public class ProviderApp {


    public static void main(String[] args) {
        SpringApplication.run(ProviderApp.class,args);
    }
}
1
2
3
4
5
6
7
8
9
10
11
12
13
14
15
16
17
18
19
20
21
22在服务方 controller 层 中定降级方法 (降级方法需要与原方法参数返回值一致), 并且在原方法中加上注解 @HystrixCommand (fallbackMethod = "降级方法名")
/**
     *降级
     *1.出现异常
     * 2.服务调用超时
     */

@GetMapping("/findOne/{id}")
@HystrixCommand(fallbackMethod = "findOne_fallback",commandProperties = {
    //设置Hystrix的超时时间默认为1000毫秒
    @HystrixProperty(name = "execution.isolation.thread.interruptOnTimeout",value = "3000")
})  //指定降级后调用的方法   commandProperties为设置指定规则
public Goods findOne(@PathVariable("id") int id){

    Goods goods = goodsService.findOne(id);

    goods.setTitle(goods.getTitle() + ":" + port);//将端口号,设置到了 商品标题上
    return goods;
}

/**
     * 定义降级方法
     * 1. 方法的返回值和参数要与原方法一致
     */
public Goods findOne_fallback(@PathVariable("id") int id){
    Goods goods = new Goods();
    goods.setTitle("降级了");
    return goods;
}
1
2
3
4
5
6
7
8
9
10
11
12
13
14
15
16
17
18
19
20
21
22
23
24
25
26
27
28
# 消费方降级
Feign 已经提供了 Hystrix 无需导入 Hystrix 坐标
在消费方配置文件中开启 Hystrix
feign:
  hystrix:
    enabled: true
# 开启 feign对hystrix的支持  默认为false
1
2
3
4定义声明式接口的实现类
package com.itheima.consumer.feign;

import com.itheima.consumer.domain.Goods;
import org.springframework.stereotype.Component;
/*
降级处理类
1.定义类实现feign客户端接口
2.使用@Component注解 加入IOC容器中

 */
@Component
public class GoodsFeignClientFallback implements GoodsFeignClient{
    @Override
    public Goods findGoodsById(int id) {
        Goods goods = new Goods();
        goods.setTitle("降级了");
        return goods;
    }
}
1
2
3
4
5
6
7
8
9
10
11
12
13
14
15
16
17
18
19在声明式接口 @FeignClient 注解 设置 fallback 属性为降级类的字节码
package com.itheima.consumer.feign;


import com.itheima.consumer.domain.Goods;
import org.springframework.cloud.openfeign.FeignClient;
import org.springframework.web.bind.annotation.GetMapping;
import org.springframework.web.bind.annotation.PathVariable;


@FeignClient(value = "HYSTRIX-PROVIDER",fallback = GoodsFeignClientFallback.class)
public interface GoodsFeignClient {


    @GetMapping("/goods/findOne/{id}")
    public Goods findGoodsById(@PathVariable("id") int id);

}
1
2
3
4
5
6
7
8
9
10
11
12
13
14
15
16
17
18
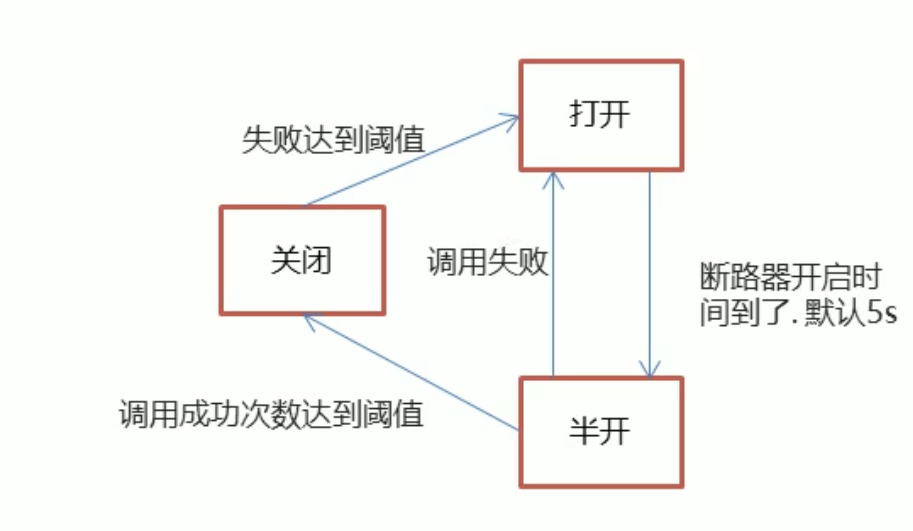
# 熔断机制
当降级的情况情况达到预定的阈值 (默认为 5 秒 20 次), 则会打开断路器,拒绝所有请求,直到服务恢复正常为止
@HystrixCommand(fallbackMethod = "findOne_fallback",commandProperties = {
//设置Hystrix的超时时间默认为1000毫秒
@HystrixProperty(name = "execution.isolation.thread.interruptOnTimeout",value = "3000"),
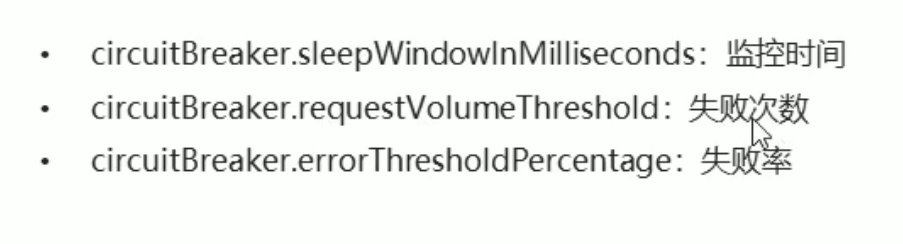
@HystrixProperty(name = "circuitBreaker.sleepWindowInMilliseconds",value = "5000"), //监控时间 默认为5000毫秒
@HystrixProperty(name = "circuitBreaker.requestVolumeThreshold",value = "20"), //失败次数 默认20次
@HystrixProperty(name = "circuitBreaker.errorThresholdPercentage",value = "50"), //失败率 默认为百分之50
}) //指定降级后调用的方法 commandProperties为设置指定规则
2
3
4
5
6
7
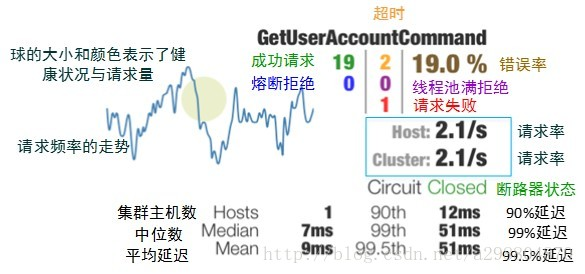
# Turbine 熔断监控
Hystrix 提供了 Hystrix-dashboard 功能 用于实时监控微服务运行状态 Hystrix-dashboard 只能监控一个微服务
Netflix 提供了 Turbine 进行聚合监控
新建模块并导入坐标
     <dependencies>
       <dependency>
           <groupId>org.springframework.cloud</groupId>
           <artifactId>spring-cloud-starter-netflix-hystrix-dashboard</artifactId>
       </dependency>
<dependency>
       <groupId>org.springframework.cloud</groupId>
       <artifactId>spring-cloud-starter-netflix-turbine</artifactId>
   </dependency>

   <dependency>
       <groupId>org.springframework.boot</groupId>
       <artifactId>spring-boot-starter-actuator</artifactId>
   </dependency>

   <dependency>
       <groupId>org.springframework.cloud</groupId>
       <artifactId>spring-cloud-starter-netflix-eureka-client</artifactId>
   </dependency>
<dependency>
        <groupId>org.springframework.boot</groupId>
        <artifactId>spring-boot-starter-test</artifactId>
        <scope>test</scope>
    </dependency>
</dependencies>

<build>
    <plugins>
        <plugin>
            <groupId>org.springframework.boot</groupId>
            <artifactId>spring-boot-maven-plugin</artifactId>
        </plugin>
    </plugins>
</build>
1
2
3
4
5
6
7
8
9
10
11
12
13
14
15
16
17
18
19
20
21
22
23
24
25
26
27
28
29
30
31
32
33
34创建 application.yml
spring:
  application.name: hystrix-monitor
server:
  port: 8769
turbine:
  combine-host-port: true
  # 配置需要监控的服务名称列表
  app-config: hystrix-provider,hystrix-consumer
  cluster-name-expression: "'default'"
  aggregator:
    cluster-config: default
  #instanceUrlSuffix: /actuator/hystrix.stream
eureka:
  client:
    serviceUrl:
      defaultZone: http://localhost:8761/eureka/
1
2
3
4
5
6
7
8
9
10
11
12
13
14
15
16
17创建启动类
package com.itheima;


import org.springframework.boot.SpringApplication;
import org.springframework.boot.autoconfigure.SpringBootApplication;
import org.springframework.cloud.netflix.eureka.EnableEurekaClient;
import org.springframework.cloud.netflix.hystrix.dashboard.EnableHystrixDashboard;
import org.springframework.cloud.netflix.turbine.EnableTurbine;

@SpringBootApplication
@EnableEurekaClient

@EnableTurbine //开启Turbine 很聚合监控功能
@EnableHystrixDashboard //开启Hystrix仪表盘监控功能
public class HystrixMonitorApp {

    public static void main(String[] args) {
        SpringApplication.run(HystrixMonitorApp.class, args);
    }

}
1
2
3
4
5
6
7
8
9
10
11
12
13
14
15
16
17
18
19
20
21修改被监控的模块 需要分别修改 hystrix-provider 和 hystrix-consumer 模块
导入坐标
		<dependency>
            <groupId>org.springframework.boot</groupId>
            <artifactId>spring-boot-starter-actuator</artifactId>
        </dependency>

        <dependency>
            <groupId>org.springframework.cloud</groupId>
            <artifactId>spring-cloud-starter-netflix-hystrix</artifactId>
        </dependency>

        <dependency>
            <groupId>org.springframework.cloud</groupId>
            <artifactId>spring-cloud-starter-netflix-hystrix-dashboard</artifactId>
        </dependency>
1
2
3
4
5
6
7
8
9
10
11
12
13
14配置 Bean
@Bean
    public ServletRegistrationBean getServlet() {
        HystrixMetricsStreamServlet streamServlet = new HystrixMetricsStreamServlet();
        ServletRegistrationBean registrationBean = new ServletRegistrationBean(streamServlet);
        registrationBean.setLoadOnStartup(1);
        registrationBean.addUrlMappings("/actuator/hystrix.stream");
        registrationBean.setName("HystrixMetricsStreamServlet");
        return registrationBean;
    }
1
2
3
4
5
6
7
8
9在启动类上添加注解 @EnableHystrixDashboard
package com.itheima.provider;

import com.netflix.hystrix.contrib.metrics.eventstream.HystrixMetricsStreamServlet;
import org.springframework.boot.SpringApplication;
import org.springframework.boot.autoconfigure.SpringBootApplication;
import org.springframework.boot.web.servlet.ServletRegistrationBean;
import org.springframework.cloud.client.circuitbreaker.EnableCircuitBreaker;
import org.springframework.cloud.netflix.eureka.EnableEurekaClient;
import org.springframework.cloud.netflix.hystrix.dashboard.EnableHystrixDashboard;
import org.springframework.context.annotation.Bean;

/**
 * 启动类
 */

@EnableEurekaClient //该注解 在新版本中可以省略
@SpringBootApplication

@EnableCircuitBreaker //开启Hystrix功能
@EnableHystrixDashboard
public class ProviderApp {


    public static void main(String[] args) {
        SpringApplication.run(ProviderApp.class, args);
    }

    @Bean
    public ServletRegistrationBean getServlet() {
        HystrixMetricsStreamServlet streamServlet = new HystrixMetricsStreamServlet();
        ServletRegistrationBean registrationBean = new ServletRegistrationBean(streamServlet);
        registrationBean.setLoadOnStartup(1);
        registrationBean.addUrlMappings("/actuator/hystrix.stream");
        registrationBean.setName("HystrixMetricsStreamServlet");
        return registrationBean;
    }
}
1
2
3
4
5
6
7
8
9
10
11
12
13
14
15
16
17
18
19
20
21
22
23
24
25
26
27
28
29
30
31
32
33
34
35
36
37
启动服务
- eureka-server
- hystrix-provider
- hystrix-consumer
- hystrix-monitor
访问 http://localhost:8769/hystrix/
监控 Url 地址为 http://localhost:8769/turbine.stream
记得访问一次 接口否则没有数据
# CircuitBreaker 断路器
由于 Htsirix 目前也进入维护模式,Hystrix 未来替换方案 Resilience4j
CircuitBreaker 的目的是保护分布式系统免受故障和异常,提高系统的可用性和健壮性。
当一个组件或服务出现故障时,CircuitBreaker 会迅速切换到开放 OPEN 状态 (保险丝跳闸断电),阻止请求发送到该组件或服务从而避免更多的请求发送到该组件或服务。这可以减少对该组件或服务的负载,防止该组件或服务进一步崩溃,并使整个系统能够继续正常运行。同时,CircuitBreaker 还可以提高系统的可用性和健壮性,因为它可以在分布式系统的各个组件之间自动切换,从而避免单点故障的问题。
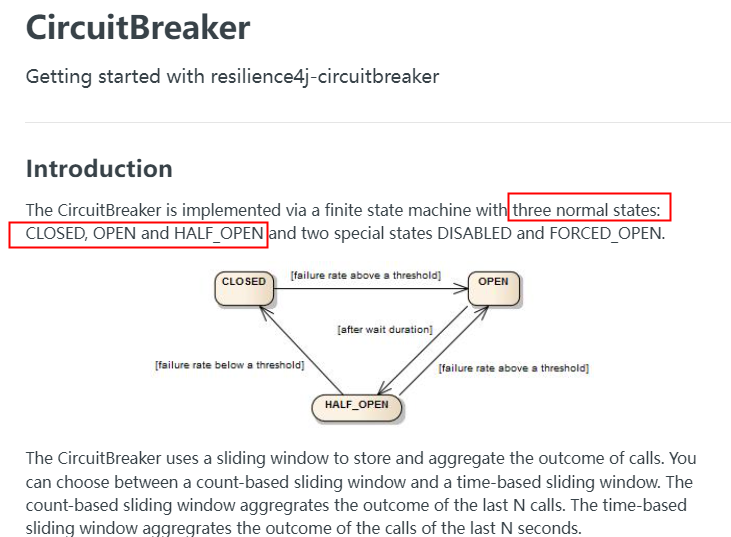
Circuit Breaker 只是一套规范和接口,落地实现者是 Resilience4J
# 服务熔断
导入依赖
<!--resilience4j-circuitbreaker-->
<dependency>
    <groupId>org.springframework.cloud</groupId>
    <artifactId>spring-cloud-starter-circuitbreaker-resilience4j</artifactId>
</dependency>
<!-- 由于断路保护等需要AOP实现,所以必须导入AOP包 -->
<dependency>
    <groupId>org.springframework.boot</groupId>
    <artifactId>spring-boot-starter-aop</artifactId>
</dependency>
2
3
4
5
6
7
8
9
10
修改配置
# Resilience4j CircuitBreaker 按照次数:COUNT_BASED 的例子
#  6次访问中当执行方法的失败率达到50%时CircuitBreaker将进入开启OPEN状态(保险丝跳闸断电)拒绝所有请求。
#  等待5秒后,CircuitBreaker 将自动从开启OPEN状态过渡到半开HALF_OPEN状态,允许一些请求通过以测试服务是否恢复正常。
#  如还是异常CircuitBreaker 将重新进入开启OPEN状态;如正常将进入关闭CLOSE闭合状态恢复正常处理请求。
resilience4j:
  circuitbreaker:
    configs:
      default:
        failureRateThreshold: 50 #设置50%的调用失败时打开断路器,超过失败请求百分⽐CircuitBreaker变为OPEN状态。
                slidingWindowType: COUNT_BASED # 滑动窗口的类型
                slidingWindowSize: 6 #滑动窗⼝的⼤⼩配置COUNT_BASED表示6个请求,配置TIME_BASED表示6秒
                minimumNumberOfCalls: 6 #断路器计算失败率或慢调用率之前所需的最小样本(每个滑动窗口周期)。如果minimumNumberOfCalls为10,则必须最少记录10个样本,然后才能计算失败率。如果只记录了9次调用,即使所有9次调用都失败,断路器也不会开启。
                automaticTransitionFromOpenToHalfOpenEnabled: true # 是否启用自动从开启状态过渡到半开状态,默认值为true。如果启用,CircuitBreaker将自动从开启状态过渡到半开状态,并允许一些请求通过以测试服务是否恢复正常
                waitDurationInOpenState: 5s #从OPEN到HALF_OPEN状态需要等待的时间
                permittedNumberOfCallsInHalfOpenState: 2 #半开状态允许的最大请求数,默认值为10。在半开状态下,CircuitBreaker将允许最多permittedNumberOfCallsInHalfOpenState个请求通过,如果其中有任何一个请求失败,CircuitBreaker将重新进入开启状态。
                recordExceptions:
          - java.lang.Exception
    instances:
      cloud-payment-service:
        baseConfig: default
2
3
4
5
6
7
8
9
10
11
12
13
14
15
16
17
18
19
20
断路器配置参数
| failure-rate-threshold | 以百分比配置失败率峰值 |
|---|---|
| sliding-window-type | 断路器的滑动窗口期类型 可以基于 “次数”(COUNT_BASED)或者 “时间”(TIME_BASED)进行熔断,默认是 COUNT_BASED。 |
| sliding-window-size | ** 若 COUNT_BASED,则 10 次调用中有 50% 失败(即 5 次)打开熔断断路器;** 若为 TIME_BASED 则,此时还有额外的两个设置属性,含义为:在 N 秒内(sliding-window-size)100%(slow-call-rate-threshold)的请求超过 N 秒(slow-call-duration-threshold)打开断路器。 |
| slowCallRateThreshold | 以百分比的方式配置,断路器把调用时间大于 slowCallDurationThreshold 的调用视为慢调用,当慢调用比例大于等于峰值时,断路器开启,并进入服务降级。 |
| slowCallDurationThreshold | 配置调用时间的峰值,高于该峰值的视为慢调用。 |
| permitted-number-of-calls-in-half-open-state | 运行断路器在 HALF_OPEN 状态下时进行 N 次调用,如果故障或慢速调用仍然高于阈值,断路器再次进入打开状态。 |
| minimum-number-of-calls | 在每个滑动窗口期样本数,配置断路器计算错误率或者慢调用率的最小调用数。比如设置为 5 意味着,在计算故障率之前,必须至少调用 5 次。如果只记录了 4 次,即使 4 次都失败了,断路器也不会进入到打开状态。 |
| wait-duration-in-open-state | 从 OPEN 到 HALF_OPEN 状态需要等待的时间 |
Controller 层
@RestController
public class PayCircuitController
{
    //=========Resilience4j CircuitBreaker 的例子
    @GetMapping(value = "/pay/circuit/{id}")
    public String myCircuit(@PathVariable("id") Integer id)
    {
        if(id == -4) throw new RuntimeException("----circuit id 不能负数");
        if(id == 9999){
            try { TimeUnit.SECONDS.sleep(5); } catch (InterruptedException e) { e.printStackTrace(); }
        }
        return "Hello, circuit! inputId:  "+id+" \t " + IdUtil.simpleUUID();
    }
}
2
3
4
5
6
7
8
9
10
11
12
13
14
通过 @CircuitBreaker 注解标记该方法熔断
@RestController
public class OrderCircuitController{
    @Resource
    private PayFeignApi payFeignApi;

    @GetMapping(value = "/feign/pay/circuit/{id}")
    @CircuitBreaker(name = "cloud-payment-service", fallbackMethod = "myCircuitFallback")
    public String myCircuitBreaker(@PathVariable("id") Integer id)
    {
        return payFeignApi.myCircuit(id);
    }

    //myCircuitFallback就是服务降级后的兜底处理方法
    public String myCircuitFallback(Integer id,Throwable t) {
    // 这里是容错处理逻辑,返回备用结果
    return "myCircuitFallback,系统繁忙,请稍后再试-----/(ㄒoㄒ)/~~";
    }
}
2
3
4
5
6
7
8
9
10
11
12
13
14
15
16
17
18
我们也可以调用基于时间的滑动窗口策略
resilience4j:
  timelimiter:
    configs:
      default:
        timeout-duration: 10s #神坑的位置,timelimiter 默认限制远程1s,超于1s就超时异常,配置了降级,就走降级逻辑
  circuitbreaker:
    configs:
      default:
        failureRateThreshold: 50 #设置50%的调用失败时打开断路器,超过失败请求百分⽐CircuitBreaker变为OPEN状态。
        slowCallDurationThreshold: 2s #慢调用时间阈值,高于这个阈值的视为慢调用并增加慢调用比例。
        slowCallRateThreshold: 30 #慢调用百分比峰值,断路器把调用时间⼤于slowCallDurationThreshold,视为慢调用,当慢调用比例高于阈值,断路器打开,并开启服务降级
        slidingWindowType: TIME_BASED # 滑动窗口的类型
        slidingWindowSize: 2 #滑动窗口的大小配置,配置TIME_BASED表示2秒
        minimumNumberOfCalls: 2 #断路器计算失败率或慢调用率之前所需的最小样本(每个滑动窗口周期)。
        permittedNumberOfCallsInHalfOpenState: 2 #半开状态允许的最大请求数,默认值为10。
        waitDurationInOpenState: 5s #从OPEN到HALF_OPEN状态需要等待的时间
        recordExceptions:
          - java.lang.Exception
    instances:
      cloud-payment-service:
        baseConfig: default
2
3
4
5
6
7
8
9
10
11
12
13
14
15
16
17
18
19
20
21
断路器开启和关闭的条件
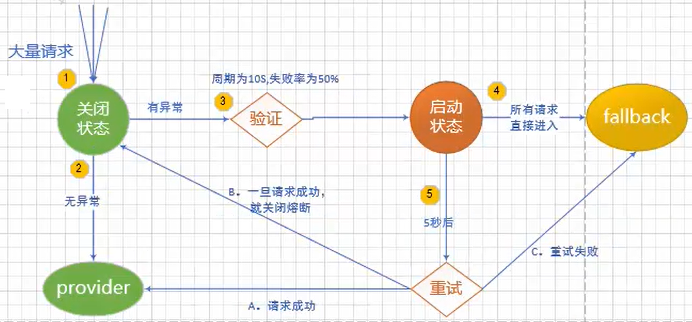
- 当满足一定的峰值和失败率达到一定条件后,断路器将会进入 OPEN 状态(保险丝跳闸),服务熔断
- 当 OPEN 的时候,所有请求都不会调用主业务逻辑方法,而是直接走 fallbackmetnod 兜底背锅方法,服务降级
- 一段时间之后,这个时候断路器会从 OPEN 进入到 HALF OPEN 半开状态,会放几个请求过去探探链路是否通?如成功,断路器会关闭 CLOSE (类似保险丝闭合,恢复可用):如失败,继续开启。重复上述
# 隔离
bulkhead (船的) 舱壁 /(飞机的) 隔板,隔板来自造船行业,床仓内部一般会分成很多小隔舱,一旦一个隔舱漏水因为隔板的存在而不至于影响其它隔舱和整体船。

依赖隔离 & 负载保护:用来限制对于下游服务的最大并发数量的限制
Resilience4 提供了如下两种隔离的实现方式,可以限制并发执行的数量
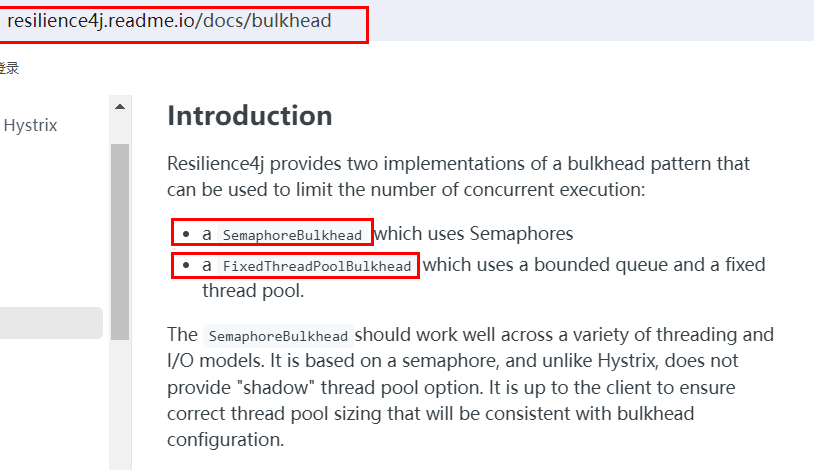
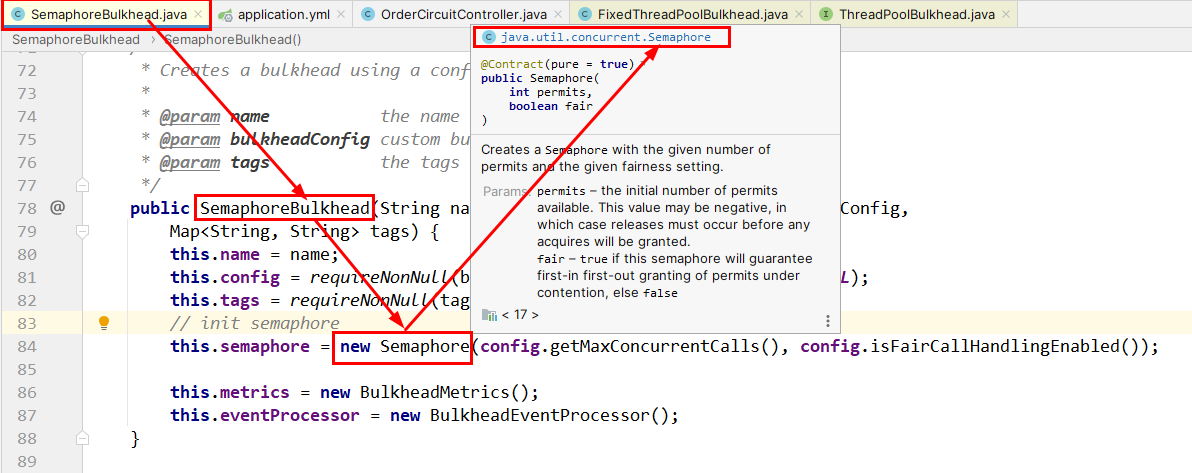
# 信号量舱壁
基本上就是我们 JUC 信号灯内容的同样思想
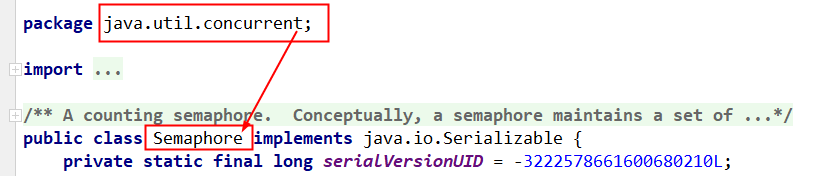
信号量舱壁(SemaphoreBulkhead)原理
当信号量有空闲时,进入系统的请求会直接获取信号量并开始业务处理。
当信号量全被占用时,接下来的请求将会进入阻塞状态,SemaphoreBulkhead 提供了一个阻塞计时器,
如果阻塞状态的请求在阻塞计时内无法获取到信号量则系统会拒绝这些请求。
若请求在阻塞计时内获取到了信号量,那将直接获取信号量并执行相应的业务处理。
导入依赖
<!--resilience4j-bulkhead-->
<dependency>
    <groupId>io.github.resilience4j</groupId>
    <artifactId>resilience4j-bulkhead</artifactId>
</dependency>
2
3
4
5
修改配置
####resilience4j bulkhead 的例子
resilience4j:
  bulkhead:
    configs:
      default:
        maxConcurrentCalls: 2 # 隔离允许并发线程执行的最大数量
                maxWaitDuration: 1s # 当达到并发调用数量时,新的线程的阻塞时间,我只愿意等待1秒,过时不候进舱壁兜底fallback
    instances:
      cloud-payment-service:
        baseConfig: default
  timelimiter:
    configs:
      default:
        timeout-duration: 20s
2
3
4
5
6
7
8
9
10
11
12
13
14
通过 @Bulkhead 注解开启隔离
/**
 *(船的)舱壁,隔离
 * @param id
 * @return
 */
@GetMapping(value = "/feign/pay/bulkhead/{id}")
@Bulkhead(name = "cloud-payment-service",fallbackMethod = "myBulkheadFallback",type = Bulkhead.Type.SEMAPHORE)
public String myBulkhead(@PathVariable("id") Integer id)
{
    return payFeignApi.myBulkhead(id);
}
public String myBulkheadFallback(Throwable t)
{
    return "myBulkheadFallback,隔板超出最大数量限制,系统繁忙,请稍后再试-----/(ㄒoㄒ)/~~";
}
2
3
4
5
6
7
8
9
10
11
12
13
14
15
浏览器新打开 2 个窗口,各点一次,分别点击 http://localhost/feign/pay/bulkhead/9999
每个请求调用需要耗时 5 秒,2 个线程瞬间达到配置过的最大并发数 2
此时第 3 个请求正常的请求访问,http://localhost/feign/pay/bulkhead/3
直接被舱壁限制隔离了,碰不到 8001
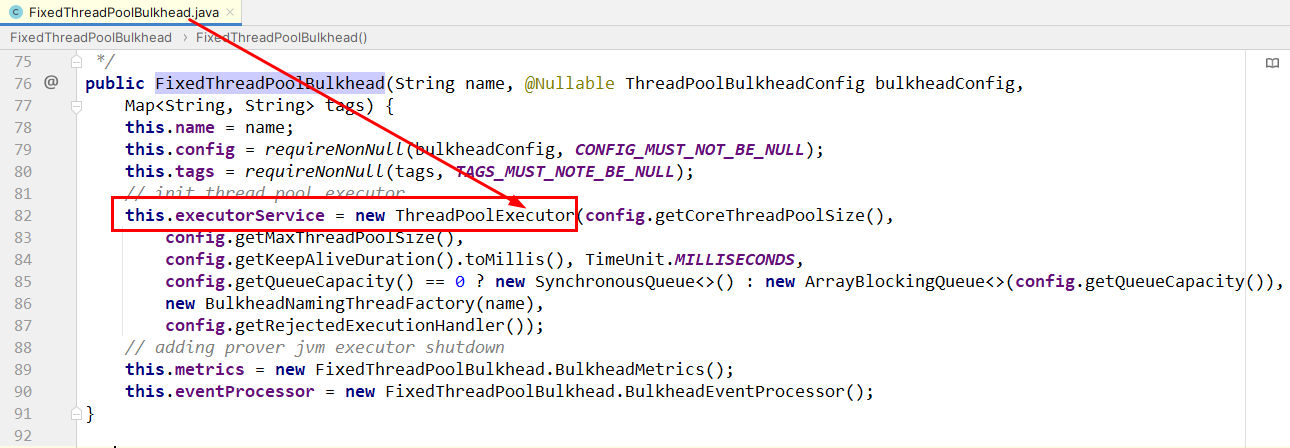
# 固定线程池舱壁

固定线程池舱壁(FixedThreadPoolBulkhead)
FixedThreadPoolBulkhead 的功能与 SemaphoreBulkhead 一样也是用于限制并发执行的次数的,但是二者的实现原理存在差别而且表现效果也存在细微的差别。FixedThreadPoolBulkhead 使用一个固定线程池和一个等待队列来实现舱壁。
当线程池中存在空闲时,则此时进入系统的请求将直接进入线程池开启新线程或使用空闲线程来处理请求。
当线程池中无空闲时时,接下来的请求将进入等待队列,
若等待队列仍然无剩余空间时接下来的请求将直接被拒绝,
在队列中的请求等待线程池出现空闲时,将进入线程池进行业务处理。
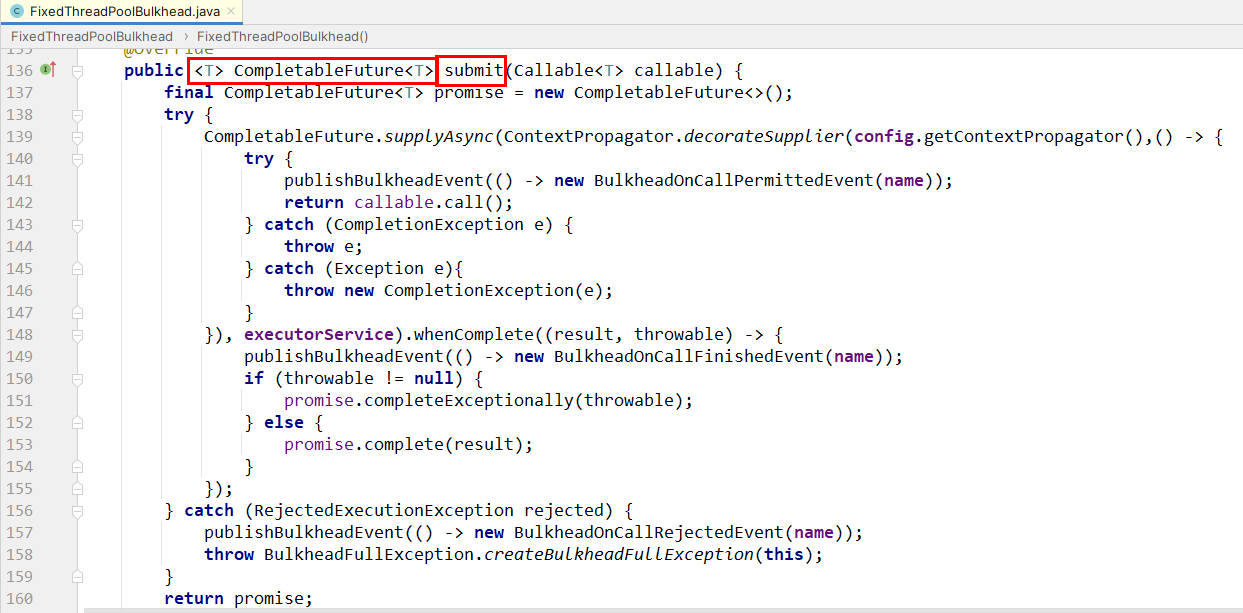
另外:ThreadPoolBulkhead 只对 CompletableFuture 方法有效,所以我们必创建返回 CompletableFuture 类型的方法
底层就是 JUC 里面的线程池 ThreadPoolExecutor
配置文件
####resilience4j bulkhead -THREADPOOL的例子
resilience4j:
  timelimiter:
    configs:
      default:
        timeout-duration: 10s #timelimiter默认限制远程1s,超过报错不好演示效果所以加上10秒
  thread-pool-bulkhead:
    configs:
      default:
        core-thread-pool-size: 1 # 线程池核心大小
        max-thread-pool-size: 1 # 最大线程大小
        queue-capacity: 1 # 队列容量
    instances:
      cloud-payment-service:
        baseConfig: default
# spring.cloud.openfeign.circuitbreaker.group.enabled 请设置为false 新启线程和原来主线程脱离
2
3
4
5
6
7
8
9
10
11
12
13
14
15
16
通过 @Bulkhead 注解开启隔离
/**
 * (船的)舱壁,隔离,THREADPOOL
 * @param id
 * @return
 */
@GetMapping(value = "/feign/pay/bulkhead/{id}")
@Bulkhead(name = "cloud-payment-service",fallbackMethod = "myBulkheadPoolFallback",type = Bulkhead.Type.THREADPOOL)
public CompletableFuture<String> myBulkheadTHREADPOOL(@PathVariable("id") Integer id)
{
    System.out.println(Thread.currentThread().getName()+"\t"+"enter the method!!!");
    try { TimeUnit.SECONDS.sleep(3); } catch (InterruptedException e) { e.printStackTrace(); }
    System.out.println(Thread.currentThread().getName()+"\t"+"exist the method!!!");

    return CompletableFuture.supplyAsync(() -> payFeignApi.myBulkhead(id) + "\t" + " Bulkhead.Type.THREADPOOL");
}
public CompletableFuture<String> myBulkheadPoolFallback(Integer id,Throwable t)
{
    return CompletableFuture.supplyAsync(() -> "Bulkhead.Type.THREADPOOL,系统繁忙,请稍后再试-----/(ㄒoㄒ)/~~");
}
2
3
4
5
6
7
8
9
10
11
12
13
14
15
16
17
18
19
# 限流
限流 就是限制最大访问流量。系统能提供的最大并发是有限的,同时来的请求又太多,就需要限流。
比如商城秒杀业务,瞬时大量请求涌入,服务器忙不过就只好排队限流了,和去景点排队买票和去医院办理业务排队等号道理相同。
所谓限流,就是通过对并发访问 / 请求进行限速,或者对一个时间窗口内的请求进行限速,以保护应用系统,一旦达到限制速率则可以拒绝服务、排队或等待、降级等处理。
# 常见的限流算法
# 漏斗算法
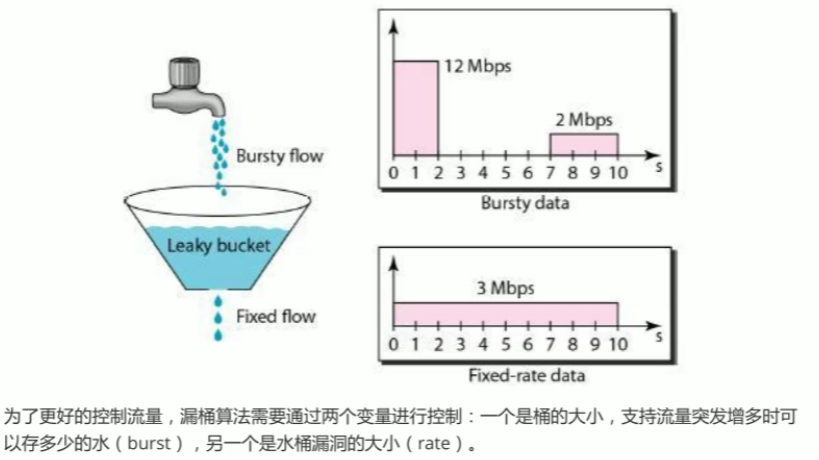
漏桶算法
一个固定容量的漏桶,按照设定常量固定速率流出水滴,类似医院打吊针,不管你源头流量多大,我设定匀速流出。
如果流入水滴超出了桶的容量,则流入的水滴将会溢出了 (被丢弃),而漏桶容量是不变的。
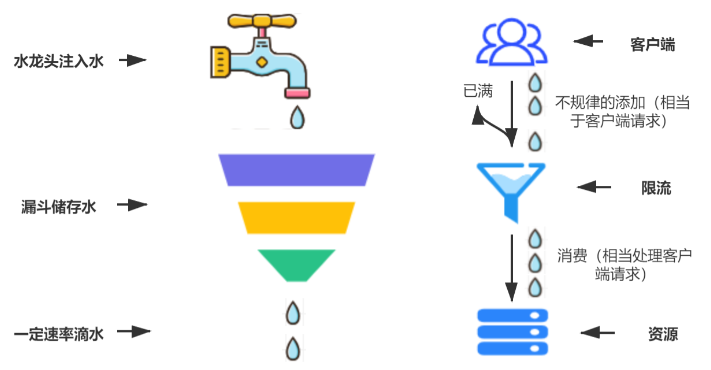
这里有两个变量,一个是桶的大小,支持流量突发增多时可以存多少的水(burst),另一个是水桶漏洞的大小(rate)。因为漏桶的漏出速率是固定的参数,所以,即使网络中不存在资源冲突(没有发生拥塞),漏桶算法也不能使流突发(burst)到端口速率。因此,漏桶算法对于存在突发特性的流量来说缺乏效率。
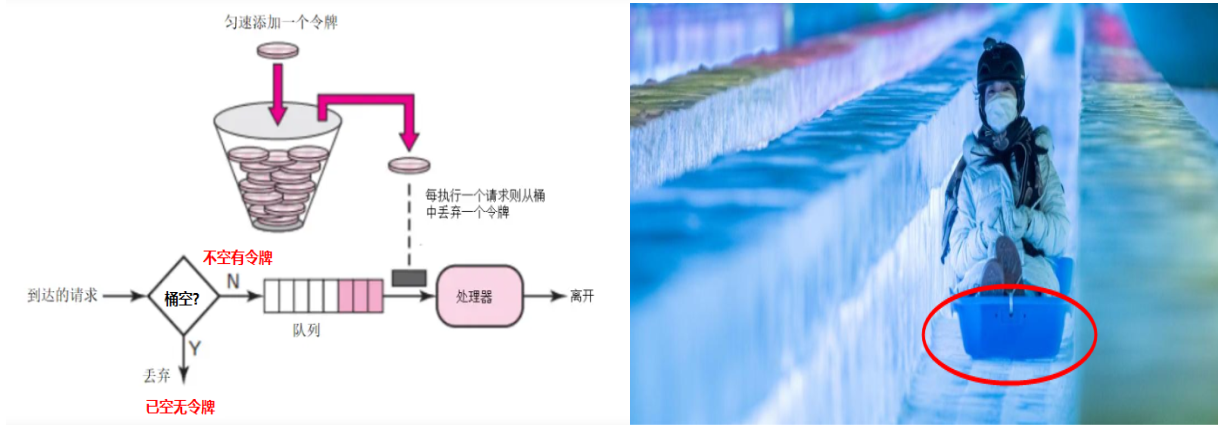
# 令牌桶算法
# 滚动时间窗口
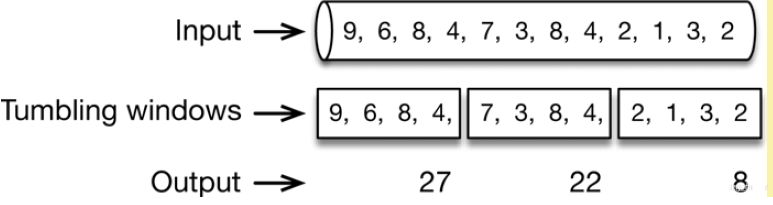
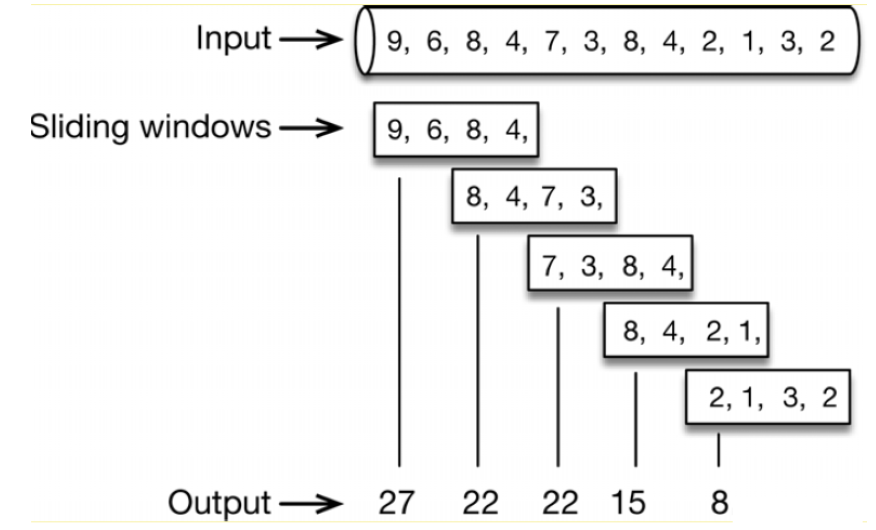
滚动时间窗 (tumbling time window)
允许固定数量的请求进入 (比如 1 秒取 4 个数据相加,超过 25 值就 over) 超过数量就拒绝或者排队,等下一个时间段进入。
由于是在一个时间间隔内进行限制,如果用户在上个时间间隔结束前请求(但没有超过限制),同时在当前时间间隔刚开始请求(同样没超过限制),在各自的时间间隔内,这些请求都是正常的。下图统计了 3 次,but......
由于计数器算法存在时间临界点缺陷,因此在时间临界点左右的极短时间段内容易遭到攻击。
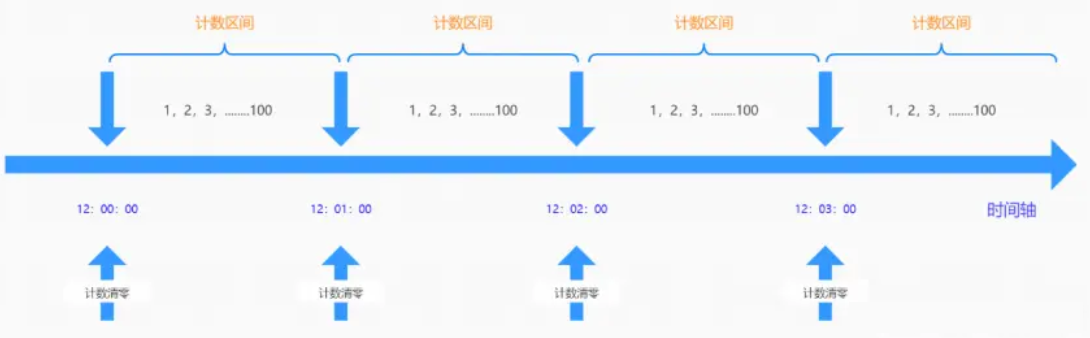
假如设定 1 分钟最多可以请求 100 次某个接口,如 12:00:00-12:00:59 时间段内没有数据请求但 12:00:59-12:01:00 时间段内突然并发 100 次请求,紧接着瞬间跨入下一个计数周期计数器清零;在 12:01:00-12:01:01 内又有 100 次请求。那么也就是说在时间临界点左右可能同时有 2 倍的峰值进行请求,从而造成后台处理请求加倍过载的 bug,导致系统运营能力不足,甚至导致系统崩溃
# 滑动时间窗口
滑动时间窗口(sliding time window)
顾名思义,该时间窗口是滑动的。所以,从概念上讲,这里有两个方面的概念需要理解:
- 窗口:需要定义窗口的大小
- 滑动:需要定义在窗口中滑动的大小,但理论上讲滑动的大小不能超过窗口大小
滑动窗口算法是把固定时间片进行划分并且随着时间移动,移动方式为开始时间点变为时间列表中的第 2 个时间点,结束时间点增加一个时间点,
不断重复,通过这种方式可以巧妙的避开计数器的临界点的问题。下图统计了 5 次
导入依赖
<!--resilience4j-ratelimiter-->
<dependency>
    <groupId>io.github.resilience4j</groupId>
    <artifactId>resilience4j-ratelimiter</artifactId>
</dependency>
2
3
4
5
配置文件
####resilience4j ratelimiter 限流的例子
resilience4j:
  ratelimiter:
    configs:
      default:
        limitForPeriod: 2 #在一次刷新周期内,允许执行的最大请求数
        limitRefreshPeriod: 1s # 限流器每隔limitRefreshPeriod刷新一次,将允许处理的最大请求数量重置为limitForPeriod
        timeout-duration: 1 # 线程等待权限的默认等待时间
    instances:
        cloud-payment-service:
          baseConfig: default
2
3
4
5
6
7
8
9
10
11
通过 @RateLimiter 注解进行限流
@GetMapping(value = "/feign/pay/ratelimit/{id}")
@RateLimiter(name = "cloud-payment-service",fallbackMethod = "myRatelimitFallback")
public String myBulkhead(@PathVariable("id") Integer id)
{
    return payFeignApi.myRatelimit(id);
}
public String myRatelimitFallback(Integer id,Throwable t)
{
    return "你被限流了,禁止访问/(ㄒoㄒ)/~~";
}
2
3
4
5
6
7
8
9
10
# Gateway 网关
网关是为微服务架构提供一种简单而有效的统一的 API 路由管理方式
Gateway 是在 Spring 生态系统之上构建的 API 网关服务,基于 Spring6,Spring Boot 3 和 Project Reactor 等技术。它旨在为微服务架构提供一种简单有效的统一的 API 路由管理方式,并为它们提供跨领域的关注点,例如:安全性、监控 / 度量和恢复能力。
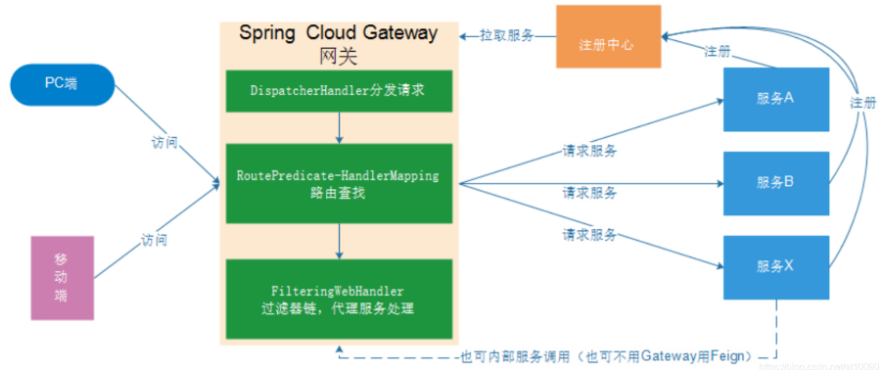
Cloud 全家桶中有个很重要的组件就是网关,在 1.x 版本中都是采用的 Zuul 网关;
但在 2.x 版本中,zuul 的升级一直跳票,SpringCloud 最后自己研发了一个网关 SpringCloud Gateway 替代 Zuul,
那就是 SpringCloud Gateway 一句话:gateway 是原 zuul1.x 版的替代
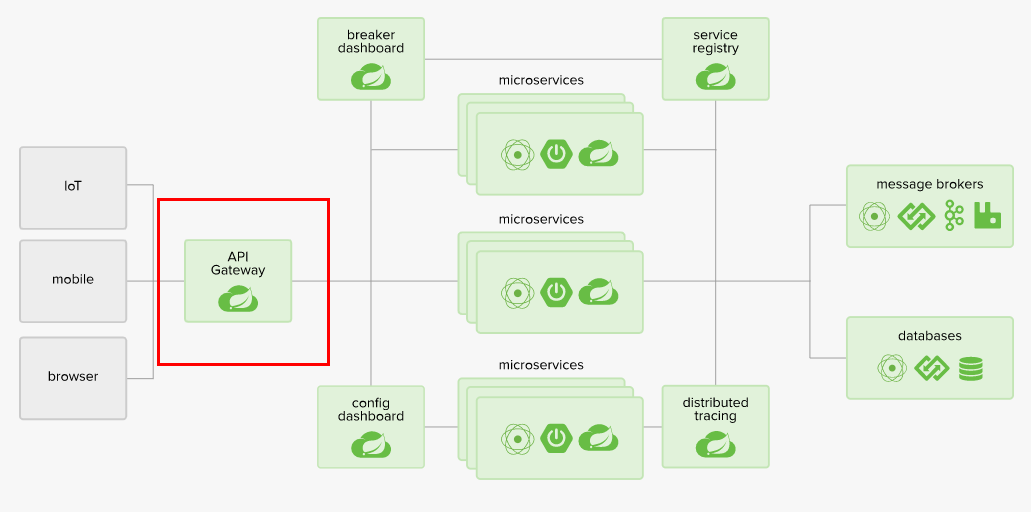
Spring Cloud Gateway 组件的核心是一系列的过滤器,通过这些过滤器可以将客户端发送的请求转发 (路由) 到对应的微服务。 Spring Cloud Gateway 是加在整个微服务最前沿的防火墙和代理器,隐藏微服务结点 IP 端口信息,从而加强安全保护。Spring Cloud Gateway 本身也是一个微服务,需要注册进服务注册中心。
# 核心逻辑
客户端向 Spring Cloud Gateway 发出请求。然后在 Gateway Handler Mapping 中找到与请求相匹配的路由,将其发送到 Gateway Web Handler。Handler 再通过指定的过滤器链来将请求发送到我们实际的服务执行业务逻辑,然后返回。
过滤器之间用虚线分开是因为过滤器可能会在发送代理请求之前 (Pre) 或之后 (Post) 执行业务逻辑。
在 “pre” 类型的过滤器可以做参数校验、权限校验、流量监控、日志输出、协议转换等;
在 “post” 类型的过滤器中可以做响应内容、响应头的修改,日志的输出,流量监控等有着非常重要的作用。
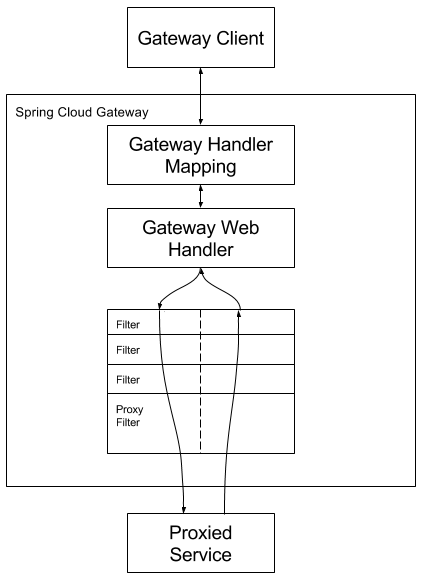
路由转发 + 断言判断 + 执行过滤器链
# 入门案例
创建 gateway 模块 导入坐标
    <dependencies>
        <!--引入gateway 网关-->

        <dependency>
            <groupId>org.springframework.cloud</groupId>
            <artifactId>spring-cloud-starter-gateway</artifactId>
        </dependency>

        <!-- eureka-client -->
        <dependency>
            <groupId>org.springframework.cloud</groupId>
            <artifactId>spring-cloud-starter-netflix-eureka-client</artifactId>
        </dependency>
    </dependencies>
1
2
3
4
5
6
7
8
9
10
11
12
13
14创建启动类
package com.itheima.gateway;

import org.springframework.boot.SpringApplication;
import org.springframework.boot.autoconfigure.SpringBootApplication;
import org.springframework.cloud.netflix.eureka.EnableEurekaClient;

@SpringBootApplication
@EnableEurekaClient
public class ApiGatewayApp {
    public static void main(String[] args) {
        SpringApplication.run(ApiGatewayApp.class, args);
    }
}
1
2
3
4
5
6
7
8
9
10
11
12
13编写 application.yml
server:
  port: 80
spring:
  application:
    name: api-geteway-server
  cloud:
    # 网关配置
    gateway:
      # 路由配置: 转发规则
      routes: # 集合
      - id: gateway-provider # 唯一标识 默认为随机UUID
        uri: http://localhost:8001/  #  转发路径  服务提供方访问路径
        predicates: # 条件 用于请求网关路径的匹配规则
        - Path=/goods/** # 断言,路径相匹配的进行路由
1
2
3
4
5
6
7
8
9
10
11
12
13
14启动模块和服务治理 服务提供方 消费方 只要访问 http://localhost:80/goods/* 地址则转发为
http://localhost:8001/goods/*
# 静态路由
通过 routes 转发规则 配置多个集合对象
server:
  port: 80
spring:
  application:
    name: api-geteway-server
  cloud:
    # 网关配置
    gateway:
      # 路由配置: 转发规则
      routes: # 集合
      - id: gateway-provider # 唯一标识 默认为随机UUID
        uri: http://localhost:8001/  #  转发路径  服务提供方访问路径
        predicates: # 条件 用于请求网关路径的匹配规则
        - Path=/goods/**

      - id: gateway-consumer # 转发规则2
        uri: http://localhost:9000/  #  转发路径  服务提供方访问路径
        predicates: # 条件 用于请求网关路径的匹配规则
        - Path=/order/**
2
3
4
5
6
7
8
9
10
11
12
13
14
15
16
17
18
19
但不推荐此方法配置
# 动态路由
从 eureka 动态获取
引入 eureka client 并在启动类中加上 @EnableEurekaClient 注解
配置 eureka 服务地址 并将 Gateway 的 uri 改成 lb:// 应用名称
server:
  port: 80
spring:
  application:
    name: api-geteway-server
  cloud:
    # 网关配置
    gateway:
      # 路由配置: 转发规则
      routes: # 集合
      - id: gateway-provider # 唯一标识 默认为随机UUID
#        uri: http://localhost:8001/  #  转发路径  服务提供方访问路径
        uri: lb://gateway-provider
        predicates: # 条件 用于请求网关路径的匹配规则
        - Path=/goods/**

      - id: gateway-consumer # 转发规则2
#          uri: http://localhost:9000/  #  转发路径  服务提供方访问路径
        uri: lb://gateway-consumer
        predicates: # 条件 用于请求网关路径的匹配规则
        - Path=/order/**

eureka:
  client:
    service-url:
      defaultZone: http://localhost:8761/eureka
1
2
3
4
5
6
7
8
9
10
11
12
13
14
15
16
17
18
19
20
21
22
23
24
25
26
# 微服务名称配置
Gateway 网关中 默认不启用由 Eureka 应用名拼接的 URL 转发访问
我们通过 sping.cloud.discovery.locator.enabled 开启之后
可以通过 http://localhost/gateway-consumer/order/goods/2 来转发访问 方便我们更好的区分应用 当然 http://localhost/order/goods/2 不加应用名称拼接也是可以转发访问
server:
  port: 80
spring:
  application:
    name: api-geteway-server
  cloud:
    # 网关配置
    gateway:
      # 路由配置: 转发规则
      routes: # 集合
      - id: gateway-provider # 唯一标识 默认为随机UUID
#        uri: http://localhost:8001/  #  转发路径  服务提供方访问路径
        uri: lb://gateway-provider
        predicates: # 条件 用于请求网关路径的匹配规则
        - Path=/goods/**

      - id: gateway-consumer # 转发规则2
#          uri: http://localhost:9000/  #  转发路径  服务提供方访问路径
        uri: lb://gateway-consumer
        predicates: # 条件 用于请求网关路径的匹配规则
        - Path=/order/**
      discovery:
        locator:
          enabled: true  # 开启微服务发现功能
          lower-case-service-id: true # 请求路径上的应用名称允许小写

eureka:
  client:
    service-url:
      defaultZone: http://localhost:8761/eureka
2
3
4
5
6
7
8
9
10
11
12
13
14
15
16
17
18
19
20
21
22
23
24
25
26
27
28
29
30
# 断言 Predicate
ZonedDateTime 获取
import java.time.ZoneId;
import java.time.ZonedDateTime;

/**
 * @auther zzyy
 * @create 2019-12-02 17:37
 */
public class ZonedDateTimeDemo
{
    public static void main(String[] args)
    {
        ZonedDateTime zbj = ZonedDateTime.now(); // 默认时区
              System.out.println(zbj);
    }
}
2
3
4
5
6
7
8
9
10
11
12
13
14
15
After Route Predicate
server:
  port: 9527

spring:
  application:
    name: cloud-gateway #以微服务注册进consul或nacos服务列表内
  cloud:
    consul: #配置consul地址
      host: localhost
      port: 8500
      discovery:
        prefer-ip-address: true
        service-name: ${spring.application.name}
    gateway:
      routes:
        - id: pay_routh1 #pay_routh1                #路由的ID(类似mysql主键ID),没有固定规则但要求唯一,建议配合服务名
          #uri: http://localhost:8001                #匹配后提供服务的路由地址
          uri: lb://cloud-payment-service          #匹配后提供服务的路由地址
          predicates:
            - Path=/pay/gateway/get/**              # 断言,路径相匹配的进行路由
            - After=2023-11-20T17:38:13.586918800+08:00[Asia/Shanghai]
2
3
4
5
6
7
8
9
10
11
12
13
14
15
16
17
18
19
20
21
Before Route Predicate
server:
  port: 9527

spring:
  application:
    name: cloud-gateway #以微服务注册进consul或nacos服务列表内
  cloud:
    consul: #配置consul地址
      host: localhost
      port: 8500
      discovery:
        prefer-ip-address: true
        service-name: ${spring.application.name}
    gateway:
      routes:
        - id: pay_routh1 #pay_routh1                #路由的ID(类似mysql主键ID),没有固定规则但要求唯一,建议配合服务名
          #uri: http://localhost:8001                #匹配后提供服务的路由地址
          uri: lb://cloud-payment-service          #匹配后提供服务的路由地址
          predicates:
            - Path=/pay/gateway/get/**              # 断言,路径相匹配的进行路由
            #- After=2023-11-20T17:38:13.586918800+08:00[Asia/Shanghai]
            - Before=2023-11-27T15:25:06.424566300+08:00[Asia/Shanghai] #超过规定时间不可访问
2
3
4
5
6
7
8
9
10
11
12
13
14
15
16
17
18
19
20
21
22
Between Route Predicate
server:
  port: 9527

spring:
  application:
    name: cloud-gateway #以微服务注册进consul或nacos服务列表内
  cloud:
    consul: #配置consul地址
      host: localhost
      port: 8500
      discovery:
        prefer-ip-address: true
        service-name: ${spring.application.name}
    gateway:
      routes:
        - id: pay_routh1 #pay_routh1                #路由的ID(类似mysql主键ID),没有固定规则但要求唯一,建议配合服务名
          #uri: http://localhost:8001                #匹配后提供服务的路由地址
          uri: lb://cloud-payment-service          #匹配后提供服务的路由地址
          predicates:
            - Path=/pay/gateway/get/**              # 断言,路径相匹配的进行路由
            #- After=2023-11-20T17:38:13.586918800+08:00[Asia/Shanghai]
            #- Before=2023-11-20T17:58:13.586918800+08:00[Asia/Shanghai]
            - Between=2023-11-21T17:38:13.586918800+08:00[Asia/Shanghai],2023-11-22T17:38:13.586918800+08:00[Asia/Shanghai]
2
3
4
5
6
7
8
9
10
11
12
13
14
15
16
17
18
19
20
21
22
23
Cookie Route Predicate
server:
  port: 9527

spring:
  application:
    name: cloud-gateway #以微服务注册进consul或nacos服务列表内
  cloud:
    consul: #配置consul地址
      host: localhost
      port: 8500
      discovery:
        prefer-ip-address: true
        service-name: ${spring.application.name}
    gateway:
      routes:
        - id: pay_routh1 #pay_routh1                #路由的ID(类似mysql主键ID),没有固定规则但要求唯一,建议配合服务名
          #uri: http://localhost:8001                #匹配后提供服务的路由地址
          uri: lb://cloud-payment-service          #匹配后提供服务的路由地址
          predicates:
            - Path=/pay/gateway/get/**              # 断言,路径相匹配的进行路由
            #- After=2023-11-20T17:38:13.586918800+08:00[Asia/Shanghai]
            - Before=2023-12-29T17:58:13.586918800+08:00[Asia/Shanghai]
            #- Between=2023-11-21T17:38:13.586918800+08:00[Asia/Shanghai],2023-11-22T17:38:13.586918800+08:00[Asia/Shanghai]
            - Cookie=username,zzyy
2
3
4
5
6
7
8
9
10
11
12
13
14
15
16
17
18
19
20
21
22
23
24
带 cookie 访问
curl http://localhost:9527/pay/gateway/get/1
curl http://localhost:9527/pay/gateway/get/1 --cookie "username=zzyy"
2
Header Route Predicate
server:
  port: 9527

spring:
  application:
    name: cloud-gateway #以微服务注册进consul或nacos服务列表内
  cloud:
    consul: #配置consul地址
      host: localhost
      port: 8500
      discovery:
        prefer-ip-address: true
        service-name: ${spring.application.name}
    gateway:
      routes:
        - id: pay_routh1 #pay_routh1                #路由的ID(类似mysql主键ID),没有固定规则但要求唯一,建议配合服务名
          #uri: http://localhost:8001                #匹配后提供服务的路由地址
          uri: lb://cloud-payment-service          #匹配后提供服务的路由地址
          predicates:
            - Path=/pay/gateway/get/**              # 断言,路径相匹配的进行路由
            #- After=2023-11-20T17:38:13.586918800+08:00[Asia/Shanghai]
            - Before=2023-12-29T17:58:13.586918800+08:00[Asia/Shanghai]
            #- Between=2023-11-21T17:38:13.586918800+08:00[Asia/Shanghai],2023-11-22T17:38:13.586918800+08:00[Asia/Shanghai]
            #- Cookie=username,zzyy
            - Header=X-Request-Id, \d+  # 请求头要有X-Request-Id属性并且值为整数的正则表达式
2
3
4
5
6
7
8
9
10
11
12
13
14
15
16
17
18
19
20
21
22
23
24
25
带参数
curl http://localhost:9527/pay/gateway/get/1 -H "X-Request-Id:123456"
Host Route Predicate
server:
  port: 9527

spring:
  application:
    name: cloud-gateway #以微服务注册进consul或nacos服务列表内
  cloud:
    consul: #配置consul地址
      host: localhost
      port: 8500
      discovery:
        prefer-ip-address: true
        service-name: ${spring.application.name}
    gateway:
      routes:
        - id: pay_routh1 #pay_routh1                #路由的ID(类似mysql主键ID),没有固定规则但要求唯一,建议配合服务名
          #uri: http://localhost:8001                #匹配后提供服务的路由地址
          uri: lb://cloud-payment-service          #匹配后提供服务的路由地址
          predicates:
            - Path=/pay/gateway/get/**              # 断言,路径相匹配的进行路由
            #- After=2023-11-20T17:38:13.586918800+08:00[Asia/Shanghai]
            - Before=2023-12-29T17:58:13.586918800+08:00[Asia/Shanghai]
            #- Between=2023-11-21T17:38:13.586918800+08:00[Asia/Shanghai],2023-11-22T17:38:13.586918800+08:00[Asia/Shanghai]
            #- Cookie=username,zzyy
            #- Header=X-Request-Id, \d+  # 请求头要有X-Request-Id属性并且值为整数的正则表达式
            - Host=**.atguigu.com
2
3
4
5
6
7
8
9
10
11
12
13
14
15
16
17
18
19
20
21
22
23
24
25
26
测试
curl http://localhost:9527/pay/gateway/get/3 -H "Host:www.atguigu.com"
Path Route Predicate
server:
  port: 9527

spring:
  application:
    name: cloud-gateway #以微服务注册进consul或nacos服务列表内
  cloud:
    consul: #配置consul地址
      host: localhost
      port: 8500
      discovery:
        prefer-ip-address: true
        service-name: ${spring.application.name}
    gateway:
      routes:
        - id: pay_routh1 #pay_routh1                #路由的ID(类似mysql主键ID),没有固定规则但要求唯一,建议配合服务名
          #uri: http://localhost:8001                #匹配后提供服务的路由地址
          uri: lb://cloud-payment-service          #匹配后提供服务的路由地址
          predicates:
            - Path=/pay/gateway/get/**              # 断言,路径相匹配的进行路由
            #- After=2023-11-20T17:38:13.586918800+08:00[Asia/Shanghai]
            - Before=2023-12-29T17:58:13.586918800+08:00[Asia/Shanghai]
            #- Between=2023-11-21T17:38:13.586918800+08:00[Asia/Shanghai],2023-11-22T17:38:13.586918800+08:00[Asia/Shanghai]
            #- Cookie=username,zzyy
            #- Header=X-Request-Id, \d+  # 请求头要有X-Request-Id属性并且值为整数的正则表达式
            - Host=**.atguigu.com
2
3
4
5
6
7
8
9
10
11
12
13
14
15
16
17
18
19
20
21
22
23
24
25
26
Query Route Predicate
server:
  port: 9527

spring:
  application:
    name: cloud-gateway #以微服务注册进consul或nacos服务列表内
  cloud:
    consul: #配置consul地址
      host: localhost
      port: 8500
      discovery:
        prefer-ip-address: true
        service-name: ${spring.application.name}
    gateway:
      routes:
        - id: pay_routh1 #pay_routh1                #路由的ID(类似mysql主键ID),没有固定规则但要求唯一,建议配合服务名
          #uri: http://localhost:8001                #匹配后提供服务的路由地址
          uri: lb://cloud-payment-service          #匹配后提供服务的路由地址
          predicates:
            - Path=/pay/gateway/get/**              # 断言,路径相匹配的进行路由
            #- After=2023-11-20T17:38:13.586918800+08:00[Asia/Shanghai]
            - Before=2023-12-29T17:58:13.586918800+08:00[Asia/Shanghai]
            #- Between=2023-11-21T17:38:13.586918800+08:00[Asia/Shanghai],2023-11-22T17:38:13.586918800+08:00[Asia/Shanghai]
            #- Cookie=username,zzyy
            #- Header=X-Request-Id, \d+  # 请求头要有X-Request-Id属性并且值为整数的正则表达式
            #- Host=**.atguigu.com
            - Query=username, \d+  # 要有参数名username并且值还要是整数才能路由
2
3
4
5
6
7
8
9
10
11
12
13
14
15
16
17
18
19
20
21
22
23
24
25
26
27
测试
curl http://localhost:9527/pay/gateway/get/3?username=abc
RemoteAddr route predicate
server:
  port: 9527

spring:
  application:
    name: cloud-gateway #以微服务注册进consul或nacos服务列表内
  cloud:
    consul: #配置consul地址
      host: localhost
      port: 8500
      discovery:
        prefer-ip-address: true
        service-name: ${spring.application.name}
    gateway:
      routes:
        - id: pay_routh1 #pay_routh1                #路由的ID(类似mysql主键ID),没有固定规则但要求唯一,建议配合服务名
          #uri: http://localhost:8001                #匹配后提供服务的路由地址
          uri: lb://cloud-payment-service          #匹配后提供服务的路由地址
          predicates:
            - Path=/pay/gateway/get/**              # 断言,路径相匹配的进行路由
            #- After=2023-11-20T17:38:13.586918800+08:00[Asia/Shanghai]
            - Before=2023-12-29T17:58:13.586918800+08:00[Asia/Shanghai]
            #- Between=2023-11-21T17:38:13.586918800+08:00[Asia/Shanghai],2023-11-22T17:38:13.586918800+08:00[Asia/Shanghai]
            #- Cookie=username,zzyy
            #- Header=X-Request-Id, \d+  # 请求头要有X-Request-Id属性并且值为整数的正则表达式
            #- Host=**.atguigu.com
            #- Query=username, \d+  # 要有参数名username并且值还要是整数才能路由
            - RemoteAddr=192.168.124.1/24 # 外部访问我的IP限制,最大跨度不超过32,目前是1~24它们是 CIDR 表示法。
2
3
4
5
6
7
8
9
10
11
12
13
14
15
16
17
18
19
20
21
22
23
24
25
26
27
28
Method Route Predicate
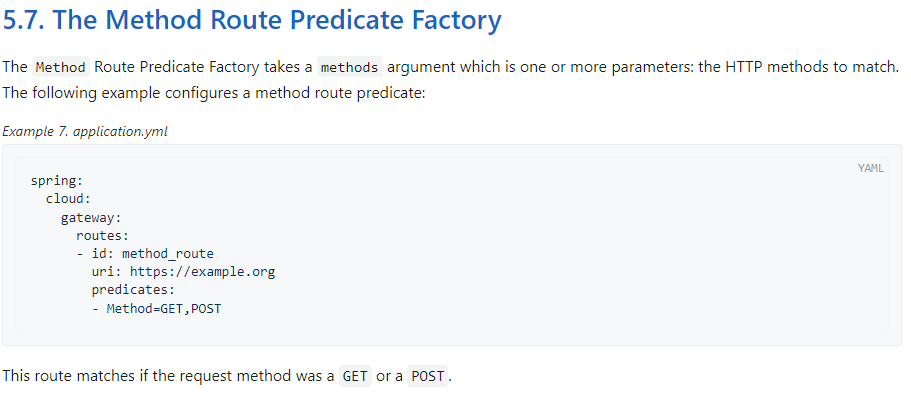 Predicate 就是为了实现一组匹配规则,让请求过来找到对应的 Route 进行处理。
# 自定义断言
public abstract class AbstractRoutePredicateFactory<C> extends AbstractConfigurable<C> implements RoutePredicateFactory<C>
{
  public AbstractRoutePredicateFactory(Class<C> configClass)
  {
    super(configClass);
  }
}
2
3
4
5
6
7
结构
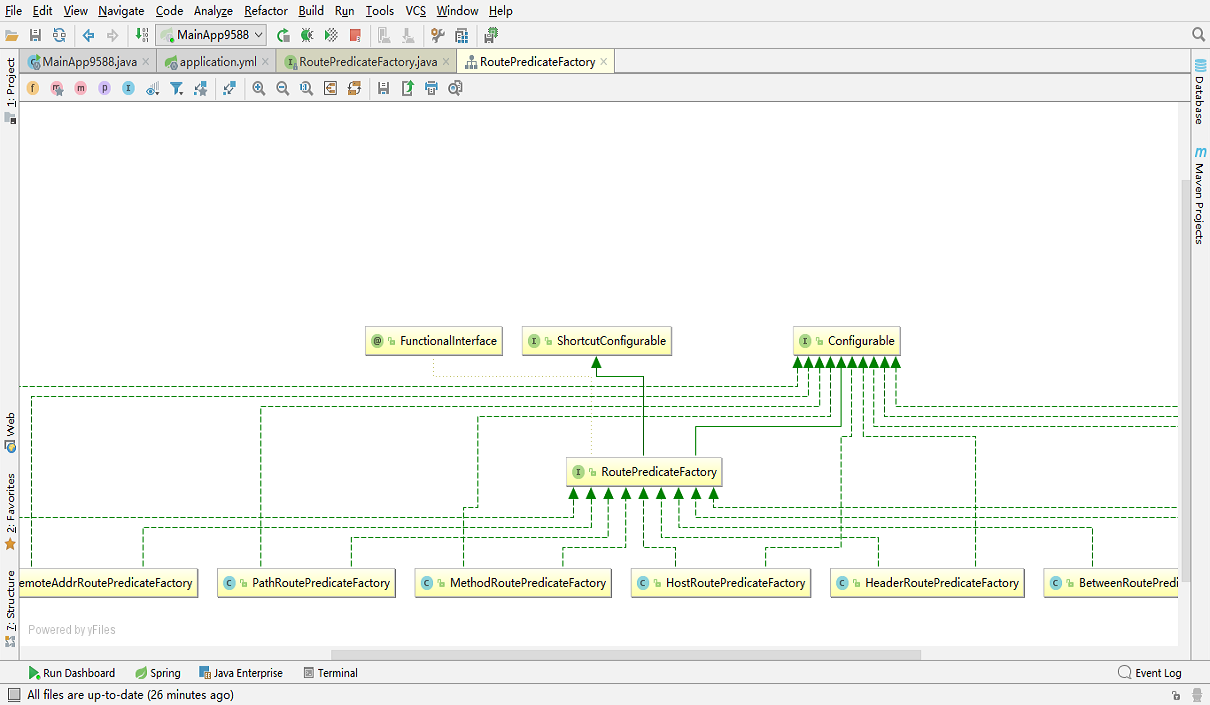
要么继承 AbstractRoutePredicateFactoryi 抽象类,要么实现 RoutePredicateFactory 接口,开头任意取名,但是必须以 RoutePredicateFactory 后缀结尾
import jakarta.validation.constraints.NotEmpty;
import lombok.Getter;
import lombok.Setter;
import org.springframework.cloud.gateway.handler.predicate.AbstractRoutePredicateFactory;
import org.springframework.stereotype.Component;
import org.springframework.validation.annotation.Validated;
import org.springframework.web.server.ServerWebExchange;

import java.util.function.Predicate;

@Component
public class MyRoutePredicateFactory extends AbstractRoutePredicateFactory<MyRoutePredicateFactory.Config>
{
    public MyRoutePredicateFactory()
    {
        super(MyRoutePredicateFactory.Config.class);
    }

    // 路由断言规则
    @Validated
    public static class Config{
        @Setter
        @Getter
        @NotEmpty
        private String userType; //钻、金、银等用户等级
    }

    @Override
    public Predicate<ServerWebExchange> apply(MyRoutePredicateFactory.Config config)
    {
        return new Predicate<ServerWebExchange>()
        {
            @Override
            public boolean test(ServerWebExchange serverWebExchange)
            {
                //检查request的参数里面,userType是否为指定的值,符合配置就通过
                String userType = serverWebExchange.getRequest().getQueryParams().getFirst("userType");

                if (userType == null) return false;

                //如果说参数存在,就和config的数据进行比较
                if(userType.equals(config.getUserType())) {
                    return true;
                }

                return false;
            }
        };
    }
}
2
3
4
5
6
7
8
9
10
11
12
13
14
15
16
17
18
19
20
21
22
23
24
25
26
27
28
29
30
31
32
33
34
35
36
37
38
39
40
41
42
43
44
45
46
47
48
49
50
51
配置文件
server:
  port: 9527

spring:
  application:
    name: cloud-gateway #以微服务注册进consul或nacos服务列表内
  cloud:
    consul: #配置consul地址
      host: localhost
      port: 8500
      discovery:
        prefer-ip-address: true
        service-name: ${spring.application.name}
    gateway:
      routes:
        - id: pay_routh1 #pay_routh1                #路由的ID(类似mysql主键ID),没有固定规则但要求唯一,建议配合服务名
          #uri: http://localhost:8001                #匹配后提供服务的路由地址
          uri: lb://cloud-payment-service                #匹配后提供服务的路由地址
          predicates:
            - Path=/pay/gateway/get/**              # 断言,路径相匹配的进行路由
            - After=2023-12-30T23:02:39.079979400+08:00[Asia/Shanghai]
            #- Cookie=username,zzyy
            # - Header=X-Request-Id, \d+ # 请求头要有X-Request-Id属性并且值为整数的正则表达式
            #- Host=**.atguigu.com
            #- Query=username, \d+  # 要有参数名username并且值还要是整数才能路由
            #- RemoteAddr=192.168.124.1/24 # 外部访问我的IP限制,最大跨度不超过32,目前是1~24它们是 CIDR 表示法。
            #- My=diamond # 缺少shortcutFieldOrder方法的实现,所以不支持短格式
            - name: My
              args:
                userType: diamond
2
3
4
5
6
7
8
9
10
11
12
13
14
15
16
17
18
19
20
21
22
23
24
25
26
27
28
29
30
缺少 shortcutFieldOrder 方法的实现,所以不支持短格式,补充 shortcutFieldOrder 方法
@Component
public class MyRoutePredicateFactory extends AbstractRoutePredicateFactory<MyRoutePredicateFactory.Config>
{
    public MyRoutePredicateFactory()
    {
        super(MyRoutePredicateFactory.Config.class);
    }

    @Validated
    public static class Config{
        @Setter
        @Getter
        @NotEmpty
        private String userType; //钻、金、银等用户等级
    }

    @Override
    public Predicate<ServerWebExchange> apply(MyRoutePredicateFactory.Config config)
    {
        return new Predicate<ServerWebExchange>()
        {
            @Override
            public boolean test(ServerWebExchange serverWebExchange)
            {
                //检查request的参数里面,userType是否为指定的值,符合配置就通过
                String userType = serverWebExchange.getRequest().getQueryParams().getFirst("userType");

                if (userType == null) return false;

                //如果说参数存在,就和config的数据进行比较
                if(userType.equals(config.getUserType())) {
                    return true;
                }

                return false;
            }
        };
    }

@Override
public List<String> shortcutFieldOrder() {
  return Collections.singletonList("userType");
}


}
2
3
4
5
6
7
8
9
10
11
12
13
14
15
16
17
18
19
20
21
22
23
24
25
26
27
28
29
30
31
32
33
34
35
36
37
38
39
40
41
42
43
44
45
46
47
使用短格式
server:
  port: 9527

spring:
  application:
    name: cloud-gateway #以微服务注册进consul或nacos服务列表内
  cloud:
    consul: #配置consul地址
      host: localhost
      port: 8500
      discovery:
        prefer-ip-address: true
        service-name: ${spring.application.name}
    gateway:
      routes:
        - id: pay_routh1 #pay_routh1                #路由的ID(类似mysql主键ID),没有固定规则但要求唯一,建议配合服务名
          #uri: http://localhost:8001                #匹配后提供服务的路由地址
          uri: lb://cloud-payment-service                #匹配后提供服务的路由地址
          predicates:
            - Path=/pay/gateway/get/**              # 断言,路径相匹配的进行路由
            - After=2023-12-30T23:02:39.079979400+08:00[Asia/Shanghai]
            #- Cookie=username,zzyy
            # - Header=X-Request-Id, \d+ # 请求头要有X-Request-Id属性并且值为整数的正则表达式
            #- Host=**.atguigu.com
            #- Query=username, \d+  # 要有参数名username并且值还要是整数才能路由
            #- RemoteAddr=192.168.124.1/24 # 外部访问我的IP限制,最大跨度不超过32,目前是1~24它们是 CIDR 表示法。
            - My=diamond
2
3
4
5
6
7
8
9
10
11
12
13
14
15
16
17
18
19
20
21
22
23
24
25
26
27
# 网关过滤器
过滤器 对请求或响应进行拦截 完成一些通用操作
Gateway 提供 两种过滤器方式 pre 和 post
- pre 过滤器 在转发之前执行 可以做参数校验 权限校验 流量监控 日志输出 协议转换等
- post 过滤器 在响应之前执行 可以用对响应内容 响应头的修改 日志的输出 流量监控等
同时还提供了两种类型过滤器
- GatewayFilter 局部过滤器 针对单个路由
- GlobalFilter 全局过滤器 针对所有路由
# 局部过滤器
| 过滤器工厂 | 作用 | 参数 |
|---|---|---|
| AddRequestHeader | 为原始请求添加 Header | Header 的名称及值 |
| AddRequestParameter | 为原始请求添加请求参数 | 参数名称及值 |
| AddResponseHeader | 为原始响应添加 Header | Header 的名称及值 |
| DedupeResponseHeader | 剔除响应头中重复的值 | 需要去重的 Header 名称及去重策略 |
| Hystrix | 为路由引入 Hystrix 的断路器保护 | HystrixCommand 的名称 |
| FallbackHeaders | 为 fallbackUri 的请求头中添加具体的异常信息 | Header 的名称 |
| PrefixPath | 为原始请求路径添加前缀 | 前缀路径 |
| PreserveHostHeader | 为请求添加一个 preserveHostHeader=true 的属性,路由过滤器会检查该属性以决定是否要发送原始的 Host | 无 |
| RequestRateLimiter | 用于对请求限流,限流算法为令牌桶 | keyResolver、rateLimiter、statusCode、denyEmptyKey、emptyKeyStatus |
| RedirectTo | 将原始请求重定向到指定的 URL | http 状态码及重定向的 url |
| RemoveHopByHopHeadersFilter | 为原始请求删除 IETF 组织规定的一系列 Header | 默认就会启用,可以通过配置指定仅删除哪些 Header |
| RemoveRequestHeader | 为原始请求删除某个 Header | Header 名称 |
| RemoveResponseHeader | 为原始响应删除某个 Header | Header 名称 |
| RewritePath | 重写原始的请求路径 | 原始路径正则表达式以及重写后路径的正则表达式 |
| RewriteResponseHeader | 重写原始响应中的某个 Header | Header 名称,值的正则表达式,重写后的值 |
| SaveSession | 在转发请求之前,强制执行 WebSession::save 操作 | 无 |
| secureHeaders | 为原始响应添加一系列起安全作用的响应头 | 无,支持修改这些安全响应头的值 |
| SetPath | 修改原始的请求路径 | 修改后的路径 |
| SetResponseHeader | 修改原始响应中某个 Header 的值 | Header 名称,修改后的值 |
| SetStatus | 修改原始响应的状态码 | HTTP 状态码,可以是数字,也可以是字符串 |
| StripPrefix | 用于截断原始请求的路径 | 使用数字表示要截断的路径的数量 |
| Retry | 针对不同的响应进行重试 | retries、statuses、methods、series |
| RequestSize | 设置允许接收最大请求包的大小。如果请求包大小超过设置的值,则返回 413 Payload Too Large | 请求包大小,单位为字节,默认值为 5M |
| ModifyRequestBody | 在转发请求之前修改原始请求体内容 | 修改后的请求体内容 |
| ModifyResponseBody | 修改原始响应体的内容 | 修改后的响应体内容 |
| Default | 为所有路由添加过滤器 | 过滤器工厂名称及值 |
在配置文件中通过 sping.cloud.gateway.routes.filters 设置
spring:
  application:
    name: api-geteway-server
  cloud:
    # 网关配置
    gateway:
      # 路由配置: 转发规则
      routes: # 集合
        - id: gateway-provider # 唯一标识 默认为随机UUID
          #        uri: http://localhost:8001/  #  转发路径  服务提供方访问路径
          uri: lb://gateway-provider
          predicates: # 条件 用于请求网关路径的匹配规则
            - Path=/goods/**
          filters:
            - AddRequestHeader=username,zhansan
2
3
4
5
6
7
8
9
10
11
12
13
14
15
也可以开启全局通用过滤器
spring:
  application:
    name: api-geteway-server
  cloud:
    # 网关配置
    gateway:
      default-filters:
        - AddRequestHeader=username,zhansan
2
3
4
5
6
7
8
# 全局过滤器
全局过滤器不需要在配置文件中配置 系统初始化时加载 并作用在每个路由上
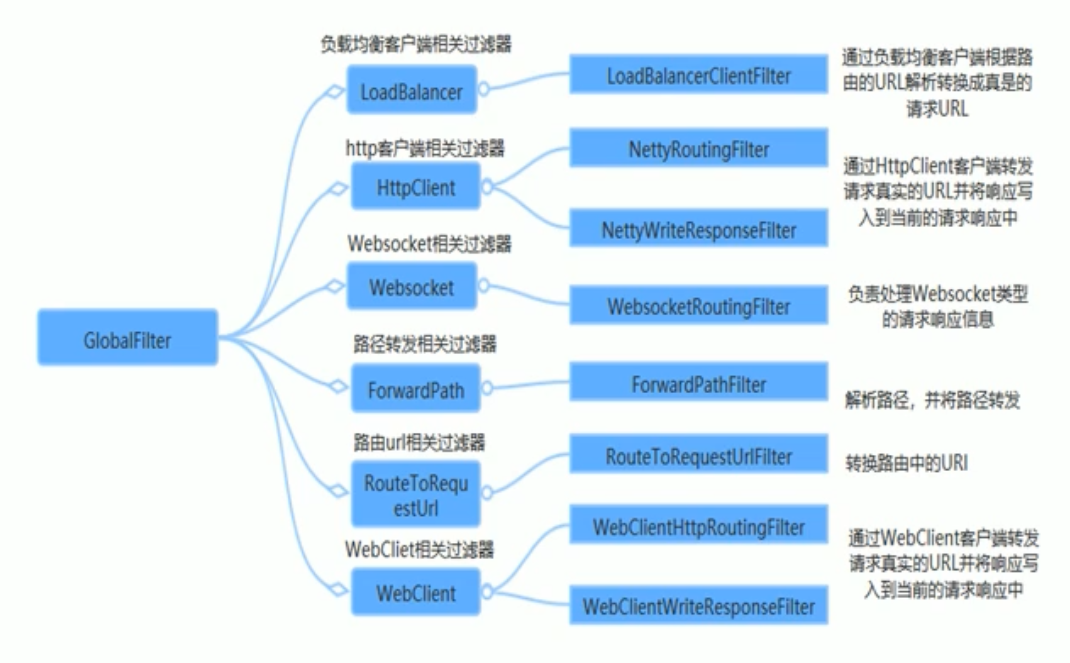
在 gateway 模块中 编写自定义过滤器类 并实现 GlobalFilter, Ordered 接口
package com.itheima.gateway.filter;

import org.springframework.cloud.gateway.filter.GatewayFilterChain;
import org.springframework.cloud.gateway.filter.GlobalFilter;
import org.springframework.core.Ordered;
import org.springframework.stereotype.Component;
import org.springframework.web.server.ServerWebExchange;
import reactor.core.publisher.Mono;

@Component
public class MyFilter implements GlobalFilter, Ordered {
    @Override
    public Mono<Void> filter(ServerWebExchange exchange, GatewayFilterChain chain) {
        System.out.println("自定义全局过滤器");
        return chain.filter(exchange);  //放行
    }

    /**
     * 过滤器排序
     * @return 数值越小 越先执行
     */
    @Override
    public int getOrder() {
        return 0;
    }
}
1
2
3
4
5
6
7
8
9
10
11
12
13
14
15
16
17
18
19
20
21
22
23
24
25
26
自定义网关过滤器规则
import lombok.Getter;
import lombok.Setter;
import org.springframework.cloud.gateway.filter.GatewayFilter;
import org.springframework.cloud.gateway.filter.GatewayFilterChain;
import org.springframework.cloud.gateway.filter.factory.AbstractGatewayFilterFactory;
import org.springframework.cloud.gateway.filter.factory.SetPathGatewayFilterFactory;
import org.springframework.http.HttpStatus;
import org.springframework.http.server.reactive.ServerHttpRequest;
import org.springframework.stereotype.Component;
import org.springframework.web.server.ServerWebExchange;
import reactor.core.publisher.Mono;

import java.util.Arrays;
import java.util.List;


@Component
public class MyGatewayFilterFactory extends AbstractGatewayFilterFactory<MyGatewayFilterFactory.Config>
{
    public MyGatewayFilterFactory()
    {
        super(MyGatewayFilterFactory.Config.class);
    }


    @Override
    public GatewayFilter apply(MyGatewayFilterFactory.Config config)
    {
        return new GatewayFilter()
        {
            @Override
            public Mono<Void> filter(ServerWebExchange exchange, GatewayFilterChain chain)
            {
                ServerHttpRequest request = exchange.getRequest();
                System.out.println("进入了自定义网关过滤器MyGatewayFilterFactory,status:"+config.getStatus());
                if(request.getQueryParams().containsKey("atguigu")){
                    return chain.filter(exchange);
                }else{
                    exchange.getResponse().setStatusCode(HttpStatus.BAD_REQUEST);
                    return exchange.getResponse().setComplete();
                }
            }
        };
    }

    @Override
    public List<String> shortcutFieldOrder() {
        return Arrays.asList("status");
    }

    public static class Config
    {
        @Getter@Setter
        private String status;//设定一个状态值/标志位,它等于多少,匹配和才可以访问
    }
}
//单一内置过滤器GatewayFilter
2
3
4
5
6
7
8
9
10
11
12
13
14
15
16
17
18
19
20
21
22
23
24
25
26
27
28
29
30
31
32
33
34
35
36
37
38
39
40
41
42
43
44
45
46
47
48
49
50
51
52
53
54
55
56
57
使用自定义的过滤器规则
server:
  port: 9527

spring:
  application:
    name: cloud-gateway #以微服务注册进consul或nacos服务列表内
  cloud:
    consul: #配置consul地址
      host: localhost
      port: 8500
      discovery:
        prefer-ip-address: true
        service-name: ${spring.application.name}
    gateway:
      routes:
        - id: pay_routh1 #pay_routh1                #路由的ID(类似mysql主键ID),没有固定规则但要求唯一,建议配合服务名
          #uri: http://localhost:8001                #匹配后提供服务的路由地址
          uri: lb://cloud-payment-service                #匹配后提供服务的路由地址
          predicates:
            - Path=/pay/gateway/get/**              # 断言,路径相匹配的进行路由
            - After=2023-12-30T23:02:39.079979400+08:00[Asia/Shanghai]
            #- Cookie=username,zzyy
            # - Header=X-Request-Id, \d+ # 请求头要有X-Request-Id属性并且值为整数的正则表达式
            #- Host=**.atguigu.com
            #- Query=username, \d+  # 要有参数名username并且值还要是整数才能路由
            #- RemoteAddr=192.168.124.1/24 # 外部访问我的IP限制,最大跨度不超过32,目前是1~24它们是 CIDR 表示法。
            #- My=gold
#            - name: My
#              args:
#                userType: diamond

        - id: pay_routh2 #pay_routh2                #路由的ID(类似mysql主键ID),没有固定规则但要求唯一,建议配合服务名
          #uri: http://localhost:8001                #匹配后提供服务的路由地址
          uri: lb://cloud-payment-service
          predicates:
            - Path=/pay/gateway/info/**              # 断言,路径相匹配的进行路由

        - id: pay_routh3 #pay_routh3
          uri: lb://cloud-payment-service                #匹配后提供服务的路由地址
          predicates:
            - Path=/pay/gateway/filter/**              # 断言,路径相匹配的进行路由,默认正确地址
            #- Path=/gateway/filter/**              # 断言,为配合PrefixPath测试过滤,暂时注释掉/pay
            #- Path=/XYZ/abc/{segment}           # 断言,为配合SetPath测试,{segment}的内容最后被SetPath取代
          filters:
            - My=atguigu
2
3
4
5
6
7
8
9
10
11
12
13
14
15
16
17
18
19
20
21
22
23
24
25
26
27
28
29
30
31
32
33
34
35
36
37
38
39
40
41
42
43
44
45
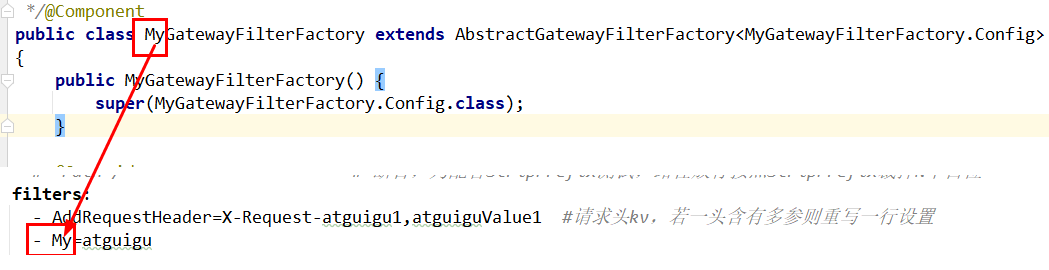
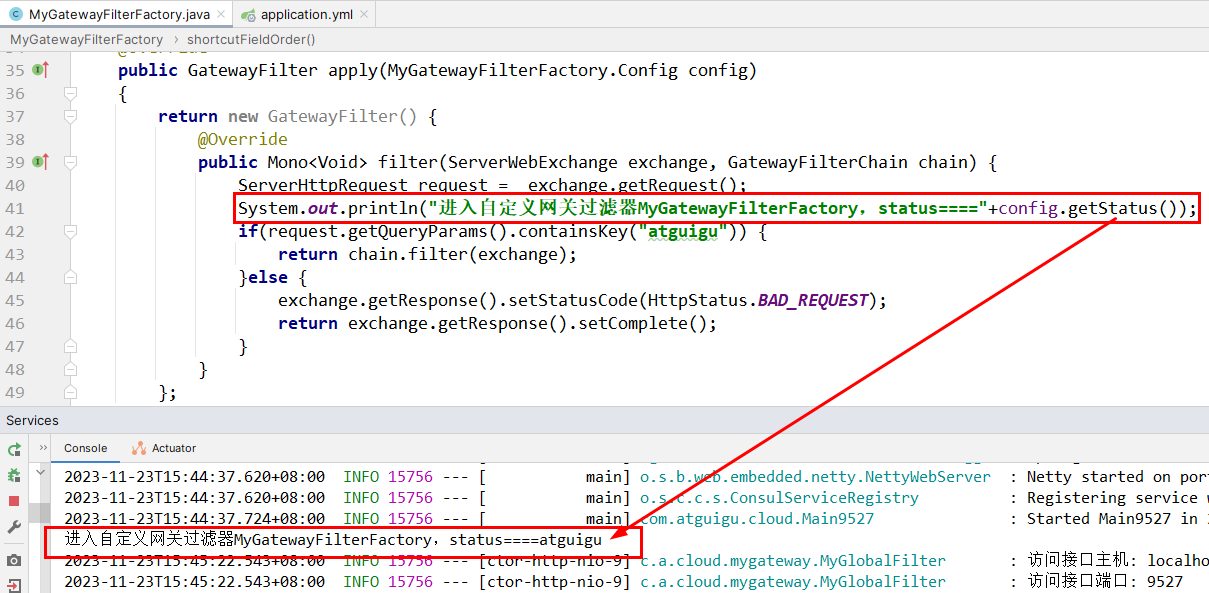
# Config 分布式配置中心
Config 解决了在分布式场景下多环境配置文件的管理和维护
在 github 或者 gitee 创建一个存放 config 配置的仓库
创建 config-server 模块 并导入坐标
    <!-- config-server -->
    <dependency>
        <groupId>org.springframework.cloud</groupId>
        <artifactId>spring-cloud-config-server</artifactId>
    </dependency>
</dependencies>
1
2
3
4
5
6创建启动类并使用 @EnableConfigServer 注解启用 config server
package com.itheima.config;

import org.springframework.boot.SpringApplication;
import org.springframework.boot.autoconfigure.SpringBootApplication;
import org.springframework.cloud.config.server.EnableConfigServer;

@SpringBootApplication
@EnableConfigServer //启用config server功能
public class ConfigServerApp {
    public static void main(String[] args) {
        SpringApplication.run(ConfigServerApp.class,args);
    }
}
1
2
3
4
5
6
7
8
9
10
11
12
13配置 application.yml
server:
  port: 8888


spring:
  application:
    name: config-server

  cloud:
    config:
      server:
        git:
          uri: https://gitee.com/Iekrwh/configs.git  # 仓库地址
#          username:   #如果是私有仓库则需要配置git的账号和密码
#          password:
          default-label: master # 分支配置
1
2
3
4
5
6
7
8
9
10
11
12
13
14
15
16在服务提供方中 导入 config client 坐标
<!--     config client   -->
<dependency>
    <groupId>org.springframework.cloud</groupId>
    <artifactId>spring-cloud-starter-config</artifactId>
</dependency>
1
2
3
4
5在创建配置文件 bootstrap.yml 优先级高于 application.yml
spring:
  cloud:
    config:
      uri: http://localhost:8888  # 配置config server地址
      name: config # 文件名称
      label: master # 分支
      profile: dev # -后面的版本名称
1
2
3
4
5
6
7此时在服务提供方中 可以读取 config 配置文件提供的值
# 客户端刷新
当远程仓库中的配置文件发生改变事 我们的 config server 会自动更新
但我们的 config client 并不会自动更新内容
客户端引入 actuator 依赖
<dependency>
    <groupId>org.springframework.boot</groupId>
    <artifactId>spring-boot-starter-actuator</artifactId>
</dependency>
1
2
3
4获取配置信息的类上 加上 @RefreshScope 注解
在 bootstrap.yml 添加 management.endpoints.web.exposure.include
spring:
  cloud:
    config:
      uri: http://localhost:8888  # 配置config server地址
      name: config # 文件名称
      label: master # 分支
      profile: dev # -后面的版本名称
management:
  endpoints:
    web:
      exposure:
        include: '*'
1
2
3
4
5
6
7
8
9
10
11
12在 cmd 中 向 http://localhost:8001/actuator/refresh 发送 post 请求
curl -X POST http://localhost:8001/actuator/refresh1但是每次更新 需要发送一次请求 后面结合 bus 才能解决此问题
# 集成 Eureka
通过上面例子 我们发现 config 客户端访问服务端 地址是固定写死 非常不灵活
我们可以通过 Eureka 使服务端在上面注册应用 自动获取应用的地址
config-server 导入 Eureka 坐标
<!-- eureka-client -->
<dependency>
    <groupId>org.springframework.cloud</groupId>
    <artifactId>spring-cloud-starter-netflix-eureka-client</artifactId>
</dependency>
1
2
3
4
5config-server 配置 加上 Eureka 的地址
server:
  port: 8888


spring:
  application:
    name: config-server

  cloud:
    config:
      server:
        git:
          uri: https://gitee.com/Iekrwh/configs.git  # 仓库地址
#          username:   #如果是私有仓库则需要配置git的账号和密码
#          password:
          default-label: master # 分支配置

eureka:
  client:
    service-url:
      defaultZone: http://localhost:8761/eureka
1
2
3
4
5
6
7
8
9
10
11
12
13
14
15
16
17
18
19
20
21在 config serve 启动类加上 @EnableEurekaClient 注解
在 config client 配置文件中 将 config uri 改为 Eurka 服务地址
spring:
  cloud:
    config:
#      uri: http://localhost:8888  # 配置config server地址
      name: config # 文件名称
      label: master # 分支
      profile: dev # -后面的版本名称
      discovery:
        enabled: true # 从注册中心寻找config server 地址
        service-id: config-server # config server 注册的应用名
management:
  endpoints:
    web:
      exposure:
        include: '*'
1
2
3
4
5
6
7
8
9
10
11
12
13
14
15
# Bus 消息总线
Spring Cloud 是用轻量的消息中间件将分布式的节点连接起来 用于广播配置文件的更改或者服务的监控管理
Spring Cloud Bus 可选的消息中间件包括 RabbitMQ 和 Kafka
在 config-server 和 config-client 中 引入 bus 依赖
<!-- bus -->
<dependency>
    <groupId>org.springframework.cloud</groupId>
    <artifactId>spring-cloud-starter-bus-amqp</artifactId>
</dependency>
<dependency>
            <groupId>org.springframework.boot</groupId>
            <artifactId>spring-boot-starter-actuator</artifactId>
        </dependency>
1
2
3
4
5
6
7
8
9在 config-server 和 config-client 中 分别配置 RabbitMQ
spring:
  rabbitmq:
    host: 192.168.130.124 # mq服务器地址
    port: 5672
    username: iekr
    password: iekr
    virtual-host: /itcast
1
2
3
4
5
6
7在 config-server 中 设置暴露监控断电 bus-refresh
management:
  endpoints:
    web:
      exposure:
        include: 'bus-refresh'  # 暴露bus的刷新端点
1
2
3
4
5更新则发送指令 curl -X post config-server 地址:端口 /actuator/bus-refresh
curl -X post http://localhost:8888/actuator/bus-refresh1
# Stream 消息驱动
Spring Clou Stream 是一个构建消息驱动微服务应用的框架
Stream 对消息中间件的进一步封装 可以做到代码层面对中间件的无感知 甚至动态切换中间件
Stream 构建的应用程序与消息中间件之间是通过绑定器 Binder 相关联的
# 消息生产者
创建生产者模块 导入坐标
        <!--spring boot web-->
        <dependency>
            <groupId>org.springframework.boot</groupId>
            <artifactId>spring-boot-starter-web</artifactId>
        </dependency>


        <!-- stream -->
        <dependency>
            <groupId>org.springframework.cloud</groupId>
            <artifactId>spring-cloud-starter-stream-rabbit</artifactId>
        </dependency>
1
2
3
4
5
6
7
8
9
10
11
12
13编写配置文件
server:
  port: 8000


spring:
  cloud:
    stream:
      # 定义绑定器,绑定到哪个消息中间件上
      binders:
        itheima_binder: # 自定义的绑定器名称
          type: rabbit # 绑定器类型
          environment: # 指定mq的环境
            spring:
              rabbitmq:
                host: 192.168.130.124
                port: 5672
                username: guest
                password: guest
                virtual-host: /
      bindings:
        output: # channel名称
          binder: itheima_binder #指定使用哪一个绑定器(自定义的绑定器名称)
          destination: itheima_exchange # 消息目的地
1
2
3
4
5
6
7
8
9
10
11
12
13
14
15
16
17
18
19
20
21
22
23
24定义发送消息类 并在类上开启 Binding 绑定为配置文件
package com.itheima.stream.producer;


import org.springframework.beans.factory.annotation.Autowired;
import org.springframework.cloud.stream.annotation.EnableBinding;
import org.springframework.cloud.stream.messaging.Source;
import org.springframework.messaging.MessageChannel;
import org.springframework.messaging.support.MessageBuilder;
import org.springframework.stereotype.Component;

@Component
@EnableBinding(Source.class)
public class MessageProducer {

    @Autowired
    private MessageChannel output;

    public void send(){
        String msessage = "hello stream~~~";

        //发送消息
        output.send(MessageBuilder.withPayload(msessage).build());

        System.out.println("消息发送成功~~~");

    }
}
1
2
3
4
5
6
7
8
9
10
11
12
13
14
15
16
17
18
19
20
21
22
23
24
25
26
27创建一个接口用于测试 是否能发送消息给 mq
package com.itheima.stream.producer;

import org.springframework.beans.factory.annotation.Autowired;
import org.springframework.web.bind.annotation.RequestMapping;
import org.springframework.web.bind.annotation.RestController;

@RestController
public class ProducerController {

    @Autowired
    private MessageProducer producer;


    @RequestMapping("/send")
        public String sendMsg(){
        producer.send();
        return "success";
    }
}
1
2
3
4
5
6
7
8
9
10
11
12
13
14
15
16
17
18
19
# 消息消费者
创建消费者模块 导入坐标
        <!--spring boot web-->
        <dependency>
            <groupId>org.springframework.boot</groupId>
            <artifactId>spring-boot-starter-web</artifactId>
        </dependency>


        <!-- stream -->
        <dependency>
            <groupId>org.springframework.cloud</groupId>
            <artifactId>spring-cloud-starter-stream-rabbit</artifactId>
        </dependency>
1
2
3
4
5
6
7
8
9
10
11
12
13编写配置文件 主要把端口和 bindings 设置为输出还是输入模式
server:
  port: 9000


spring:
  cloud:
    stream:
      # 定义绑定器,绑定到哪个消息中间件上
      binders:
        itheima_binder: # 自定义的绑定器名称
          type: rabbit # 绑定器类型
          environment: # 指定mq的环境
            spring:
              rabbitmq:
                host: localhost
                port: 5672
                username: guest
                password: guest
                virtual-host: /
      bindings:
        input: # channel名称
          binder: itheima_binder #指定使用哪一个binder
          destination: itheima_exchange # 消息目的地
1
2
3
4
5
6
7
8
9
10
11
12
13
14
15
16
17
18
19
20
21
22
23
24创建消息接收类 在类开启 binding 注解 并在接收方法中定义 @StreamListener (Sink.INPUT)
package com.itheima.stream.consumer;

import org.springframework.cloud.stream.annotation.EnableBinding;
import org.springframework.cloud.stream.annotation.StreamListener;
import org.springframework.cloud.stream.messaging.Sink;
import org.springframework.messaging.Message;
import org.springframework.stereotype.Component;

/**
 * 消息接收类
 */
@EnableBinding({Sink.class})
@Component
public class MessageListener {

    @StreamListener(Sink.INPUT)
    public void receive(Message message){

        System.out.println(message);
        System.out.println(message.getPayload());
    }
}
1
2
3
4
5
6
7
8
9
10
11
12
13
14
15
16
17
18
19
20
21
22
# Sleuth+Zipkin 链路追踪
Spring Cloud Sleuth 它在分布式中能跟踪一个用户请求的过程 捕获这些跟踪数据 就能构建微服务的整个调用链的视图 它是调试和监控微服务的关键工具
在微服务框架中,一个由客户端发起的请求在后端系统中会经过多个不同的的服务节点调用来协同产生最后的请求结果,每一个前段请求都会形成一条复杂的分布式服务调用链路,链路中的任何一环出现高延时或错误都会引起整个请求最后的失败。
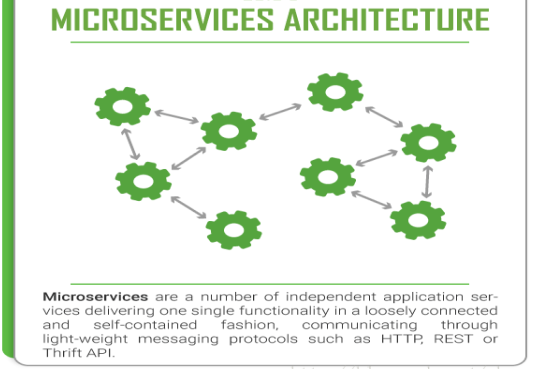
Zipkin 是一种分布式链路跟踪系统图形化的工具,Zipkin 是 Twitter 开源的分布式跟踪系统,能够收集微服务运行过程中的实时调用链路信息,并能够将这些调用链路信息展示到 Web 图形化界面上供开发人员分析,开发人员能够从 ZipKin 中分析出调用链路中的性能瓶颈,识别出存在问题的应用程序,进而定位问题和解决问题。
当没有配置 Sleuth 链路追踪的时候,INFO 信息里面是 [passjava-question,,,],后面跟着三个空字符串。
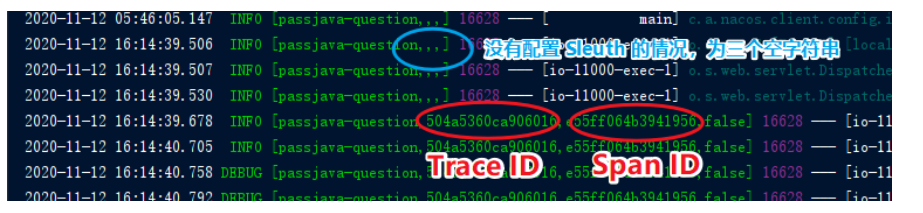
当配置了 Sleuth 链路追踪的时候,追踪到的信息是 [passjava-question,504a5360ca906016,e55ff064b3941956,false] ,第一个是 Trace ID,第二个是 Span ID。** 只有日志没有图,观看不方便,不美观,so,** 引入图形化 Zipkin 链路监控让你好看
安装启动 zipkin 访问 http://localhost:9411/
java -jar zipkin.jar1在服务提供方和消费方法 引入 zipkin 坐标
<dependency>
    <groupId>org.springframework.cloud</groupId>
    <artifactId>spring-cloud-starter-zipkin</artifactId>
</dependency>
1
2
3
4配置文件
server:
  port: 8001

eureka:
  client:
    service-url:
      defaultZone: http://localhost:8761/eureka
spring:
  application:
    name: feign-provider
  zipkin:
    base-url: http://localhost:9411/  # 设置zipkin的服务端路径

  sleuth:
    sampler:
      probability: 1 # 采集率 默认 0.1 百分之十。
1
2
3
4
5
6
7
8
9
10
11
12
13
14
15
16
访问 http://localhost:9411/
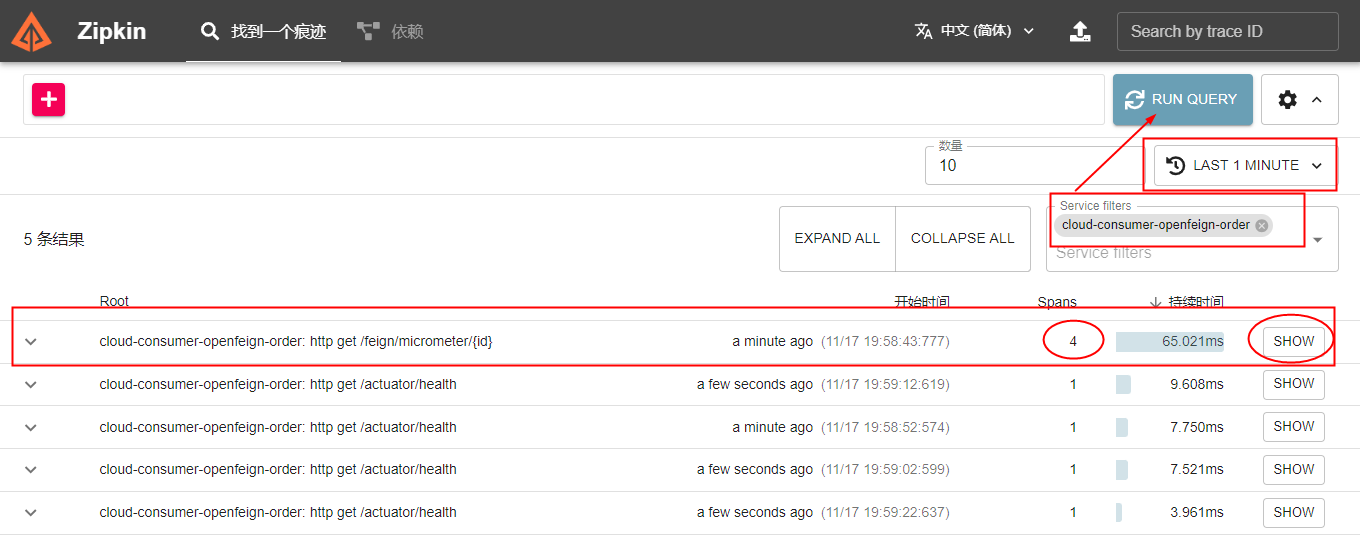
# Seata
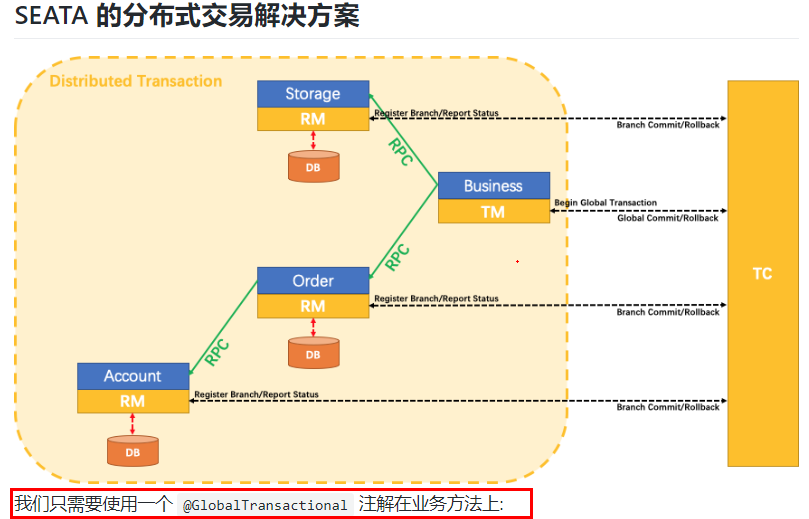
纵观整个分布式,事务的管理,就是全局事务 D 的传递和变更,要让开发者无感知
1 个 XID,XID 是全局事务的唯一标识,它可以在服务的调用链路中传递,绑定到服务的事务上下文中。
(TC→TM→RM)
- TC (Transaction Coordinator):事务协调器就是 Seata, 负责维护全局事务和分支事务的状态,驱动全局事务提交或回滚。
- TM (Transaction Manager):标注全局 @GlobalTransactionalf 启动入口动作的微服务模块(比如订单模块),它是事务的发起者,负责定义全局事务的范围,并根据事务管理器 TC 维护的全局事务和分支事务状态,做出开始事务、提交事务、回滚事务的决议
- RM (Resource Manager):就是 ysq 数据库本身,可以是多个 RM, 负责管理分支事务上的资源,向 TC 资源管理器注册分支事务,汇报分支事务状态,驱动分支事务的提交或回滚
三个组件相互协作,TC 以 Seata 服务器 (Server) 形式独立部署,TM 和 RM 则是以 Seata Client 的形式集成在微服务中运行
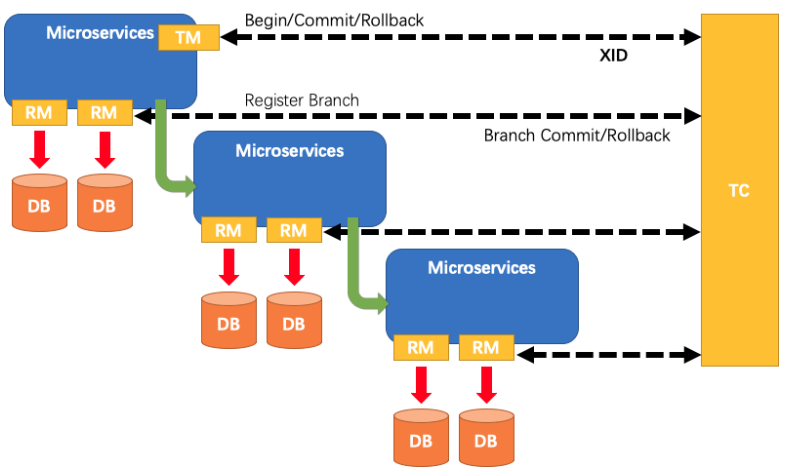
- TM 向 TC 申请开启一个全局事务,全局事务创建成功并生成一个全局唯一的 XID;
- XID 在微服务调用链路的上下文中传播;
- RM 向 TC 注册分支事务,将其纳入 XID 对应全局事务的管辖;
- TM 向 TC 发起针对 XID 的全局提交或回滚决议;
- TC 调度 XID 下管辖的全部分支事务完成提交或回滚请求。