 营销管理模块和公众号菜单管理
# 营销管理模块和公众号菜单管理
# 优惠券列表接口
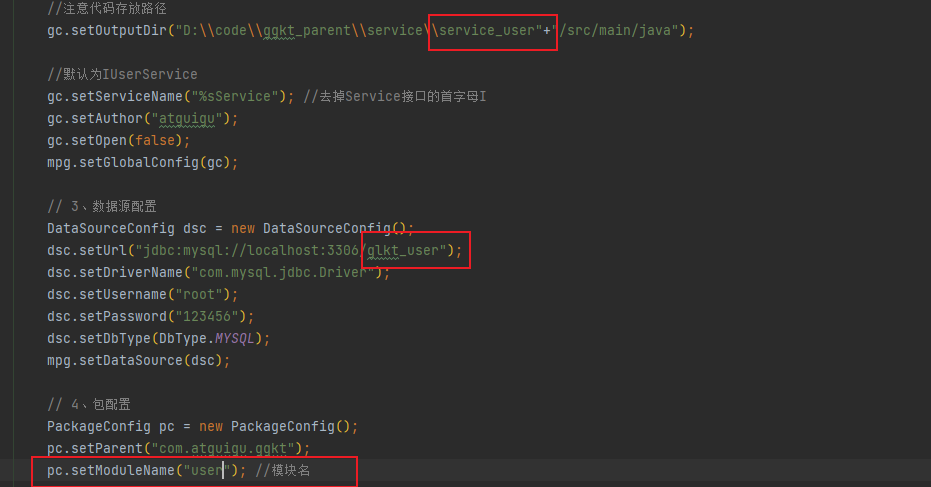
创建 service_user 模块
生成相关代码

删除 entity 包 并重新引用 common 中的 entity

创建启动类 ServiceUserApplication
@SpringBootApplication
@EnableDiscoveryClient
@MapperScan("com.atguigu.ggkt.user.mapper")
public class ServiceUserApplication {

    public static void main(String[] args) {
        SpringApplication.run(ServiceUserApplication.class, args);
    }

}
2
3
4
5
6
7
8
9
10
创建配置文件
# 服务端口
server.port=8304
# 服务名
spring.application.name=service-user

# 环境设置:dev、test、prod
spring.profiles.active=dev

# mysql数据库连接
spring.datasource.driver-class-name=com.mysql.jdbc.Driver
spring.datasource.url=jdbc:mysql://localhost:3306/glkt_user?characterEncoding=utf-8&useSSL=false
spring.datasource.username=root
spring.datasource.password=123456

#返回json的全局时间格式
spring.jackson.date-format=yyyy-MM-dd HH:mm:ss
spring.jackson.time-zone=GMT+8

#mybatis日志
mybatis-plus.configuration.log-impl=org.apache.ibatis.logging.stdout.StdOutImpl

# nacos服务地址
spring.cloud.nacos.discovery.server-addr=127.0.0.1:8848
2
3
4
5
6
7
8
9
10
11
12
13
14
15
16
17
18
19
20
21
22
23
# 编写获取用户信息接口
编写 UserInfocontroller
实现根据用户 id 获取用户信息接口
@RestController
@RequestMapping("/admin/user/userInfo")
public class UserInfoController {

    @Autowired
    private UserInfoService userService;

    @ApiOperation(value = "获取用户信息")
    @GetMapping("/inner/getById/{id}")
    public UserInfo getById(@PathVariable Long id) {
        return userService.getById(id);
    }
}
2
3
4
5
6
7
8
9
10
11
12
13
在网关配置文件配置路径
#service-user模块配置
#设置路由id
spring.cloud.gateway.routes[3].id=service-user
#设置路由的uri
spring.cloud.gateway.routes[3].uri=lb://service-user
#设置路由断言,代理servicerId为auth-service的/auth/路径
spring.cloud.gateway.routes[3].predicates= Path=/*/user/**
2
3
4
5
6
7
# 创建模块定义远程接口
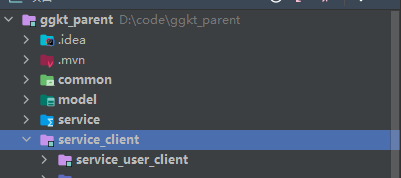
创建 ggkt_parent/ service_client / service_user_client 两个模块
service_client 引入依赖
<dependencies>
    <dependency>
        <groupId>com.atguigu</groupId>
        <artifactId>service_utils</artifactId>
        <version>0.0.1-SNAPSHOT</version>
        <scope>provided </scope>
    </dependency>

    <dependency>
        <groupId>com.atguigu</groupId>
        <artifactId>model</artifactId>
        <version>0.0.1-SNAPSHOT</version>
        <scope>provided </scope>
    </dependency>

    <dependency>
        <groupId>org.springframework.boot</groupId>
        <artifactId>spring-boot-starter-web</artifactId>
        <scope>provided </scope>
    </dependency>

    <!-- 服务调用feign -->
    <dependency>
        <groupId>org.springframework.cloud</groupId>
        <artifactId>spring-cloud-starter-openfeign</artifactId>
        <scope>provided </scope>
    </dependency>
</dependencies>
2
3
4
5
6
7
8
9
10
11
12
13
14
15
16
17
18
19
20
21
22
23
24
25
26
27
28
在 service_user_client 定义远程调用的接口 com.atguigu.ggkt.user.UserInfoFeignClient
@FeignClient(value = "service-user")
public interface UserInfoFeignClient {

    @GetMapping("/admin/user/userInfo/inner/getById/{id}")
    UserInfo getById(@PathVariable Long id);

}
2
3
4
5
6
7
# 编写 Service 实现方法
service_activity 引入 feign 接口依赖
<dependencies>
    <dependency>
        <groupId>com.atguigu</groupId>
        <artifactId>service_user_client</artifactId>
        <version>0.0.1-SNAPSHOT</version>
    </dependency>
</dependencies>
2
3
4
5
6
7
在 service_activity 模块的启动添加注解 @EnableFeignClients
@SpringBootApplication
@EnableDiscoveryClient
@EnableFeignClients(basePackages = "com.atguigu")
public class ServiceActivityApplication {

    public static void main(String[] args) {
        SpringApplication.run(ServiceActivityApplication.class, args);
    }
}
2
3
4
5
6
7
8
9
CouponInfoServiceImpl 实现方法
远程调用,根据用户 id 获取用户信息
@Service
public class CouponInfoServiceImpl extends ServiceImpl<CouponInfoMapper, CouponInfo> implements CouponInfoService {

    @Autowired
    private CouponUseService couponUseService;

    @Autowired
    private UserInfoFeignClient userInfoFeignClient;


    @Override
    public IPage<CouponUse> selectCouponUsePage(Page<CouponUse> pageParam, CouponUseQueryVo couponUseQueryVo) {
        //获取条件
        Long couponId = couponUseQueryVo.getCouponId();
        String couponStatus = couponUseQueryVo.getCouponStatus();
        String getTimeBegin = couponUseQueryVo.getGetTimeBegin();
        String getTimeEnd = couponUseQueryVo.getGetTimeEnd();
        //封装条件
        QueryWrapper<CouponUse> wrapper = new QueryWrapper<>();
        if(!StringUtils.isEmpty(couponId)) {
            wrapper.eq("coupon_id",couponId);
        }
        if(!StringUtils.isEmpty(couponStatus)) {
            wrapper.eq("coupon_status",couponStatus);
        }
        if(!StringUtils.isEmpty(getTimeBegin)) {
            wrapper.ge("get_time",getTimeBegin);
        }
        if(!StringUtils.isEmpty(getTimeEnd)) {
            wrapper.le("get_time",getTimeEnd);
        }
        //调用方法查询
        IPage<CouponUse> page = couponUseService.page(pageParam, wrapper);
        //封装用户昵称和手机号
        List<CouponUse> couponUseList = page.getRecords();
        couponUseList.stream().forEach(item->{
            this.getUserInfoBycouponUse(item);
        });
        return page;
    }


    /**
     * 封装用户昵称和手机号
     * @param couponUse
     * @return
     */
    private CouponUse getUserInfoBycouponUse(CouponUse couponUse) {
        Long userId = couponUse.getUserId();
        if(!StringUtils.isEmpty(userId)) {
            UserInfo userInfo = userInfoFeignClient.getById(userId);
            if(userInfo != null) {
                couponUse.getParam().put("nickName", userInfo.getNickName());
                couponUse.getParam().put("phone", userInfo.getPhone());
            }
        }
        return couponUse;
    }
}
2
3
4
5
6
7
8
9
10
11
12
13
14
15
16
17
18
19
20
21
22
23
24
25
26
27
28
29
30
31
32
33
34
35
36
37
38
39
40
41
42
43
44
45
46
47
48
49
50
51
52
53
54
55
56
57
58
59
60
# 配置网关
service_gateway 配置文件
#service-activity模块配置
#设置路由id
spring.cloud.gateway.routes[2].id=service-activity
#设置路由的uri
spring.cloud.gateway.routes[2].uri=lb://service-activity
#设置路由断言,代理servicerId为auth-service的/auth/路径
spring.cloud.gateway.routes[2].predicates= Path=/*/activity/**
2
3
4
5
6
7
# 整合优惠券前端
定义接口 /api/ activity / couponInfo.js
import request from '@/utils/request'

const api_name = '/admin/activity/couponInfo'

export default {

  getPageList(page, limit) {
    return request({
      url: `${api_name}/${page}/${limit}`,
      method: 'get'
    })
  },
  getById(id) {
    return request({
      url: `${api_name}/get/${id}`,
      method: 'get'
    })
  },

  save(role) {
    return request({
      url: `${api_name}/save`,
      method: 'post',
      data: role
    })
  },

  updateById(role) {
    return request({
      url: `${api_name}/update`,
      method: 'put',
      data: role
    })
  },
  removeById(id) {
    return request({
      url: `${api_name}/remove/${id}`,
      method: 'delete'
    })
  },
  removeRows(idList) {
    return request({
      url: `${api_name}/batchRemove`,
      method: 'delete',
      data: idList
    })
  },

  getPageCouponUseList(page, limit, searchObj) {
    return request({
      url: `${api_name}/couponUse/${page}/${limit}`,
      method: 'get',
      params: searchObj
    })
  }
}
2
3
4
5
6
7
8
9
10
11
12
13
14
15
16
17
18
19
20
21
22
23
24
25
26
27
28
29
30
31
32
33
34
35
36
37
38
39
40
41
42
43
44
45
46
47
48
49
50
51
52
53
54
55
56
添加路由
{
  path: '/activity',
  component: Layout,
  redirect: '/couponInfo/list',
  name: 'Activity',
  meta: { title: '营销活动管理', icon: 'el-icon-football' },
  alwaysShow: true,
  children: [
    {
      path: 'couponInfo/list',
      name: 'CouponInfo',
      component: () => import('@/views/activity/couponInfo/list'),
      meta: { title: '优惠券列表' }
    },
    {
      path: 'couponInfo/add',
      name: 'CouponInfoAdd',
      component: () => import('@/views/activity/couponInfo/form'),
      meta: { title: '添加' },
      hidden: true
    },
    {
      path: 'couponInfo/edit/:id',
      name: 'CouponInfoEdit',
      component: () => import('@/views/activity/couponInfo/form'),
      meta: { title: '编辑', noCache: true },
      hidden: true
    },
    {
      path: 'couponInfo/show/:id',
      name: 'CouponInfoShow',
      component: () => import('@/views/activity/couponInfo/show'),
      meta: { title: '详情', noCache: true },
      hidden: true
    }
  ]
},
2
3
4
5
6
7
8
9
10
11
12
13
14
15
16
17
18
19
20
21
22
23
24
25
26
27
28
29
30
31
32
33
34
35
36
37
创建 /views/ activity / couponInfo / list.vue
<template>
  <div class="app-container">

    <!-- 工具条 -->
    <el-card class="operate-container" shadow="never">
      <i class="el-icon-tickets" style="margin-top: 5px"></i>
      <span style="margin-top: 5px">数据列表</span>
      <el-button class="btn-add" size="mini" @click="add()">添加</el-button>
    </el-card>

    <!-- banner列表 -->
    <el-table
      v-loading="listLoading"
      :data="list"
      element-loading-text="数据正在加载......"
      border
      fit
      highlight-current-row>

      <el-table-column
        label="序号"
        width="70"
        align="center">
        <template slot-scope="scope">
          {{ (page - 1) * limit + scope.$index + 1 }}
        </template>
      </el-table-column>

      <el-table-column prop="couponName" label="购物券名称" />
      <el-table-column prop="couponType" label="购物券类型">
        <template slot-scope="scope">
          {{ scope.row.couponType == 'REGISTER' ? '注册卷' : '推荐赠送卷' }}
        </template>
      </el-table-column>
      <el-table-column label="规则">
        <template slot-scope="scope">
          {{ '现金卷:' + scope.row.amount + '元' }}
        </template>
      </el-table-column>
      <el-table-column label="使用范围 ">
          所有商品
      </el-table-column>
      <el-table-column prop="publishCount" label="发行数量" />
      <el-table-column prop="expireTime" label="过期时间" />
      <el-table-column prop="createTime" label="创建时间" />
      <el-table-column label="操作" width="150" align="center">
        <template slot-scope="scope">
          <router-link :to="'/activity/couponInfo/edit/'+scope.row.id">
            <el-button size="mini" type="text" >修改</el-button>
          </router-link>
          <el-button size="mini" type="text" @click="removeDataById(scope.row.id)">删除</el-button>
          <router-link :to="'/activity/couponInfo/show/'+scope.row.id">
            <el-button size="mini" type="text" >详情</el-button>
          </router-link>
        </template>
      </el-table-column>
    </el-table>

    <!-- 分页组件 -->
    <el-pagination
      :current-page="page"
      :total="total"
      :page-size="limit"
      :page-sizes="[5, 10, 20, 30, 40, 50, 100]"
      style="padding: 30px 0; text-align: center;"
      layout="sizes, prev, pager, next, jumper, ->, total, slot"
      @current-change="fetchData"
      @size-change="changeSize"
    />
  </div>
</template>

<script>
import api from '@/api/activity/couponInfo'

export default {
  data() {
    return {
      listLoading: true, // 数据是否正在加载
      list: null, // banner列表
      total: 0, // 数据库中的总记录数
      page: 1, // 默认页码
      limit: 10, // 每页记录数
      searchObj: {}, // 查询表单对象
      multipleSelection: [] // 批量选择中选择的记录列表
    }
  },

  // 生命周期函数:内存准备完毕,页面尚未渲染
  created() {
    console.log('list created......')
    this.fetchData()
  },

  // 生命周期函数:内存准备完毕,页面渲染成功
  mounted() {
    console.log('list mounted......')
  },

  methods: {

    // 当页码发生改变的时候
    changeSize(size) {
      console.log(size)
      this.limit = size
      this.fetchData(1)
    },

    add(){
      this.$router.push({ path: '/activity/couponInfo/add' })
    },

    // 加载banner列表数据
    fetchData(page = 1) {
      console.log('翻页。。。' + page)
      // 异步获取远程数据(ajax)
      this.page = page

      api.getPageList(this.page, this.limit, this.searchObj).then(
        response => {
          this.list = response.data.records
          this.total = response.data.total

          // 数据加载并绑定成功
          this.listLoading = false
        }
      )
    },

    // 重置查询表单
    resetData() {
      console.log('重置查询表单')
      this.searchObj = {}
      this.fetchData()
    },

    // 根据id删除数据
    removeDataById(id) {
      // debugger
      this.$confirm('此操作将永久删除该记录, 是否继续?', '提示', {
        confirmButtonText: '确定',
        cancelButtonText: '取消',
        type: 'warning'
      }).then(() => { // promise
        // 点击确定,远程调用ajax
        return api.removeById(id)
      }).then((response) => {
        this.fetchData(this.page)
        if (response.code) {
          this.$message({
            type: 'success',
            message: '删除成功!'
          })
        }
      }).catch(() => {
        this.$message({
          type: 'info',
          message: '已取消删除'
        })
      })
    }
  }
}
</script>
2
3
4
5
6
7
8
9
10
11
12
13
14
15
16
17
18
19
20
21
22
23
24
25
26
27
28
29
30
31
32
33
34
35
36
37
38
39
40
41
42
43
44
45
46
47
48
49
50
51
52
53
54
55
56
57
58
59
60
61
62
63
64
65
66
67
68
69
70
71
72
73
74
75
76
77
78
79
80
81
82
83
84
85
86
87
88
89
90
91
92
93
94
95
96
97
98
99
100
101
102
103
104
105
106
107
108
109
110
111
112
113
114
115
116
117
118
119
120
121
122
123
124
125
126
127
128
129
130
131
132
133
134
135
136
137
138
139
140
141
142
143
144
145
146
147
148
149
150
151
152
153
154
155
156
157
158
159
160
161
162
163
164
创建 /views/activity/couponInfo/ form.vue
<template>
  <div class="app-container">
    <el-form label-width="120px">

      <el-form-item label="优惠券名称">
        <el-input v-model="couponInfo.couponName"/>
      </el-form-item>
      <el-form-item label="优惠券类型">
        <el-radio-group v-model="couponInfo.couponType">
          <el-radio label="1">注册卷</el-radio>
          <el-radio label="2">推荐购买卷</el-radio>
        </el-radio-group>
      </el-form-item>

      <el-form-item label="发行数量">
        <el-input v-model="couponInfo.publishCount"/>
      </el-form-item>
      <el-form-item label="领取时间">
        <el-date-picker
          v-model="couponInfo.startTime"
          type="date"
          placeholder="选择开始日期"
          value-format="yyyy-MM-dd" />
        至
        <el-date-picker
          v-model="couponInfo.endTime"
          type="date"
          placeholder="选择开始日期"
          value-format="yyyy-MM-dd" />
      </el-form-item>
      <el-form-item label="过期时间">
        <el-date-picker
          v-model="couponInfo.expireTime"
          type="datetime"
          placeholder="选择开始日期"
          value-format="yyyy-MM-dd HH:mm:ss" />
      </el-form-item>
      <el-form-item label="直播详情">
        <el-input v-model="couponInfo.ruleDesc" type="textarea" rows="5"/>
      </el-form-item>
      <el-form-item>
        <el-button type="primary" @click="saveOrUpdate">保存</el-button>
        <el-button @click="back">返回</el-button>
      </el-form-item>
    </el-form>
  </div>
</template>

<script>

import api from '@/api/activity/couponInfo'

const defaultForm = {
  id: '',
  couponType: '1',
  couponName: '',
  amount: '0',
  conditionAmount: '0',
  startTime: '',
  endTime: '',
  rangeType: '1',
  ruleDesc: '',
  publishCount: '',
  perLimit: '1',
  useCount: '0',
  receiveCount: '',
  expireTime: '',
  publishStatus: ''
}

export default {
  data() {
    return {
      couponInfo: defaultForm,
      saveBtnDisabled: false,

      keyword: '',
      skuInfoList: []
    }
  },

  // 监听器
  watch: {
    $route(to, from) {
      console.log('路由变化......')
      console.log(to)
      console.log(from)
      this.init()
    }
  },

  // 生命周期方法(在路由切换,组件不变的情况下不会被调用)
  created() {
    console.log('form created ......')
    this.init()
  },

  methods: {

    // 表单初始化
    init() {
      // debugger
      if (this.$route.params && this.$route.params.id) {
        const id = this.$route.params.id
        this.fetchDataById(id)
      } else {
        // 对象拓展运算符:拷贝对象,而不是赋值对象的引用
        this.couponInfo = { ...defaultForm }
      }
    },

    saveOrUpdate() {
      this.saveBtnDisabled = true // 防止表单重复提交
      if (!this.couponInfo.id) {
        this.saveData()
      } else {
        this.updateData()
      }
    },

    // 新增
    saveData() {
      api.save(this.couponInfo).then(response => {
        // debugger
        if (response.code) {
          this.$message({
            type: 'success',
            message: response.message
          })
          this.$router.push({ path: '/activity/couponInfo/list' })
        }
      })
    },

    // 根据id更新记录
    updateData() {
      api.updateById(this.couponInfo).then(response => {
        debugger
        if (response.code) {
          this.$message({
            type: 'success',
            message: response.message
          })
          this.$router.push({ path: '/activity/couponInfo/list' })
        }
      })
    },

    back() {
      this.$router.push({ path: '/activity/couponInfo/list' })
    },

    // 根据id查询记录
    fetchDataById(id) {
      api.getById(id).then(response => {
        // debugger
        this.couponInfo = response.data
      })
    }
  }
}
</script>
2
3
4
5
6
7
8
9
10
11
12
13
14
15
16
17
18
19
20
21
22
23
24
25
26
27
28
29
30
31
32
33
34
35
36
37
38
39
40
41
42
43
44
45
46
47
48
49
50
51
52
53
54
55
56
57
58
59
60
61
62
63
64
65
66
67
68
69
70
71
72
73
74
75
76
77
78
79
80
81
82
83
84
85
86
87
88
89
90
91
92
93
94
95
96
97
98
99
100
101
102
103
104
105
106
107
108
109
110
111
112
113
114
115
116
117
118
119
120
121
122
123
124
125
126
127
128
129
130
131
132
133
134
135
136
137
138
139
140
141
142
143
144
145
146
147
148
149
150
151
152
153
154
155
156
157
158
159
160
161
162
创建 /views/activity/couponInfo/ show.vue
<template>
<div class="app-container">
<h4>优惠券信息</h4>
<table class="table table-striped table-condenseda table-bordered" width="100%">
<tbody>
<tr>
<th width="15%">优惠券名称</th>
<td width="35%"><b style="font-size: 14px">{{ couponInfo.couponName }}</b></td>
<th width="15%">优惠券类型</th>
<td width="35%">
{{ couponInfo.couponType == 'REGISTER' ? '注册卷' : '推荐赠送卷' }}
</td>
</tr>
<tr>
<th>发行数量</th>
<td>{{ couponInfo.publishCount }}</td>
<th>每人限领次数</th>
<td>{{ couponInfo.perLimit }}</td>
</tr>
<tr>
<th>领取数量</th>
<td>{{ couponInfo.receiveCount }}</td>
<th>使用数量</th>
<td>{{ couponInfo.useCount }}</td>
</tr>
<tr>
<th>领取时间</th>
<td>{{ couponInfo.startTime }}至{{ couponInfo.endTime }}</td>
<th>过期时间</th>
<td>{{ couponInfo.expireTime }}</td>
</tr>
<tr>
<th>规则描述</th>
<td colspan="3">{{ couponInfo.ruleDesc }}</td>
</tr>
</tbody>
</table>
<h4>
优惠券发放列表
</h4>
<el-table
v-loading="listLoading"
:data="list"
stripe
border
style="width: 100%;margin-top: 10px;">
<el-table-column
label="序号"
width="70"
align="center">
<template slot-scope="scope">
{{ (page - 1) * limit + scope.$index + 1 }}
</template>
</el-table-column>
<el-table-column prop="param.nickName" label="用户昵称" />
<el-table-column prop="param.phone" label="手机号" />
<el-table-column label="使用状态">
<template slot-scope="scope">
{{ scope.row.couponStatus == 'NOT_USED' ? '未使用' : '已使用' }}
</template>
</el-table-column>
<el-table-column prop="getTime" label="获取时间" />
<el-table-column prop="usingTime" label="使用时间" />
<el-table-column prop="usedTime" label="支付时间" />
<el-table-column prop="expireTime" label="过期时间" />
</el-table>
<!-- 分页组件 -->
<el-pagination
:current-page="page"
:total="total"
:page-size="limit"
:page-sizes="[5, 10, 20, 30, 40, 50, 100]"
style="padding: 30px 0; text-align: center;"
layout="sizes, prev, pager, next, jumper, ->, total, slot"
@current-change="fetchData"
@size-change="changeSize"
/>
<div style="margin-top: 15px;">
<el-form label-width="0px">
<el-form-item>
<el-button @click="back">返回</el-button>
</el-form-item>
</el-form>
</div>
</div>
</template>
<script>
import api from '@/api/activity/couponInfo'
export default {
data() {
return {
listLoading: false, // 数据是否正在加载
couponId: null,
couponInfo: {},
list: null, // banner列表
total: 0, // 数据库中的总记录数
page: 1, // 默认页码
limit: 10, // 每页记录数
searchObj: {} // 查询表单对象
}
},
// 监听器
watch: {
$route(to, from) {
console.log('路由变化......')
console.log(to)
console.log(from)
this.init()
}
},
// 生命周期方法(在路由切换,组件不变的情况下不会被调用)
created() {
console.log('form created ......')
this.couponId = this.$route.params.id
// 获取优惠券信息
this.fetchDataById()
this.fetchData()
},
methods: {
// 根据id查询记录
fetchDataById() {
api.getById(this.couponId).then(response => {
//
this.couponInfo = response.data
})
},
// 当页码发生改变的时候
changeSize(size) {
console.log(size)
this.limit = size
this.fetchData(1)
},
// 加载banner列表数据
fetchData(page = 1) {
console.log('翻页。。。' + page)
// 异步获取远程数据(ajax)
this.page = page
this.searchObj.couponId = this.couponId
api.getPageCouponUseList(this.page, this.limit, this.searchObj).then(
response => {
this.list = response.data.records
this.total = response.data.total
// 数据加载并绑定成功
this.listLoading = false
}
)
},
back() {
this.$router.push({ path: '/activity/couponInfo/list' })
}
}
}
</script>
<style>
.app-container h4 {
color: #606266;
}
</style>
2
3
4
5
6
7
8
9
10
11
12
13
14
15
16
17
18
19
20
21
22
23
24
25
26
27
28
29
30
31
32
33
34
35
36
37
38
39
40
41
42
43
44
45
46
47
48
49
50
51
52
53
54
55
56
57
58
59
60
61
62
63
64
65
66
67
68
69
70
71
72
73
74
75
76
77
78
79
80
81
82
83
84
85
86
87
88
89
90
91
92
93
94
95
96
97
98
99
100
101
102
103
104
105
106
107
108
109
110
111
112
113
114
115
116
117
118
119
120
121
122
123
124
125
126
127
128
129
130
131
132
133
134
135
136
137
138
139
140
141
142
143
144
145
146
147
148
149
150
151
152
153
154
155
156
157
158
159
160
161
162
163
164
165
166
167
168
169
170
171
172
173
# 微信公众号
# 注册公众号
微信公众平台:https://mp.weixin.qq.com/
注册步骤参考官方注册文档:https://kf.qq.com/faq/120911VrYVrA151013MfYvYV.html,
注册过程仅做了解,有公司运营负责申请与认证。
作为开发人员,首先应该关注的是设置与开发模块;而作为产品运营人员与数据分析人员,关注的是内容与互动、数据及广告与服务模块。
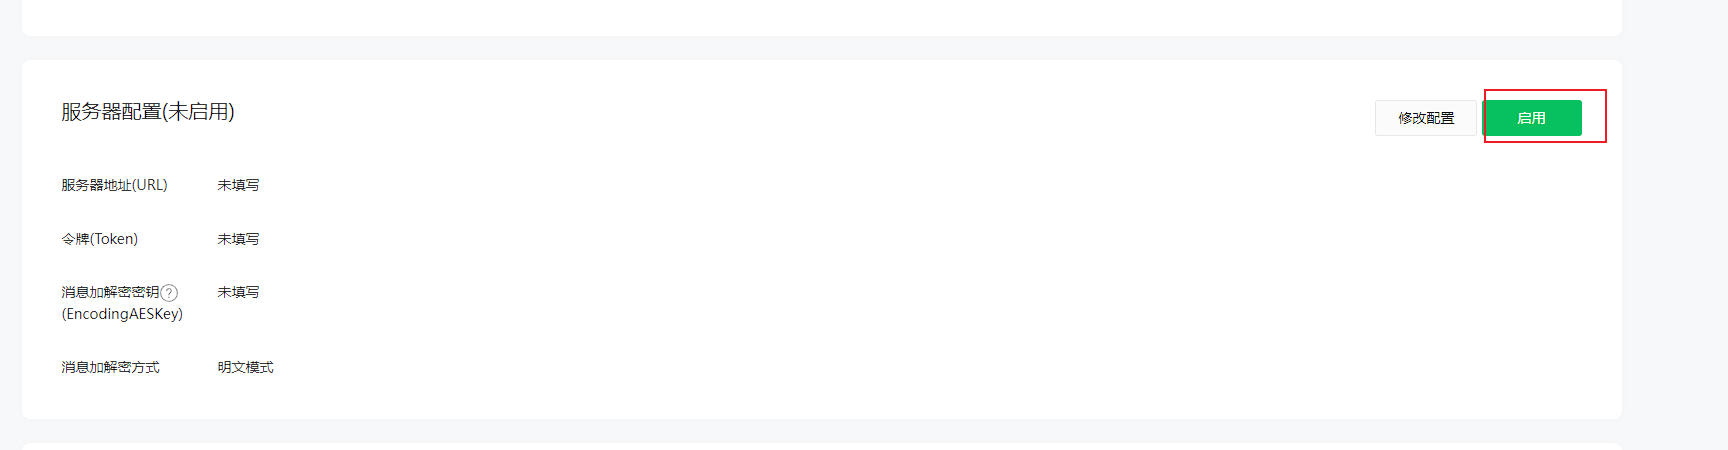
开启开发功能
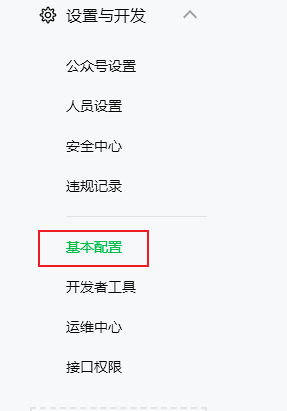
如果我们决定技术人员开发公众号,必须启用服务器配置,而这将导致 UI 界面设置的自动回复和自定义菜单失效!
我们在 设置与开发 - 基本配置 - 服务器配置 中点击启用:
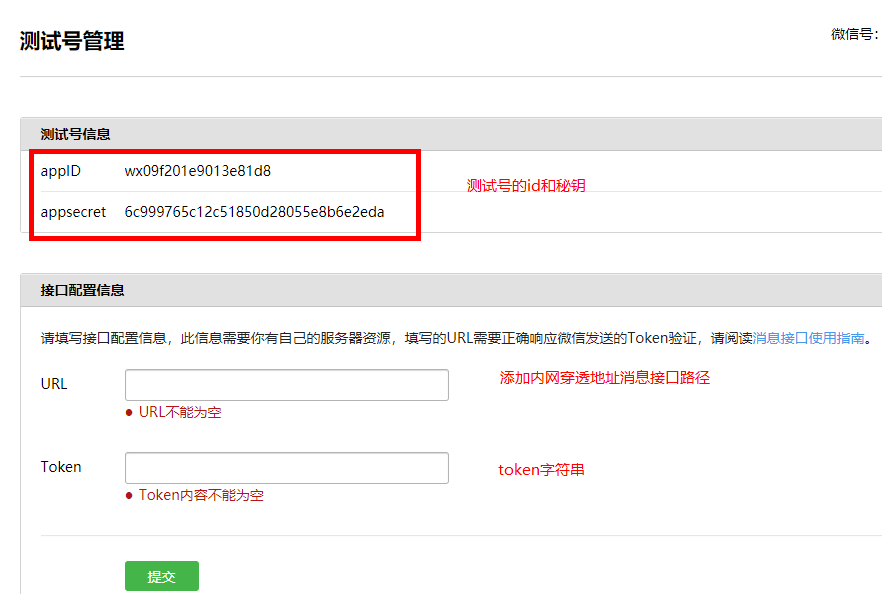
# 微信公众平台测试帐号
微信公众平台接口测试帐号:https://mp.weixin.qq.com/debug/cgi-bin/sandbox?t=sandbox/login&token=399029368&lang=zh_CN
- 其中 appID 和 appsecret 用于后面菜单开发使用
- 其中 URL 是开发者用来接收微信消息和事件的接口 URL。Token 可由开发者可以任意填写,用作生成签名(该 Token 会和接口 URL 中包含的 Token 进行比对,从而验证安全性)。本地测试,url 改为内网穿透地址。
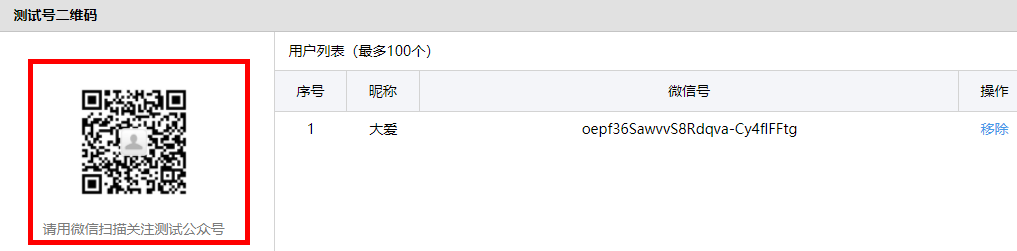
关注公众号
# 后台管理系统 - 公众号菜单管理
# 微信自定义菜单说明
微信自定义菜单文档地址:https://developers.weixin.qq.com/doc/offiaccount/Custom_Menus/Creating_Custom-Defined_Menu.html
微信自定义菜单注意事项:
- 自定义菜单最多包括 3 个一级菜单,每个一级菜单最多包含 5 个二级菜单。
- 一级菜单最多 4 个汉字,二级菜单最多 8 个汉字,多出来的部分将会以 “...” 代替。
- 创建自定义菜单后,菜单的刷新策略是,在用户进入公众号会话页或公众号 profile 页时,如果发现上一次拉取菜单的请求在 5 分钟以前,就会拉取一下菜单,如果菜单有更新,就会刷新客户端的菜单。测试时可以尝试取消关注公众账号后再次关注,则可以看到创建后的效果。
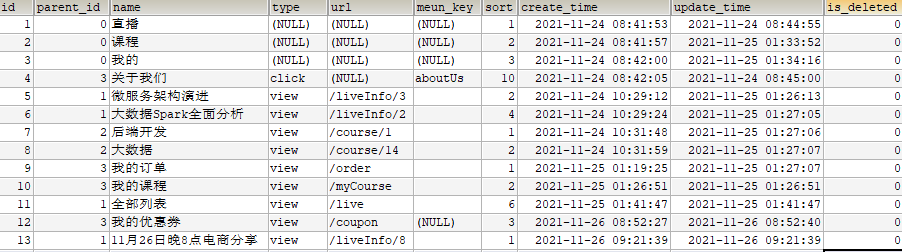
需求分析
一级菜单:直播、课程、我的
二级菜单:根据一级菜单动态设置二级菜单,直播(近期直播课程),课程(课程分类),我的(我的订单、我的课程、我的优惠券及关于我们)
说明:
1、二级菜单可以是网页类型,点击跳转 H5 页面
2、二级菜单可以是消息类型,点击返回消息
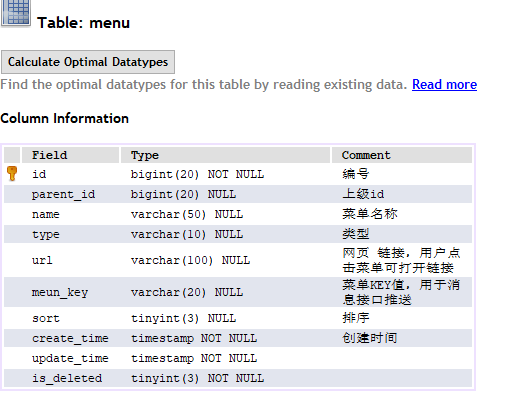
(1)页面功能 “列表、添加、修改与删除” 是对 menu 表的操作
(2)页面功能 “同步菜单与删除菜单” 是对微信平台接口操作
# 搭建菜单管理后端环境
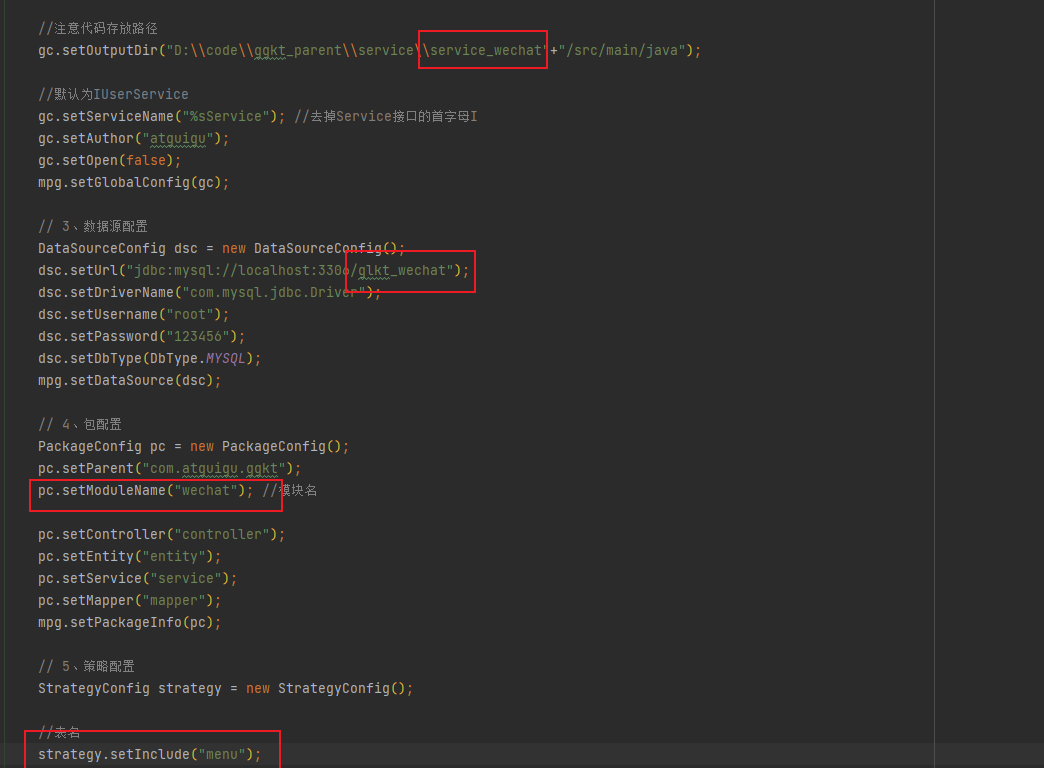
在 service 下创建子模块 service_wechat
导入依赖
    <dependencies>
        <dependency>
            <groupId>com.github.binarywang</groupId>
            <artifactId>weixin-java-mp</artifactId>
            <version>4.1.0</version>
        </dependency>
    </dependencies>
2
3
4
5
6
7
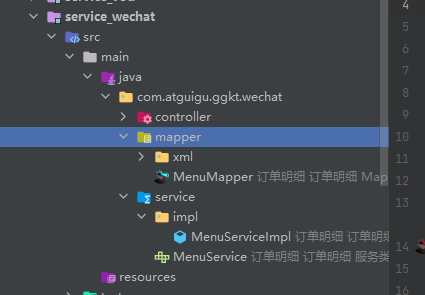
生成代码
创建启动类 ServiceWechatApplication
@SpringBootApplication
@EnableDiscoveryClient
@EnableFeignClients(basePackages = "com.atguigu")
@MapperScan("com.atguigu.ggkt.wechat.mapper")
@ComponentScan(basePackages = "com.atguigu")
public class ServiceWechatApplication {
    public static void main(String[] args) {
        SpringApplication.run(ServiceWechatApplication.class, args);
    }
}
2
3
4
5
6
7
8
9
10
配置文件
# 服务端口
server.port=8305
# 服务名
spring.application.name=service-wechat

# 环境设置:dev、test、prod
spring.profiles.active=dev

# mysql数据库连接
spring.datasource.driver-class-name=com.mysql.jdbc.Driver
spring.datasource.url=jdbc:mysql://localhost:3306/glkt_wechat?characterEncoding=utf-8&useSSL=false
spring.datasource.username=root
spring.datasource.password=123456

#返回json的全局时间格式
spring.jackson.date-format=yyyy-MM-dd HH:mm:ss
spring.jackson.time-zone=GMT+8

#mybatis日志
mybatis-plus.configuration.log-impl=org.apache.ibatis.logging.stdout.StdOutImpl

mybatis-plus.mapper-locations=classpath:com/atguigu/ggkt/wechat/mapper/xml/*.xml

# nacos服务地址
spring.cloud.nacos.discovery.server-addr=127.0.0.1:8848

#公众号id和秘钥
# 硅谷课堂微信公众平台appId
wechat.mpAppId: wx09f201e9013e81d8
# 硅谷课堂微信公众平台api秘钥
wechat.mpAppSecret: 6c999765c12c51850d28055e8b6e2eda
2
3
4
5
6
7
8
9
10
11
12
13
14
15
16
17
18
19
20
21
22
23
24
25
26
27
28
29
30
31
配置网关
#service-wechat模块配置
#设置路由id
spring.cloud.gateway.routes[4].id=service-wechat
#设置路由的uri
spring.cloud.gateway.routes[4].uri=lb://service-wechat
#设置路由断言,代理servicerId为auth-service的/auth/路径
spring.cloud.gateway.routes[4].predicates= Path=/*/wechat/**
2
3
4
5
6
7
# 开发菜单管理接口
编写 MenuController
@RestController
@RequestMapping("/admin/wechat/menu")
public class MenuController {

    @Autowired
    private MenuService menuService;

    /**
     * 获取所有菜单,按照一级和二级菜单封装
      * @return
     */
    @GetMapping("/findMenuInfo")
    public Result findMenuInfo() {
        List<MenuVo> list = menuService.findMenuInfo();
        return Result.ok(list);
    }

    /**
     * 获取所有一级菜单
     * @return
     */
    @GetMapping("/findOneMenuInfo")
    public Result findOneMenuInfo() {
        List<Menu> list = menuService.findMenuOneInfo();
        return Result.ok(list);
    }

    @ApiOperation(value = "获取")
    @GetMapping("/get/{id}")
    public Result get(@PathVariable Long id) {
        Menu menu = menuService.getById(id);
        return Result.ok(menu);
    }

    @ApiOperation(value = "新增")
    @PostMapping("save")
    public Result save(@RequestBody Menu menu) {
        menuService.save(menu);
        return Result.ok();
    }

    @ApiOperation(value = "修改")
    @PutMapping("/update")
    public Result updateById(@RequestBody Menu menu) {
        menuService.updateById(menu);
        return Result.ok();
    }

    @ApiOperation(value = "删除")
    @DeleteMapping("/remove/{id}")
    public Result remove(@PathVariable Long id) {
        menuService.removeById(id);
        return Result.ok();
    }

    @ApiOperation(value = "根据id列表删除")
    @DeleteMapping("/batchRemove")
    public Result batchRemove(@RequestBody List<Long> idList) {
        menuService.removeByIds(idList);
        return Result.ok();
    }
}
2
3
4
5
6
7
8
9
10
11
12
13
14
15
16
17
18
19
20
21
22
23
24
25
26
27
28
29
30
31
32
33
34
35
36
37
38
39
40
41
42
43
44
45
46
47
48
49
50
51
52
53
54
55
56
57
58
59
60
61
62
MenuService 定义方法
    /**
    获取全部菜单
     */
    List<MenuVo> findMenuInfo();

    /**
     * 获取一级菜单
     */
    List<Menu> findMenuOneInfo();
2
3
4
5
6
7
8
9
MenuServiceImpl 实现方法
@Service
public class MenuServiceImpl extends ServiceImpl<MenuMapper, Menu> implements MenuService {

    /**
     * 获取全部菜单
     * @return
     */
    @Override
    public List<MenuVo> findMenuInfo() {
        List<MenuVo> list = new ArrayList<>();
        List<Menu> menuList = baseMapper.selectList(null);
        // 查询所有一级菜单
        List<Menu> oneMenuList = menuList.stream().filter(menu -> menu.getParentId() == 0).collect(Collectors.toList());
        for(Menu oneMenu : oneMenuList) {
            MenuVo oneMenuVo = new MenuVo();
            BeanUtils.copyProperties(oneMenu, oneMenuVo);
            //查询每个一级菜单的子菜单
            List<Menu> twoMenuList = menuList.stream()
                    .filter(menu -> menu.getParentId().longValue() == oneMenu.getId())
                    .sorted(Comparator.comparing(Menu::getSort))
                    .collect(Collectors.toList());
            List<MenuVo> children = new ArrayList<>();
            //遍历子菜单转换为 vo表现层对象 再加入到1级菜单下面
            for(Menu twoMenu : twoMenuList) {
                MenuVo twoMenuVo = new MenuVo();
                BeanUtils.copyProperties(twoMenu, twoMenuVo);
                children.add(twoMenuVo);
            }
            oneMenuVo.setChildren(children);
            list.add(oneMenuVo);
        }
        return list;
    }

    /**
     * 获取一级菜单
     * @return
     */
    @Override
    public List<Menu> findMenuOneInfo() {
        QueryWrapper<Menu> wrapper = new QueryWrapper<>();
        wrapper.eq("parent_id",0);
        List<Menu> list = baseMapper.selectList(wrapper);
        return list;
    }
}
2
3
4
5
6
7
8
9
10
11
12
13
14
15
16
17
18
19
20
21
22
23
24
25
26
27
28
29
30
31
32
33
34
35
36
37
38
39
40
41
42
43
44
45
46
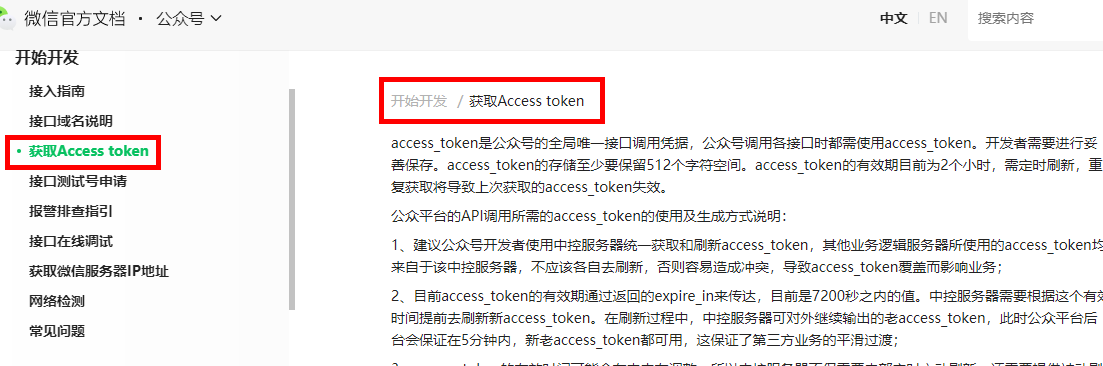
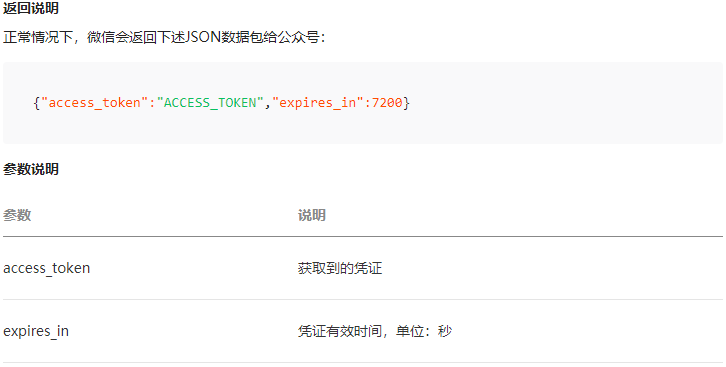
# 同步菜单(获取 access_token)
进行菜单同步时候,需要获取到公众号的 access_token,通过 access_token 进行菜单同步
接口文档:https://developers.weixin.qq.com/doc/offiaccount/Basic_Information/Get_access_token.html
service_wechat 添加配置
# 硅谷课堂微信公众平台appId
wechat.mpAppId: wx09f201e9013e81d8
# 硅谷课堂微信公众平台api秘钥
wechat.mpAppSecret: 6c999765c12c51850d28055e8b6e2eda
2
3
4
添加工具类 ConstantPropertiesUtil
@Component
public class ConstantPropertiesUtil implements InitializingBean {

    @Value("${wechat.mpAppId}")
    private String appid;

    @Value("${wechat.mpAppSecret}")
    private String appsecret;

    public static String ACCESS_KEY_ID;
    public static String ACCESS_KEY_SECRET;

    @Override
    public void afterPropertiesSet() throws Exception {
        ACCESS_KEY_ID = appid;
        ACCESS_KEY_SECRET = appsecret;
    }
}
2
3
4
5
6
7
8
9
10
11
12
13
14
15
16
17
18
复制资源文件夹下的 HttpClient 工具类
package com.atguigu.ggkt.wechat.utils;

import org.apache.http.Consts;
import org.apache.http.HttpEntity;
import org.apache.http.NameValuePair;
import org.apache.http.client.ClientProtocolException;
import org.apache.http.client.entity.UrlEncodedFormEntity;
import org.apache.http.client.methods.*;
import org.apache.http.conn.ssl.SSLConnectionSocketFactory;
import org.apache.http.conn.ssl.SSLContextBuilder;
import org.apache.http.conn.ssl.TrustStrategy;
import org.apache.http.entity.StringEntity;
import org.apache.http.impl.client.CloseableHttpClient;
import org.apache.http.impl.client.HttpClients;
import org.apache.http.message.BasicNameValuePair;
import org.apache.http.ssl.SSLContexts;
import org.apache.http.util.EntityUtils;

import javax.net.ssl.SSLContext;
import java.io.File;
import java.io.FileInputStream;
import java.io.IOException;
import java.security.KeyStore;
import java.security.cert.CertificateException;
import java.security.cert.X509Certificate;
import java.text.ParseException;
import java.util.HashMap;
import java.util.LinkedList;
import java.util.List;
import java.util.Map;

/**
 * http请求客户端
 *
 * @author qy
 *
 */
public class HttpClient {

    private String url;
    private Map<String, String> param;
    private int statusCode;
    private String content;
    private String xmlParam;
    private boolean isHttps;
    private boolean isCert = false;
    //证书密码 微信商户号(mch_id)
    private String certPassword;

    public boolean isHttps() {
        return isHttps;
    }

    public void setHttps(boolean isHttps) {
        this.isHttps = isHttps;
    }

    public boolean isCert() {
        return isCert;
    }

    public void setCert(boolean cert) {
        isCert = cert;
    }

    public String getXmlParam() {
        return xmlParam;
    }

    public void setXmlParam(String xmlParam) {
        this.xmlParam = xmlParam;
    }

    public HttpClient(String url, Map<String, String> param) {
        this.url = url;
        this.param = param;
    }

    public HttpClient(String url) {
        this.url = url;
    }

    public String getCertPassword() {
        return certPassword;
    }

    public void setCertPassword(String certPassword) {
        this.certPassword = certPassword;
    }

    public void setParameter(Map<String, String> map) {
        param = map;
    }

    public void addParameter(String key, String value) {
        if (param == null)
            param = new HashMap<String, String>();
        param.put(key, value);
    }

    public void post() throws ClientProtocolException, IOException {
        HttpPost http = new HttpPost(url);
        setEntity(http);
        execute(http);
    }

    public void put() throws ClientProtocolException, IOException {
        HttpPut http = new HttpPut(url);
        setEntity(http);
        execute(http);
    }

    public void get() throws ClientProtocolException, IOException {
        if (param != null) {
            StringBuilder url = new StringBuilder(this.url);
            boolean isFirst = true;
            for (String key : param.keySet()) {
                if (isFirst)
                    url.append("?");
                else
                    url.append("&");
                url.append(key).append("=").append(param.get(key));
            }
            this.url = url.toString();
        }
        HttpGet http = new HttpGet(url);
        execute(http);
    }

    /**
     * set http post,put param
     */
    private void setEntity(HttpEntityEnclosingRequestBase http) {
        if (param != null) {
            List<NameValuePair> nvps = new LinkedList<NameValuePair>();
            for (String key : param.keySet())
                nvps.add(new BasicNameValuePair(key, param.get(key))); // 参数
            http.setEntity(new UrlEncodedFormEntity(nvps, Consts.UTF_8)); // 设置参数
        }
        if (xmlParam != null) {
            http.setEntity(new StringEntity(xmlParam, Consts.UTF_8));
        }
    }
    private void execute(HttpUriRequest http) throws ClientProtocolException,
            IOException {
        CloseableHttpClient httpClient = null;
        try {
            if (isHttps) {
                if(isCert) {
                    //TODO 退款使用 需要完善
                    FileInputStream inputStream = null;//new FileInputStream(new File(ConstantPropertiesUtils.CERT));
                    KeyStore keystore = KeyStore.getInstance("PKCS12");
                    char[] partnerId2charArray = certPassword.toCharArray();
                    keystore.load(inputStream, partnerId2charArray);
                    SSLContext sslContext = SSLContexts.custom().loadKeyMaterial(keystore, partnerId2charArray).build();
                    SSLConnectionSocketFactory sslsf =
                            new SSLConnectionSocketFactory(sslContext,
                                    new String[] { "TLSv1" },
                                    null,
                                    SSLConnectionSocketFactory.BROWSER_COMPATIBLE_HOSTNAME_VERIFIER);
                    httpClient = HttpClients.custom().setSSLSocketFactory(sslsf).build();
                } else {
                    SSLContext sslContext = new SSLContextBuilder()
                            .loadTrustMaterial(null, new TrustStrategy() {
                                // 信任所有
                                public boolean isTrusted(X509Certificate[] chain,
                                                         String authType)
                                        throws CertificateException {
                                    return true;
                                }
                            }).build();
                    SSLConnectionSocketFactory sslsf = new SSLConnectionSocketFactory(
                            sslContext);
                    httpClient = HttpClients.custom().setSSLSocketFactory(sslsf)
                            .build();
                }
            } else {
                httpClient = HttpClients.createDefault();
            }
            CloseableHttpResponse response = httpClient.execute(http);
            try {
                if (response != null) {
                    if (response.getStatusLine() != null)
                        statusCode = response.getStatusLine().getStatusCode();
                    HttpEntity entity = response.getEntity();
                    // 响应内容
                    content = EntityUtils.toString(entity, Consts.UTF_8);
                }
            } finally {
                response.close();
            }
        } catch (Exception e) {
            e.printStackTrace();
        } finally {
            httpClient.close();
        }
    }
    public int getStatusCode() {
        return statusCode;
    }
    public String getContent() throws ParseException, IOException {
        return content;
    }
}
2
3
4
5
6
7
8
9
10
11
12
13
14
15
16
17
18
19
20
21
22
23
24
25
26
27
28
29
30
31
32
33
34
35
36
37
38
39
40
41
42
43
44
45
46
47
48
49
50
51
52
53
54
55
56
57
58
59
60
61
62
63
64
65
66
67
68
69
70
71
72
73
74
75
76
77
78
79
80
81
82
83
84
85
86
87
88
89
90
91
92
93
94
95
96
97
98
99
100
101
102
103
104
105
106
107
108
109
110
111
112
113
114
115
116
117
118
119
120
121
122
123
124
125
126
127
128
129
130
131
132
133
134
135
136
137
138
139
140
141
142
143
144
145
146
147
148
149
150
151
152
153
154
155
156
157
158
159
160
161
162
163
164
165
166
167
168
169
170
171
172
173
174
175
176
177
178
179
180
181
182
183
184
185
186
187
188
189
190
191
192
193
194
195
196
197
198
199
200
201
202
203
204
205
206
添加 Menucontroller 方法
    /**
     * 获取access_token
     * @return
     */
    @GetMapping("/getAccessToken")
    public Result getAccessToken() {
        try {
            //拼接请求地址
            StringBuffer buffer = new StringBuffer();
            buffer.append("https://api.weixin.qq.com/cgi-bin/token");
            buffer.append("?grant_type=client_credential");
            buffer.append("&appid=%s");
            buffer.append("&secret=%s");
            //请求地址设置参数
            String url = String.format(buffer.toString(),
                    ConstantPropertiesUtil.ACCESS_KEY_ID,
                    ConstantPropertiesUtil.ACCESS_KEY_SECRET);
            //发送http请求
            String tokenString = HttpClientUtils.get(url);
            //获取access_token
            JSONObject jsonObject = JSONObject.parseObject(tokenString);
            String access_token = jsonObject.getString("access_token");
            //返回
            return Result.ok(access_token);
        } catch (Exception e) {
            e.printStackTrace();
            return Result.fail(null);
        }
    }
2
3
4
5
6
7
8
9
10
11
12
13
14
15
16
17
18
19
20
21
22
23
24
25
26
27
28
29
# 同步菜单(功能实现)
接口文档:https://developers.weixin.qq.com/doc/offiaccount/Custom_Menus/Creating_Custom-Defined_Menu.html
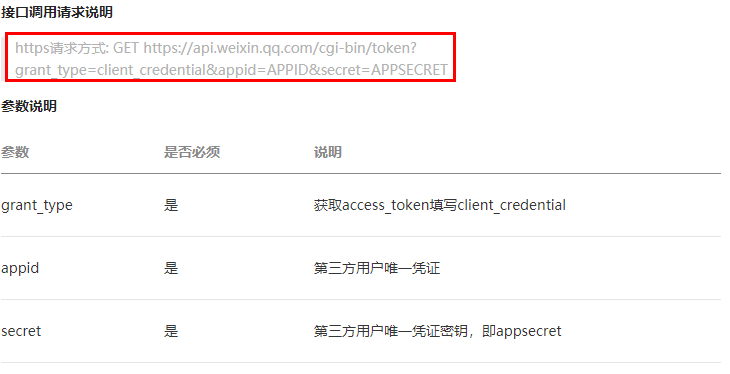
接口调用请求说明
http 请求方式:POST(请使用 https 协议) https://api.weixin.qq.com/cgi-bin/menu/create?access_token=ACCESS_TOKEN
weixin-java-mp 是封装好了的微信接口客户端,使用起来很方便,后续我们就使用 weixin-java-mp 处理微信平台接口。
添加配置类 WeChatMpConfig
@Component
public class WeChatMpConfig {

    @Autowired
    private ConstantPropertiesUtil constantPropertiesUtil;

    @Bean
    public WxMpService wxMpService(){
        WxMpService wxMpService = new WxMpServiceImpl();
        wxMpService.setWxMpConfigStorage(wxMpConfigStorage());
        return wxMpService;
    }
    @Bean
    public WxMpConfigStorage wxMpConfigStorage(){
        WxMpDefaultConfigImpl wxMpConfigStorage = new WxMpDefaultConfigImpl();
        wxMpConfigStorage.setAppId(ConstantPropertiesUtil.ACCESS_KEY_ID);
        wxMpConfigStorage.setSecret(ConstantPropertiesUtil.ACCESS_KEY_SECRET);
        return wxMpConfigStorage;
    }
}
2
3
4
5
6
7
8
9
10
11
12
13
14
15
16
17
18
19
20
定义 Service 方法 MenuService
    /**
     * 同步菜单
     */
    void syncMenu();
2
3
4
实现 Service 方法
    @Autowired
    private WxMpService wxMpService;

	/**
     * 说明:
     * 自定义菜单最多包括3个一级菜单,每个一级菜单最多包含5个二级菜单。
     * 一级菜单最多4个汉字,二级菜单最多8个汉字,多出来的部分将会以“...”代替。
     * 创建自定义菜单后,菜单的刷新策略是,在用户进入公众号会话页或公众号profile页时,如果发现上一次拉取菜单的请求在5分钟以前,就会拉取一下菜单,如果菜单有更新,就会刷新客户端的菜单。测试时可以尝试取消关注公众账号后再次关注,则可以看到创建后的效果。
     */
    @SneakyThrows
    @Override
    public void syncMenu() {
        List<MenuVo> menuVoList = this.findMenuInfo();
        //菜单
        JSONArray buttonList = new JSONArray();
        for(MenuVo oneMenuVo : menuVoList) {
            JSONObject one = new JSONObject();
            one.put("name", oneMenuVo.getName());
            JSONArray subButton = new JSONArray();
            for(MenuVo twoMenuVo : oneMenuVo.getChildren()) {
                JSONObject view = new JSONObject();
                view.put("type", twoMenuVo.getType());
                if(twoMenuVo.getType().equals("view")) {
                    view.put("name", twoMenuVo.getName());
                    view.put("url", "http://ggkt2.vipgz1.91tunnel.com/#"
                            +twoMenuVo.getUrl());
                } else {
                    view.put("name", twoMenuVo.getName());
                    view.put("key", twoMenuVo.getMeunKey());
                }
                subButton.add(view);
            }
            one.put("sub_button", subButton);
            buttonList.add(one);
        }
        //菜单
        JSONObject button = new JSONObject();
        button.put("button", buttonList);
        this.wxMpService.getMenuService().menuCreate(button.toJSONString());
    }
2
3
4
5
6
7
8
9
10
11
12
13
14
15
16
17
18
19
20
21
22
23
24
25
26
27
28
29
30
31
32
33
34
35
36
37
38
39
40
controller 方法
@ApiOperation(value = "同步菜单")
@GetMapping("/syncMenu")
public Result createMenu() throws WxErrorException {
    menuService.syncMenu();
    return Result.ok(null);
}
2
3
4
5
6
# 删除菜单
service 接口,添加 removeMenu() 方法
void removeMenu();
service 接口实现
@SneakyThrows
@Override
public void removeMenu() {
    wxMpService.getMenuService().menuDelete();
}
2
3
4
5
controller 方法
@ApiOperation(value = "删除菜单")
@DeleteMapping("removeMenu")
public Result removeMenu() {
    menuService.removeMenu();
    return Result.ok(null);
}
2
3
4
5
6
# 开发菜单管理前端
添加路由, src/router/index.js 添加路由
{
    path: '/wechat',
    component: Layout,
    redirect: '/wechat/menu/list',
    name: 'Wechat',
    meta: {
      title: '菜单管理',
      icon: 'el-icon-refrigerator'
    },
    alwaysShow: true,
    children: [
      {
        path: 'menu/list',
        name: 'Menu',
        component: () => import('@/views/wechat/menu/list'),
        meta: { title: '菜单列表' }
      }
    ]
},
2
3
4
5
6
7
8
9
10
11
12
13
14
15
16
17
18
19
定义接口, src/api/wechat/menu.js
import request from '@/utils/request'

const api_name = '/admin/wechat/menu'

export default {

  findMenuInfo() {
    return request({
      url: `${api_name}/findMenuInfo`,
      method: `get`
    })
  },

  findOneMenuInfo() {
    return request({
      url: `${api_name}/findOneMenuInfo`,
      method: `get`
    })
  },

  save(menu) {
    return request({
      url: `${api_name}/save`,
      method: `post`,
      data: menu
    })
  },

  getById(id) {
    return request({
      url: `${api_name}/get/${id}`,
      method: `get`
    })
  },

  updateById(menu) {
    return request({
      url: `${api_name}/update`,
      method: `put`,
      data: menu
    })
  },

  syncMenu() {
    return request({
      url: `${api_name}/syncMenu`,
      method: `get`
    })
  },

  removeById(id) {
    return request({
      url: `${api_name}/remove/${id}`,
      method: 'delete'
    })
  },

  removeMenu() {
    return request({
      url: `${api_name}/removeMenu`,
      method: `delete`
    })
  }
}
2
3
4
5
6
7
8
9
10
11
12
13
14
15
16
17
18
19
20
21
22
23
24
25
26
27
28
29
30
31
32
33
34
35
36
37
38
39
40
41
42
43
44
45
46
47
48
49
50
51
52
53
54
55
56
57
58
59
60
61
62
63
64
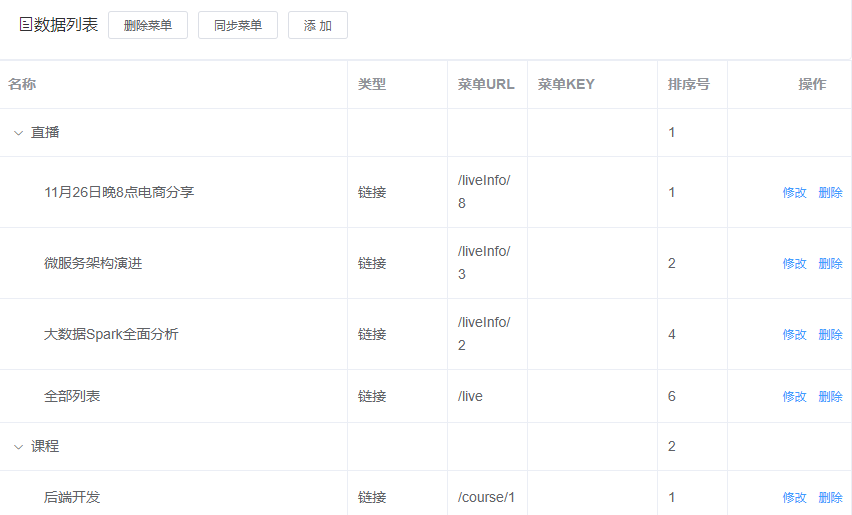
编写页面,创建 views/wechat/menu/list.vue
<template>
  <div class="app-container">

    <!-- 工具条 -->
    <el-card class="operate-container" shadow="never">
      <i class="el-icon-tickets" style="margin-top: 5px"></i>
      <span style="margin-top: 5px">数据列表</span>
      <el-button class="btn-add" size="mini" @click="remove" style="margin-left: 10px;">删除菜单</el-button>
      <el-button class="btn-add" size="mini" @click="syncMenu">同步菜单</el-button>
      <el-button class="btn-add" size="mini" @click="add">添 加</el-button>
    </el-card>

    <el-table
      :data="list"
      style="width: 100%;margin-bottom: 20px;"
      row-key="id"
      border
      default-expand-all
      :tree-props="{children: 'children'}">

      <el-table-column label="名称" prop="name" width="350"></el-table-column>
      <el-table-column label="类型" width="100">
        <template slot-scope="scope">
          {{ scope.row.type == 'view' ? '链接' : scope.row.type == 'click' ? '事件' : '' }}
        </template>
      </el-table-column>
      <el-table-column label="菜单URL" prop="url" ></el-table-column>
      <el-table-column label="菜单KEY" prop="meunKey"  width="130"></el-table-column>
      <el-table-column label="排序号" prop="sort"  width="70"></el-table-column>
      <el-table-column label="操作" width="170" align="center">
        <template slot-scope="scope">
          <el-button v-if="scope.row.parentId > 0" type="text" size="mini" @click="edit(scope.row.id)">修改</el-button>
          <el-button v-if="scope.row.parentId > 0" type="text" size="mini" @click="removeDataById(scope.row.id)">删除</el-button>
        </template>
      </el-table-column>
    </el-table>

    <el-dialog title="添加/修改" :visible.sync="dialogVisible" width="40%" >
      <el-form ref="flashPromotionForm" label-width="150px" size="small" style="padding-right: 40px;">

        <el-form-item label="选择一级菜单">
          <el-select
            v-model="menu.parentId"
            placeholder="请选择">
            <el-option
              v-for="item in list"
              :key="item.id"
              :label="item.name"
              :value="item.id"/>
          </el-select>
        </el-form-item>
        <el-form-item v-if="menu.parentId == 1" label="菜单名称">
          <el-select
            v-model="menu.name"
            placeholder="请选择"
            @change="liveCourseChanged">
            <el-option
              v-for="item in liveCourseList"
              :key="item.id"
              :label="item.courseName"
              :value="item"/>
          </el-select>
        </el-form-item>
        <el-form-item v-if="menu.parentId == 2" label="菜单名称">
          <el-select
            v-model="menu.name"
            placeholder="请选择"
            @change="subjectChanged">
            <el-option
              v-for="item in subjectList"
              :key="item.id"
              :label="item.title"
              :value="item"/>
          </el-select>
        </el-form-item>
        <el-form-item v-if="menu.parentId == 3" label="菜单名称">
          <el-input v-model="menu.name"/>
        </el-form-item>
        <el-form-item label="菜单类型">
          <el-radio-group v-model="menu.type">
            <el-radio label="view">链接</el-radio>
            <el-radio label="click">事件</el-radio>
          </el-radio-group>
        </el-form-item>
        <el-form-item v-if="menu.type == 'view'" label="链接">
          <el-input v-model="menu.url"/>
        </el-form-item>
        <el-form-item v-if="menu.type == 'click'" label="菜单KEY">
          <el-input v-model="menu.meunKey"/>
        </el-form-item>
        <el-form-item label="排序">
          <el-input v-model="menu.sort"/>
        </el-form-item>
      </el-form>
      <span slot="footer" class="dialog-footer">
        <el-button @click="dialogVisible = false" size="small">取 消</el-button>
        <el-button type="primary" @click="saveOrUpdate()" size="small">确 定</el-button>
      </span>
    </el-dialog>
  </div>
</template>
<script>
import menuApi from '@/api/wechat/menu'
//import liveCourseApi from '@/api/live/liveCourse'
import subjectApi from '@/api/vod/subject'
const defaultForm = {
  id: null,
  parentId: 1,
  name: '',
  nameId: null,
  sort: 1,
  type: 'view',
  meunKey: '',
  url: ''
}
export default {

  // 定义数据
  data() {
    return {
      list: [],

      liveCourseList: [],
      subjectList: [],

      dialogVisible: false,
      menu: defaultForm,
      saveBtnDisabled: false
    }
  },

  // 当页面加载时获取数据
  created() {
    this.fetchData()
   // this.fetchLiveCourse()
    this.fetchSubject()
  },

  methods: {
    // 调用api层获取数据库中的数据
    fetchData() {
      console.log('加载列表')
      menuApi.findMenuInfo().then(response => {
        this.list = response.data
        console.log(this.list)
      })
    },

    // fetchLiveCourse() {
    //   liveCourseApi.findLatelyList().then(response => {
    //     this.liveCourseList = response.data
    //     this.liveCourseList.push({'id': 0, 'courseName': '全部列表'})
    //   })
    // },

    fetchSubject() {
      console.log('加载列表')
      subjectApi.getChildList(0).then(response => {
        this.subjectList = response.data
      })
    },

    syncMenu() {
      this.$confirm('你确定上传菜单吗, 是否继续?', '提示', {
        confirmButtonText: '确定',
        cancelButtonText: '取消',
        type: 'warning'
      }).then(() => {
        return menuApi.syncMenu();
      }).then((response) => {
        this.fetchData()
        this.$message.success(response.message)
      }).catch(error => {
        console.log('error', error)
        // 当取消时会进入catch语句:error = 'cancel'
        // 当后端服务抛出异常时:error = 'error'
        if (error === 'cancel') {
          this.$message.info('取消上传')
        }
      })
    },

    // 根据id删除数据
    removeDataById(id) {
      // debugger
      this.$confirm('此操作将永久删除该记录, 是否继续?', '提示', {
        confirmButtonText: '确定',
        cancelButtonText: '取消',
        type: 'warning'
      }).then(() => { // promise
        // 点击确定,远程调用ajax
        return menuApi.removeById(id)
      }).then((response) => {
        this.fetchData(this.page)
        if (response.code) {
          this.$message({
            type: 'success',
            message: '删除成功!'
          })
        }
      }).catch(() => {
        this.$message({
          type: 'info',
          message: '已取消删除'
        })
      })
    },

    // -------------
    add(){
      this.dialogVisible = true
      this.menu = Object.assign({}, defaultForm)
    },

    edit(id) {
      this.dialogVisible = true
      this.fetchDataById(id)
    },

    fetchDataById(id) {
      menuApi.getById(id).then(response => {
        this.menu = response.data
      })
    },

    saveOrUpdate() {
      this.saveBtnDisabled = true // 防止表单重复提交

      if (!this.menu.id) {
        this.saveData()
      } else {
        this.updateData()
      }
    },

    // 新增
    saveData() {
      menuApi.save(this.menu).then(response => {
        if (response.code) {
          this.$message({
            type: 'success',
            message: response.message
          })
          this.dialogVisible = false;
          this.fetchData(this.page)
        }
      })
    },

    // 根据id更新记录
    updateData() {
      menuApi.updateById(this.menu).then(response => {
        if (response.code) {
          this.$message({
            type: 'success',
            message: response.message
          })
          this.dialogVisible = false;
          this.fetchData(this.page)
        }
      })
    },

    // 根据id查询记录
    fetchDataById(id) {
      menuApi.getById(id).then(response => {
        this.menu = response.data
      })
    },

    subjectChanged(item) {
      console.info(item)
      this.menu.name = item.title
      this.menu.url = '/course/' + item.id
    },

    liveCourseChanged(item) {
      console.info(item)
      this.menu.name = item.courseName
      if(item.id == 0) {
        this.menu.url = '/live'
      } else {
        this.menu.url = '/liveInfo/' + item.id
      }

    }
  }
}
</script>
2
3
4
5
6
7
8
9
10
11
12
13
14
15
16
17
18
19
20
21
22
23
24
25
26
27
28
29
30
31
32
33
34
35
36
37
38
39
40
41
42
43
44
45
46
47
48
49
50
51
52
53
54
55
56
57
58
59
60
61
62
63
64
65
66
67
68
69
70
71
72
73
74
75
76
77
78
79
80
81
82
83
84
85
86
87
88
89
90
91
92
93
94
95
96
97
98
99
100
101
102
103
104
105
106
107
108
109
110
111
112
113
114
115
116
117
118
119
120
121
122
123
124
125
126
127
128
129
130
131
132
133
134
135
136
137
138
139
140
141
142
143
144
145
146
147
148
149
150
151
152
153
154
155
156
157
158
159
160
161
162
163
164
165
166
167
168
169
170
171
172
173
174
175
176
177
178
179
180
181
182
183
184
185
186
187
188
189
190
191
192
193
194
195
196
197
198
199
200
201
202
203
204
205
206
207
208
209
210
211
212
213
214
215
216
217
218
219
220
221
222
223
224
225
226
227
228
229
230
231
232
233
234
235
236
237
238
239
240
241
242
243
244
245
246
247
248
249
250
251
252
253
254
255
256
257
258
259
260
261
262
263
264
265
266
267
268
269
270
271
272
273
274
275
276
277
278
279
280
281
282
283
284
285
286
287
288
289
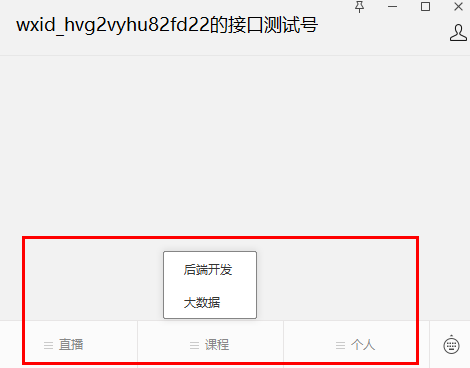
在手机公众号可以看到同步之后的菜单
# 公众号普通消息
# 实现目标
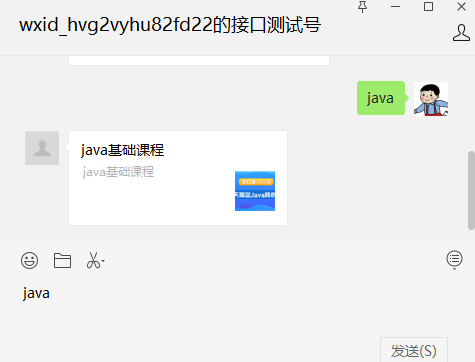
- 硅谷课堂” 公众号实现根据关键字搜索相关课程,如:输入 “java”,可返回 java 相关的一个课程;
- “硅谷课堂” 公众号点击菜单 “关于我们”,返回关于我们的介绍
- 关注或取消关注等
# 消息接入
参考文档:https://developers.weixin.qq.com/doc/offiaccount/Basic_Information/Access_Overview.html
接入微信公众平台开发,开发者需要按照如下步骤完成:
1、填写服务器配置
2、验证服务器地址的有效性
3、依据接口文档实现业务逻辑
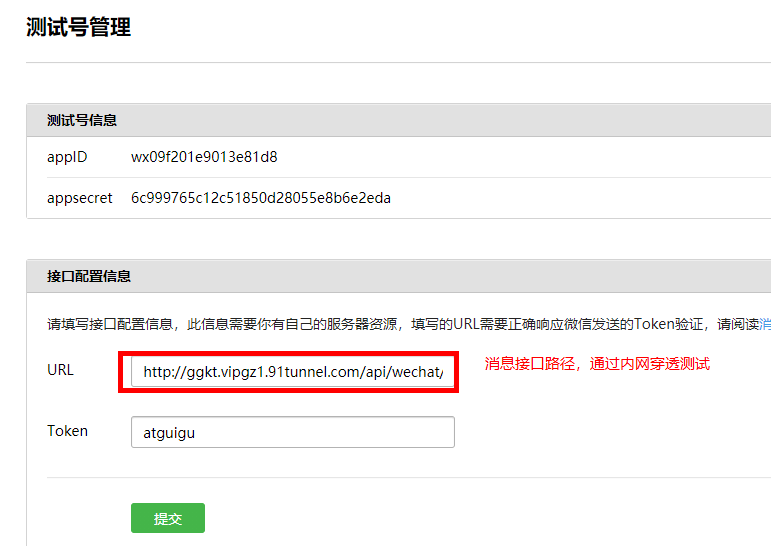
# 公众号服务器配置
在测试管理 -> 接口配置信息,点击 “修改” 按钮,填写服务器地址(URL)和 Token,其中 URL 是开发者用来接收微信消息和事件的接口 URL。Token 可由开发者可以任意填写,用作生成签名(该 Token 会和接口 URL 中包含的 Token 进行比对,从而验证安全性)
说明:本地测试,url 改为内网穿透地址
验证来自微信服务器消息
开发者提交信息后,微信服务器将发送 GET 请求到填写的服务器地址 URL 上,GET 请求携带参数如下表所示:
| 参数 | 描述 |
|---|---|
| signature | 微信加密签名,signature 结合了开发者填写的 token 参数和请求中的 timestamp 参数、nonce 参数。 |
| timestamp | 时间戳 |
| nonce | 随机数 |
| echostr | 随机字符串 |
开发者通过检验 signature 对请求进行校验(下面有校验方式)。若确认此次 GET 请求来自微信服务器,请原样返回 echostr 参数内容,则接入生效,成为开发者成功,否则接入失败。加密 / 校验流程如下:
- 将 token、timestamp、nonce 三个参数进行字典序排序
- 将三个参数字符串拼接成一个字符串进行 sha1 加密
- 开发者获得加密后的字符串可与 signature 对比,标识该请求来源于微信
# 代码实现
创建 MessageController
@RestController
@RequestMapping("/api/wechat/message")
public class MessageController {

    private static final String token = "ggkt";

    /**
     * 服务器有效性验证
     * @param request
     * @return
     */
    @GetMapping
    public String verifyToken(HttpServletRequest request) {
        String signature = request.getParameter("signature");
        String timestamp = request.getParameter("timestamp");
        String nonce = request.getParameter("nonce");
        String echostr = request.getParameter("echostr");
        log.info("signature: {} nonce: {} echostr: {} timestamp: {}", signature, nonce, echostr, timestamp);
        if (this.checkSignature(signature, timestamp, nonce)) {
            log.info("token ok");
            return echostr;
        }
        return echostr;
    }

    private boolean checkSignature(String signature, String timestamp, String nonce) {
        String[] str = new String[]{token, timestamp, nonce};
        //排序
        Arrays.sort(str);
        //拼接字符串
        StringBuffer buffer = new StringBuffer();
        for (int i = 0; i < str.length; i++) {
            buffer.append(str[i]);
        }
        //进行sha1加密
        String temp = SHA1.encode(buffer.toString());
        //与微信提供的signature进行匹对
        return signature.equals(temp);
    }
}
2
3
4
5
6
7
8
9
10
11
12
13
14
15
16
17
18
19
20
21
22
23
24
25
26
27
28
29
30
31
32
33
34
35
36
37
38
39
40
# 消息接收
消息接收接口和上面的服务器校验接口地址是一样的,都是我们一开始在公众号后台配置的地址。只不过消息接收接口是一个 POST 请求。
在公众号后台配置的时候,消息加解密方式选择了明文模式,这样在后台收到的消息直接就可以处理了。微信服务器给我发来的普通文本消息格式如下:
<xml>
    <ToUserName><![CDATA[toUser]]></ToUserName>
    <FromUserName><![CDATA[fromUser]]></FromUserName>
    <CreateTime>1348831860</CreateTime>
    <MsgType><![CDATA[text]]></MsgType>
    <Content><![CDATA[this is a test]]></Content>
    <MsgId>1234567890123456</MsgId>
</xml>
2
3
4
5
6
7
8
| 参数 | 描述 |
|---|---|
| ToUserName | 开发者微信号 |
| FromUserName | 发送方帐号(一个 OpenID) |
| CreateTime | 消息创建时间 (整型) |
| MsgType | 消息类型,文本为 text |
| Content | 文本消息内容 |
| MsgId | 消息 id,64 位整型 |
当我们收到微信服务器发来的消息之后,我们就进行 XML 解析,提取出来我们需要的信息,去做相关的查询操作,再将查到的结果返回给微信服务器。
这里我们先来个简单的,我们将收到的消息解析并打印出来:
   /**
     * 接收微信服务器发送来的消息
     * @param request
     * @return
     * @throws Exception
     */
    @PostMapping
    public String receiveMessage(HttpServletRequest request) throws Exception {

        WxMpXmlMessage wxMpXmlMessage = WxMpXmlMessage.fromXml(request.getInputStream());
        System.out.println(JSONObject.toJSONString(wxMpXmlMessage));
        return "success";
    }

    private Map<String, String> parseXml(HttpServletRequest request) throws Exception {
        Map<String, String> map = new HashMap<String, String>();
        InputStream inputStream = request.getInputStream();
        SAXReader reader = new SAXReader();
        Document document = reader.read(inputStream);
        Element root = document.getRootElement();
        List<Element> elementList = root.elements();
        for (Element e : elementList) {
            map.put(e.getName(), e.getText());
        }
        inputStream.close();
        inputStream = null;
        return map;
    }
2
3
4
5
6
7
8
9
10
11
12
13
14
15
16
17
18
19
20
21
22
23
24
25
26
27
28
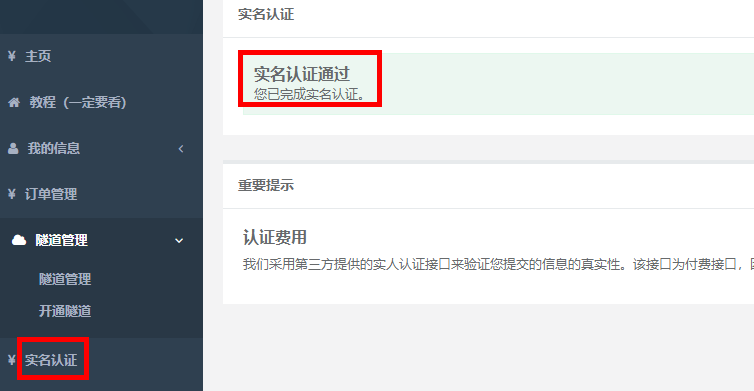
# 配置内网穿透 (ngrok)
网址:https://ngrok.cc/login/register
注册成功之后,登录系统,进行实名认证,认证费 2 元,认证通过后才能开通隧道
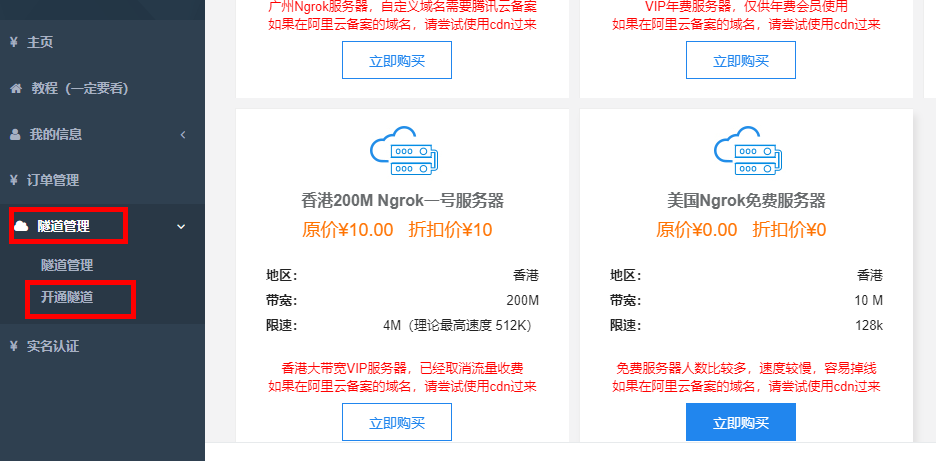
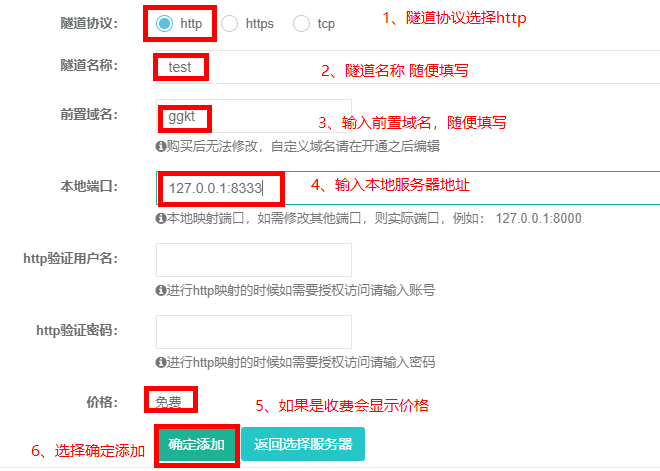
选择隧道管理 -> 开通隧道
最后一个是免费服务器,建议选择付费服务器,10 元 / 月,因为免费服务器使用人数很多,经常掉线
这里开通了两个隧道,一个用于后端接口调用,一个用于公众号前端调用
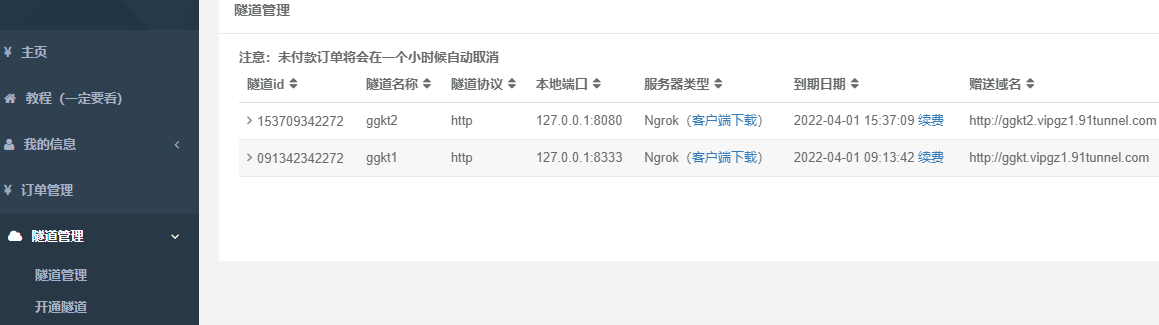
下载客户端启动,输入隧道 id,多个使用逗号隔开,最后回车就可以启动
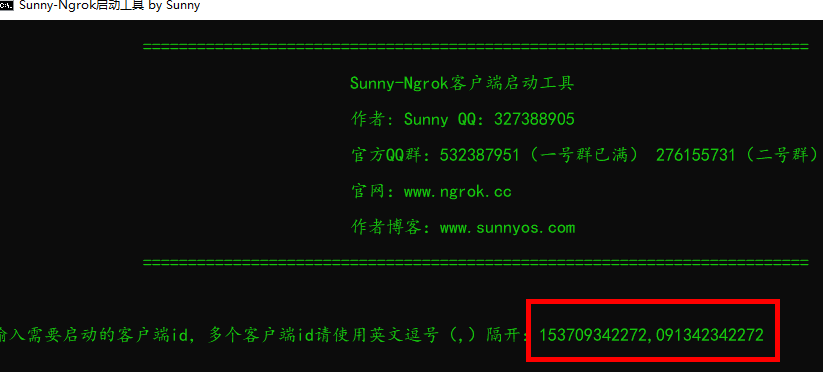

启动服务,在硅谷课堂公众号发送文本消息测试效果。
# 消息业务实现
在 service_vod 模块中的 CourseApiController 类中添加方法,根据课程关键字查询课程信息
    @ApiOperation("根据关键字查询课程")
    @GetMapping("inner/findByKeyword/{keyword}")
    public List<Course> findByKeyword(
            @ApiParam(value = "关键字", required = true)
            @PathVariable String keyword){
        QueryWrapper<Course> queryWrapper = new QueryWrapper();
        queryWrapper.like("title", keyword);
        List<Course> list = courseService.list(queryWrapper);
        return list;
    }
2
3
4
5
6
7
8
9
10
在 service_client 下创建子模块 service_course_client
创建远程调用类 CourseFeignClient
@FeignClient(value = "service-vod")
public interface CourseFeignClient {

    @ApiOperation("根据关键字查询课程")
    @GetMapping("/api/vod/course/inner/findByKeyword/{keyword}")
    List<Course> findByKeyword(@PathVariable String keyword);
}
2
3
4
5
6
7
在 service_wechat 引入远程调用模块依赖
<dependency>
    <groupId>com.atguigu</groupId>
    <artifactId>service_course_client</artifactId>
    <version>0.0.1-SNAPSHOT</version>
</dependency>
2
3
4
5
service_wechat 模块实现方法
MessageService
public interface MessageService {
    //接收消息
    String receiveMessage(Map<String, String> param);
}
2
3
4
MessageServiceImpl
@Service
public class MessageServiceImpl implements MessageService {

    @Autowired
    private CourseFeignClient courseFeignClient;

    @Autowired
    private WxMpService wxMpService;

    //接收消息
    @Override
    public String receiveMessage(Map<String, String> param) {
        String content = "";
        try {
            String msgType = param.get("MsgType");
            switch(msgType){
                case "text" :
                    content = this.search(param);
                    break;
                case "event" :
                    String event = param.get("Event");
                    String eventKey = param.get("EventKey");
                    if("subscribe".equals(event)) {//关注公众号
                        content = this.subscribe(param);
                    } else if("unsubscribe".equals(event)) {//取消关注公众号
                        content = this.unsubscribe(param);
                    } else if("CLICK".equals(event) && "aboutUs".equals(eventKey)){
                        content = this.aboutUs(param);
                    } else {
                        content = "success";
                    }
                    break;
                default:
                    content = "success";
            }
        } catch (Exception e) {
            e.printStackTrace();
            content = this.text(param, "请重新输入关键字,没有匹配到相关视频课程").toString();
        }
        return content;
    }

    /**
     * 关于我们
     * @param param
     * @return
     */
    private String aboutUs(Map<String, String> param) {
        return this.text(param, "硅谷课堂现开设Java、HTML5前端+全栈、大数据、全链路UI/UE设计、人工智能、大数据运维+Python自动化、Android+HTML5混合开发等多门课程;同时,通过视频分享、谷粒学苑在线课堂、大厂学苑直播课堂等多种方式,满足了全国编程爱好者对多样化学习场景的需求,已经为行业输送了大量IT技术人才。").toString();
    }

    /**
     * 处理关注事件
     * @param param
     * @return
     */
    private String subscribe(Map<String, String> param) {
        //处理业务
        return this.text(param, "感谢你关注“硅谷课堂”,可以根据关键字搜索您想看的视频教程,如:JAVA基础、Spring boot、大数据等").toString();
    }

     /**
     * 处理取消关注事件
     * @param param
     * @return
     */
    private String unsubscribe(Map<String, String> param) {
        //处理业务
        return "success";
    }

    /**
     * 处理关键字搜索事件
     * 图文消息个数;当用户发送文本、图片、语音、视频、图文、地理位置这六种消息时,开发者只能回复1条图文消息;其余场景最多可回复8条图文消息
     * @param param
     * @return
     */
    private String search(Map<String, String> param) {
        String fromusername = param.get("FromUserName");
        String tousername = param.get("ToUserName");
        String content = param.get("Content");
        //单位为秒,不是毫秒
        Long createTime = new Date().getTime() / 1000;
        StringBuffer text = new StringBuffer();
        List<Course> courseList = courseFeignClient.findByKeyword(content);
        if(CollectionUtils.isEmpty(courseList)) {
            text = this.text(param, "请重新输入关键字,没有匹配到相关视频课程");
        } else {
            //一次只能返回一个
            Random random = new Random();
            int num = random.nextInt(courseList.size());
            Course course = courseList.get(num);
            StringBuffer articles = new StringBuffer();
            articles.append("<item>");
            articles.append("<Title><![CDATA["+course.getTitle()+"]]></Title>");
            articles.append("<Description><![CDATA["+course.getTitle()+"]]></Description>");
            articles.append("<PicUrl><![CDATA["+course.getCover()+"]]></PicUrl>");
            articles.append("<Url><![CDATA[http://glkt.atguigu.cn/#/liveInfo/"+course.getId()+"]]></Url>");
            articles.append("</item>");

            text.append("<xml>");
            text.append("<ToUserName><![CDATA["+fromusername+"]]></ToUserName>");
            text.append("<FromUserName><![CDATA["+tousername+"]]></FromUserName>");
            text.append("<CreateTime><![CDATA["+createTime+"]]></CreateTime>");
            text.append("<MsgType><![CDATA[news]]></MsgType>");
            text.append("<ArticleCount><![CDATA[1]]></ArticleCount>");
            text.append("<Articles>");
            text.append(articles);
            text.append("</Articles>");
            text.append("</xml>");
        }
        return text.toString();
    }

    /**
     * 回复文本
     * @param param
     * @param content
     * @return
     */
    private StringBuffer text(Map<String, String> param, String content) {
        String fromusername = param.get("FromUserName");
        String tousername = param.get("ToUserName");
        //单位为秒,不是毫秒
        Long createTime = new Date().getTime() / 1000;
        StringBuffer text = new StringBuffer();
        text.append("<xml>");
        text.append("<ToUserName><![CDATA["+fromusername+"]]></ToUserName>");
        text.append("<FromUserName><![CDATA["+tousername+"]]></FromUserName>");
        text.append("<CreateTime><![CDATA["+createTime+"]]></CreateTime>");
        text.append("<MsgType><![CDATA[text]]></MsgType>");
        text.append("<Content><![CDATA["+content+"]]></Content>");
        text.append("</xml>");
        return text;
    }
}
2
3
4
5
6
7
8
9
10
11
12
13
14
15
16
17
18
19
20
21
22
23
24
25
26
27
28
29
30
31
32
33
34
35
36
37
38
39
40
41
42
43
44
45
46
47
48
49
50
51
52
53
54
55
56
57
58
59
60
61
62
63
64
65
66
67
68
69
70
71
72
73
74
75
76
77
78
79
80
81
82
83
84
85
86
87
88
89
90
91
92
93
94
95
96
97
98
99
100
101
102
103
104
105
106
107
108
109
110
111
112
113
114
115
116
117
118
119
120
121
122
123
124
125
126
127
128
129
130
131
132
133
134
135
136
更改 MessageController 方法
/**
 * 接收微信服务器发送来的消息
 * @param request
 * @return
 * @throws Exception
 */
@PostMapping
public String receiveMessage(HttpServletRequest request) throws Exception {
    Map<String, String> param = this.parseXml(request);
    return messageService.receiveMessage(param);
}
2
3
4
5
6
7
8
9
10
11
测试公众号消息
点击个人 -> 关于我们,返回关于我们的介绍
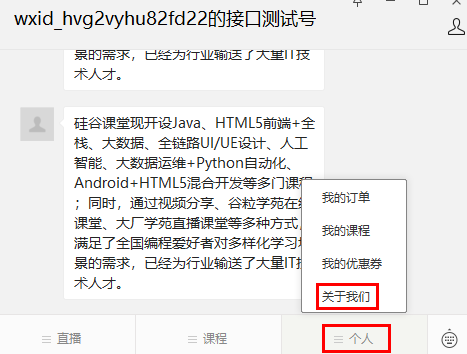
在公众号输入关键字,返回搜索的课程信息
# 公众号模板消息
实现目标,购买课程支付成功微信推送消息
接口文档:https://developers.weixin.qq.com/doc/offiaccount/Message_Management/Template_Message_Interface.html
# 申请模板消息
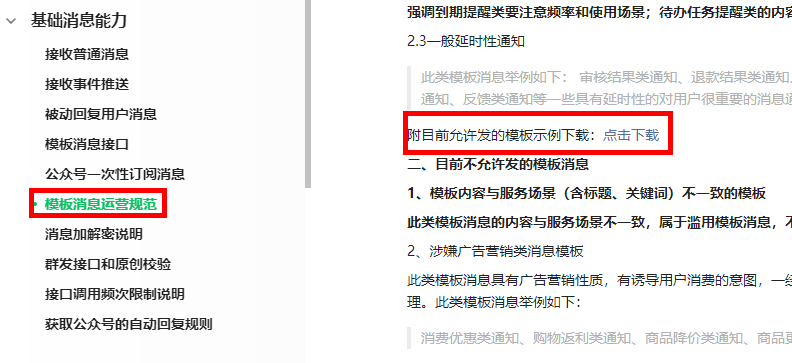
模板消息是需要申请的。但是我们在申请时还是有一些东西要注意,这个在官方的文档有非常详细的说明。
https://developers.weixin.qq.com/doc/offiaccount/Message_Management/Template_Message_Operation_Specifications.html
选择行业的时候可要谨慎些,因为这个一个月只可以修改一次。申请之后就耐心等待,审核通过之后就会出现 “广告与服务” 模板消息的菜单。
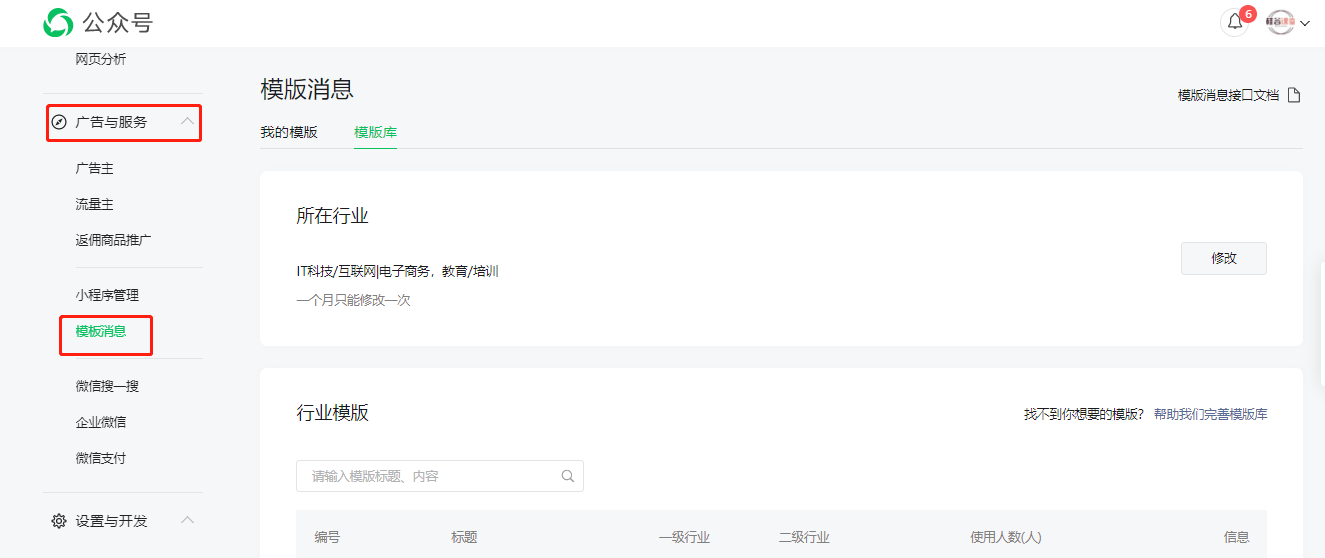
# 添加模板消息
审核通过之后,我们就可以添加模板消息,进行开发了。
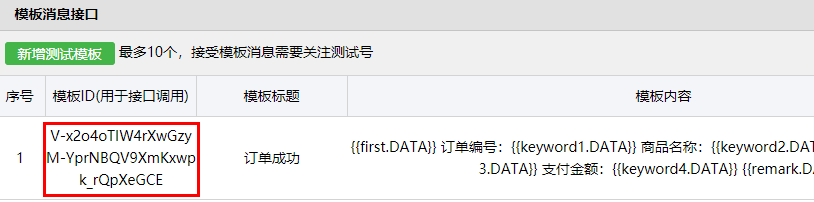
我们点击模板消息进入后,直接在模板库中选择你需要的消息模板添加就可以了,添加之后就会在我的模板中。会有一个模板 id,这个模板 id 在我们发送消息的时候会用到。
模板消息如下:
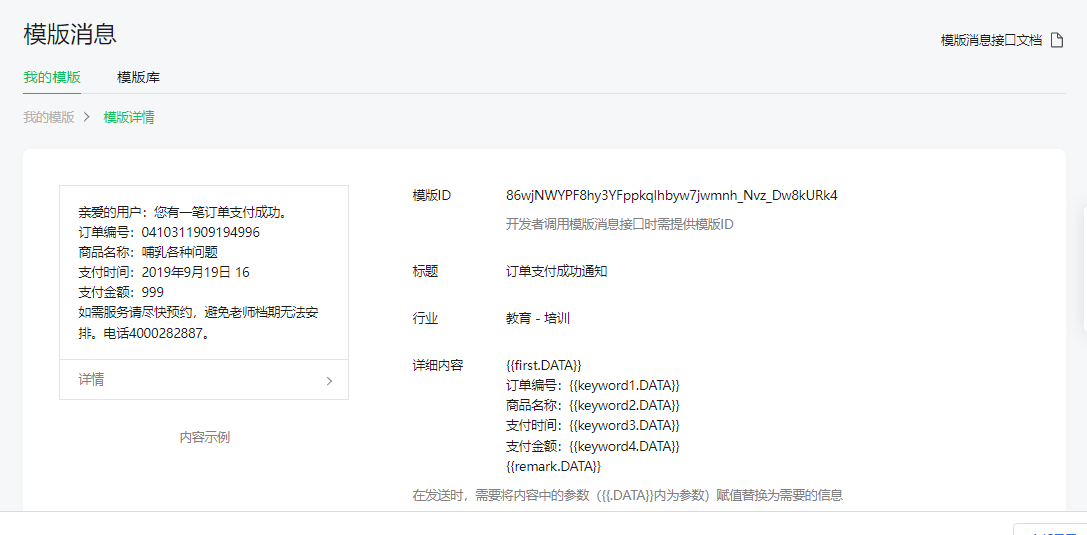
我们需要模板消息:订单支付成功通知;
模板库中没有的模板,可以自定义模板,审核通过后可以使用。
新增测试模板
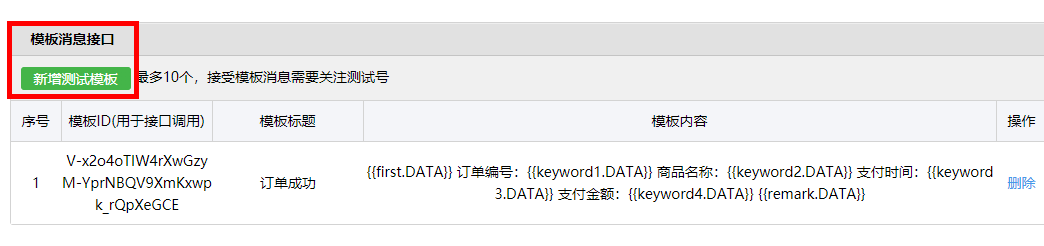
下载地址:https://developers.weixin.qq.com/doc/offiaccount/Message_Management/Template_Message_Operation_Specifications.html
填写模板标题和模板内容

# 模板消息接口封装
MessageController 添加方法
@GetMapping("/pushPayMessage")
public Result pushPayMessage() throws WxErrorException {
    messageService.pushPayMessage(1L);
    return Result.ok();
}
2
3
4
5
MessageService 添加方法
void pushPayMessage(Long orderId);
MessageServiceImpl 类
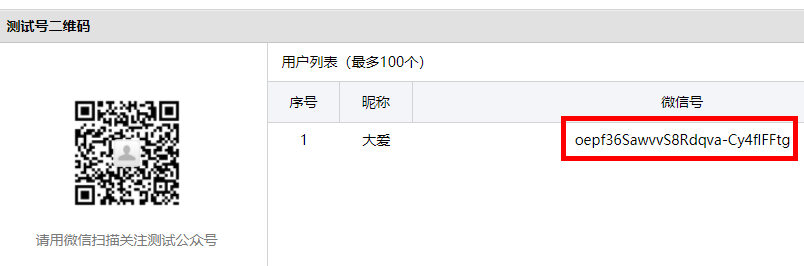
openid 值
模板 id 值
@Autowired
private WxMpService wxMpService;

//TODO 暂时写成固定值测试,后续完善
@SneakyThrows
@Override
public void pushPayMessage(long orderId) {
    String openid = "oepf36SawvvS8Rdqva-Cy4flFFtg";
    WxMpTemplateMessage templateMessage = WxMpTemplateMessage.builder()
            .toUser(openid)//要推送的用户openid
            .templateId("V-x2o4oTIW4rXwGzyM-YprNBQV9XmKxwpk_rQpXeGCE")//模板id
            .url("http://ggkt2.vipgz1.91tunnel.com/#/pay/"+orderId)//点击模板消息要访问的网址
            .build();
    //3,如果是正式版发送消息,,这里需要配置你的信息
    templateMessage.addData(new WxMpTemplateData("first", "亲爱的用户:您有一笔订单支付成功。", "#272727"));
    templateMessage.addData(new WxMpTemplateData("keyword1", "1314520", "#272727"));
    templateMessage.addData(new WxMpTemplateData("keyword2", "java基础课程", "#272727"));
    templateMessage.addData(new WxMpTemplateData("keyword3", "2022-01-11", "#272727"));
    templateMessage.addData(new WxMpTemplateData("keyword4", "100", "#272727"));
    templateMessage.addData(new WxMpTemplateData("remark", "感谢你购买课程,如有疑问,随时咨询!", "#272727"));
    String msg = wxMpService.getTemplateMsgService().sendTemplateMsg(templateMessage);
    System.out.println(msg);
}
2
3
4
5
6
7
8
9
10
11
12
13
14
15
16
17
18
19
20
21
22
23
通过 swagger 测试效果,在公众号可以看到发送的模板消息
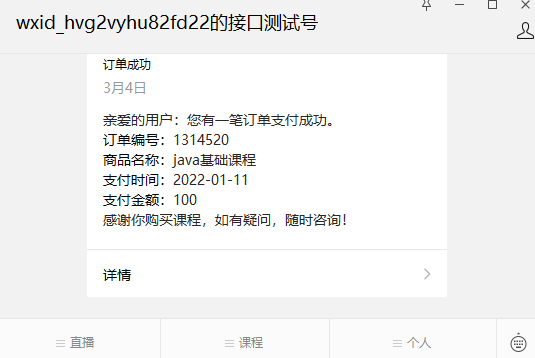
# 微信授权登录
根据流程图通过菜单进入的页面都要授权登录
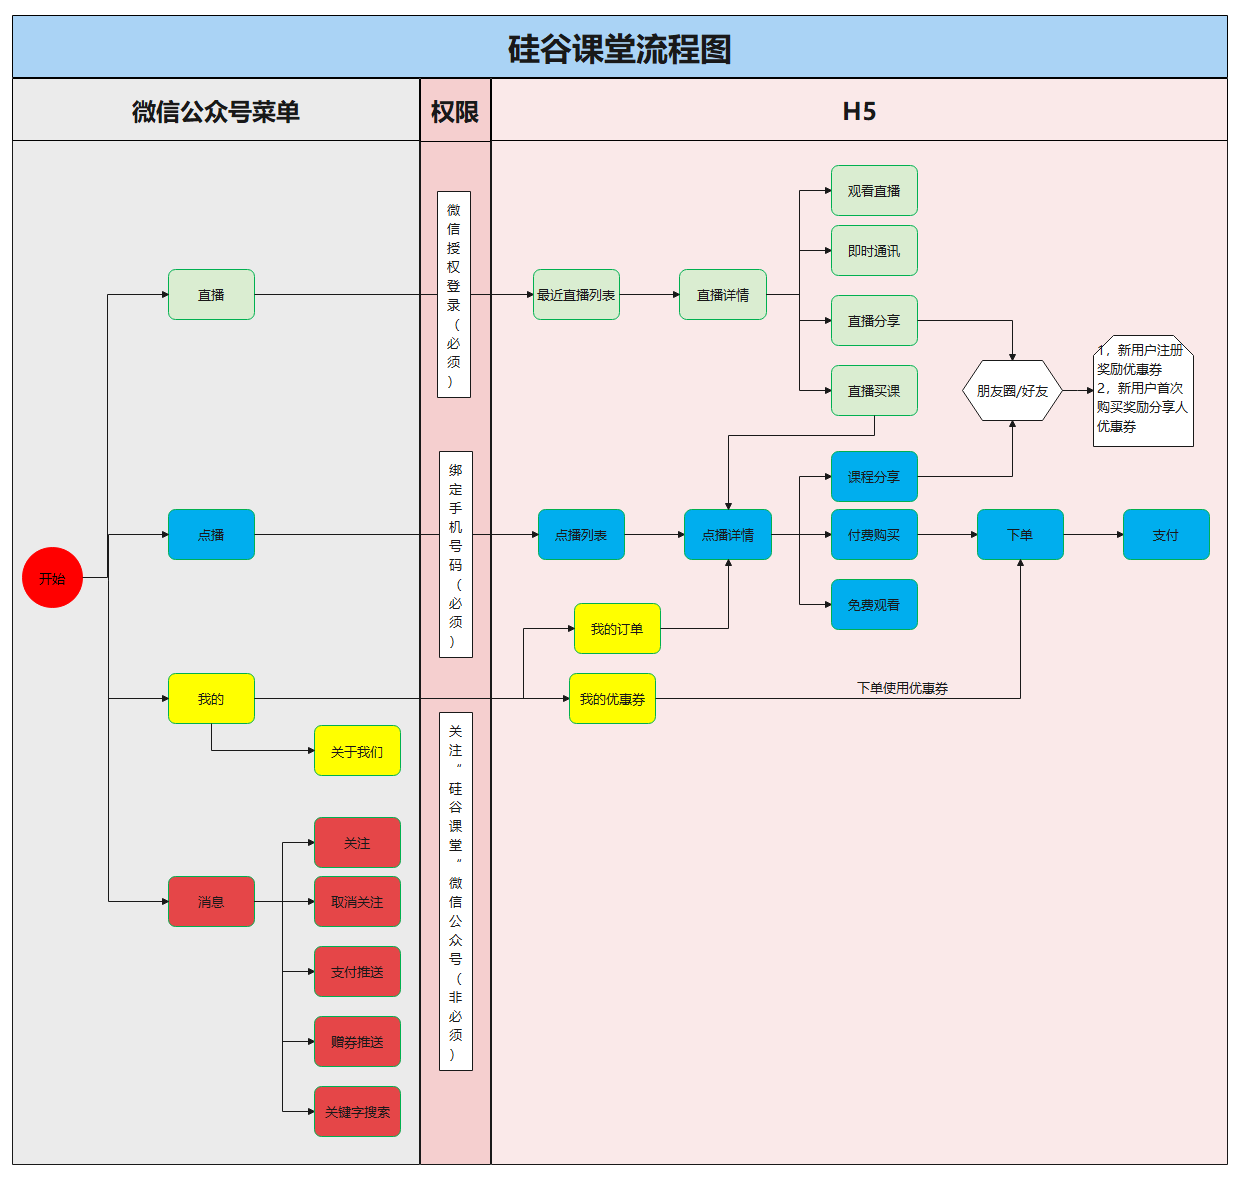
接口文档:https://developers.weixin.qq.com/doc/offiaccount/OA_Web_Apps/Wechat_webpage_authorization.html
- 严格按照接口文档实现;
- 应用授权作用域 scope:
scope为snsapi_userinfo
# 配置授权回调域名
在微信公众号请求用户网页授权之前,开发者需要先到公众平台官网中的 “设置与开发 - 接口权限 - 网页服务 - 网页帐号 - 网页授权获取用户基本信息” 的配置选项中,修改授权回调域名。请注意,这里填写的是域名(是一个字符串),而不是 URL,因此请勿加 http:// 等协议头;
本地测试配置内网穿透地址
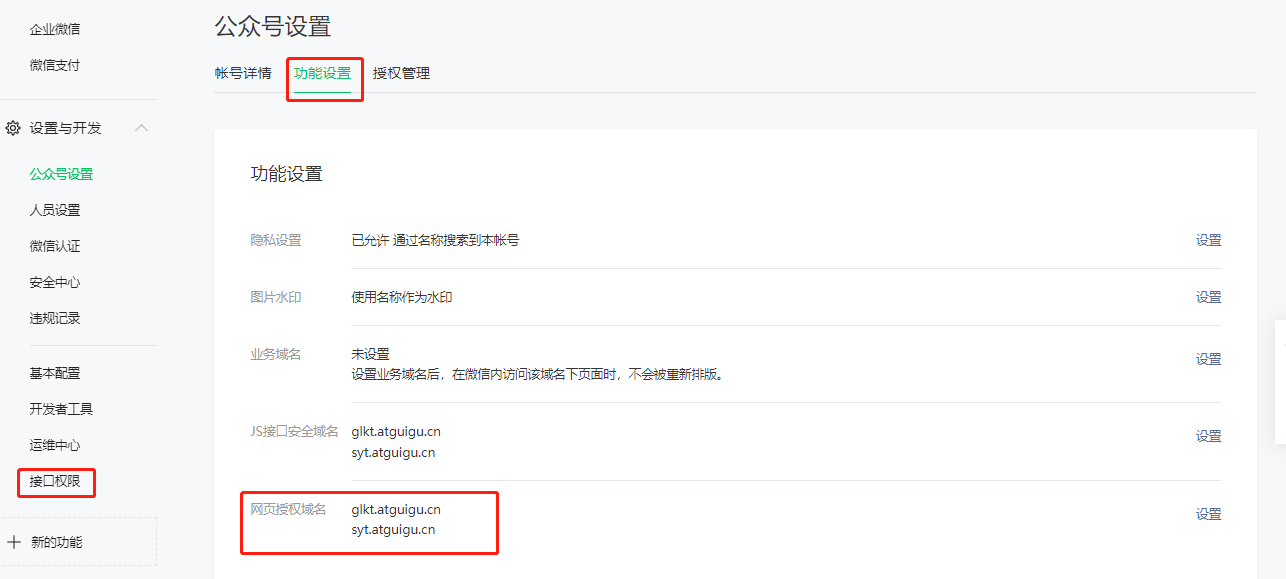
在公众号测试号配置
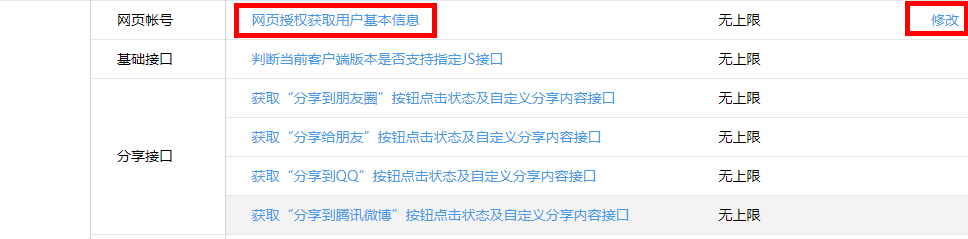
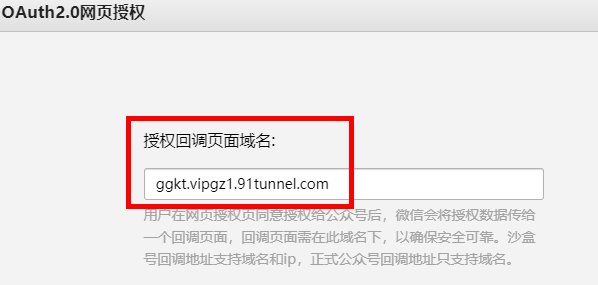
# 公众号前端页面
公众号前端页面已经开发完成,直接部署使用即可
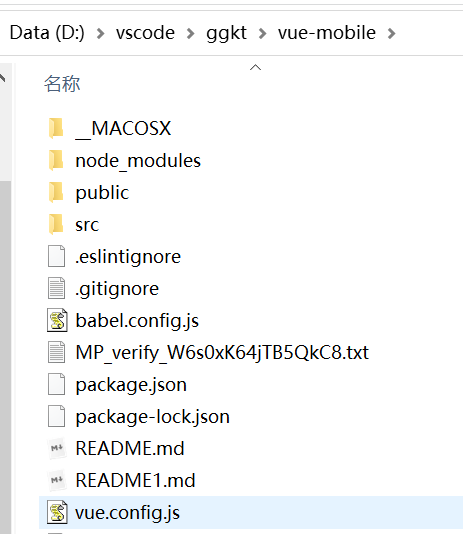
npm run serve
前端处理,全局处理授权登录,处理页面: /src/App.vue
- 访问页面时首先判断是否有 token 信息,如果没有跳转到授权登录接口
- 通过 localStorage 存储 token 信息
在 HTML5 中,加入了一个 localStorage 特性,这个特性主要是用来作为本地存储来使用的,解决了 cookie 存储空间不足的问题 (cookie 中每条 cookie 的存储空间很小,只有几 K),localStorage 中一般浏览器支持的是 5M 大小,这个在不同的浏览器中 localStorage 会有所不同。它只能存储字符串格式的数据,所以最好在每次存储时把数据转换成 json 格式,取出的时候再转换回来。
wechatLogin() {
    // 处理微信授权登录
    let token = this.getQueryString('token') || '';
    if(token != '') {
        window.localStorage.setItem('token', token);
    }

    // 所有页面都必须登录,两次调整登录,这里与接口返回208状态
    token = window.localStorage.getItem('token') || '';
    if (token == '') {
        let url = window.location.href.replace('#', 'guiguketan')
        window.location = 'http://glkt.atguigu.cn/api/user/wechat/authorize?returnUrl=' + url
    }
    console.log('token2:'+window.localStorage.getItem('token'));

},
2
3
4
5
6
7
8
9
10
11
12
13
14
15
16
# 授权登录接口
在 service-user 模块,引入微信工具包
<dependencies>
    <dependency>
        <groupId>com.github.binarywang</groupId>
        <artifactId>weixin-java-mp</artifactId>
        <version>2.7.0</version>
    </dependency>

    <dependency>
        <groupId>dom4j</groupId>
        <artifactId>dom4j</artifactId>
        <version>1.1</version>
    </dependency>

    <dependency>
        <groupId>com.aliyun</groupId>
        <artifactId>aliyun-java-sdk-core</artifactId>
    </dependency>
</dependencies>
2
3
4
5
6
7
8
9
10
11
12
13
14
15
16
17
18
添加配置
#公众号id和秘钥
# 硅谷课堂微信公众平台appId
wechat.mpAppId: wx09f201e9013e81d8
## 硅谷课堂微信公众平台api秘钥
wechat.mpAppSecret: 6c999765c12c51850d28055e8b6e2eda
# 授权回调获取用户信息接口地址
wechat.userInfoUrl: http://ggkt.vipgz1.91tunnel.com/api/user/wechat/userInfo
2
3
4
5
6
7
添加工具类
@Component
public class ConstantPropertiesUtil implements InitializingBean {

    @Value("${wechat.mpAppId}")
    private String appid;

    @Value("${wechat.mpAppSecret}")
    private String appsecret;

    public static String ACCESS_KEY_ID;
    public static String ACCESS_KEY_SECRET;

    @Override
    public void afterPropertiesSet() throws Exception {
        ACCESS_KEY_ID = appid;
        ACCESS_KEY_SECRET = appsecret;
    }
}
2
3
4
5
6
7
8
9
10
11
12
13
14
15
16
17
18
@Component
public class WeChatMpConfig {

    @Autowired
    private ConstantPropertiesUtil constantPropertiesUtil;

    @Bean
    public WxMpService wxMpService(){
        WxMpService wxMpService = new WxMpServiceImpl();
        wxMpService.setWxMpConfigStorage(wxMpConfigStorage());
        return wxMpService;
    }

    @Bean
    public WxMpConfigStorage wxMpConfigStorage(){
        WxMpInMemoryConfigStorage wxMpConfigStorage = new WxMpInMemoryConfigStorage();
        wxMpConfigStorage.setAppId(ConstantPropertiesUtil.ACCESS_KEY_ID);
        wxMpConfigStorage.setSecret(ConstantPropertiesUtil.ACCESS_KEY_SECRET);
        return wxMpConfigStorage;
    }
}
2
3
4
5
6
7
8
9
10
11
12
13
14
15
16
17
18
19
20
21
controller 类
WechatController
@Controller
@RequestMapping("/api/user/wechat")
public class WechatController {

    @Autowired
    private UserInfoService userInfoService;

    @Autowired
    private WxMpService wxMpService;

    @Value("${wechat.userInfoUrl}")
    private String userInfoUrl;

    @GetMapping("/authorize")
    public String authorize(@RequestParam("returnUrl") String returnUrl, HttpServletRequest request) {
        String redirectURL = wxMpService.oauth2buildAuthorizationUrl(userInfoUrl,
                WxConsts.OAUTH2_SCOPE_USER_INFO,
                URLEncoder.encode(returnUrl.replace("guiguketan", "#")));
        return "redirect:" + redirectURL;
    }

    @GetMapping("/userInfo")
    public String userInfo(@RequestParam("code") String code,
                           @RequestParam("state") String returnUrl) throws Exception {
        WxMpOAuth2AccessToken wxMpOAuth2AccessToken = this.wxMpService.oauth2getAccessToken(code);
        String openId = wxMpOAuth2AccessToken.getOpenId();

        System.out.println("【微信网页授权】openId={}"+openId);

        WxMpUser wxMpUser = wxMpService.oauth2getUserInfo(wxMpOAuth2AccessToken, null);
        System.out.println("【微信网页授权】wxMpUser={}"+JSON.toJSONString(wxMpUser));

        UserInfo userInfo = userInfoService.getByOpenid(openId);
        if(null == userInfo) {
            userInfo = new UserInfo();
            userInfo.setOpenId(openId);
            userInfo.setUnionId(wxMpUser.getUnionId());
            userInfo.setNickName(wxMpUser.getNickname());
            userInfo.setAvatar(wxMpUser.getHeadImgUrl());
            userInfo.setSex(wxMpUser.getSexId());
            userInfo.setProvince(wxMpUser.getProvince());

            userInfoService.save(userInfo);
        }
        //生成token
        String token = JwtHelper.createToken(userInfo.getId(), userInfo.getNickName());
        if(returnUrl.indexOf("?") == -1) {
            return "redirect:" + returnUrl + "?token=" + token;
        } else {
            return "redirect:" + returnUrl + "&token=" + token;
        }
    }
}
2
3
4
5
6
7
8
9
10
11
12
13
14
15
16
17
18
19
20
21
22
23
24
25
26
27
28
29
30
31
32
33
34
35
36
37
38
39
40
41
42
43
44
45
46
47
48
49
50
51
52
53
UserInfoService
@Service
public class UserInfoServiceImpl extends ServiceImpl<UserInfoMapper, UserInfo> implements UserInfoService {

    @Override
    public UserInfo getByOpenid(String openId) {
        QueryWrapper<UserInfo> wrapper = new QueryWrapper<>();
        wrapper.eq("open_id",openId);
        UserInfo userInfo = baseMapper.selectOne(wrapper);
        return userInfo;
    }
}
2
3
4
5
6
7
8
9
10
11
# 使用 token
通过 token 传递用户信息
JWT(Json Web Token)是为了在网络应用环境间传递声明而执行的一种基于 JSON 的开放标准。
JWT 的声明一般被用来在身份提供者和服务提供者间传递被认证的用户身份信息,以便于从资源服务器获取资源。比如用在用户登录上
JWT 最重要的作用就是对 token 信息的防伪作用。
一个 JWT 由三个部分组成:公共部分、私有部分、签名部分。最后由这三者组合进行 base64 编码得到 JWT。
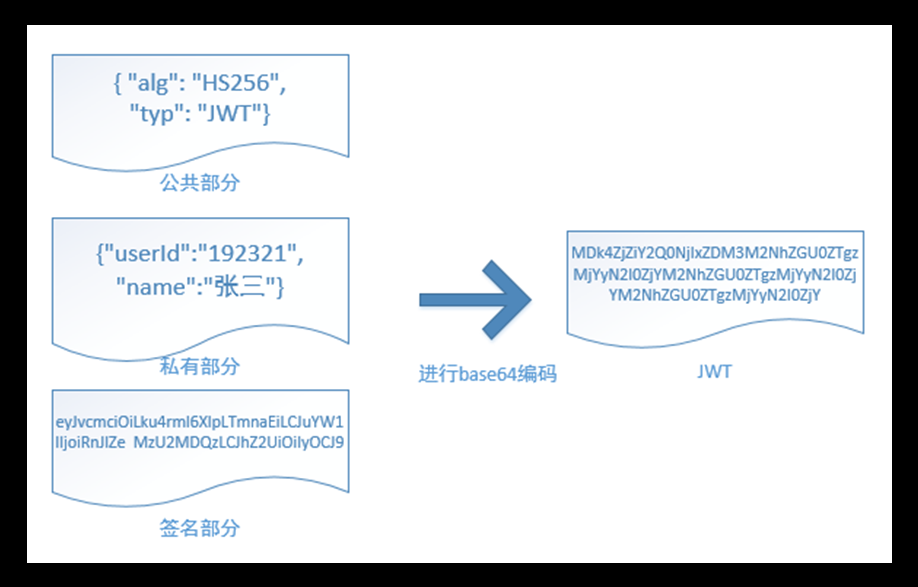
公共部分
主要是该 JWT 的相关配置参数,比如签名的加密算法、格式类型、过期时间等等。
私有部分
用户自定义的内容,根据实际需要真正要封装的信息。
userInfo {用户的 Id,用户的昵称 nickName}
签名部分
SaltiP: 当前服务器的 Ip 地址!{linux 中配置代理服务器的 ip}
主要用户对 JWT 生成字符串的时候,进行加密 {盐值}
base64 编码,并不是加密,只是把明文信息变成了不可见的字符串。但是其实只要用一些工具就可以把 base64 编码解成明文,所以不要在 JWT 中放入涉及私密的信息。
# 整合 JWT
在 service_utils 模块添加依赖
<dependencies>
	<dependency>
		<groupId>org.apache.httpcomponents</groupId>
		<artifactId>httpclient</artifactId>
	</dependency>
	<dependency>
		<groupId>io.jsonwebtoken</groupId>
		<artifactId>jjwt</artifactId>
	</dependency>
	<dependency>
		<groupId>joda-time</groupId>
		<artifactId>joda-time</artifactId>
	</dependency>
</dependencies>
2
3
4
5
6
7
8
9
10
11
12
13
14
添加 JWT 工具类
public class JwtHelper {
    //token字符串有效时间
    private static long tokenExpiration = 24*60*60*1000;
    //加密编码秘钥
    private static String tokenSignKey = "123456";

    //根据userid  和  username 生成token字符串
    public static String createToken(Long userId, String userName) {
        String token = Jwts.builder()
                //设置token分类
                .setSubject("GGKT-USER")
                //token字符串有效时长
                .setExpiration(new Date(System.currentTimeMillis() + tokenExpiration))
                //私有部分(用户信息)
                .claim("userId", userId)
                .claim("userName", userName)
                //根据秘钥使用加密编码方式进行加密,对字符串压缩
                .signWith(SignatureAlgorithm.HS512, tokenSignKey)
                .compressWith(CompressionCodecs.GZIP)
                .compact();
        return token;
    }

    //从token字符串获取userid
    public static Long getUserId(String token) {
        if(StringUtils.isEmpty(token)) return null;
        Jws<Claims> claimsJws = Jwts.parser().setSigningKey(tokenSignKey).parseClaimsJws(token);
        Claims claims = claimsJws.getBody();
        Integer userId = (Integer)claims.get("userId");
        return userId.longValue();
    }

    //从token字符串获取getUserName
    public static String getUserName(String token) {
        if(StringUtils.isEmpty(token)) return "";
        Jws<Claims> claimsJws
                = Jwts.parser().setSigningKey(tokenSignKey).parseClaimsJws(token);
        Claims claims = claimsJws.getBody();
        return (String)claims.get("userName");
    }

    public static void main(String[] args) {
        String token = JwtHelper.createToken(1L, "lucy");
        System.out.println(token);
        System.out.println(JwtHelper.getUserId(token));
        System.out.println(JwtHelper.getUserName(token));
    }
}
2
3
4
5
6
7
8
9
10
11
12
13
14
15
16
17
18
19
20
21
22
23
24
25
26
27
28
29
30
31
32
33
34
35
36
37
38
39
40
41
42
43
44
45
46
47
48