 Kubeasz
# Kubeasz
# 一键安装
首先先安装系统依赖
apt update
apt install ansible git vim curl sudo iptables -y
1
2
2
允许 root 用户 ssh 登录
vim /etc/ssh/sshd_config
1
添加下面的配置
PermitRootLogin yes
1
设置静态地址
vim /etc/network/interfaces
1
iface ens33 inet static
address 192.168.130.81
netmask 255.255.255.0
gateway 192.168.130.2
1
2
3
4
2
3
4
以下操作皆在安装脚本的节点上执行
宿主机设置 ssh 免密登录
ssh-keygen #生成密钥

#分发密钥
ssh-copy-id 192.168.130.71
ssh-copy-id 192.168.130.72
ssh-copy-id 192.168.130.73
1
2
3
4
5
6
2
3
4
5
6
宿主机安装 docker
curl -fsSL https://get.docker.com -o get-docker.sh
sudo sh get-docker.sh
1
2
2
获取下载工具脚本 ezdown
export release=3.6.1
wget https://github.com/easzlab/kubeasz/releases/download/${release}/ezdown
chmod +x ./ezdown
1
2
3
2
3
设置下载源
# 国内环境
./ezdown -D
# 海外环境
#./ezdown -D -m standard
1
2
3
4
2
3
4
容器化运行 kubeasz
./ezdown -S
1
创建新集群 k8s-01
docker exec -it kubeasz ezctl new k8s-01
1
设置 /etc/kubeasz/clusters/k8s-01/hosts 和 /etc/kubeasz/clusters/k8s-01/config.yml
vim /etc/kubeasz/clusters/k8s-01/hosts
1
修改配置文件的节点 ip 地址
# 'etcd' cluster should have odd member(s) (1,3,5,...)
[etcd]
192.168.130.71
192.168.130.72
192.168.130.73

# master node(s), set unique 'k8s_nodename' for each node
# CAUTION: 'k8s_nodename' must consist of lower case alphanumeric characters, '-' or '.',
# and must start and end with an alphanumeric character
[kube_master]
192.168.130.71 k8s_nodename='master-01'
#192.168.130.72 k8s_nodename='master-02'
#192.168.130.73 k8s_nodename='master-03'

# work node(s), set unique 'k8s_nodename' for each node
# CAUTION: 'k8s_nodename' must consist of lower case alphanumeric characters, '-' or '.',
# and must start and end with an alphanumeric character
[kube_node]
192.168.130.72 k8s_nodename='worker-01'
192.168.130.73 k8s_nodename='worker-02'

# [optional] harbor server, a private docker registry
# 'NEW_INSTALL': 'true' to install a harbor server; 'false' to integrate with existed one
[harbor]
#192.168.1.8 NEW_INSTALL=false

# [optional] loadbalance for accessing k8s from outside
[ex_lb]
#192.168.1.6 LB_ROLE=backup EX_APISERVER_VIP=192.168.1.250 EX_APISERVER_PORT=8443
#192.168.1.7 LB_ROLE=master EX_APISERVER_VIP=192.168.1.250 EX_APISERVER_PORT=8443

# [optional] ntp server for the cluster
[chrony]
#192.168.1.1

[all:vars]
# --------- Main Variables ---------------
# Secure port for apiservers
SECURE_PORT="6443"

# Cluster container-runtime supported: docker, containerd
# if k8s version >= 1.24, docker is not supported
CONTAINER_RUNTIME="containerd"

# Network plugins supported: calico, flannel, kube-router, cilium, kube-ovn
CLUSTER_NETWORK="calico"

# Service proxy mode of kube-proxy: 'iptables' or 'ipvs'
PROXY_MODE="ipvs"

# K8S Service CIDR, not overlap with node(host) networking
SERVICE_CIDR="10.68.0.0/16"

# Cluster CIDR (Pod CIDR), not overlap with node(host) networking
CLUSTER_CIDR="172.20.0.0/16"

# NodePort Range
NODE_PORT_RANGE="30000-32767"

# Cluster DNS Domain
CLUSTER_DNS_DOMAIN="cluster.local"

# -------- Additional Variables (don't change the default value right now) ---
# Binaries Directory
bin_dir="/opt/kube/bin"

# Deploy Directory (kubeasz workspace)
base_dir="/etc/kubeasz"

# Directory for a specific cluster
cluster_dir="{{ base_dir }}/clusters/k8s-01"

# CA and other components cert/key Directory
ca_dir="/etc/kubernetes/ssl"

# Default 'k8s_nodename' is empty
k8s_nodename=''

# Default python interpreter
ansible_python_interpreter=/usr/bin/python3
1
2
3
4
5
6
7
8
9
10
11
12
13
14
15
16
17
18
19
20
21
22
23
24
25
26
27
28
29
30
31
32
33
34
35
36
37
38
39
40
41
42
43
44
45
46
47
48
49
50
51
52
53
54
55
56
57
58
59
60
61
62
63
64
65
66
67
68
69
70
71
72
73
74
75
76
77
78
79
80
2
3
4
5
6
7
8
9
10
11
12
13
14
15
16
17
18
19
20
21
22
23
24
25
26
27
28
29
30
31
32
33
34
35
36
37
38
39
40
41
42
43
44
45
46
47
48
49
50
51
52
53
54
55
56
57
58
59
60
61
62
63
64
65
66
67
68
69
70
71
72
73
74
75
76
77
78
79
80
config.yml 按需修改
修改完成后一键安装或按需安装
#建议使用alias命令,查看~/.bashrc 文件应该包含:alias dk='docker exec -it kubeasz'
source ~/.bashrc

# 一键安装,等价于执行docker exec -it kubeasz ezctl setup k8s-01 all
dk ezctl setup k8s-01 all

# 或者分步安装,具体使用 dk ezctl help setup 查看分步安装帮助信息
# dk ezctl setup k8s-01 01
# dk ezctl setup k8s-01 02
# dk ezctl setup k8s-01 03
# dk ezctl setup k8s-01 04
1
2
3
4
5
6
7
8
9
10
11
2
3
4
5
6
7
8
9
10
11
如无发生错误即安装成功

可以通过命令查看节点情况
source ~/.bashrc #更新一下环境变量
kubectl get node #查看节点情况
1
2
2
NAME        STATUS                     ROLES    AGE   VERSION
master-01   Ready                      master   19m   v1.27.2
worker-01   Ready                      node     17m   v1.27.2
worker-02   Ready                      node     17m   v1.27.2
1
2
3
4
2
3
4
kubectl get componentstatus #查看健康情况
1
NAME                 STATUS    MESSAGE                         ERROR
scheduler            Healthy   ok
controller-manager   Healthy   ok
etcd-1               Healthy   {"health":"true","reason":""}
etcd-2               Healthy   {"health":"true","reason":""}
etcd-0               Healthy   {"health":"true","reason":""}
1
2
3
4
5
6
2
3
4
5
6
kubectl get pod -A #查询pod
1
NAMESPACE     NAME                                         READY   STATUS    RESTARTS   AGE
kube-system   calico-kube-controllers-67c67b9b5f-jtbj2     1/1     Running   0          23m
kube-system   calico-node-cbxlt                            1/1     Running   0          23m
kube-system   calico-node-ns6rr                            1/1     Running   0          23m
kube-system   calico-node-xtgvt                            1/1     Running   0          23m
kube-system   coredns-6557d7db9c-f7gkx                     1/1     Running   0          20m
kube-system   dashboard-metrics-scraper-5c876f54bd-zdzbr   1/1     Running   0          19m
kube-system   kubernetes-dashboard-89b5448d6-4rx4p         1/1     Running   0          19m
kube-system   metrics-server-57fbbb5957-cb6jk              1/1     Running   0          19m
kube-system   node-local-dns-7b2q7                         1/1     Running   0          20m
kube-system   node-local-dns-lxtf2                         1/1     Running   0          20m
kube-system   node-local-dns-vxbds                         1/1     Running   0          20m
1
2
3
4
5
6
7
8
9
10
11
12
2
3
4
5
6
7
8
9
10
11
12
更多 ezctl 命令请查看官方仓库文档
如出现重大错误可尝试删除集群再重新安装
dk ezctl destroy k8s-01 #销毁指定集群
dk ezctl setup k8s-01 all #重新一键安装
1
2
2
关于其他工具或应用(如 heml、Jenkins、Prometheus、istio 等)可以查看 kubeasz 提供的文档
# 污点问题
造成原因,该节点无法调度,被系统自动标记为污点,需要手动清除,出现问题如 helm 后 pod 一直处于 Pending 状态
# 查询污点
kubectl get pod
1
NAME        READY   STATUS    RESTARTS   AGE
jenkins-0   0/2     Pending   0          24m
1
2
2
首先查找污点在哪个节点上
kubectl get node #获取所有节点
1
NAME        STATUS                     ROLES    AGE    VERSION
master-01   Ready,SchedulingDisabled   master   131m   v1.27.2
worker-01   Ready                      node     129m   v1.27.2
worker-02   Ready                      node     129m   v1.27.2
1
2
3
4
2
3
4
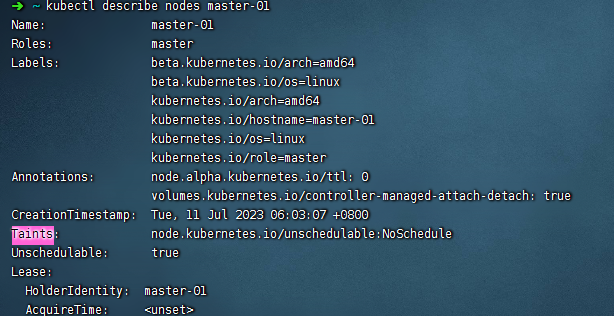
kubectl describe node master-01 |grep Taint
kubectl describe node worker-01 |grep Taint
kubectl describe node worker-02 |grep Taint
1
2
3
2
3
查找 Taints 关键字
# 删除污点
污点处于 master 节点上,污点为 node.kubernetes.io/unschedulable:NoSchedule
#注意污点名称后需要加一个横杠
kubectl taint nodes master-01 node.kubernetes.io/unschedulable:NoSchedule-
1
2
2
将 unschedulable 设置为 false
kubectl patch node master-01 -p '{"spec":{"unschedulable":false}}'
1
# Pod 上添加污点容忍
下面以 nginx pod 为例子
kubectl edit deployment nginx
1
在 Yaml 文件 template 中的 spec 处添加容忍。例如,增加已存在 special 污点所对应的容忍:
tolerations:
- key: "special" #污点名称
 operator: "Equal"
 value: "true"
 effect: "NoSchedule"
1
2
3
4
5
2
3
4
5
node.kubernetes.io/not-ready:节点尚未准备好。这对应于NodeConditionReady为False。

node.kubernetes.io/unreachable:无法从节点控制器访问节点。这对应于NodeConditionReady为Unknown。

node.kubernetes.io/out-of-disk:节点磁盘不足。

node.kubernetes.io/memory-pressure:节点有内存压力。

node.kubernetes.io/disk-pressure:节点有磁盘压力。

node.kubernetes.io/network-unavailable:节点的网络不可用。

node.kubernetes.io/unschedulable:节点不可调度。

node.cloudprovider.kubernetes.io/uninitialized:当kubelet从外部云服务提供程序启动时,在节点上设置此污点以将其标记为不可用。来自cloud-controller-manager的控制器初始化此节点后,kubelet删除此污点。
1
2
3
4
5
6
7
8
9
10
11
12
13
14
15
2
3
4
5
6
7
8
9
10
11
12
13
14
15
# containerd 镜像代理
解决拉取容器时无法拉取
vim /lib/systemd/system/containerd.service
#vim /etc/systemd/system/containerd.service #如果是apt/yum安装则配置文件在etc下
1
2
2
[Service]
Environment="HTTP_PROXY=http://192.168.42.183:1082/"
Environment="HTTPS_PROXY=http://192.168.42.183:1082/"
Environment="NO_PROXY =10.96.0.0/16,127.0.0.1,192.168.130.0,192.168.42.0/16,localhost"
1
2
3
4
2
3
4
重启 containerd
systemctl daemon-reload
systemctl restart containerd.service
1
2
2
方式二直接追加
mkdir /etc/systemd/system/containerd.service.d
cat > /etc/systemd/system/containerd.service.d/http_proxy.conf << EOF
[Service]
Environment="HTTP_PROXY=http://192.168.32.2:7890"
Environment="HTTPS_PROXY=http://192.168.32.2:7890"
Environment="NO_PROXY=.svc,.svc.cluster.local,.cluster.local,.todoit.tech,10.244.0.0/16,10.96.0.0/12,127.0.0.1,localhost,192.168.0.0/16,172.16.0.0/12,10.0.0.0/8"
EOF


systemctl daemon-reload
systemctl restart containerd
1
2
3
4
5
6
7
8
9
10
11
2
3
4
5
6
7
8
9
10
11
编辑 (opens new window)
上次更新: 2023/12/06, 01:31:48