 Day09 Oauth2
# Day09 Oauth2
# 用户认证

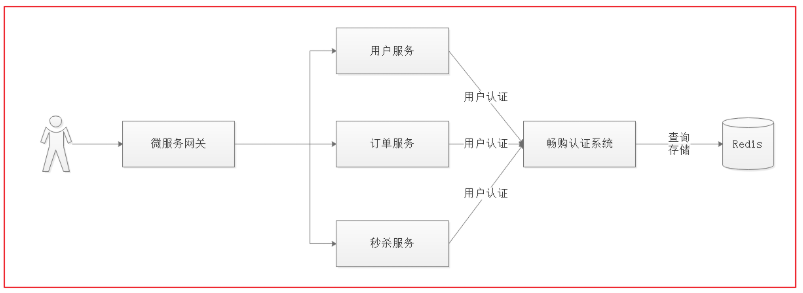
上面流程图描述了用户要操作的各个微服务,用户查看个人信息需要访问客户微服务,下单需要访问订单微服务,秒杀抢购商品需要访问秒杀微服务。每个服务都需要认证用户的身份,身份认证成功后,需要识别用户的角色然后授权访问对应的功能。
# 单点登陆
单点登录(Single Sign On),简称为 SSO,是目前比较流行的企业业务整合的解决方案之一。 SSO 的定义是在多个应用系统中,用户只需要登录一次就可以访问所有相互信任的应用系统
用户访问的项目中,至少有 3 个微服务需要识别用户身份,如果用户访问每个微服务都登录一次就太麻烦了,为了提高用户的体验,我们需要实现让用户在一个系统中登录,其他任意受信任的系统都可以访问,这个功能就叫单点登录。
# 第三方账号登陆
随着国内及国外巨头们的平台开放战略以及移动互联网的发展,第三方登录已经不是一个陌生的产品设计概念了。 所谓的第三方登录,是说基于用户在第三方平台上已有的账号和密码来快速完成己方应用的登录或者注册的功能。而这里的第三方平台,一般是已经拥有大量用户的平台,国外的比 Facebook,Twitter 等,国内的比如微博、微信、QQ 等。
# 认证解决方案
分布式系统要实现单点登录,通常将认证系统独立抽取出来,并且将用户身份信息存储在单独的存储介质,比如: MySQL、Redis,考虑性能要求,通常存储在 Redis 中,如下图:
Java 中有很多用户认证的框架都可以实现单点登录
- Apache Shiro
- CAS
- Spring security
# 第三方登录技术方案
第三方认证技术方案最主要是解决认证协议的通用标准问题,因为要实现跨系统认证,各系统之间要遵循一定的 接口协议。 OAUTH 协议为用户资源的授权提供了一个安全的、开放而又简易的标准。 Oauth 协议目前发展到 2.0 版本,1.0 版本过于复杂,2.0 版本已得到广泛应用。
# Spring security Oauth2 认证解决方案
本项目采用 Spring security + Oauth2+JWT 完成用户认证及用户授权,Spring security 是一个强大的和高度可定制的身份验证和访问控制框架,Spring security 框架集成了 Oauth2 协议,下图是项目认证架构图:
1、用户请求认证服务完成认证。
2、认证服务下发用户身份令牌,拥有身份令牌表示身份合法。
3、用户携带令牌请求资源服务,请求资源服务必先经过网关。
4、网关校验用户身份令牌的合法,不合法表示用户没有登录,如果合法则放行继续访问。
5、资源服务获取令牌,根据令牌完成授权。
6、资源服务完成授权则响应资源信息。
# 基于私钥生成 jwt 令牌
# 生成私钥公钥
JWT 令牌生成采用非对称加密算法
1、生成密钥证书 下边命令生成密钥证书,采用 RSA 算法每个证书包含公钥和私钥
keytool -genkeypair -alias changgou -keyalg RSA -keypass changgou -keystore changgou.jks -storepass changgou
Keytool 是一个 java 提供的证书管理工具
-alias:密钥的别名
-keyalg:使用的hash算法
-keypass:密钥的访问密码
-keystore:密钥库文件名,changgou.jks保存了生成的证书
-storepass:密钥库的访问密码
2
3
4
5
查询证书信息:
keytool -list -keystore changgou.jks
# 导出公钥
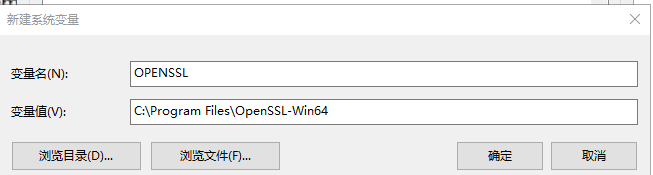
openssl 是一个加解密工具包,这里使用 openssl 来导出公钥信息。
安装 openssl:http://slproweb.com/products/Win32OpenSSL.html
安装资料目录下的 Win64OpenSSL-1_1_1b.exe
配置 openssl 的 path 环境变量,
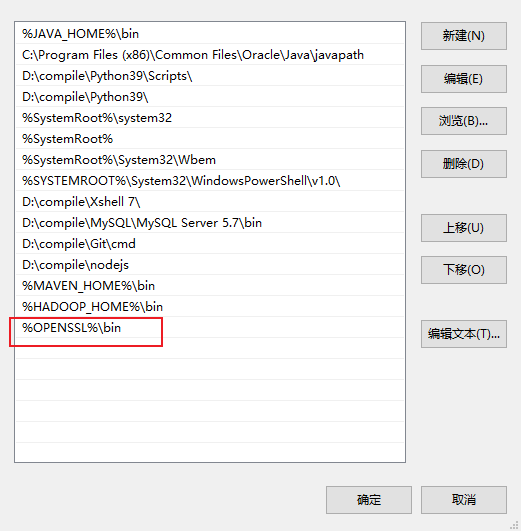
cmd 进入 changgou.jks 文件所在目录执行如下命令:
keytool -list -rfc --keystore changgou.jks | openssl x509 -inform pem -pubkey
获取公钥
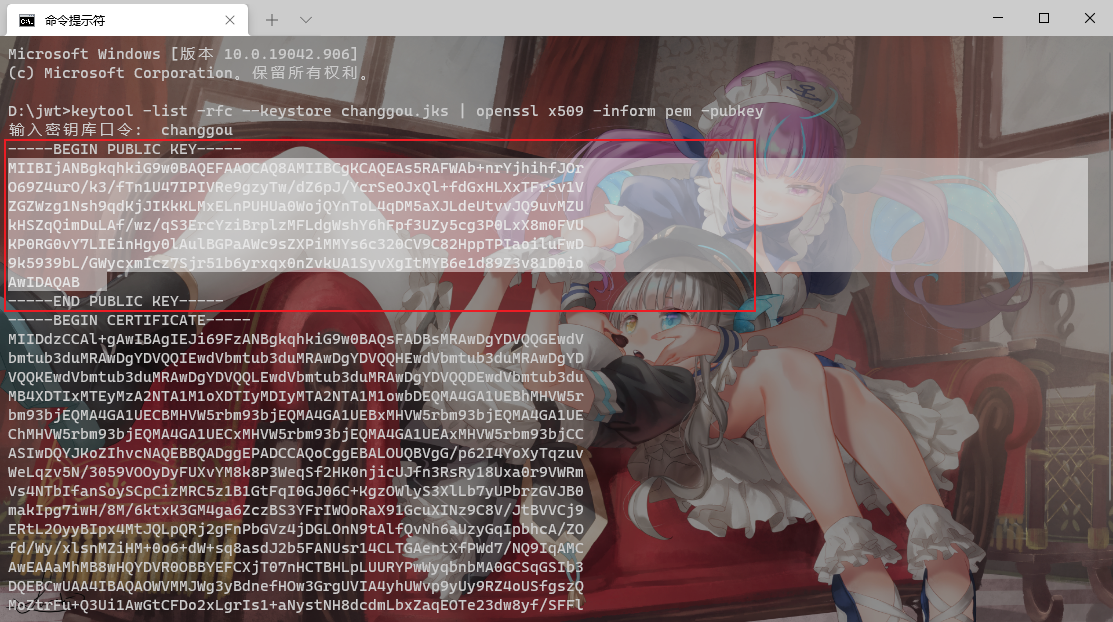
复制并格式化
-----BEGIN PUBLIC KEY-----MIIBIjANBgkqhkiG9w0BAQEFAAOCAQ8AMIIBCgKCAQEAs5RAFWAb+nrYjhihfJOrO69Z4urO/k3/fTn1U47IPIVRe9gzyTw/dZ6pJ/YcrSeOJxQl+fdGxHLXxTFrSv1VZGZWzg1Nsh9qdKjJIKkKLMxELnPUHUa0WojQYnToL4qDM5aXJLdeUtvvJQ9uvMZUkHSZqQimDuLAf/wz/qS3ErcYziBrplzMFLdgWshY6hFpf3UZy5cg3P0LxX8m0FVUKP0RG0vY7LIEinHgy0lAulBGPaAWc9sZXPiMMYs6c320CV9C82HppTPIaoiluFwD9k5939bL/GWycxmIcz7Sjr51b6yrxqx0nZvkUA1SyvXgItMYB6e1d89Z3v81D0ioAwIDAQAB-----END PUBLIC KEY-----
# 导入认证服务并进行测试
将课件中 changgou_user_auth 的工程导入到项目中去
创建通过密钥生成 jwt 的测试类
package com.changgou.oauth;

import com.alibaba.fastjson.JSON;
import org.junit.Test;
import org.springframework.core.io.ClassPathResource;
import org.springframework.security.jwt.Jwt;
import org.springframework.security.jwt.JwtHelper;
import org.springframework.security.jwt.crypto.sign.RsaSigner;
import org.springframework.security.rsa.crypto.KeyStoreKeyFactory;

import java.security.KeyPair;
import java.security.interfaces.RSAPrivateKey;
import java.util.HashMap;
import java.util.Map;

public class CreateJwtTest {

    @Test
    public void createJWT() {
        //基于私钥生成jwt

        //1.创建一个密钥工厂
        //1.1指定私钥的位置
        ClassPathResource classPathResource = new ClassPathResource("changgou.jks");
        //1.2 指定密钥库的密码
        String keyPass = "changgou";
        //参数一:指定私钥的位置  参数二:指定密钥库的密码
        KeyStoreKeyFactory keyStoreKeyFactory = new KeyStoreKeyFactory(classPathResource, keyPass.toCharArray());
        //2.基于工厂获取私钥
        String alias = "changgou";
        String password = "changgou";
        /**
         *参数一 私钥的别名
         * 参数二 密码库的密码
         */
        KeyPair keyPair = keyStoreKeyFactory.getKeyPair(alias, password.toCharArray());
        //将当前私钥转换为ras私钥
        RSAPrivateKey rsaPrivateKey = (RSAPrivateKey) keyPair.getPrivate();
        //3.生成jwt
        Map<String, String> map = new HashMap<>();
        map.put("company", "heima");
        map.put("address", "beijing");
        Jwt jwt = JwtHelper.encode(JSON.toJSONString(map), new RsaSigner(rsaPrivateKey));
        String jwtEncoded = jwt.getEncoded();
        System.out.println(jwtEncoded);

    }


}
2
3
4
5
6
7
8
9
10
11
12
13
14
15
16
17
18
19
20
21
22
23
24
25
26
27
28
29
30
31
32
33
34
35
36
37
38
39
40
41
42
43
44
45
46
47
48
49
50
再通过公钥解析 jwt 内容
package com.changgou.oauth;

import org.junit.Test;
import org.springframework.security.jwt.Jwt;
import org.springframework.security.jwt.JwtHelper;
import org.springframework.security.jwt.crypto.sign.RsaVerifier;


public class ParseJwtTest {

    @Test
    public void parseJwt() {
        //基于公钥解析jwt
        //jwt
        String jwt = "eyJhbGciOiJSUzI1NiIsInR5cCI6IkpXVCJ9.eyJhZGRyZXNzIjoiYmVpamluZyIsImNvbXBhbnkiOiJoZWltYSJ9.cjZNz8G0m4noNYN2VM1SH3ujAtbHElW5Vtbadb0NDI0cjM1DaAXzMA53Qbj4pmVQPl_IfSKqUEXbLxowdRa5NHR43laFsR0kzGbJiTINfSVSroSslYpDdEVwCeAF_a7I-R819YTj4p6sjuYKXbzXpeZQErczFbWWWGR2_U44xH6u1ejRNv8PikFiuzNw-muL7zUJkvqeSJzbEMnQdZMbfvZp4LtSI6B4G_PqpdNXkv19-juxAh99VgJInH_ItF0y5IBOxofA7gRebCZmU8L57gO9ohf2L00D95kis_Ji8lmA1ptLIfXqO_qLVvLBUNH-VtgjGAF0-0pyB-5jlbHP7w";
        //公钥
        String publicKey = "-----BEGIN PUBLIC KEY-----MIIBIjANBgkqhkiG9w0BAQEFAAOCAQ8AMIIBCgKCAQEAvFsEiaLvij9C1Mz+oyAmt47whAaRkRu/8kePM+X8760UGU0RMwGti6Z9y3LQ0RvK6I0brXmbGB/RsN38PVnhcP8ZfxGUH26kX0RK+tlrxcrG+HkPYOH4XPAL8Q1lu1n9x3tLcIPxq8ZZtuIyKYEmoLKyMsvTviG5flTpDprT25unWgE4md1kthRWXOnfWHATVY7Y/r4obiOL1mS5bEa/iNKotQNnvIAKtjBM4RlIDWMa6dmz+lHtLtqDD2LF1qwoiSIHI75LQZ/CNYaHCfZSxtOydpNKq8eb1/PGiLNolD4La2zf0/1dlcr5mkesV570NxRmU1tFm8Zd3MZlZmyv9QIDAQAB-----END PUBLIC KEY-----";
        //解析jwt
        Jwt token = JwtHelper.decodeAndVerify(jwt, new RsaVerifier(publicKey));
        //获取jwt的原始内容
        String claims = token.getClaims();
        System.out.println(claims);
    }
}
2
3
4
5
6
7
8
9
10
11
12
13
14
15
16
17
18
19
20
21
22
23
24
# Oauth2.0 入门
# 准备工作
\1) 搭建认证服务器之前,先在用户系统表结构中增加如下表结构:
此表名是 oauth2.0 固定写法 不能修改
CREATE TABLE `oauth_client_details` (
  `client_id` varchar(48) NOT NULL COMMENT '客户端ID,主要用于标识对应的应用',
  `resource_ids` varchar(256) DEFAULT NULL,
  `client_secret` varchar(256) DEFAULT NULL COMMENT '客户端秘钥,BCryptPasswordEncoder加密',
  `scope` varchar(256) DEFAULT NULL COMMENT '对应的范围',
  `authorized_grant_types` varchar(256) DEFAULT NULL COMMENT '认证模式',
  `web_server_redirect_uri` varchar(256) DEFAULT NULL COMMENT '认证后重定向地址',
  `authorities` varchar(256) DEFAULT NULL,
  `access_token_validity` int(11) DEFAULT NULL COMMENT '令牌有效期',
  `refresh_token_validity` int(11) DEFAULT NULL COMMENT '令牌刷新周期',
  `additional_information` varchar(4096) DEFAULT NULL,
  `autoapprove` varchar(256) DEFAULT NULL,
  PRIMARY KEY (`client_id`)
) ENGINE=InnoDB DEFAULT CHARSET=utf8;
2
3
4
5
6
7
8
9
10
11
12
13
14
导入 1 条初始化数据,其中加密字符明文为 changgou:
INSERT INTO `oauth_client_details` VALUES ('changgou', null, '$2a$10$Yvkp3xzDcri6MAsPIqnzzeGBHez1QZR3A079XDdmNU4R725KrkXi2', 'app', 'authorization_code,password,refresh_token,client_credentials', 'http://localhost', null, '43200', '43200', null, null);
# Oauth2 授权模式介绍
Oauth2 有以下授权模式:
- 授权码模式(Authorization Code)
- 隐式授权模式(Implicit)
- 密码模式(Resource Owner Password Credentials)
- 客户端模式(Client Credentials)
其中授权码模式和密码模式应用较多
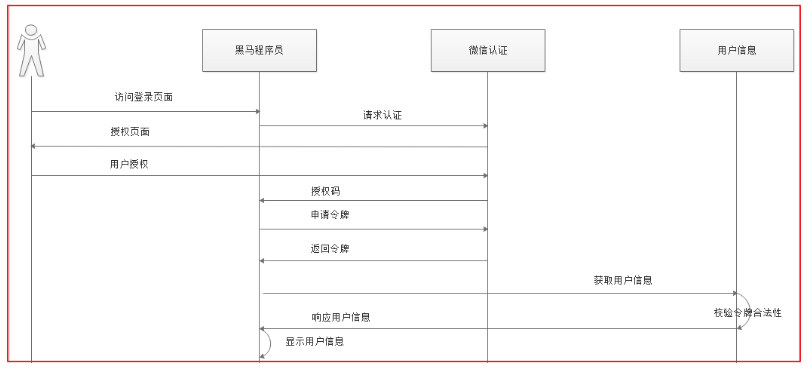
# 授权码模式
上边例举的黑马程序员网站使用 QQ 认证的过程就是授权码模式,流程如下:
1、客户端请求第三方授权
2、用户同意给客户端授权
3、客户端获取到授权码,请求认证服务器申请 令牌
4、认证服务器向客户端响应令牌
5、客户端请求资源服务器的资源,资源服务校验令牌合法性,完成授权
6、资源服务器返回受保护资源
# 申请授权码
通过 get 请求获取 必须要与数据库信息一致
http://localhost:9200/oauth/authorize?client_id=changgou&response_type=code&scop=app&redirect_uri=http://localhost
client_id:客户端id,和授权配置类中设置的客户端id一致。
response_type:授权码模式固定为code
scop:客户端范围,和授权配置类中设置的scop一致。
redirect_uri:跳转uri,当授权码申请成功后会跳转到此地址,并在后边带上code参数(授权码)
2
3
4
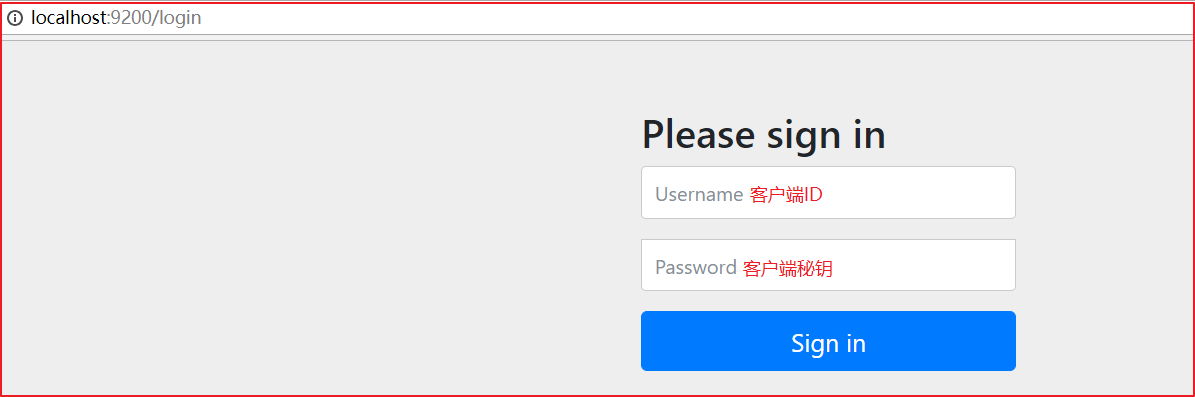
输入账号和密码,点击 Login。 Spring Security 接收到请求会调用 UserDetailsService 接口的 loadUserByUsername 方法查询用户正确的密码。 当前导入的基础工程中客户端 ID 为 changgou,秘钥也为 changgou 即可认证通过。
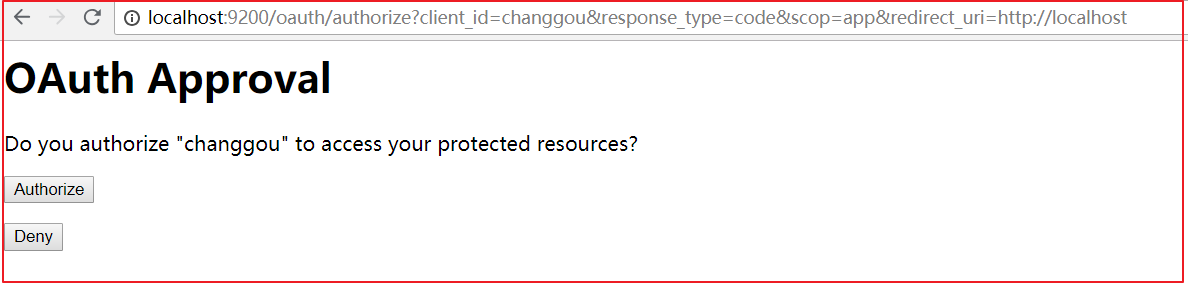
点击 Authorize, 接下来返回授权码: 认证服务携带授权码跳转 redirect_uri,code=k45iLY 就是返回的授权码,每一个授权码只能使用一次

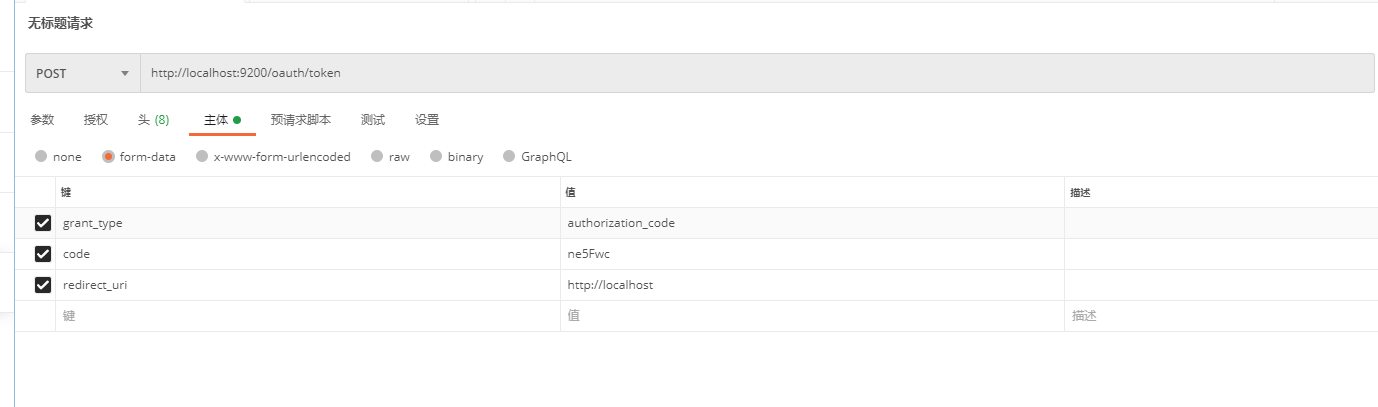
# 申请令牌
拿到授权码后,申请令牌。
Post请求:
http://localhost:9200/oauth/token
2
grant_type:授权类型,填写authorization_code,表示授权码模式
code:授权码,就是刚刚获取的授权码,注意:授权码只使用一次就无效了,需要重新申请。
redirect_uri:申请授权码时的跳转url,一定和申请授权码时用的redirect_uri一致。
2
3
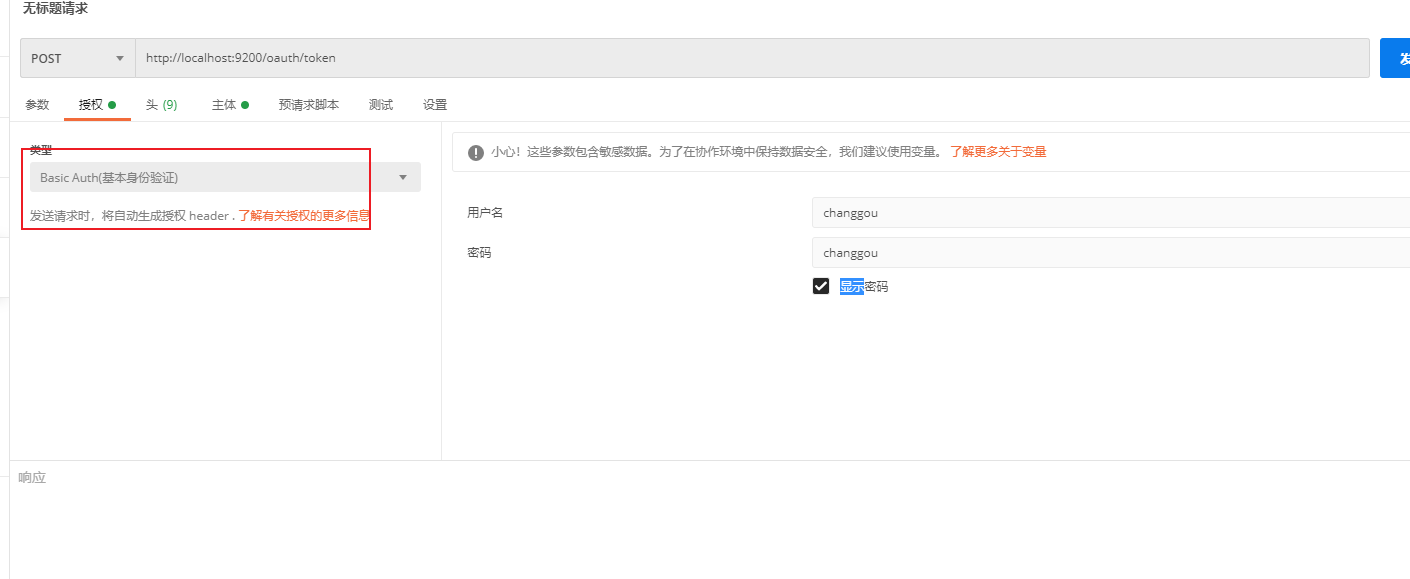
此链接需要使用 http Basic 认证。
http 协议定义的一种认证方式,将客户端 id 和客户端密码按照 “客户端 ID: 客户端密码” 的格式拼接,并用 base64 编 码,放在 header 中请求服务端,一个例子:
Authorization:Basic WGNXZWJBcHA6WGNXZWJBcHA=WGNXZWJBcHA6WGNXZWJBcHA= 是用户名:密码的 base64 编码。 认证失败服务端返回 401 Unauthorized。
在 postman 中操作
返回结果
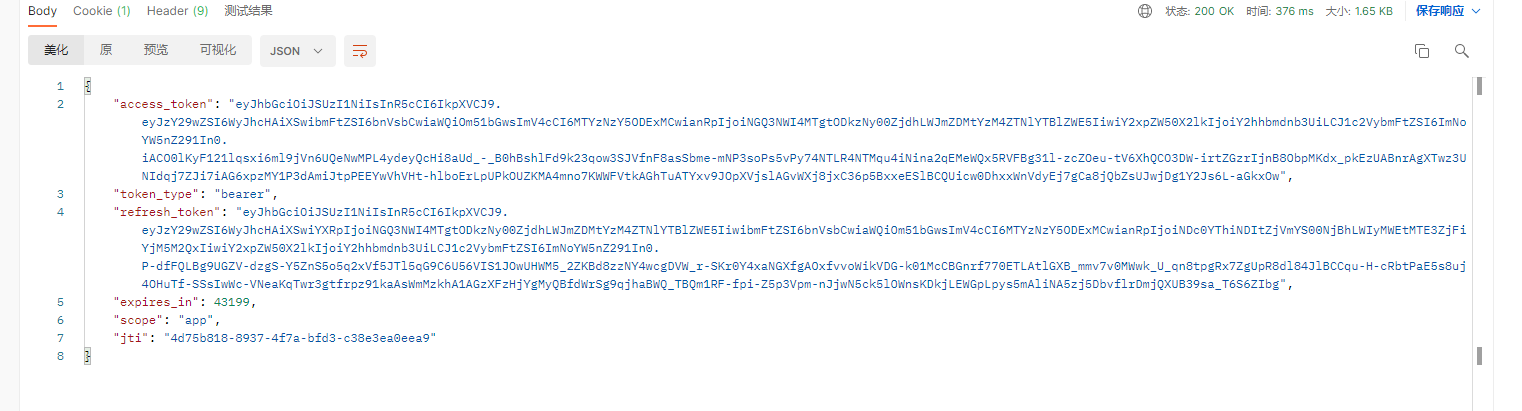
access_token:访问令牌,携带此令牌访问资源
token_type:有MAC Token与Bearer Token两种类型,两种的校验算法不同,RFC 6750建议Oauth2采用 Bearer Token(http://www.rfcreader.com/#rfc6750)。
refresh_token:刷新令牌,使用此令牌可以延长访问令牌的过期时间。
expires_in:过期时间,单位为秒。
scope:范围,与定义的客户端范围一致。
jti:当前token的唯一标识
2
3
4
5
6
# 令牌校验
Spring Security Oauth2 提供校验令牌的端点,如下:
Get: http://localhost:9200/oauth/check_token?token= [access_token]
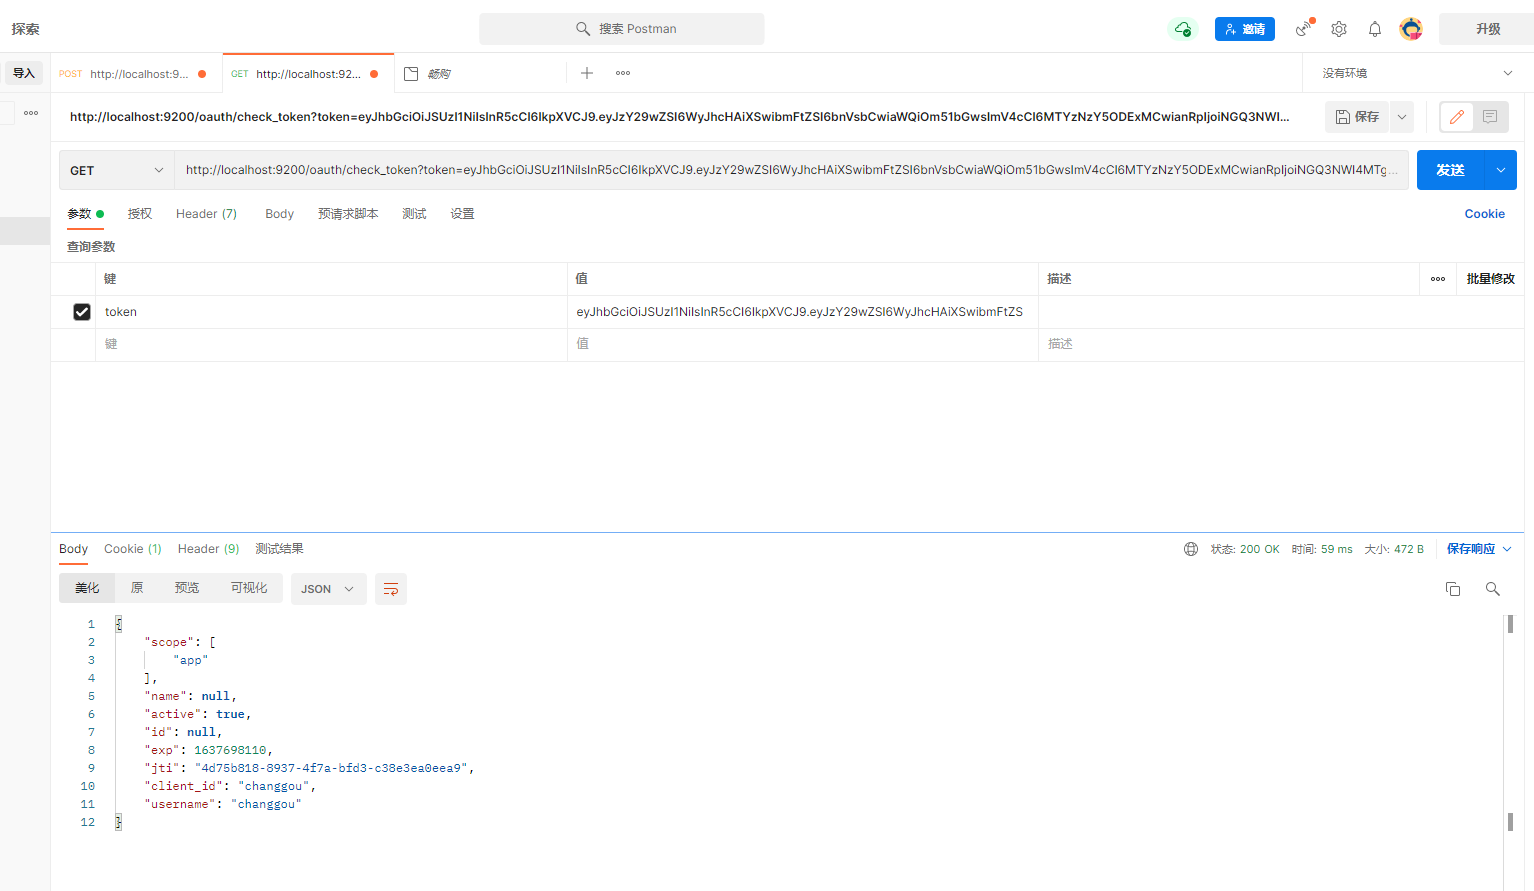
令牌不通过会返回 400 并返回异常
令牌过期会返回 400 token has expired
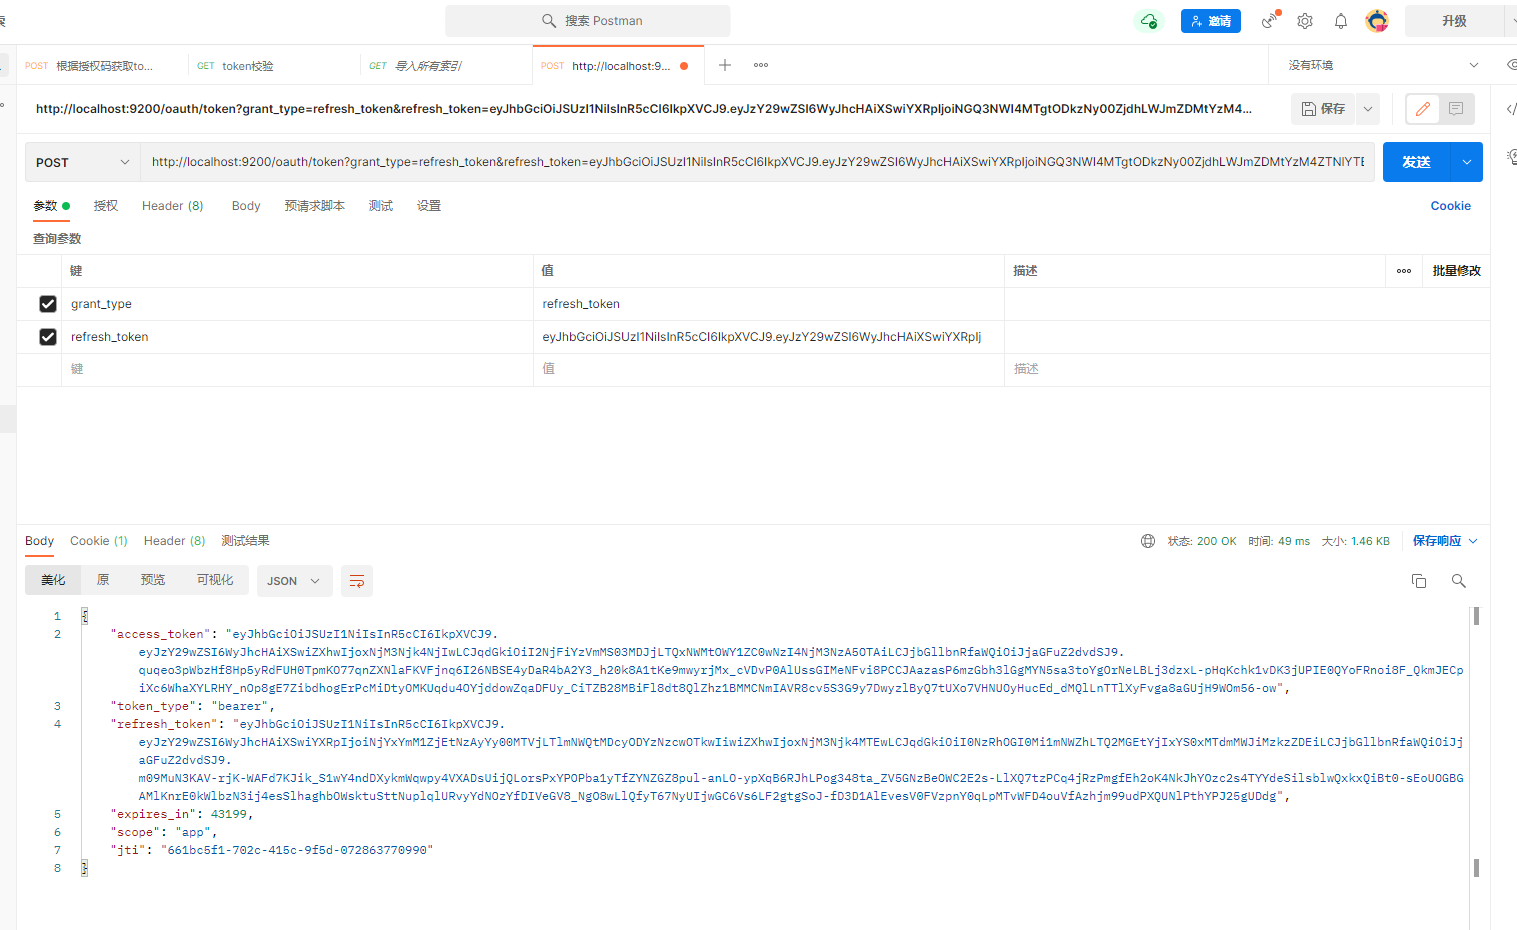
# 刷新令牌
刷新令牌是当令牌快过期时重新生成一个令牌,它于授权码授权和密码授权生成令牌不同,刷新令牌不需要授权码 也不需要账号和密码,只需要一个刷新令牌、客户端 id 和客户端密码。
测试如下: Post:http://localhost:9200/oauth/token
参数:
grant_type: 固定为 refresh_token
refresh_token:刷新令牌(注意不是 access_token,而是 refresh_token)
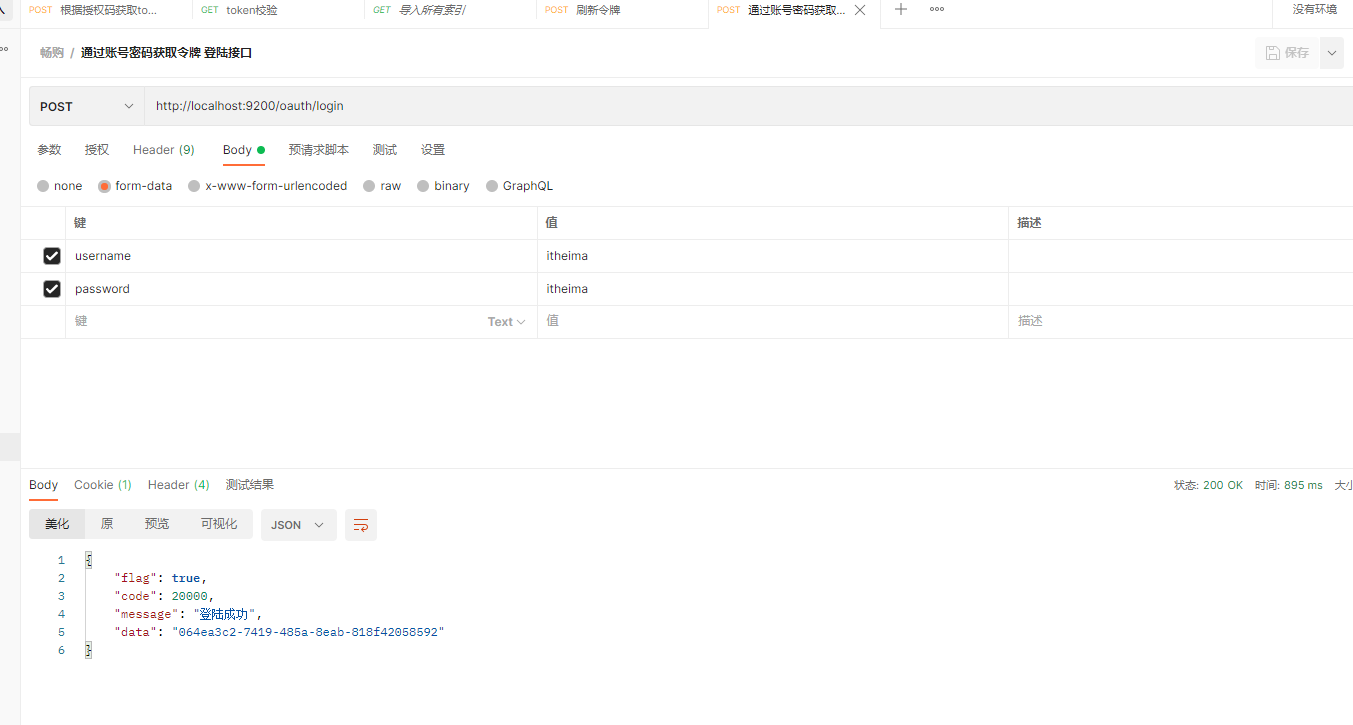
# 密码模式
密码模式(Resource Owner Password Credentials)与授权码模式的区别是申请令牌不再使用授权码,而是直接 通过用户名和密码即可申请令牌。
# 申请令牌
Post请求:
http://localhost:9200/oauth/token

携带参数:
grant_type:密码模式授权填写password
username:账号
password:密码
2
3
4
5
6
7
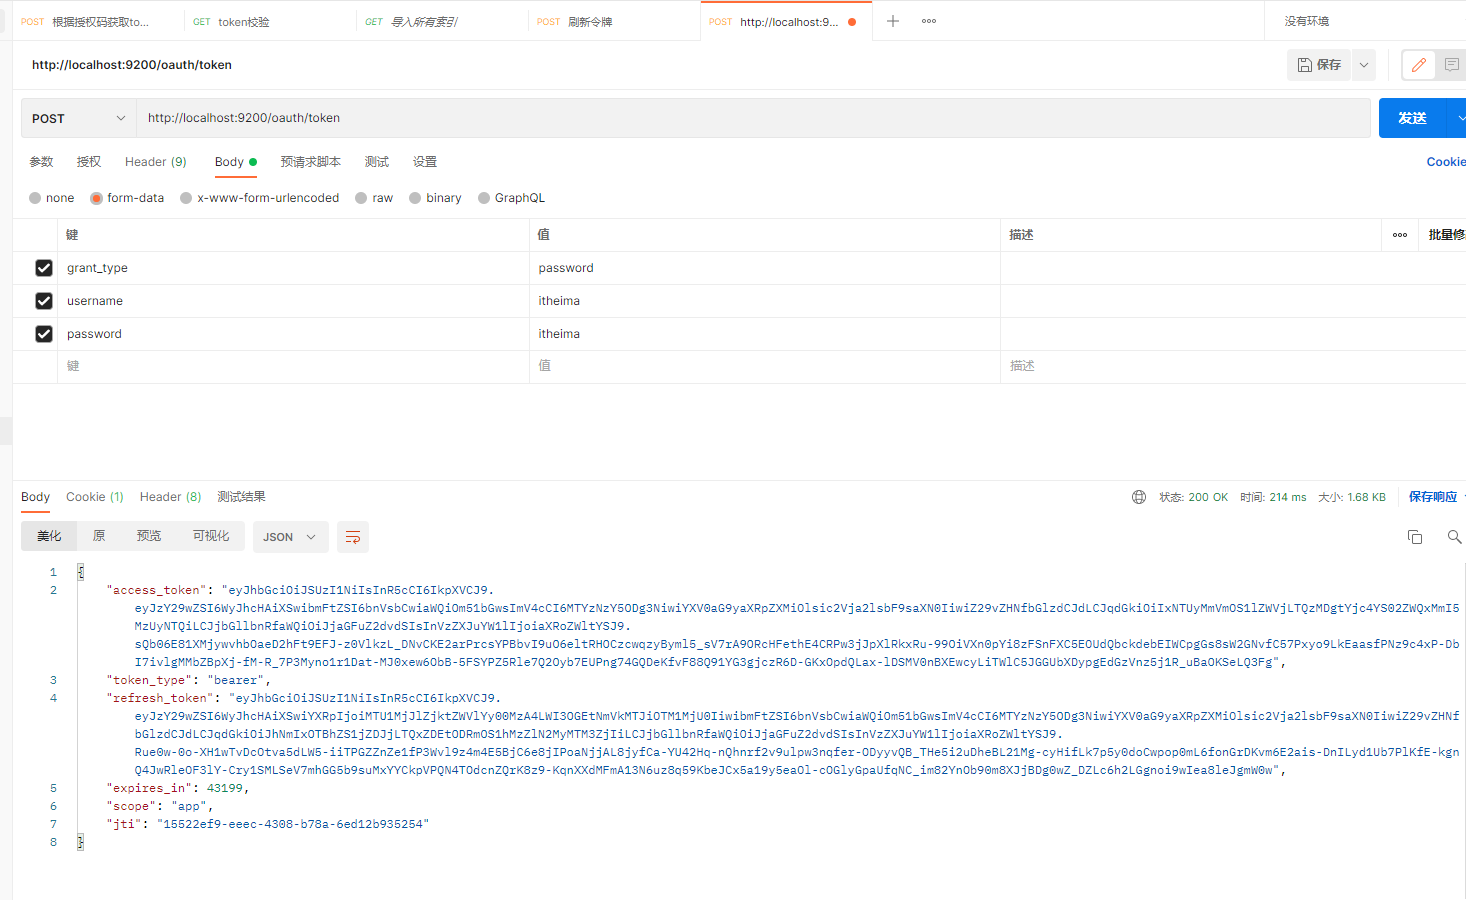
目前后端密码是写死未 itheima 后期会动态查询验证
# 资源服务授权
资源服务拥有要访问的受保护资源,客户端携带令牌访问资源服务,如果令牌合法则可成功访问资源服务中的资源
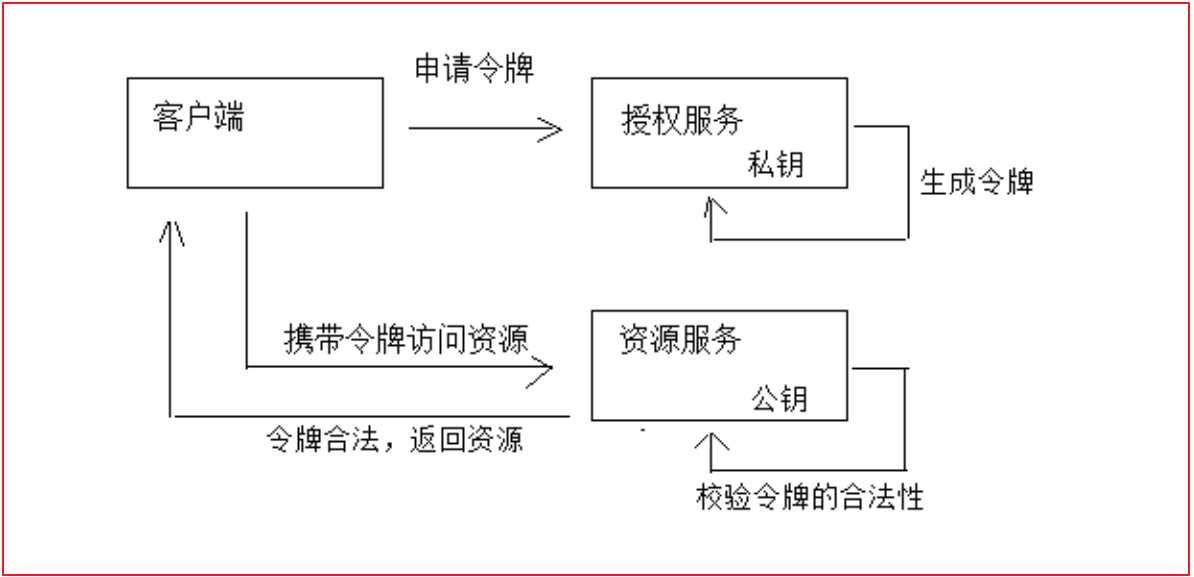
1、客户端请求认证服务申请令牌 2、认证服务生成令牌认证服务采用非对称加密算法,使用私钥生成令牌。 3、客户端携带令牌访问资源服务客户端在 Http header 中添加: Authorization:Bearer 令牌。 4、资源服务请求认证服务校验令牌的有效性资源服务接收到令牌,使用公钥校验令牌的合法性。 5、令牌有效,资源服务向客户端响应资源信息
# 用户服务对接 Oauth2
基本上所有微服务都是资源服务,这里我们在课程管理服务上配置授权控制,当配置了授权控制后如要访问课程信 息则必须提供令牌。
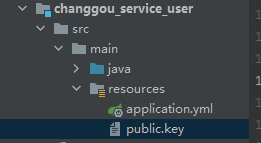
1、配置公钥 ,将 changggou_user_auth 项目中 public.key 复制到 changgou_service_user 中
2、添加依赖
<dependency>
    <groupId>org.springframework.cloud</groupId>
    <artifactId>spring-cloud-starter-oauth2</artifactId>
</dependency>
2
3
4
3、配置每个系统的 Http 请求路径安全控制策略以及读取公钥信息识别令牌,如下:
package com.changgou.user.config;

import org.springframework.context.annotation.Bean;
import org.springframework.context.annotation.Configuration;
import org.springframework.core.io.ClassPathResource;
import org.springframework.core.io.Resource;
import org.springframework.security.config.annotation.method.configuration.EnableGlobalMethodSecurity;
import org.springframework.security.config.annotation.web.builders.HttpSecurity;
import org.springframework.security.oauth2.config.annotation.web.configuration.EnableResourceServer;
import org.springframework.security.oauth2.config.annotation.web.configuration.ResourceServerConfigurerAdapter;
import org.springframework.security.oauth2.provider.token.TokenStore;
import org.springframework.security.oauth2.provider.token.store.JwtAccessTokenConverter;
import org.springframework.security.oauth2.provider.token.store.JwtTokenStore;

import java.io.BufferedReader;
import java.io.IOException;
import java.io.InputStreamReader;
import java.util.stream.Collectors;

@Configuration
@EnableResourceServer
@EnableGlobalMethodSecurity(prePostEnabled = true, securedEnabled = true)//激活方法上的PreAuthorize注解
public class ResourceServerConfig extends ResourceServerConfigurerAdapter {

    //公钥
    private static final String PUBLIC_KEY = "public.key";

    /***
     * 定义JwtTokenStore
     * @param jwtAccessTokenConverter
     * @return
     */
    @Bean
    public TokenStore tokenStore(JwtAccessTokenConverter jwtAccessTokenConverter) {
        return new JwtTokenStore(jwtAccessTokenConverter);
    }

    /***
     * 定义JJwtAccessTokenConverter
     * @return
     */
    @Bean
    public JwtAccessTokenConverter jwtAccessTokenConverter() {
        JwtAccessTokenConverter converter = new JwtAccessTokenConverter();
        converter.setVerifierKey(getPubKey());
        return converter;
    }
    /**
     * 获取非对称加密公钥 Key
     * @return 公钥 Key
     */
    private String getPubKey() {
        Resource resource = new ClassPathResource(PUBLIC_KEY);
        try {
            InputStreamReader inputStreamReader = new InputStreamReader(resource.getInputStream());
            BufferedReader br = new BufferedReader(inputStreamReader);
            return br.lines().collect(Collectors.joining("\n"));
        } catch (IOException ioe) {
            return null;
        }
    }

    /***
     * Http安全配置,对每个到达系统的http请求链接进行校验
     * @param http
     * @throws Exception
     */
    @Override
    public void configure(HttpSecurity http) throws Exception {
        //所有请求必须认证通过
        http.authorizeRequests()
                //下边的路径放行
                .antMatchers(
                        "/user/add"). //配置地址放行
                permitAll()
                .anyRequest().
                authenticated();    //其他地址需要认证授权
    }
}
2
3
4
5
6
7
8
9
10
11
12
13
14
15
16
17
18
19
20
21
22
23
24
25
26
27
28
29
30
31
32
33
34
35
36
37
38
39
40
41
42
43
44
45
46
47
48
49
50
51
52
53
54
55
56
57
58
59
60
61
62
63
64
65
66
67
68
69
70
71
72
73
74
75
76
77
78
79
# 资源服务授权测试
启动 user 启动类
不携带令牌访问 http://localhost:9005/user
由于该地址受访问限制,需要授权,所以出现如下错误:
{
    "error": "unauthorized",
    "error_description": "Full authentication is required to access this resource"
}
2
3
4
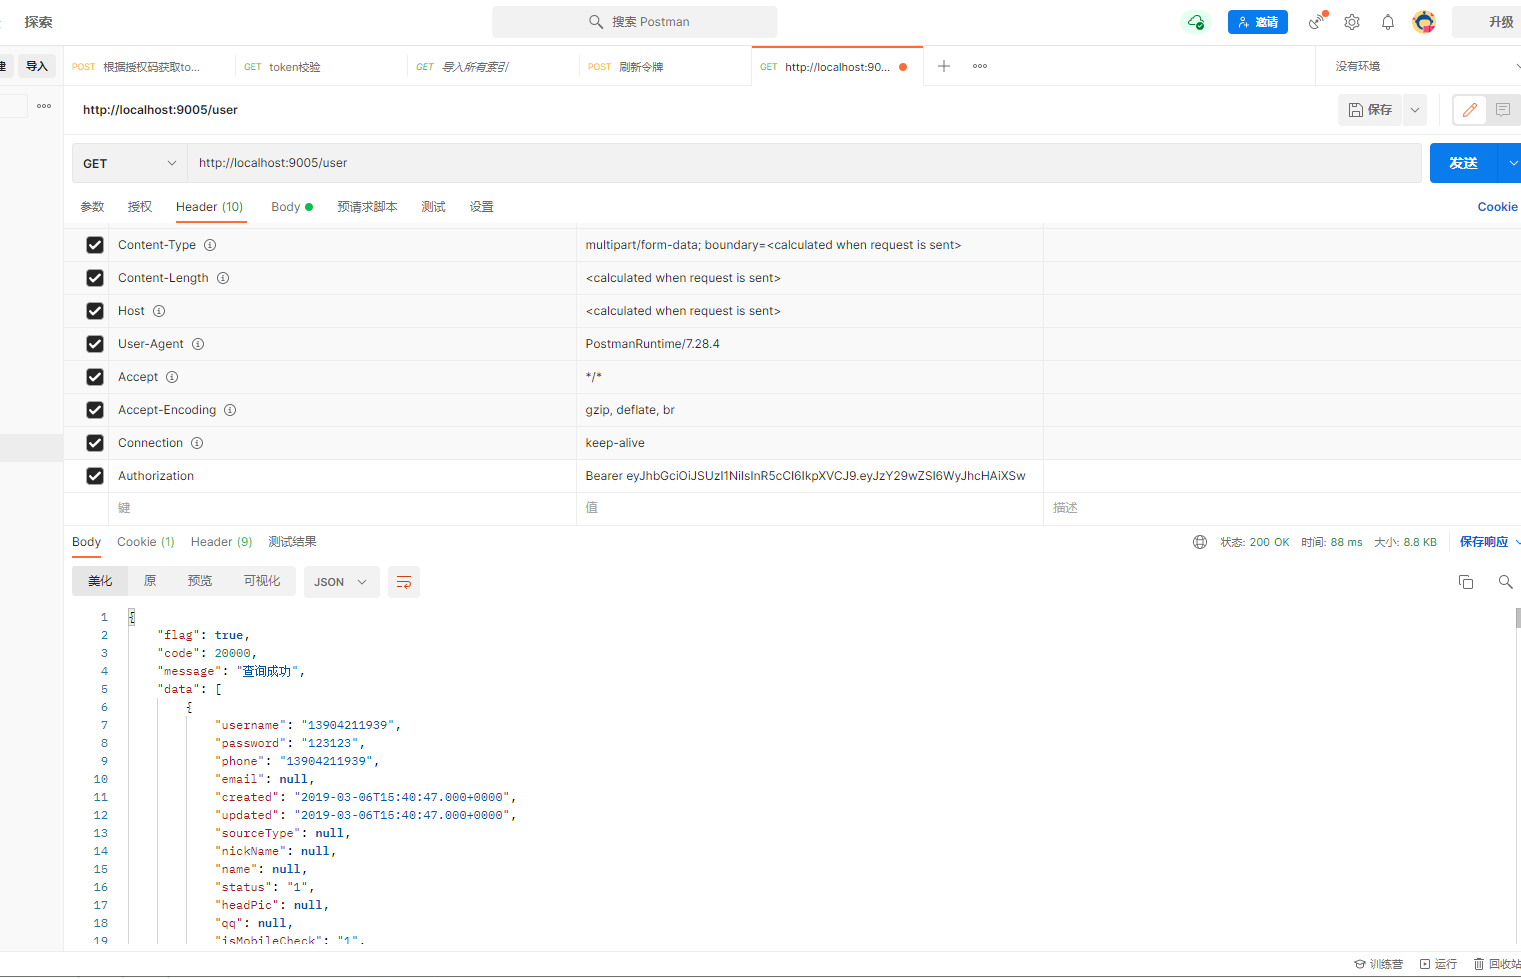
携带令牌访问 http://localhost:9005/user
在 http header 中添加 Authorization: Bearer 令牌
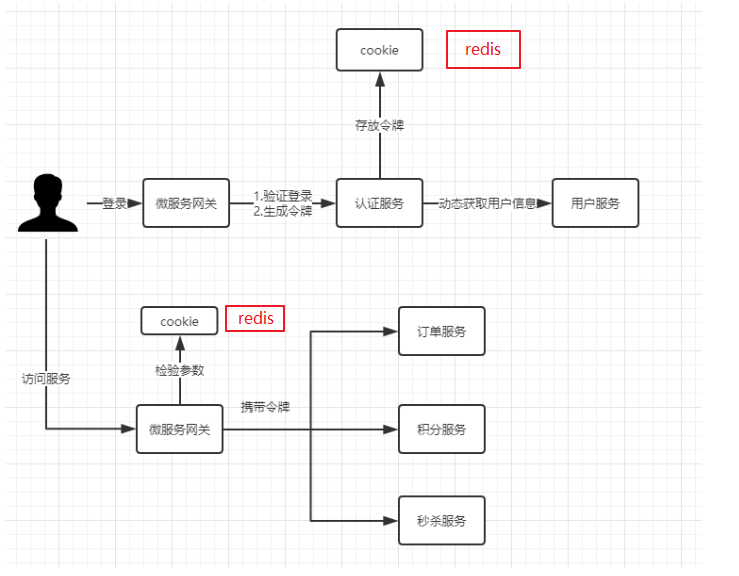
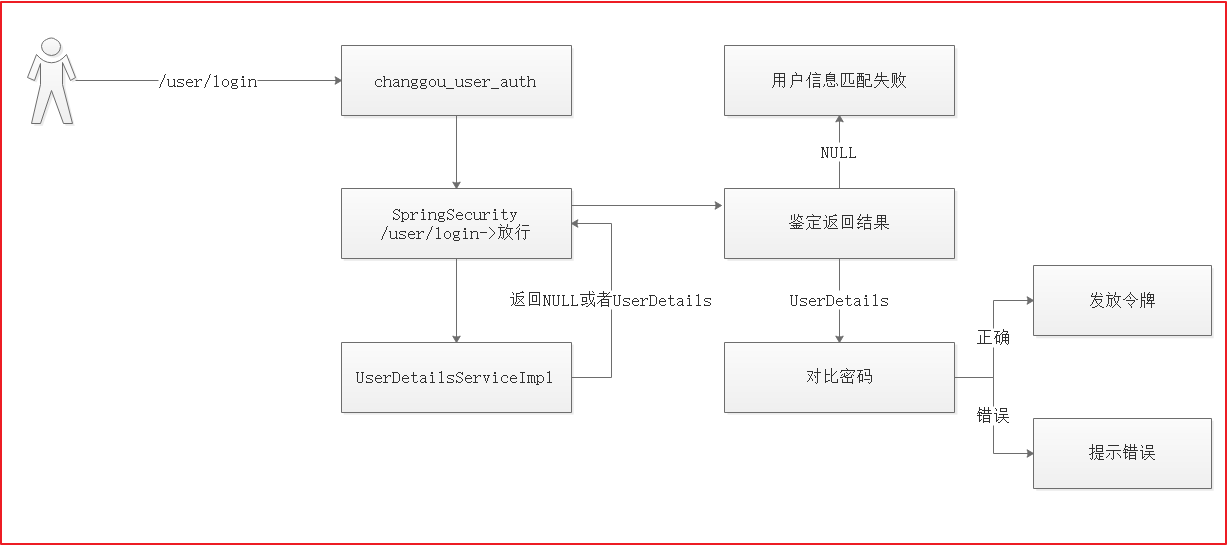
# 认证开发

1、用户登录,请求认证服务 2、认证服务认证通过,生成 jwt 令牌,将 jwt 令牌及相关信息写入 Redis,并且将身份令牌写入 cookie 3、用户访问资源页面,带着 cookie 到网关 4、网关从 cookie 获取 token,并查询 Redis 校验 token, 如果 token 不存在则拒绝访问,否则放行 5、用户退出,请求认证服务,清除 redis 中的 token,并且删除 cookie 中的 token
使用 redis 存储用户的身份令牌有以下作用:
1、实现用户退出注销功能,服务端清除令牌后,即使客户端请求携带token也是无效的。
2、由于jwt令牌过长,不宜存储在cookie中,所以将jwt令牌存储在redis,由客户端请求服务端获取并在客户端存储。
2
# 认证需求
认证服务需要实现的功能如下:
1、登录接口
前端 post 提交账号、密码等,用户身份校验通过,生成令牌,并将令牌存储到 redis。 将令牌写入 cookie。
2、退出接口 校验当前用户的身份为合法并且为已登录状态。 将令牌从 redis 删除。 删除 cookie 中的令牌。
# 授权参数配置
修改 changgou_user_auth 中 application.yml 配置文件,修改对应的授权配置
auth:
  ttl: 1200  #token存储到redis的过期时间
  clientId: changgou    #客户端ID
  clientSecret: changgou    #客户端秘钥
  cookieDomain: localhost   #Cookie保存对应的域名
  cookieMaxAge: -1          #Cookie过期时间,-1表示浏览器关闭则销毁
2
3
4
5
6
# 申请令牌测试
为了不破坏 Spring Security 的代码,我们在 Service 方法中通过 RestTemplate 请求 Spring Security 所暴露的申请令 牌接口来申请令牌,下边是测试代码:
package com.changgou.oauth;

import org.junit.Test;
import org.junit.runner.RunWith;
import org.springframework.beans.factory.annotation.Autowired;
import org.springframework.boot.test.context.SpringBootTest;
import org.springframework.cloud.client.ServiceInstance;
import org.springframework.cloud.client.loadbalancer.LoadBalancerClient;
import org.springframework.http.HttpEntity;
import org.springframework.http.HttpMethod;
import org.springframework.http.ResponseEntity;
import org.springframework.http.client.ClientHttpResponse;
import org.springframework.test.context.junit4.SpringRunner;
import org.springframework.util.Base64Utils;
import org.springframework.util.LinkedMultiValueMap;
import org.springframework.util.MultiValueMap;
import org.springframework.web.client.DefaultResponseErrorHandler;
import org.springframework.web.client.RestTemplate;

import java.io.IOException;
import java.net.URI;
import java.nio.charset.StandardCharsets;
import java.util.Map;

@SpringBootTest
@RunWith(SpringRunner.class)
public class ApplyTokenTest {

    @Autowired
    private RestTemplate restTemplate;

    @Autowired
    private LoadBalancerClient loadBalancerClient;

    @Test
    public void applyToken() {
        //构建请求地址
        ServiceInstance serviceInstance = loadBalancerClient.choose("user-auth");
        URI uri = serviceInstance.getUri(); //http://localhost:9200
        //拼接
        String url = uri + "/oauth/token";
        //封装请求参数 body和headers
        MultiValueMap<String, String> body = new LinkedMultiValueMap<>();
        body.add("grant_type", "password");
        body.add("username", "itheima");
        body.add("password", "itheima");
        MultiValueMap<String, String> headers = new LinkedMultiValueMap<>();
        headers.add("Authorization", this.getHttpBasic("changgou", "changgou"));
        HttpEntity<MultiValueMap<String, String>> requestEntity = new HttpEntity<>(body, headers);

        //当后端出现了401或者400 后端不对这两个异常进行处理 而是直接返回给前端
        restTemplate.setErrorHandler(new DefaultResponseErrorHandler() {
            @Override
            public void handleError(ClientHttpResponse response) throws IOException {
                //如果不是400或401 状态码 放行
                if (response.getStatusCode().value() != 400 && response.getStatusCode().value() != 401) {
                    super.handleError(response);
                }
            }
        });

        //发送请求
        ResponseEntity<Map> responseEntity = restTemplate.exchange(url, HttpMethod.POST, requestEntity, Map.class);
        Map entityBody = responseEntity.getBody();
        System.out.println(entityBod3y);
    }

    private String getHttpBasic(String clientId, String clientSecret) {
        String value = clientId + ":" + clientSecret;
        byte[] encode = Base64Utils.encode(value.getBytes(StandardCharsets.UTF_8));
        return "Basic " + new String(encode);
    }
}
2
3
4
5
6
7
8
9
10
11
12
13
14
15
16
17
18
19
20
21
22
23
24
25
26
27
28
29
30
31
32
33
34
35
36
37
38
39
40
41
42
43
44
45
46
47
48
49
50
51
52
53
54
55
56
57
58
59
60
61
62
63
64
65
66
67
68
69
70
71
72
73
在启动类添加 bean 注解 RestTemplate
@Bean
public RestTemplate restTemplate(){
    return new RestTemplate();
}
2
3
4
运行测试方法
# 业务层
service
package com.changgou.oauth.service;

import com.changgou.oauth.util.AuthToken;

public interface AuthService {

    AuthToken login(String username,String password,String clientId,String clientSecret);
}
2
3
4
5
6
7
8
impl
package com.changgou.oauth.service.impl;

import com.changgou.oauth.service.AuthService;
import com.changgou.oauth.util.AuthToken;
import org.springframework.beans.factory.annotation.Autowired;
import org.springframework.beans.factory.annotation.Value;
import org.springframework.cloud.client.ServiceInstance;
import org.springframework.cloud.client.loadbalancer.LoadBalancerClient;
import org.springframework.data.redis.core.StringRedisTemplate;
import org.springframework.http.HttpEntity;
import org.springframework.http.HttpMethod;
import org.springframework.http.ResponseEntity;
import org.springframework.http.client.ClientHttpResponse;
import org.springframework.stereotype.Service;
import org.springframework.util.Base64Utils;
import org.springframework.util.LinkedMultiValueMap;
import org.springframework.util.MultiValueMap;
import org.springframework.web.client.DefaultResponseErrorHandler;
import org.springframework.web.client.RestTemplate;

import java.io.IOException;
import java.net.URI;
import java.util.Map;
import java.util.concurrent.TimeUnit;

@Service
public class AuthServiceImpl implements AuthService {


    @Autowired
    private RestTemplate restTemplate;

    @Autowired
    private LoadBalancerClient loadBalancerClient;

    @Autowired
    private StringRedisTemplate stringRedisTemplate;

    @Value("${auth.ttl}")
    private long ttl;


    @Override
    public AuthToken login(String username, String password, String clientId, String clientSecret) {

        //1.申请令牌
        ServiceInstance serviceInstance = loadBalancerClient.choose("user-auth");
        URI uri = serviceInstance.getUri();
        String url = uri + "/oauth/token";

        MultiValueMap<String, String> body = new LinkedMultiValueMap<>();
        body.add("grant_type", "password");
        body.add("username", username);
        body.add("password", password);

        MultiValueMap<String, String> headers = new LinkedMultiValueMap<>();
        headers.add("Authorization", this.getHttpBasic(clientId, clientSecret));
        HttpEntity<MultiValueMap<String, String>> requestEntity = new HttpEntity<>(body, headers);
        restTemplate.setErrorHandler(new DefaultResponseErrorHandler() {
            @Override
            public void handleError(ClientHttpResponse response) throws IOException {
                if (response.getStatusCode().value() != 400 && response.getStatusCode().value() != 401) {
                    super.handleError(response);
                }
            }
        });
        ResponseEntity<Map> exchange = restTemplate.exchange(url, HttpMethod.POST, requestEntity, Map.class);
        Map map = exchange.getBody();
        if (map == null || map.get("access_token") == null || map.get("refresh_token") == null|| map.get("jti") == null){
            //申请令牌失败
            throw new RuntimeException("申请令牌失败");
        }

        //2.封装结果数据
        AuthToken authToken =new AuthToken();
        authToken.setAccessToken((String) map.get("access_token"));
        authToken.setRefreshToken((String) map.get("refresh_token"));
        authToken.setJti((String) map.get("jti"));

        //3.将jti作为redis中的key 将jwt作为redis中的value进行存储
        stringRedisTemplate.boundValueOps(authToken.getJti()).set(authToken.getAccessToken(),ttl, TimeUnit.SECONDS);

        return authToken;
    }

    private String getHttpBasic(String clientId, String clientSecret) {
        String value = clientId + ":" + clientSecret;
        byte[] encode = Base64Utils.encode(value.getBytes());
        return "Basic " + new String(encode);
    }
}
2
3
4
5
6
7
8
9
10
11
12
13
14
15
16
17
18
19
20
21
22
23
24
25
26
27
28
29
30
31
32
33
34
35
36
37
38
39
40
41
42
43
44
45
46
47
48
49
50
51
52
53
54
55
56
57
58
59
60
61
62
63
64
65
66
67
68
69
70
71
72
73
74
75
76
77
78
79
80
81
82
83
84
85
86
87
88
89
90
91
# 控制层
package com.changgou.oauth.controller;

import com.changgou.entity.Result;
import com.changgou.entity.StatusCode;
import com.changgou.oauth.service.AuthService;
import com.changgou.oauth.util.AuthToken;
import com.changgou.oauth.util.CookieUtil;
import org.apache.commons.lang.StringUtils;
import org.springframework.beans.factory.annotation.Autowired;
import org.springframework.beans.factory.annotation.Value;
import org.springframework.stereotype.Controller;
import org.springframework.web.bind.annotation.RequestMapping;
import org.springframework.web.bind.annotation.ResponseBody;

import javax.servlet.http.HttpServletResponse;

@Controller
@RequestMapping("/oauth")
public class AuthController {

    @Autowired
    private AuthService authService;

    @Value("${auth.clientId}")
    private String clientId;

    @Value("${auth.clientSecret}")
    private String clientSecret;

    @Value("${auth.cookieDomain}")
    private String cookieDomain;

    @Value("${auth.cookieMaxAge}")
    private int cookieMaxAge;

    @RequestMapping("/login")
    @ResponseBody
    public Result login(String username, String password, HttpServletResponse response) {
        //校验参数
        if (StringUtils.isEmpty(username)) {
            throw new RuntimeException("请输入用户名");
        }
        if (StringUtils.isEmpty(password)) {
            throw new RuntimeException("请输入密码");
        }
        //申请令牌

        AuthToken authToken = authService.login(username, password, clientId, clientSecret);
        //将jti的值存入cookie中
        this.saveJtiToCookie(authToken.getJti(), response);

        //返回结果
        return new Result(true, StatusCode.OK, "登陆成功", authToken.getJti());
    }

    //将令牌的jti存入到cookie中
    private void saveJtiToCookie(String jti, HttpServletResponse response) {
        CookieUtil.addCookie(response, cookieDomain, "/", "uid", jti, cookieMaxAge, false);
    }
}
2
3
4
5
6
7
8
9
10
11
12
13
14
15
16
17
18
19
20
21
22
23
24
25
26
27
28
29
30
31
32
33
34
35
36
37
38
39
40
41
42
43
44
45
46
47
48
49
50
51
52
53
54
55
56
57
58
59
60
# 登录请求放行
# 测试接口
# 动态获取用户信息
当前在认证服务中,用户密码是写死在用户认证类中。所以用户登录时,无论帐号输入什么,只要密码是 itheima 都可以访问。 因此需要动态获取用户帐号与密码.
在 changgou_service_user 下的 controller 层 UserController 类
添加以用户名查询用户信息
@GetMapping("/load/{username}")
public User findUserInfo(@PathVariable("username") String username) {
    User user = userService.findById(username);
    return user;
}
2
3
4
5
在 changgou_service_user_api 下创建 feign 包 创建 userFeign 类 注册到 feign
com.changgou.user.feign.UserFeign
package com.changgou.user.feign;

import com.changgou.user.pojo.User;
import org.springframework.cloud.openfeign.FeignClient;
import org.springframework.web.bind.annotation.GetMapping;
import org.springframework.web.bind.annotation.PathVariable;

@FeignClient(name = "user")
public interface UserFeign {

    @GetMapping("/user/load/{username}")
    public User findUserInfo(@PathVariable("username") String username);
}
2
3
4
5
6
7
8
9
10
11
12
13
回到 changgou-user-oauth 项目 pom 文件引入 changgou_service_user_api
      <dependency>
            <groupId>com.changgou</groupId>
            <artifactId>changgou_service_user_api</artifactId>
            <version>1.0-SNAPSHOT</version>
        </dependency>
2
3
4
5
修改在 changgou-user-oauth 的启动类开启 feign 客户端扫描注解
@EnableFeignClients(basePackages = {"com.changgou.user.feign"})
在 changgou-user-oauth 的 UserDetailsServiceImpl 注入 userFeign 并动态查询用户信息 验证用户账号和密码
@Autowired
private UserFeign userFeign;
2
//String pwd = new BCryptPasswordEncoder().encode("itheima");
com.changgou.user.pojo.User userInfo = userFeign.findUserInfo(username);
String pwd = userInfo.getPassword();
2
3
在 changgou_service_user 项目下的 config ResourceServerConfig 配置类
添加登陆时用户查询请求
/***
 * Http安全配置,对每个到达系统的http请求链接进行校验
 * @param http
 * @throws Exception
 */
@Override
public void configure(HttpSecurity http) throws Exception {
    //所有请求必须认证通过
    http.authorizeRequests()
            //下边的路径放行
            .antMatchers(
                    "/user/add","/user/load/**"). //配置地址放行
            permitAll()
            .anyRequest().
            authenticated();    //其他地址需要认证授权
}
2
3
4
5
6
7
8
9
10
11
12
13
14
15
16
# 认证服务对接网关
进入 changgou_gateway_system 项目 pom 文件将所有依赖全部注释掉
然后在 changgou_gateway 项目 pom 文件引入以下依赖
        <dependency>
            <groupId>org.springframework.cloud</groupId>
            <artifactId>spring-cloud-starter-gateway</artifactId>
        </dependency>

        <dependency>
            <groupId>org.springframework.cloud</groupId>
            <artifactId>spring-cloud-starter-netflix-hystrix</artifactId>
        </dependency>
        <dependency>
            <groupId>org.springframework.cloud</groupId>
            <artifactId>spring-cloud-starter-netflix-eureka-client</artifactId>
        </dependency>
        <!--redis-->
        <dependency>
            <groupId>org.springframework.boot</groupId>
            <artifactId>spring-boot-starter-data-redis-reactive</artifactId>
            <version>2.1.3.RELEASE</version>
        </dependency>
2
3
4
5
6
7
8
9
10
11
12
13
14
15
16
17
18
19
新建 changgou_gateway_web 项目模块
创建启动类
package com.changgou.web.gateway;

import org.springframework.boot.SpringApplication;
import org.springframework.boot.autoconfigure.SpringBootApplication;
import org.springframework.cloud.netflix.eureka.EnableEurekaClient;

@SpringBootApplication
@EnableEurekaClient
public class WebGatewayApplication {
    public static void main(String[] args) {
        SpringApplication.run(WebGatewayApplication.class, args);
    }
}
2
3
4
5
6
7
8
9
10
11
12
13
application
spring:
  application:
    name: gateway-web
  cloud:
    gateway:
      globalcors:
        cors-configurations:
          '[/**]': # 匹配所有请求
            allowedOrigins: "*" #跨域处理 允许所有的域
            allowedMethods: # 支持的方法
              - GET
              - POST
              - PUT
              - DELETE
      routes:
        - id: changgou_goods_route
          uri: lb://goods
          predicates:
            - Path=/api/album/**,/api/brand/**,/api/cache/**,/api/categoryBrand/**,/api/category/**,/api/para/**,/api/pref/**,/api/sku/**,/api/spec/**,/api/spu/**,/api/stockBack/**,/api/template/**
          filters:
            #- PrefixPath=/brand
            - StripPrefix=1
          #用户微服务
        - id: changgou_user_route
          uri: lb://user
          predicates:
            - Path=/api/user/**,/api/address/**,/api/areas/**,/api/cities/**,/api/provinces/**
          filters:
            - StripPrefix=1
          #认证微服务
        - id: changgou_oauth_user
          uri: lb://user-auth
          predicates:
            - Path=/api/oauth/**
          filters:
            - StripPrefix=1
  redis:
    host: 192.168.130.128
server:
  port: 8001
eureka:
  client:
    service-url:
      defaultZone: http://127.0.0.1:6868/eureka
  instance:
    prefer-ip-address: true
management:
  endpoint:
    gateway:
      enabled: true
    web:
      exposure:
        include: true
2
3
4
5
6
7
8
9
10
11
12
13
14
15
16
17
18
19
20
21
22
23
24
25
26
27
28
29
30
31
32
33
34
35
36
37
38
39
40
41
42
43
44
45
46
47
48
49
50
51
52
53
# 网关全局过滤器
新建过滤器类 AuthorizeFilter, 对请求进行过滤
业务逻辑:
- 判断当前请求是否为登录请求,是的话,则放行
- 判断 cookie 中是否存在信息,没有的话,拒绝访问
- 判断 redis 中令牌是否存在,没有的话,拒绝访问
package com.changgou.web.gateway.filter;

import com.changgou.web.gateway.service.AuthService;
import org.apache.commons.lang.StringUtils;
import org.springframework.beans.factory.annotation.Autowired;
import org.springframework.cloud.gateway.filter.GatewayFilterChain;
import org.springframework.cloud.gateway.filter.GlobalFilter;
import org.springframework.core.Ordered;
import org.springframework.http.HttpStatus;
import org.springframework.http.server.reactive.ServerHttpRequest;
import org.springframework.http.server.reactive.ServerHttpResponse;
import org.springframework.stereotype.Component;
import org.springframework.web.server.ServerWebExchange;
import reactor.core.publisher.Mono;

@Component
public class AuthFilter implements GlobalFilter, Ordered {

    @Autowired
    private AuthService authService;


    @Override
    public Mono<Void> filter(ServerWebExchange exchange, GatewayFilterChain chain) {
        ServerHttpRequest request = exchange.getRequest();
        ServerHttpResponse response = exchange.getResponse();
        //1.判断请求路径是否为登陆请求 如果是 则直接放行
        String path = request.getURI().getPath();
        if ("/api/oauth/login".equals(path)) {
            //直接放行
            return chain.filter(exchange);
        }
        //2.不是登陆请求 从cookie中获取jti的值 如果值不存在 拒绝本次访问
        String jti = authService.getJtiFromCookie(request);
        if (StringUtils.isEmpty(jti)) {
            //为空 拒绝访问
            response.setStatusCode(HttpStatus.UNAUTHORIZED);
            return response.setComplete();
        }


        //3.如果cookie中有jti的值 从redis中获取jwt的值 如果值不存在 拒绝本次访问
        String jwt = authService.getJwtFromRedis(jti);
        if (StringUtils.isEmpty(jwt)) {
            //过期或不存在 拒绝访问
            response.setStatusCode(HttpStatus.UNAUTHORIZED);
            return response.setComplete();
        }

        //对当前的请求对象进行增强 让它携带令牌的信息
        request.mutate().header("Authorization", "Bearer " + jwt);
        return chain.filter(exchange);
    }

    @Override
    public int getOrder() {
        return 0;
    }
}
2
3
4
5
6
7
8
9
10
11
12
13
14
15
16
17
18
19
20
21
22
23
24
25
26
27
28
29
30
31
32
33
34
35
36
37
38
39
40
41
42
43
44
45
46
47
48
49
50
51
52
53
54
55
56
57
58
59
新建业务逻辑类 AuthService
package com.changgou.web.gateway.service;

import org.springframework.beans.factory.annotation.Autowired;
import org.springframework.data.redis.core.StringRedisTemplate;
import org.springframework.http.HttpCookie;
import org.springframework.http.server.reactive.ServerHttpRequest;
import org.springframework.stereotype.Service;

@Service
public class AuthService {

    @Autowired
    private StringRedisTemplate stringRedisTemplate;

    //从cookie中获取jti的值
    public String getJtiFromCookie(ServerHttpRequest request) {
        HttpCookie httpCookie = request.getCookies().getFirst("uid");
        if (httpCookie != null) {
            String jti = httpCookie.getValue();
            return jti;
        }
        return null;
    }

    public String getJwtFromRedis(String jti) {
        //从redis中获取jwt
        String jwt = stringRedisTemplate.boundValueOps(jti).get();
        return jwt;
    }
}
2
3
4
5
6
7
8
9
10
11
12
13
14
15
16
17
18
19
20
21
22
23
24
25
26
27
28
29
30
# 自定义登陆页面
在 changgou-user-oauth 导入 thymeleaf 依赖
<!--thymeleaf-->
<dependency>
    <groupId>org.springframework.boot</groupId>
    <artifactId>spring-boot-starter-thymeleaf</artifactId>
</dependency>
2
3
4
5
将前端页面放到项目中

将 static 文件夹复制一份拷贝到 changgou_gateway_web 的 resource 下
# 静态资源放行
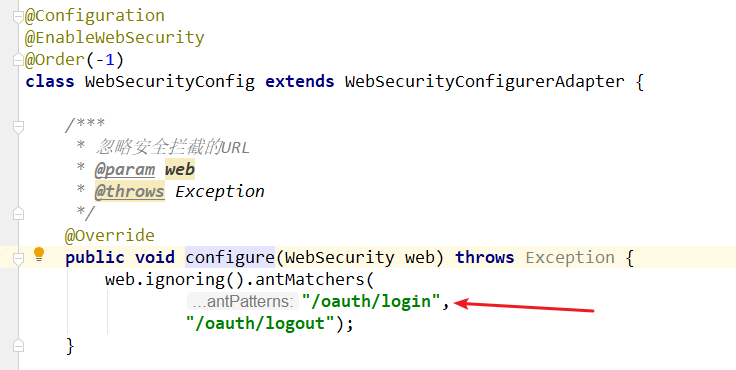
修改 WebSecurityConfig 类下 configure 方法 放行指定资源和请求
  /***
     * 忽略安全拦截的URL
     * @param web
     * @throws Exception
     */
    @Override
    public void configure(WebSecurity web) throws Exception {
        web.ignoring().antMatchers(
                "/oauth/login",
                "/oauth/logout","/oauth/toLogin","/login.html","/css/**","/data/**","/fonts/**","/img/**","/js/**");
    }
2
3
4
5
6
7
8
9
10
11
第二个 configure
@Override
public void configure(HttpSecurity http) throws Exception {
    http.csrf().disable()
            .httpBasic()        //启用Http基本身份验证
            .and()
            .formLogin()       //启用表单身份验证
            .and()
            .authorizeRequests()    //限制基于Request请求访问
            .anyRequest()
            .authenticated();       //其他请求都需要经过验证

    //开启表单登陆
    http.formLogin().loginPage("/oauth/toLogin") //设置访问登陆页面的路径
            .loginProcessingUrl("/oauth/login");  //设置执行登陆操作的路径

}
2
3
4
5
6
7
8
9
10
11
12
13
14
15
16
# 返回 login 页面
com.changgou.oauth.controller.AuthController 添加 toLogin 方法 返回 login 页面
@RequestMapping("/toLogin")
public String toLogin(){
    return "login";
}
2
3
4
# 修改 login 页面
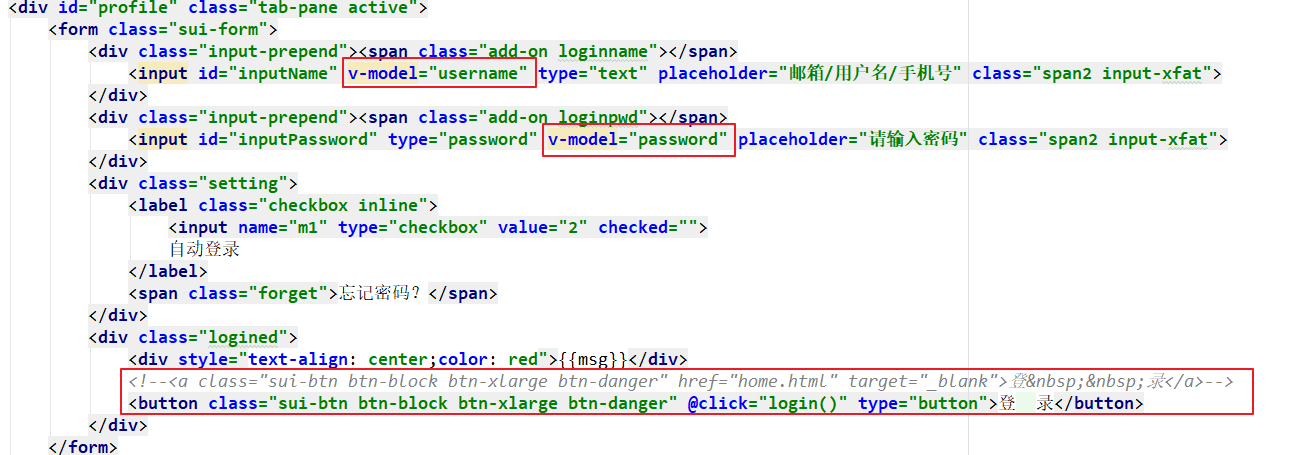
<script th:inline="javascript">
    var app = new Vue({
        el:"#app",
        data:{
            username:"",
            password:"",
            msg:""
        },
        methods:{
            login:function(){
                app.msg="正在登录";
                axios.post("/api/oauth/login?username="+app.username+"&password="+app.password).then(function (response) {
                    if (response.data.flag){
                        app.msg="登录成功";
                    }else{
                        app.msg="登录失败";
                    }
                })
            }
        }
    })
</script>
2
3
4
5
6
7
8
9
10
11
12
13
14
15
16
17
18
19
20
21
22
# 定义路径过滤
在 changgou_gateway_web 项目下的 filter 创建 URLFilter
package com.changgou.web.gateway.filter;

public class URLFilter {
    //所有需要传递令牌的地址
//    public static String filterPath = "/api/oauth/toLogin,/api/wseckillorder,/api/seckill,/api/wxpay,/api/wxpay/**,/api/worder/**,/api/user/**,/api/address/**,/api/cart/**,/api/categoryReport/**,/api/orderConfig/**,/api/order/**,/api/orderItem/**,/api/orderLog/**,/api/preferential/**,/api/returnCause/**,/api/returnOrder/**,/api/returnOrderItem/**";
    public static String filterPath = "/api/wseckillorder,/api/seckill,/api/wxpay,/api/wxpay/**,/api/worder/**,/api/user/**,/api/address/**,/api/wcart/**,/api/cart/**,/api/categoryReport/**,/api/orderConfig/**,/api/order/**,/api/orderItem/**,/api/orderLog/**,/api/preferential/**,/api/returnCause/**,/api/returnOrder/**,/api/returnOrderItem/**";

    public static boolean hasAuthorize(String url) {
        String[] split = filterPath.replace("**", "").split(",");
        for (String value : split) {
            if (url.startsWith(value)) {
                return true; //代表当前的访问地址是需要传递令牌的
            }
        }
        return false;//当前请求地址是不需要令牌的
    }

}
2
3
4
5
6
7
8
9
10
11
12
13
14
15
16
17
18
19
修改 AuthFilter filter 方法中的判断请求路径
//1.判断请求路径是否为登陆请求 如果是 则直接放行
String path = request.getURI().getPath();
if ("/api/oauth/login".equals(path) || !URLFilter.hasAuthorize(path)) {
    //直接放行
    return chain.filter(exchange);
}
2
3
4
5
6