 Day15 秒杀前端
# Day15 秒杀前端
所谓 “秒杀”,就是网络卖家发布一些超低价格的商品,所有买家在同一时间网上抢购的一种销售方式。通俗一点讲就是网络商家为促销等目的组织的网上限时抢购活动。由于商品价格低廉,往往一上架就被抢购一空,有时只用一秒钟。
秒杀商品通常有两种限制:库存限制、时间限制。
需求:
- 秒杀频道首页列出秒杀商品
- 点击立即抢购实现秒杀下单,下单时扣减库存。当库存为 0 或不在活动期范围内时无法秒杀。
- 秒杀下单成功,直接跳转到支付页面(微信扫码),支付成功,跳转到成功页,填写收货地址、电话、收件人等信息,完成订单。
- 当用户秒杀下单 5 分钟内未支付,取消预订单,调用微信支付的关闭订单接口,恢复库存。
# 秒杀商品存入缓存
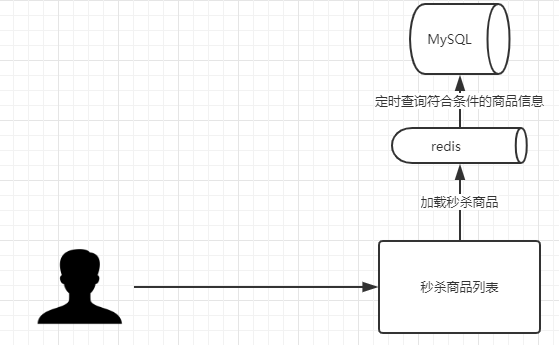
秒杀商品由 B 端存入 Mysql,设置定时任务,每隔一段时间就从 Mysql 中将符合条件的数据从 Mysql 中查询出来并存入缓存中,redis 以 Hash 类型进行数据存储。
# 秒杀服务搭建
- 在
changgou_service_api项目下 新建changgou_service_seckill_api服务 添加公共依赖
<dependencies>
    <dependency>
        <groupId>com.changgou</groupId>
        <artifactId>changgou_common</artifactId>
        <version>1.0-SNAPSHOT</version>
    </dependency>
</dependencies>
2
3
4
5
6
7
在 changgou_service_seckill_api 服务下 添加
com.changgou.seckill.feign和com.changgou.seckill.pojo两个包将资源文件夹下的两个 pojo 类放入 com.changgou.seckill.pojo 包中
在
changgou_service项目下 新建服务changgou_service_seckill添加依赖
<dependencies>
    <dependency>
        <groupId>com.changgou</groupId>
        <artifactId>changgou_common_db</artifactId>
        <version>1.0-SNAPSHOT</version>
    </dependency>
    <dependency>
        <groupId>org.springframework.cloud</groupId>
        <artifactId>spring-cloud-starter-netflix-eureka-client</artifactId>
    </dependency>
    <dependency>
        <groupId>com.changgou</groupId>
        <artifactId>changgou_service_order_api</artifactId>
        <version>1.0-SNAPSHOT</version>
    </dependency>
    <dependency>
        <groupId>com.changgou</groupId>
        <artifactId>changgou_service_seckill_api</artifactId>
        <version>1.0-SNAPSHOT</version>
    </dependency>
    <dependency>
        <groupId>com.changgou</groupId>
        <artifactId>changgou_service_goods_api</artifactId>
        <version>1.0-SNAPSHOT</version>
    </dependency>
    <dependency>
        <groupId>org.springframework.amqp</groupId>
        <artifactId>spring-rabbit</artifactId>
    </dependency>
    <!--oauth依赖-->
    <dependency>
        <groupId>org.springframework.cloud</groupId>
        <artifactId>spring-cloud-starter-oauth2</artifactId>
    </dependency>
</dependencies>
2
3
4
5
6
7
8
9
10
11
12
13
14
15
16
17
18
19
20
21
22
23
24
25
26
27
28
29
30
31
32
33
34
35
- 创建包
com.changgou.seckill然后创建启动类SecKillApplication
@SpringBootApplication
@EnableEurekaClient
@MapperScan(basePackages = {"com.changgou.seckill.dao"})
public class SecKillApplication {
    public static void main(String[] args) {
        SpringApplication.run(SecKillApplication.class, args);
    }

    //idwork
    @Bean
    public IdWorker idWorker() {
        return new IdWorker(1, 1);
    }

    //设置redisTemplate序列化
    @Bean
    public RedisTemplate<Object, Object> redisTemplate(RedisConnectionFactory redisConnectionFactory) {
        // 1.创建 redisTemplate 模版
        RedisTemplate<Object, Object> template = new RedisTemplate<>();
        // 2.关联 redisConnectionFactory
        template.setConnectionFactory(redisConnectionFactory);
        // 3.创建 序列化类
        GenericToStringSerializer genericToStringSerializer = new GenericToStringSerializer(Object.class);
        // 6.序列化类,对象映射设置
        // 7.设置 value 的转化格式和 key 的转化格式
        template.setValueSerializer(genericToStringSerializer);
        template.setKeySerializer(new StringRedisSerializer());
        template.afterPropertiesSet();
        return template;
    }
}
2
3
4
5
6
7
8
9
10
11
12
13
14
15
16
17
18
19
20
21
22
23
24
25
26
27
28
29
30
31
- 设置 application
server:
  port: 9016
spring:
  jackson:
    time-zone: GMT+8
  application:
    name: seckill
  datasource:
    driver-class-name: com.mysql.jdbc.Driver
    url: jdbc:mysql://192.168.130.128:3306/changgou_seckill?useUnicode=true&characterEncoding=utf-8&useSSL=false&allowMultiQueries=true&serverTimezone=GMT%2b8
    username: root
    password: root
  main:
    allow-bean-definition-overriding: true #当遇到同样名字的时候,是否允许覆盖注册
  redis:
    host: 192.168.130.128
  rabbitmq:
    host: 192.168.130.128
eureka:
  client:
    service-url:
      defaultZone: http://127.0.0.1:6868/eureka
  instance:
    prefer-ip-address: true
feign:
  hystrix:
    enabled: true
  client:
    config:
      default:   #配置全局的feign的调用超时时间  如果 有指定的服务配置 默认的配置不会生效
        connectTimeout: 60000 # 指定的是 消费者 连接服务提供者的连接超时时间 是否能连接  单位是毫秒
        readTimeout: 20000  # 指定的是调用服务提供者的 服务 的超时时间()  单位是毫秒
#hystrix 配置
hystrix:
  command:
    default:
      execution:
        timeout:
          #如果enabled设置为false,则请求超时交给ribbon控制
          enabled: true
        isolation:
          strategy: SEMAPHORE
          thread:
            # 熔断器超时时间,默认:1000/毫秒
            timeoutInMilliseconds: 20000
2
3
4
5
6
7
8
9
10
11
12
13
14
15
16
17
18
19
20
21
22
23
24
25
26
27
28
29
30
31
32
33
34
35
36
37
38
39
40
41
42
43
44
45
将 author 的公钥复制一份到 resource 目录下
创建
com.changgou.config包 然后新建ResourceServerConfig配置类
@Configuration
@EnableResourceServer
//开启方法上的PreAuthorize注解
@EnableGlobalMethodSecurity(prePostEnabled = true, securedEnabled = true)
public class ResourceServerConfig extends ResourceServerConfigurerAdapter {

    //公钥
    private static final String PUBLIC_KEY = "public.key";

    /***
     * 定义JwtTokenStore
     * @param jwtAccessTokenConverter
     * @return
     */
    @Bean
    public TokenStore tokenStore(JwtAccessTokenConverter jwtAccessTokenConverter) {
        return new JwtTokenStore(jwtAccessTokenConverter);
    }

    /***
     * 定义JJwtAccessTokenConverter
     * @return
     */
    @Bean
    public JwtAccessTokenConverter jwtAccessTokenConverter() {
        JwtAccessTokenConverter converter = new JwtAccessTokenConverter();
        converter.setVerifierKey(getPubKey());
        return converter;
    }

    /**
     * 获取非对称加密公钥 Key
     *
     * @return 公钥 Key
     */
    private String getPubKey() {
        Resource resource = new ClassPathResource(PUBLIC_KEY);
        try {
            InputStreamReader inputStreamReader = new InputStreamReader(resource.getInputStream());
            BufferedReader br = new BufferedReader(inputStreamReader);
            return br.lines().collect(Collectors.joining("\n"));
        } catch (IOException ioe) {
            return null;
        }
    }

    /***
     * Http安全配置,对每个到达系统的http请求链接进行校验
     * @param http
     * @throws Exception
     */
    @Override
    public void configure(HttpSecurity http) throws Exception {
        //所有请求必须认证通过
        http.authorizeRequests()
                .anyRequest().
                authenticated();    //其他地址需要认证授权
    }
}
2
3
4
5
6
7
8
9
10
11
12
13
14
15
16
17
18
19
20
21
22
23
24
25
26
27
28
29
30
31
32
33
34
35
36
37
38
39
40
41
42
43
44
45
46
47
48
49
50
51
52
53
54
55
56
57
58
59
- 更改网关路径过滤类 添加秒杀工程过滤信息
进到到 changgou_gateway_web 项目下的 com.changgou.web.gateway.filter.URLFilter 过滤类中
添加 路径为 /api/seckill 之前我们添加过 所有无需添加

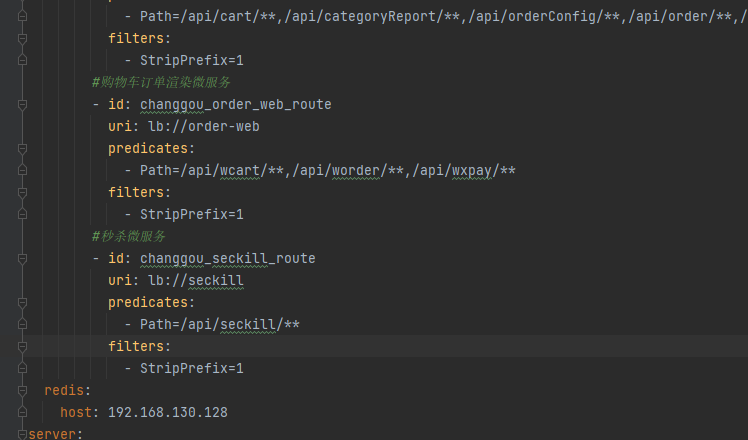
- 更改网关的 application 配置文件 添加秒杀服务的路由转发
        #秒杀微服务
        - id: changgou_seckill_route
          uri: lb://seckill
          predicates:
            - Path=/api/seckill/**
          filters:
            - StripPrefix=1
2
3
4
5
6
7
# 时间操作

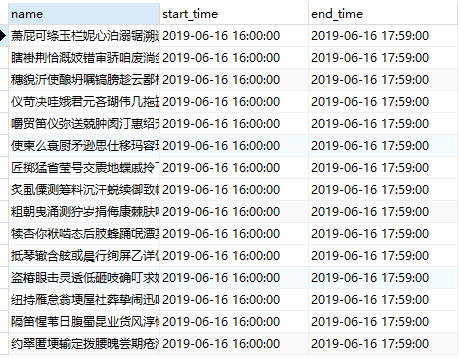
根据产品原型图结合秒杀商品表设计可以得知,秒杀商品是存在开始时间与结束时间的,当前秒杀商品是按照秒杀时间段进行显示,如果当前时间在符合条件的时间段范围之内,则用户可以秒杀购买当前时间段之内的秒杀商品。
缓存数据加载思路:定义定时任务,每天凌晨会进行当天所有时间段秒杀商品预加载。并且在 B 端进行限制,添加秒杀商品的话,只能添加当前日期 + 1 的时间限制,比如说:当前日期为 8 月 5 日,则添加秒杀商品时,开始时间必须为 6 日的某一个时间段,否则不能添加。
- 将资源文件夹下的 DateUtil 工具类 放到 changgou_common 的 util 包下
public class DateUtil {

    /***
     * 从yyyy-MM-dd HH:mm格式转成yyyyMMddHH格式
     * @param dateStr
     * @return
     */
    public static String formatStr(String dateStr){
        SimpleDateFormat simpleDateFormat = new SimpleDateFormat("yyyy-MM-dd HH:mm");
        try {
            Date date = simpleDateFormat.parse(dateStr);
            simpleDateFormat = new SimpleDateFormat("yyyyMMddHH");
            return simpleDateFormat.format(date);
        } catch (ParseException e) {
            e.printStackTrace();
        }
        return null;
    }

    /***
     * 获取指定日期的凌晨
     * @return
     */
    public static Date toDayStartHour(Date date){
        Calendar calendar = Calendar.getInstance();
        calendar.setTime(date);
        calendar.set(Calendar.HOUR_OF_DAY, 0);
        calendar.set(Calendar.MINUTE, 0);
        calendar.set(Calendar.SECOND, 0);
        calendar.set(Calendar.MILLISECOND, 0);
        Date start = calendar.getTime();
        return start;
    }


    /***
     * 时间增加N分钟
     * @param date
     * @param minutes
     * @return
     */
    public static Date addDateMinutes(Date date,int minutes){
        Calendar calendar = Calendar.getInstance();
        calendar.setTime(date);
        calendar.add(Calendar.MINUTE, minutes);// 24小时制
        date = calendar.getTime();
        return date;
    }

    /***
     * 时间递增N小时
     * @param hour
     * @return
     */
    public static Date addDateHour(Date date,int hour){
        Calendar calendar = Calendar.getInstance();
        calendar.setTime(date);
        calendar.add(Calendar.HOUR, hour);// 24小时制
        date = calendar.getTime();
        return date;
    }

    /***
     * 获取时间菜单
     * @return
     */
    public static List<Date> getDateMenus(){

        //定义一个List<Date>集合,存储所有时间段
        List<Date> dates = new ArrayList<Date>();

        //循环12次
        Date date = toDayStartHour(new Date()); //凌晨
        for (int i = 0; i <12 ; i++) {
            //每次递增2小时,将每次递增的时间存入到List<Date>集合中
            dates.add(addDateHour(date,i*2));
        }

        //判断当前时间属于哪个时间范围
        Date now = new Date();
        for (Date cdate : dates) {
            //开始时间<=当前时间<开始时间+2小时
            if(cdate.getTime()<=now.getTime() && now.getTime()<addDateHour(cdate,2).getTime()){
                now = cdate;
                break;
            }
        }

        //当前需要显示的时间菜单
        List<Date> dateMenus = new ArrayList<Date>();

        for (int i = 0; i <5 ; i++) {
            dateMenus.add(addDateHour(now,i*2));
        }
        return dateMenus;
    }

    /***
     * 时间转成yyyyMMddHH
     * @param date
     * @return
     */
    public static String date2Str(Date date){
        SimpleDateFormat simpleDateFormat = new SimpleDateFormat("yyyyMMddHH");
        return simpleDateFormat.format(date);
    }
}
2
3
4
5
6
7
8
9
10
11
12
13
14
15
16
17
18
19
20
21
22
23
24
25
26
27
28
29
30
31
32
33
34
35
36
37
38
39
40
41
42
43
44
45
46
47
48
49
50
51
52
53
54
55
56
57
58
59
60
61
62
63
64
65
66
67
68
69
70
71
72
73
74
75
76
77
78
79
80
81
82
83
84
85
86
87
88
89
90
91
92
93
94
95
96
97
98
99
100
101
102
103
104
105
106
107
# 当前业务整体流程分析
1.查询所有符合条件的秒杀商品
    1) 获取时间段集合并循环遍历出每一个时间段
    2) 获取每一个时间段名称,用于后续redis中key的设置
    3) 状态必须为审核通过 status=1
    4) 商品库存个数>0
    5) 秒杀商品开始时间>=当前时间段
    6) 秒杀商品结束<当前时间段+2小时
    7) 排除之前已经加载到Redis缓存中的商品数据
    8) 执行查询获取对应的结果集
2.将秒杀商品存入缓存
2
3
4
5
6
7
8
9
10
# 代码实现
# 更改启动类,添加开启定时任务注解
@EnableScheduling
# 定义定时任务类
秒杀工程新建 task 包,并新建任务类 SeckillGoodsPushTask
业务逻辑:
1)获取秒杀时间段菜单信息
2)遍历每一个时间段,添加该时间段下秒杀商品
2.1)将当前时间段转换为 String,作为 redis 中的 key
2.2)查询商品信息(状态为 1,库存大于 0,秒杀商品开始时间大于当前时间段,秒杀商品结束时间小于当前时间段,当前商品的 id 不在 redis 中)
3)添加 redis
@Component
public class SeckillGoodsPushTask {

    @Autowired
    private SeckillGoodsMapper seckillGoodsMapper;


    // redis key的前缀
    public static final String SECKILL_GOODS_KEY = "seckill_goods";


    @Autowired
    private RedisTemplate redisTemplate;

    @Scheduled(cron = "0/30 * * * * ?")
    public void loadSecKillGoodsToRedis() {

        SimpleDateFormat sdf = new SimpleDateFormat("yyyy-MM-dd HH:mm:ss");

        //获取当前时间到 每2小时的5个时间集合
        List<Date> dateMenus = DateUtil.getDateMenus();
        for (Date dateMenu : dateMenus) {
            //获取每个时间段名称 用于redis中作为key
            String redisExtName = DateUtil.date2Str(dateMenu);
            Example example = new Example(SeckillGoods.class);
            Example.Criteria criteria = example.createCriteria();
            // 状态要为1 表示已审核
            criteria.andEqualTo("status", "1");
            // 商品库存个数 要大于0
            criteria.andGreaterThan("stockCount", 0);
            // 秒杀商品开始时间 >= 当前时间段
            criteria.andGreaterThanOrEqualTo("startTime", sdf.format(dateMenu));
            // 并且秒杀商品结束时间 < 当前时间段+2
            criteria.andLessThan("endTime", sdf.format(DateUtil.addDateHour(dateMenu, 2)));
            // 获取当前时间段在redis的所有商品的key值  key为redis前缀+时间段名
            Set keys = redisTemplate.boundHashOps(SECKILL_GOODS_KEY + redisExtName).keys();
            if (keys != null && keys.size() > 0) {
                // 排除之前已经加载到Redis缓存中的商品  即在redis已经存在
                criteria.andNotIn("id", keys);
            }

            // 符合以上条件的结果集合
            List<SeckillGoods> seckillGoodsList = seckillGoodsMapper.selectByExample(example);

            // 添加到redis缓存中
            for (SeckillGoods seckillGoods : seckillGoodsList) {
                redisTemplate.opsForHash().put(SECKILL_GOODS_KEY + redisExtName, seckillGoods.getGoodsId(), seckillGoods);
            }

        }
    }
}
2
3
4
5
6
7
8
9
10
11
12
13
14
15
16
17
18
19
20
21
22
23
24
25
26
27
28
29
30
31
32
33
34
35
36
37
38
39
40
41
42
43
44
45
46
47
48
49
50
51
52
# 秒杀页面
秒杀商品首页会显示处于秒杀中以及未开始秒杀的商品。
# 需求分析
秒杀首页需要显示不同时间段的秒杀商品信息,然后当用户选择不同的时间段,查询该时间段下的秒杀商品,实现过程分为两大过程:
1) 加载时间菜单
2)加载时间菜单下秒杀商品信息
2
# 加载时间菜单分析
每 2 个小时就会切换一次抢购活动,所以商品发布的时候,我们将时间定格在 2 小时内抢购,每次发布商品的时候,商品抢购开始时间和结束时间是这 2 小时的边界。
每 2 小时会有一批商品参与抢购,所以我们可以将 24 小时切分为 12 个菜单,每个菜单都是个 2 小时的时间段,当前选中的时间菜单需要根据当前时间判断,判断当前时间属于哪个秒杀时间段,然后将该时间段作为选中的第 1 个时间菜单。
# 加载对应秒杀商品分析
进入首页时,到后台查询时间菜单信息,然后将第 1 个菜单的时间段作为 key,在 Redis 中查询秒杀商品集合,并显示到页面,页面每次点击切换不同时间段菜单的时候,都将时间段传入到后台,后台根据时间段获取对应的秒杀商品集合。
# 秒杀渲染服务 - 渲染秒杀首页
- 在工程
changgou_web中创建工程changgou_web_seckill, 用于秒杀页面渲染 添加依赖
<dependencies>
    <dependency>
        <groupId>com.changgou</groupId>
        <artifactId>changgou_service_seckill_api</artifactId>
        <version>1.0-SNAPSHOT</version>
    </dependency>
    <dependency>
        <groupId>org.springframework.boot</groupId>
        <artifactId>spring-boot-starter-thymeleaf</artifactId>
    </dependency>
</dependencies>
2
3
4
5
6
7
8
9
10
11
- 创建
com.changgou.seckill.web包 并新建启动类SecKillWebApplication
@SpringBootApplication
@EnableEurekaClient
@EnableFeignClients(basePackages = {"com.changgou.seckill.feign"})
public class SecKillWebApplication {
    public static void main(String[] args) {
        SpringApplication.run(SecKillWebApplication.class, args);
    }


    /**
     * Feign拦截器
     */
    @Bean
    public FeignInterceptor feignInterceptor() {
        return new FeignInterceptor();
    }

    /**
     * 设置 redisTemplate 的序列化设置
     * @param redisConnectionFactory
     * @return
     */
    @Bean
    public RedisTemplate<Object, Object> redisTemplate(RedisConnectionFactory redisConnectionFactory) {
        // 1.创建 redisTemplate 模版
        RedisTemplate<Object, Object> template = new RedisTemplate<>();
        // 2.关联 redisConnectionFactory
        template.setConnectionFactory(redisConnectionFactory);
        // 3.创建 序列化类
        GenericToStringSerializer genericToStringSerializer = new GenericToStringSerializer(Object.class);
        // 6.序列化类,对象映射设置
        // 7.设置 value 的转化格式和 key 的转化格式
        template.setValueSerializer(genericToStringSerializer);
        template.setKeySerializer(new StringRedisSerializer());
        template.afterPropertiesSet();
        return template;
    }
}
2
3
4
5
6
7
8
9
10
11
12
13
14
15
16
17
18
19
20
21
22
23
24
25
26
27
28
29
30
31
32
33
34
35
36
37
38
- application
server:
  port: 9104
eureka:
  client:
    service-url:
      defaultZone: http://127.0.0.1:6868/eureka
  instance:
    prefer-ip-address: true
feign:
  hystrix:
    enabled: true
spring:
  jackson:
    time-zone: GMT+8
  thymeleaf:
    cache: false
  application:
    name: seckill-web
  main:
    allow-bean-definition-overriding: true
  redis:
    host: 192.168.130.128
#hystrix 配置
hystrix:
  command:
    default:
      execution:
        timeout:
          #如果enabled设置为false,则请求超时交给ribbon控制
          enabled: true
        isolation:
          strategy: SEMAPHORE
          thread:
            timeoutInMilliseconds: 60000
#请求处理的超时时间
ribbon:
  ReadTimeout: 4000
  #请求连接的超时时间
  ConnectTimeout: 3000
2
3
4
5
6
7
8
9
10
11
12
13
14
15
16
17
18
19
20
21
22
23
24
25
26
27
28
29
30
31
32
33
34
35
36
37
38
39
- 添加静态化资源 在 resource 创建
templates文件夹 并将资源文件夹的静态资源复制进去 注意层级 static 和 templates 是同一级

- 将当前微服务添加到网关中
        #秒杀渲染微服务
        - id: changgou_seckill_web_route
          uri: lb://seckill-web
          predicates:
            - Path=/api/wseckillgoods/**
          filters:
            - StripPrefix=1
2
3
4
5
6
7
# 时间菜单实现
时间菜单显示,先运算出每 2 小时一个抢购,就需要实现 12 个菜单,可以先计算出每个时间的临界值,然后根据当前时间判断需要显示 12 个时间段菜单中的哪个菜单,再在该时间菜单的基础之上往后挪 4 个菜单,一直显示 5 个时间菜单。
# 时间菜单获取
在 changgou_web_seckill 项目下创建 controller 层包
再创建 控制层类 SecKillGoodsController
@Controller
@RequestMapping("/wseckillgoods")
public class SecKillGoodsController {

    //跳转到秒杀首页
    @RequestMapping("/toIndex")
    public String toIndex() {
        return "seckill-index";
    }


    //获取秒杀时间集合信息
    @RequestMapping("/timeMenus")
    @ResponseBody
    public List<String> dataMenus() {

        //获取当前时间段修改集合
        List<Date> dateMenus = DateUtil.getDateMenus();
        List<String> result = new ArrayList<>();
        SimpleDateFormat sdf = new SimpleDateFormat("yyyy-MM-dd HH:mm:ss");
        for (Date dateMenu : dateMenus) {
            result.add(sdf.format(dateMenu));
        }

        return result;
    }

}
2
3
4
5
6
7
8
9
10
11
12
13
14
15
16
17
18
19
20
21
22
23
24
25
26
27
28
# 页面加载时间菜单
修改 seckill-index.html 第 113 行的代码
<!--秒杀时间-->
<div class="sectime">
    <div class="item-time active"
         v-for="(item,index) in dateMenus">
        <div class="time-clock">{{item}}</div>
        <div class="time-state-on">
            <span class="on-text" v-if="index==0">快抢中</span>
            <span class="on-over" v-if="index==0">距离结束:01:02:03</span>

            <span class="on-text" v-if="index>0">即将开始</span>
            <span class="on-over" v-if="index>0">距离开始:03:02:01</span>
        </div>
    </div>

</div>
2
3
4
5
6
7
8
9
10
11
12
13
14
15
修改当前页面的 vue 代码 编写请求
 var app = new Vue({
        el: '#app',
        data() {
            return {
                goodslist: [],
                dateMenus: [],
                ctime: 0,     //当前时间菜单选中的下标,
                alltimes: []
            }
        },
        methods: {
            loadMenus: () => {
                axios.get("/api/wseckillgoods/timeMenus").then((response) => {
                    app.dateMenus = response.data
                })
            }
        },
        created:function () {
            this.loadMenus();
        }
    })
2
3
4
5
6
7
8
9
10
11
12
13
14
15
16
17
18
19
20
21
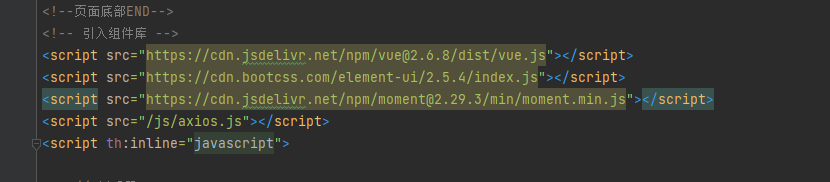
# 时间格式化
- 引入 moment.min.js
- 添加过滤器 在 vue 中 script 标签中编写
    // 过滤器
    Vue.filter("dateFilter", (date, format) => {
        return moment(date).format(format || "YYYY-MM-DD HH:mm:sss") // 设置默认值 YYYY-MM-DD HH:mm:sss
    })
2
3
4
- 取值格式化 第 116 行
<div class="time-clock">{{item | dateFilter("HH:mm")}}</div>
# 选中实现
- 定义 ctime=0
var app = new Vue({
    el: '#app',
    data() {
        return {
            goodslist: [],
            dateMenus:[],
            ctime:0,     //当前时间菜单选中的下标
        }
    }
})
2
3
4
5
6
7
8
9
10
- 页面样式控制
<div class="sectime">
    <div class="item-time active"
         v-for="(item,index) in dateMenus"
         :class="['item-time',index == ctime?'active':'']"
         @click="ctime=index"
    >
        <div class="time-clock">{{item | dateFilter("HH:mm")}}</div>
        <div class="time-state-on">
            <span class="on-text" v-if="index==0">快抢中</span>
            <span class="on-over" v-if="index==0">距离结束:01:02:03</span>

            <span class="on-text" v-if="index>0">即将开始</span>
            <span class="on-over" v-if="index>0">距离开始:03:02:01</span>
        </div>
    </div>

</div>
2
3
4
5
6
7
8
9
10
11
12
13
14
15
16
17
# 倒计时实现
如遇 moment.min.js 文件获取 404 可更换为 jsdelivr 的
<script src="https://cdn.jsdelivr.net/npm/[email protected]/min/moment.min.js"></script>
第1个时差:第2个抢购开始时间-当前时间,距离结束时间
第2个时差:第2个抢购开始时间-当前时间,距离开始时间
第3个时差:第3个抢购开始时间-当前时间,距离开始时间
第4个时差:第4个抢购开始时间-当前时间,距离开始时间
第5个时差:第5个抢购开始时间-当前时间,距离开始时间
2
3
4
5
在 vue 的 data 中定 alltimes 用于存放 5 个结束 / 开始时间点
data() {
    return {
        goodslist: [],
        dateMenus: [],
        ctime: 0,     //当前时间菜单选中的下标,
        alltimes: []
    }
},
2
3
4
5
6
7
8
修改 methods 中的 loadMenus 并添加 timedown 方法
methods: {
            loadMenus: () => {
                axios.get("/api/wseckillgoods/timeMenus").then((response) => {
                    app.dateMenus = response.data


                    //计算倒计时时间差
                    for (let i = 0; i < app.dateMenus.length; i++) {
                        if (i === 0) {
                            let x = i + 1
                            app.$set(app.alltimes, i, new Date(app.dateMenus[x]).getTime() - new Date().getTime())
                        } else {
                            app.$set(app.alltimes, i, new Date(app.dateMenus[i]).getTime() - new Date().getTime())
                        }
                    }

                    //时间差递减实现
                    let timers = window.setInterval(
                        () => {
                            for (let i = 0; i < app.alltimes.length; i++) {
                                //时间递减
                                app.$set(app.alltimes, i, app.alltimes[i] - 1000)
                                if (app.alltimes[i] <= 0) {
                                    //停止倒计时 并重新刷新秒杀时间段
                                    window.clearInterval(timers)
                                    app.loadMenus()
                                }


                            }
                        }
                        , 1000
                    )
                })
            },
            //将毫秒转换成时分秒
            timedown: (num) => {
                let oneSecond = 1000;
                let oneMinute = oneSecond * 60;
                let oneHour = oneMinute * 60
                //小时
                let hours = Math.floor(num / oneHour);
                //分钟
                let minutes = Math.floor((num % oneHour) / oneMinute);
                //秒
                let seconds = Math.floor((num % oneMinute) / oneSecond);
                //拼接时间格式
                return hours.toString().padStart(2, "0") + ':' + minutes.toString().padStart(2, "0") + ':' + seconds.toString().padStart(2, "0");
            }
        },
2
3
4
5
6
7
8
9
10
11
12
13
14
15
16
17
18
19
20
21
22
23
24
25
26
27
28
29
30
31
32
33
34
35
36
37
38
39
40
41
42
43
44
45
46
47
48
49
50
修改 html 的 113 行
    <div class="sectime">
        <div class="item-time active"
             v-for="(item,index) in dateMenus"
             :class="['item-time',index == ctime?'active':'']"
             @click="ctime=index"
        >
            <div class="time-clock">{{item | dateFilter("HH:mm")}}</div>
            <div class="time-state-on">
                <span class="on-text" v-if="index==0">快抢中</span>
                <span class="on-over" v-if="index==0">距离结束:{{timedown(alltimes[index])}}</span>

                <span class="on-text" v-if="index>0">即将开始</span>
                <span class="on-over" v-if="index>0">距离开始:{{timedown(alltimes[index])}}</span>
            </div>
        </div>

    </div>
2
3
4
5
6
7
8
9
10
11
12
13
14
15
16
17
# 加载秒杀商品实现
当前已经完成了秒杀时间段菜单的显示,那么当用户在切换不同的时间段的时候,需要按照用户所选择的时间去显示相对应时间段下的秒杀商品
- 在
changgou_service_seckill模块下创建 service 包 和 service.impl 包 - 创建
SecKillGoodsService接口类
public interface SecKillGoodsService {

    /**
     * 根据时间点查询redis中的秒杀商品
     * @param time
     * @return
     */
    List<SeckillGoods> list(String time);
}
2
3
4
5
6
7
8
9
- impl 实现类
@Service
public class SecKillGoodsServiceImpl implements SecKillGoodsService {

    @Autowired
    private RedisTemplate redisTemplate;


    public static final String SECKILL_GOODS_KEY = "seckill_goods";


    @Override
    public List<SeckillGoods> list(String time) {
        List<SeckillGoods> list= redisTemplate.boundHashOps(SECKILL_GOODS_KEY + time).values();
        return list;
    }
}
2
3
4
5
6
7
8
9
10
11
12
13
14
15
16
- 创建 controller 包 创建
SecKillGoodsController类
@RestController
@RequestMapping("/seckillgoods")
public class SecKillGoodsController {

    @Autowired
    private SecKillGoodsService secKillGoodsService;


    @RequestMapping("/list")
    public Result<List<SeckillGoods>> list(@RequestParam("time") String time) {
        List<SeckillGoods> list = secKillGoodsService.list(time);
        return new Result<>(true, StatusCode.OK, "查询成功", secKillGoodsService);
    }
}
2
3
4
5
6
7
8
9
10
11
12
13
14
- 因为整个了 auto2.0 修改配置类 放行 list 路径查询 在 configure 添加 antMatchers 和 permitAll
/***
 * Http安全配置,对每个到达系统的http请求链接进行校验
 * @param http
 * @throws Exception
 */
@Override
public void configure(HttpSecurity http) throws Exception {
    //所有请求必须认证通过
    http.authorizeRequests()
            .antMatchers("/seckillgoods/list/**") //放行路径
            .permitAll()
            .anyRequest().
            authenticated();    //其他地址需要认证授权
}
2
3
4
5
6
7
8
9
10
11
12
13
14
- 在 changgou_service_seckill_api 模块 添加 feign 接口
SecKillGodsFeign
@FeignClient(name = "seckill")
public interface SecKillGodsFeign {

    @RequestMapping("/seckillgoods/list")
    public Result<List<SeckillGoods>> list(@RequestParam("time") String time);

}
2
3
4
5
6
7
# 秒杀渲染服务 - 查询秒杀商品列表
- 在
changgou_web_seckill的 controller 的类SecKillGoodsController添加 feign 调用
@Autowired
private SecKillGodsFeign secKillGodsFeign;

@RequestMapping("/list")
@ResponseBody
public Result<List<SeckillGoods>> list(String time){
    return secKillGoodsFeign.list(DateUtil.formatStr(time));
}
2
3
4
5
6
7
8
# 抢购按钮
因为当前业务设定为用户秒杀商品为 sku,所以当用户点击立即抢购按钮的时候,则直接进行下单操作。
在 vue 的 methods 中添加 add 方法
add:function (id) {
					axios.get("/api/wseckillorder/add?time="+moment(app.dateMenus[0].format("YYYYMMDDHH")+"&id="+id)).then(function (response) {
						if (response.data.flag){
							app.msg="抢单成功,即将进入支付";
						} else{
							app.msg="抢单失败";
						}
					})
				}
2
3
4
5
6
7
8
9
修改抢购按钮 点击事件调用 add 方法 第 154 行
<a class='sui-btn btn-block btn-buy' href='javascript:void(0)' @click="add(item.id)" >立即抢购</a>
先定一个 add 路径的接口
在 changgou_web_seckill 项目下的 controller
@RestController
@RequestMapping("/wseckillorder")
public class SecKillOrderController {

    @RequestMapping("/add")
    public Result add(@RequestParam("time") String time, @RequestParam("id") Long id) {

        return null;
    }
}
2
3
4
5
6
7
8
9
10