 Spring
# Spring
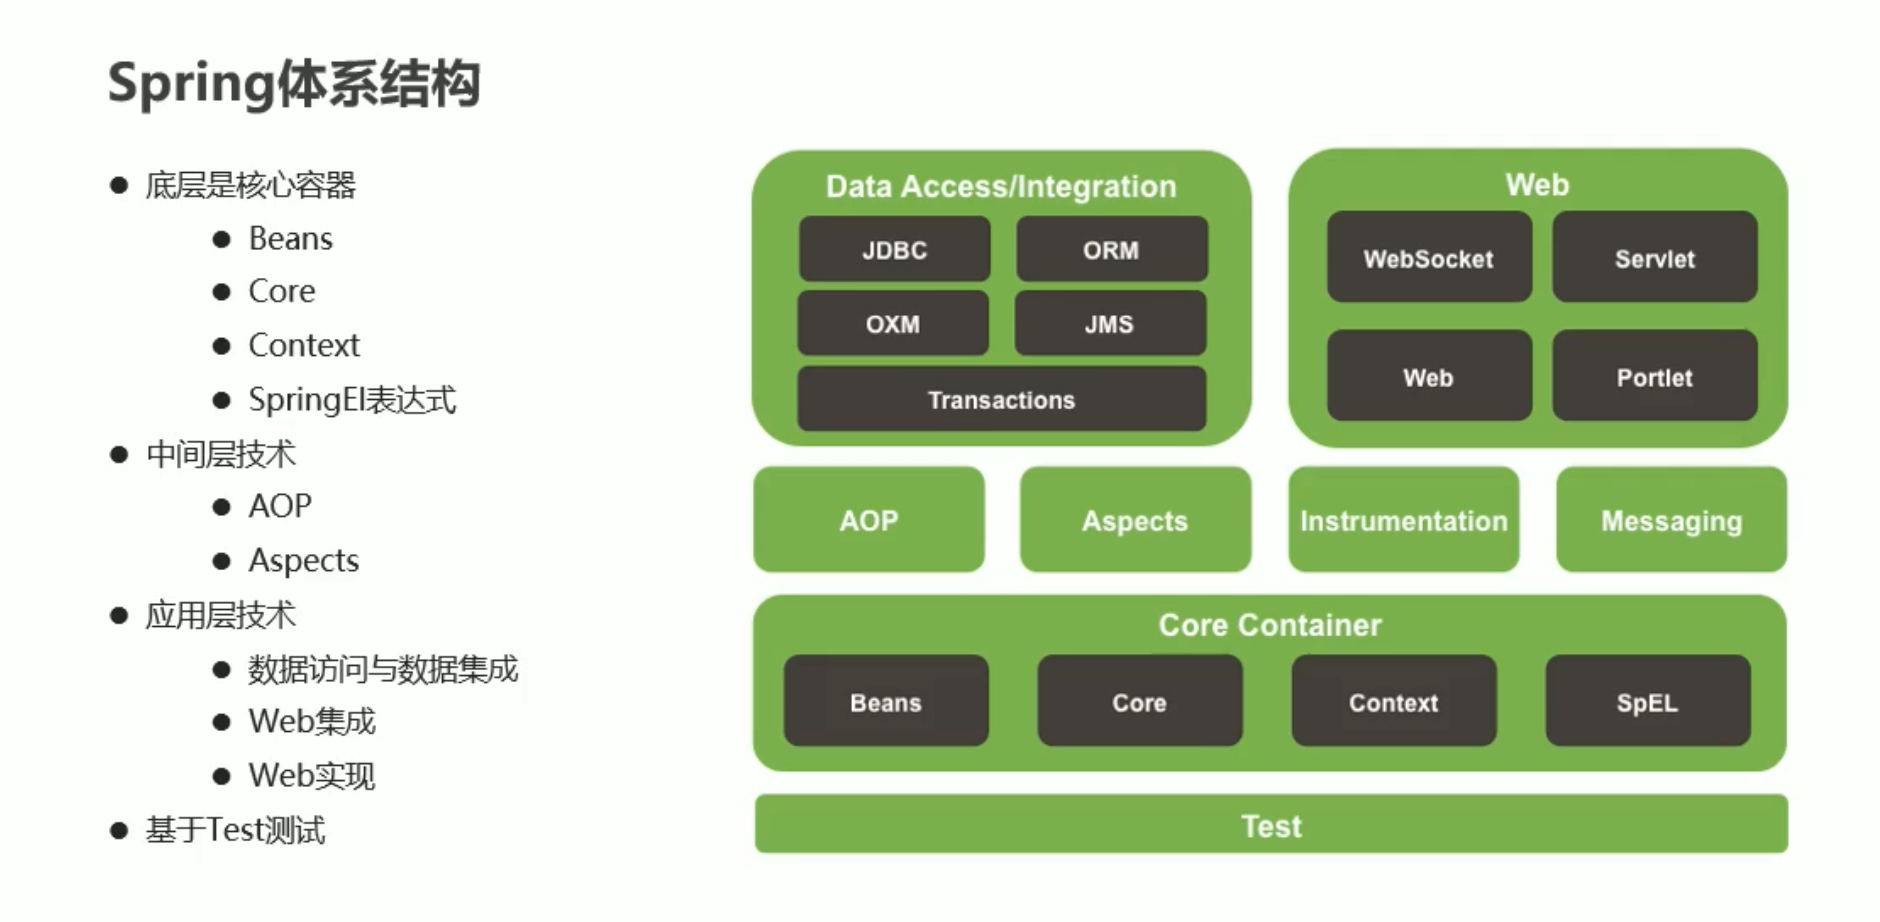
Spring 是分层的 JavaSE/EE 应用 full-stack 轻量级 一站式 开源框架
体系结构:
# IoC 反转
IoC (Inversion Of Control) 控制反转,Spring 反向控制应用程序所需要使用的外部资源
Spring 控制的资源全部放置在 Spring 容器中,该容器称为 IoC 容器
# 耦合与内聚
耦合 (Coupling): 代码书写过程中所使用技术的结合紧密度,用于衡量软件中各个模块之间的互联程度
内聚 (Cohesion): 代码书写过程中单个模块内部各组成部分间的联系,用于衡量软件中各个功能模块内部的功能联系
我们追求 高内聚 低耦合
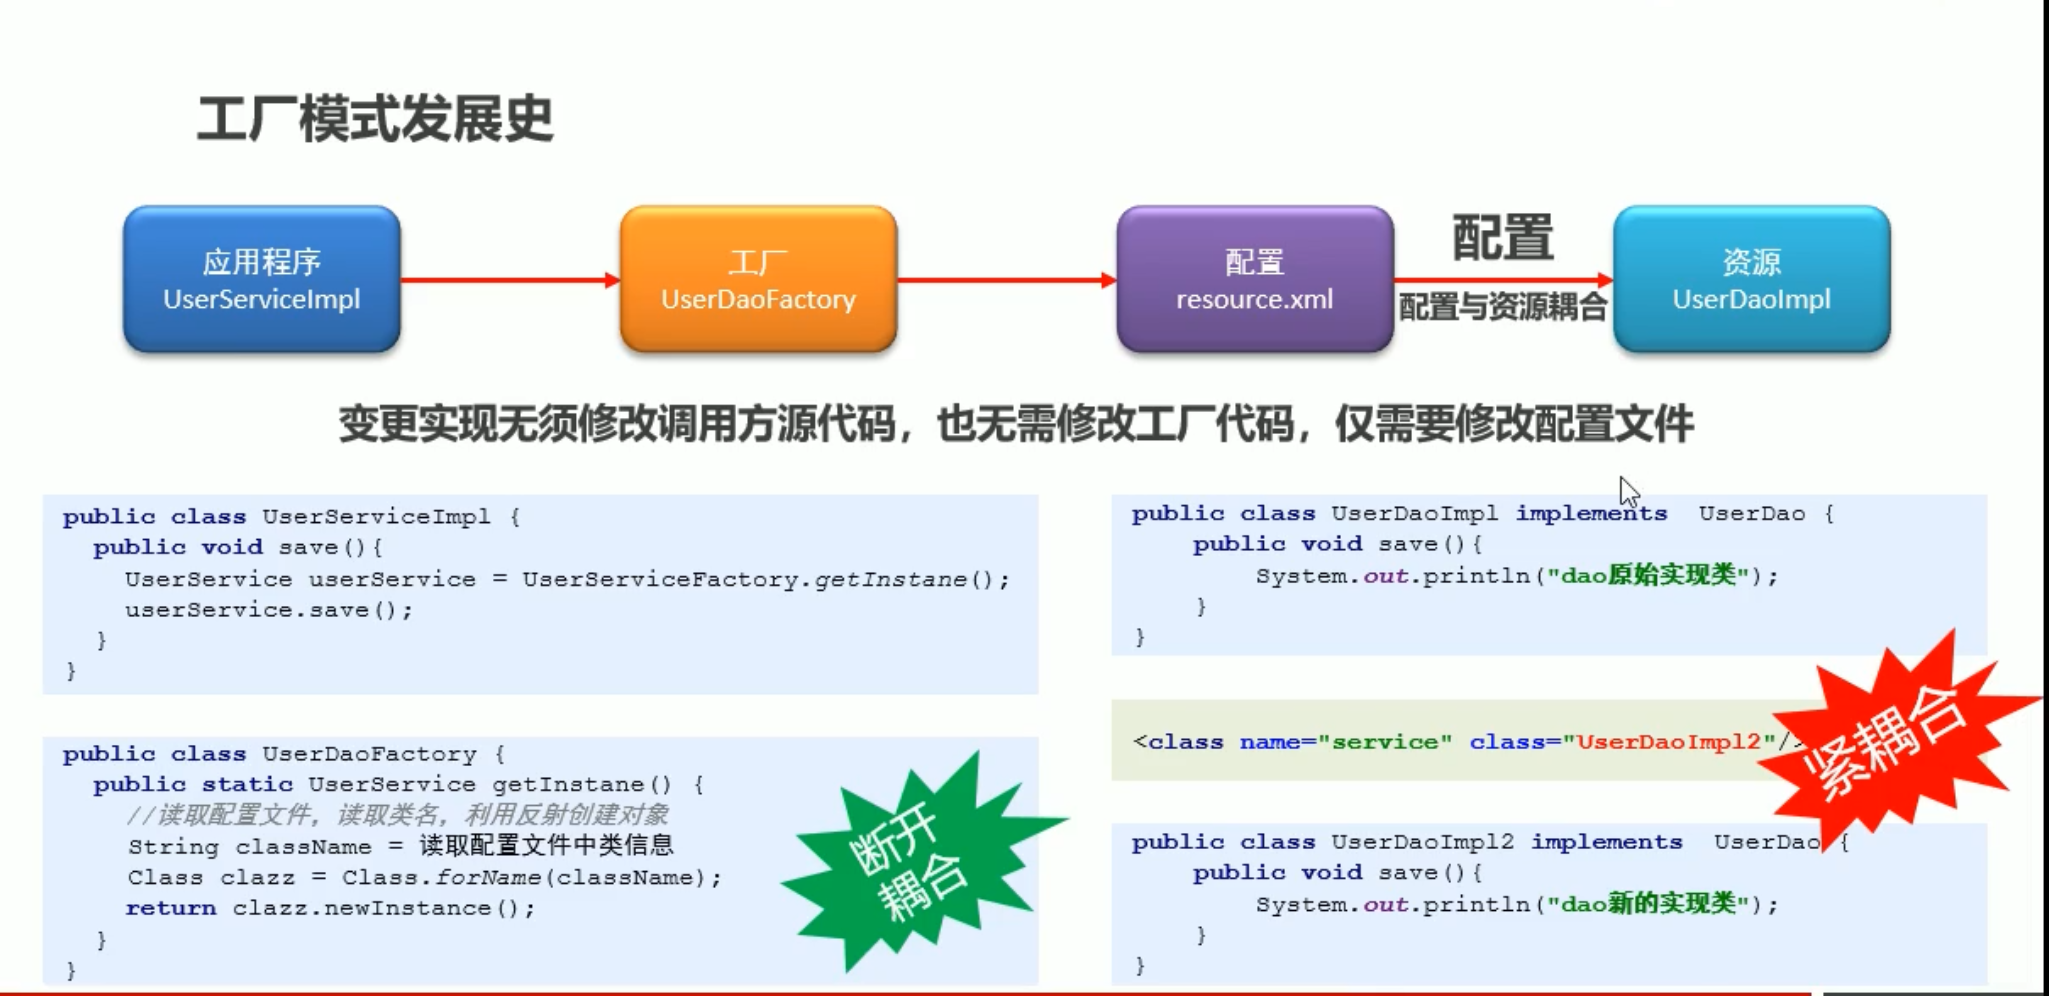
# 工厂模式
# 创建项目
创建 maven 项目
导入模块
    <dependencies>
        <dependency>
            <groupId>org.springframework</groupId>
            <artifactId>spring-context</artifactId>
            <version>5.1.9.RELEASE</version>
        </dependency>
    </dependencies>
1
2
3
4
5
6
7
在 resources 中创建 applicationContext.xml 文件
<?xml version="1.0" encoding="UTF-8"?>
<beans xmlns="http://www.springframework.org/schema/beans"
       xmlns:xsi="http://www.w3.org/2001/XMLSchema-instance"
       xsi:schemaLocation="http://www.springframework.org/schema/beans
        https://www.springframework.org/schema/beans/spring-beans.xsd">
<!--   bean为映射标签 创建spring控制的资源  id为操作空间  class为实现类引用路径-->
    <bean id="userService" class="com.itheima.service.impl.UserServiceImpl"/>
</beans>
1
2
3
4
5
6
7
8
使用方法
//2.加载配置文件
        ApplicationContext ctx =new ClassPathXmlApplicationContext("applicationContext.xml");
        //3.获取资源
        UserService userService = (UserService) ctx.getBean("userService");

        userService.save();
1
2
3
4
5
6
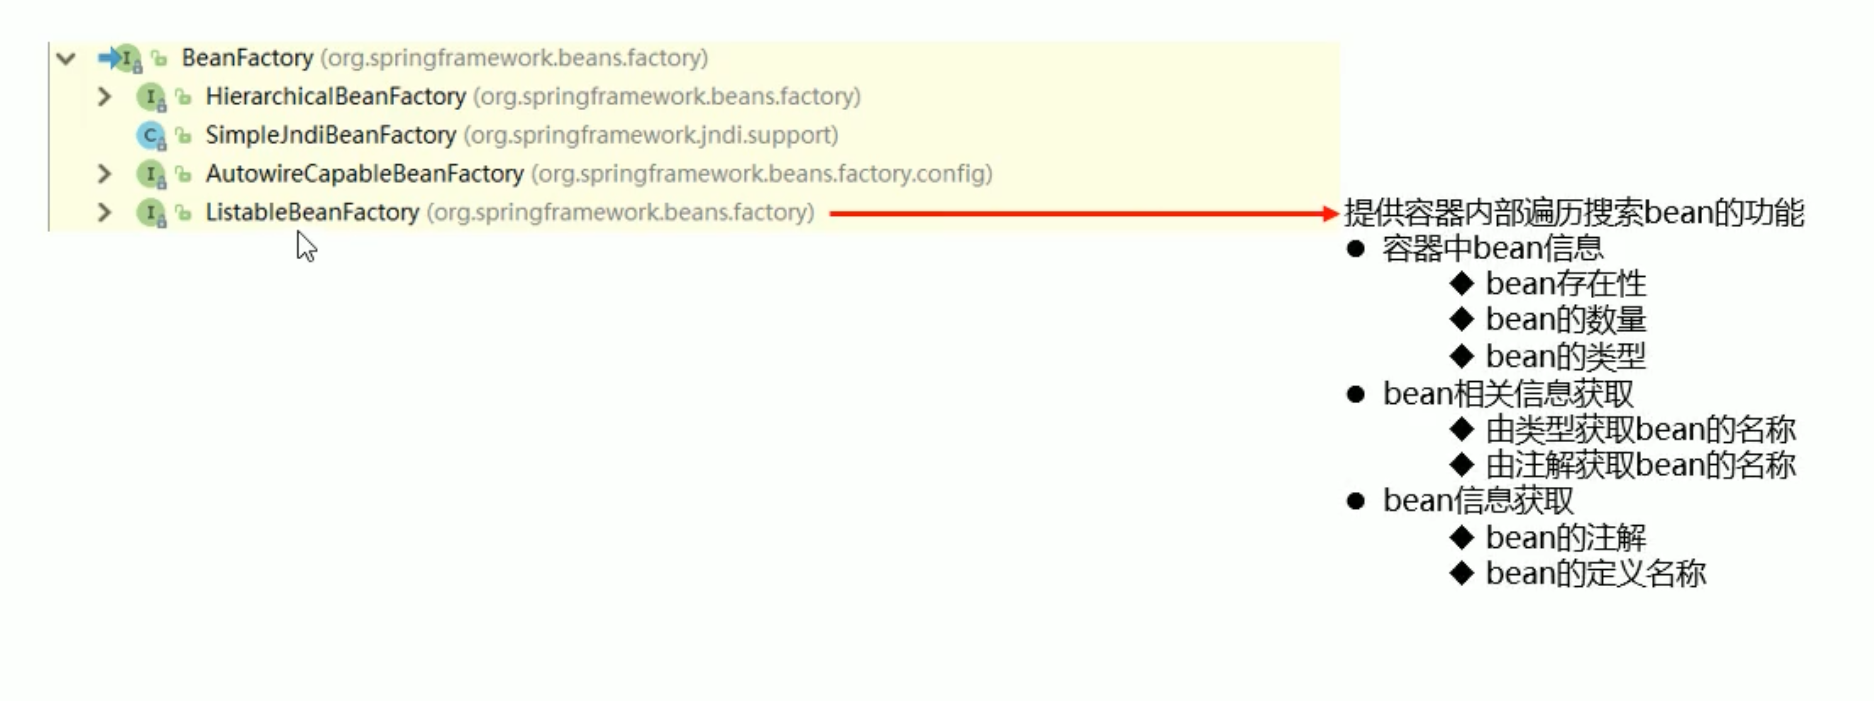
# bean
<bean>标签 定义 spring 中的资源,此标签定义的资源将受到 spring 控制id 属性 bean 的名词 通过 id 值获取到 bean
class 属性 bean 的类型
name 属性 bean 的别名 我们可以通过 id 或者 name 来获取到 bean 并且 name 可以起多个别名 别名之间用逗号隔开
scope 属性 定义 bean 的作用范围
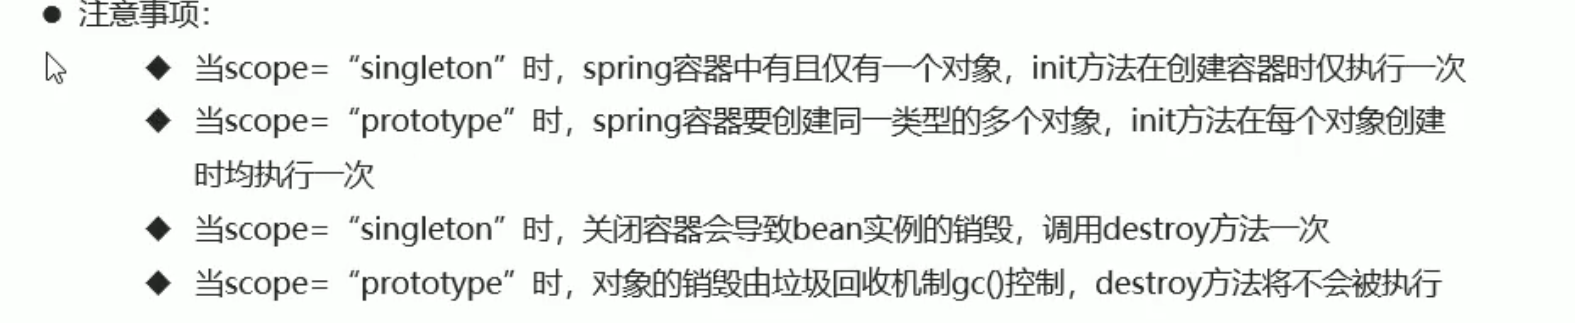
- singleton 值 设置创建出的对象保存在 spring 容器中 是一个单例对象 默认值 单例时创建 spring 容器时就加载 bean 绑定的类
- prototype 值 设置创建出的对象保存在 spring 容器中 是一个 ** 非单例对象 ** 非单例则是在 getBean 时创建类
- request、session、application、websocket 值 设置创建出的对象放置在 web 容器对应的位置
init-method bean 对象初始化时执行指定方法
- 值为 bean 对应的类中的具体方法名
destroy-method bean 对象销毁时执行指定方法
- 值为 bean 对应的类中的具体方法名 只有 ClassPathXmlApplicationContext 才有 close 方法 spring 默认自动销毁但销毁方法不会执行
factory-method 属性
- 值为静态工厂中创建对象的方法
factory-bean 属性
值为实例工厂的 id 需要先用一个 bean 绑定实例工厂类 然后第二个 bean 的 factory-bean 为第一个 bean 的 id 然后用 factory-method 调用其实例工厂的方法
<!--    factory-bea  实例工厂创建对象  需要bean先绑定实例工厂类 然后第二个bean的factory-bea为实例工厂的id 然后factory-method调用其创建对象方法-->
    <bean id="userService3" class="com.itheima.service.UserServiceFactory2" />
    <bean factory-bean="userService3" factory-method="getService"/>
1
2
3
# DI 依赖注入
DI (Dependency Injection) 依赖注入,应用程序运行依赖的资源由 Spring 为其提供,资源进入应用程序的方式称为注入
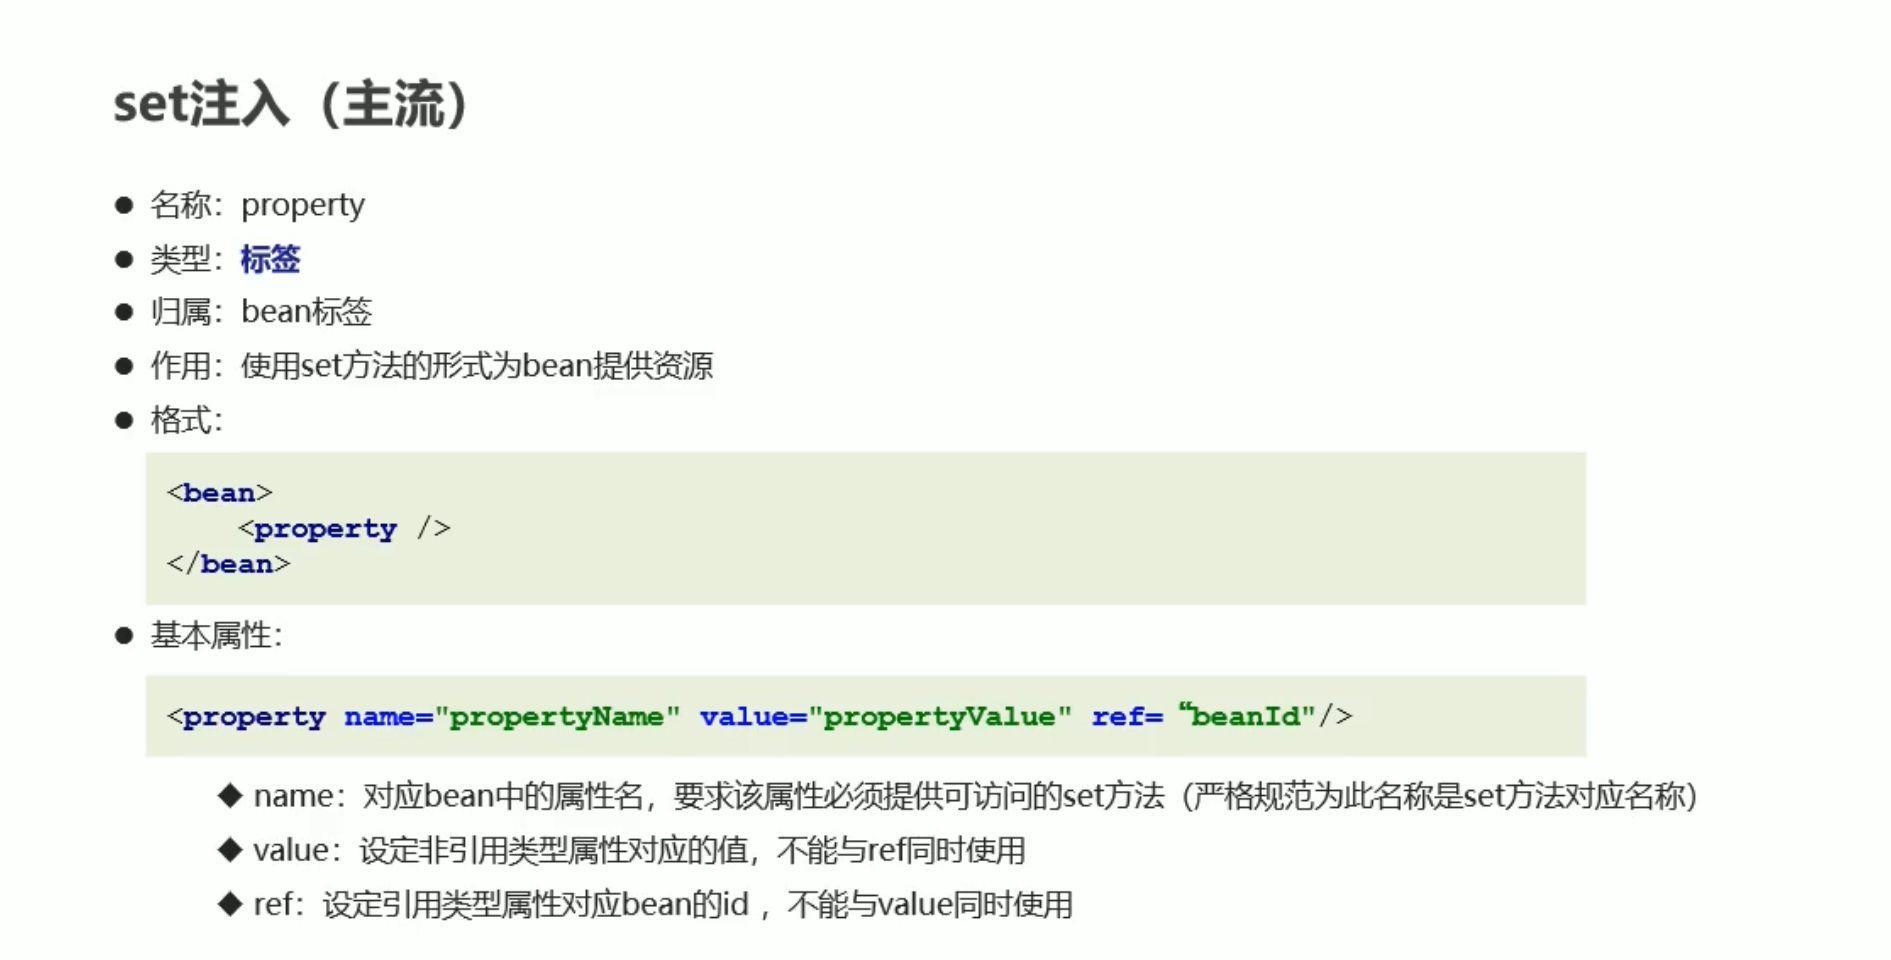
# set 注入
<property>标签 使用 set 方法的形式为 bean 提供资源 是 bean 的子标签- name 属性
- 值为对应 bean 中的属性名 要该属性必须为私有属性同时提供 set 方法
- value 属性
- 值为 name 绑定属性的 值 设定非引用类型属性的值
- ref 属性
- 值为引用类型属性对象 bean 的 id 不能与 value 同时使用
- name 属性
配置
    <bean id="userService" class="com.itheima.service.impl.UserServiceImpl">
<!--        将要注入的引用类型变量通过property属性进行注入 对应的name是要注入的变量名  使用ref声明要注入的bean的id  -->
        <property name="userDao" ref="userDao"></property>
<!--        如果要注入的变量为一个值 我们通过value来设置 同样需要在类中设置私有变量 和set方法-->
        <property name="num" value="13"/>
    </bean>

<!--    将要注入的资源声明为bean-->
    <bean id="userDao" class="com.itheima.dao.impl.UserDaoImpl"/>
2
3
4
5
6
7
8
9
反转资源注入
import com.itheima.dao.UserDao;
import com.itheima.service.UserService;

public class UserServiceImpl implements UserService {
    private UserDao userDao;
    private int num;

    //对需要进行注入的变量添加set方法
    public void setUserDao(UserDao userDao) {
        this.userDao = userDao;
    }

    public void setNum(int num) {
        this.num = num;
    }

    @Override
    public void save() {
        userDao.save();
        System.out.println("running...");
        System.out.println(num);
    }


}
2
3
4
5
6
7
8
9
10
11
12
13
14
15
16
17
18
19
20
21
22
23
24
25
调用
public class UserApp {
    public static void main(String[] args) {
        //2.加载配置文件
        ApplicationContext ctx =new ClassPathXmlApplicationContext("applicationContext.xml");
        //3.获取资源
        UserService userService = (UserService) ctx.getBean("userService");
        userService.save();
    }
}
2
3
4
5
6
7
8
9
# 构造器注入
<constructor-arg>标签 使用构造方法的形式为 bean 提供资源 是 bean 的子标签- name 属性
- 值为对应 bean 中的属性名 要该属性必须为私有属性同时提供 set 方法
- value 属性
- 值为 name 绑定属性的 值 设定非引用类型属性的值
- ref 属性
- 值为引用类型属性对象 bean 的 id 不能与 value 同时使用
- type 属性
- 值为设定构造方法参数的类型 用于赋值给指定的变量类型 推荐使用 nanme 指定变量
- index 属性
- 值为设定构造方法参数的位置 用于赋值给指定 构造方法中 变量的 index 从 0 开始 推荐使用 name 指定变量
- name 属性
被注入类要声明构造方法并赋值
private UserDao userDao;
private int num;
public UserServiceImpl(UserDao userDao,int num){
        this.userDao=userDao;
        this.num=num;
    }
2
3
4
5
6
bean 配置
<!--    构造方法注入-->
<!--    注入类-->
    <bean id="userDao" class="com.itheima.dao.impl.UserDaoImpl"/>
<!--被注入的类-->
    <bean id="userService" class="com.itheima.service.impl.UserServiceImpl">
        <constructor-arg ref="userDao" />
        <constructor-arg name="num" value="456"/>
    </bean>
2
3
4
5
6
7
8
# 集合类型数据注入
如 <array>、<list>、<set> 、 <map> 、 <props> 等集合 是归属于 property 或 constructor-arg 标签的子标签
<list><value>标签- 值为元素对于的值
<props><prop>标签- key 属性
- 值为属性名
- 值为元素对于的值
- key 属性
<array><value>标签- 值为元素对于的值
<set><value>标签- 值为元素对于的值
    <!--    集合注入-->
    <bean id="userDao" class="com.itheima.dao.impl.UserDaoImpl"/>

    <bean id="userService" class="com.itheima.service.impl.UserServiceImpl">
        <property name="userDao" ref="userDao"/>
        <property name="bookDao" ref="bookDao"/>
    </bean>

    <bean id="bookDao" class="com.itheima.dao.impl.BookDaoImpl">
        <property name="al">
            <list>
                <value>helll</value>
                <value>world</value>
            </list>
        </property>
        <property name="properties">
            <props>
                <prop key="name">age</prop>
                <prop key="value">19</prop>
            </props>
        </property>
        <property name="arr">
            <array>
                <value>123</value>
                <value>456</value>
            </array>
        </property>
        <property name="hs">
            <set>
                <value>111</value>
                <value>222</value>
            </set>
        </property>
        <property name="hm">
            <map>
                <entry key="name" value="zhangsan"/>
                <entry key="name" value="lisi"/>
            </map>
        </property>
    </bean>
2
3
4
5
6
7
8
9
10
11
12
13
14
15
16
17
18
19
20
21
22
23
24
25
26
27
28
29
30
31
32
33
34
35
36
37
38
39
40
# p 命名空间 简化配置
增加属性 xmlns:p="http://www.springframework.org/schema/p" 配置 p 命名空间
<beans xmlns="http://www.springframework.org/schema/beans"
       xmlns:xsi="http://www.w3.org/2001/XMLSchema-instance"
       xmlns:p="http://www.springframework.org/schema/p"
       xsi:schemaLocation="http://www.springframework.org/schema/beans
        https://www.springframework.org/schema/beans/spring-beans.xsd">
2
3
4
5
p 命名空间为 bean 注入属性值 替代 property
<!--    两个bean一样的-->
   <bean id="userService" class="com.itheima.service.impl.UserServiceImpl" p:bookDao-ref="bookDao" p:userDao-ref="userDao" />

    <bean id="userService" class="com.itheima.service.impl.UserServiceImpl">
        <property name="userDao" ref="userDao"/>
        <property name="bookDao" ref="bookDao"/>
    </bean>
2
3
4
5
6
7
# SpEL EL 表达式
spring 通过 EL 表达式的支持,统一属性注入格式
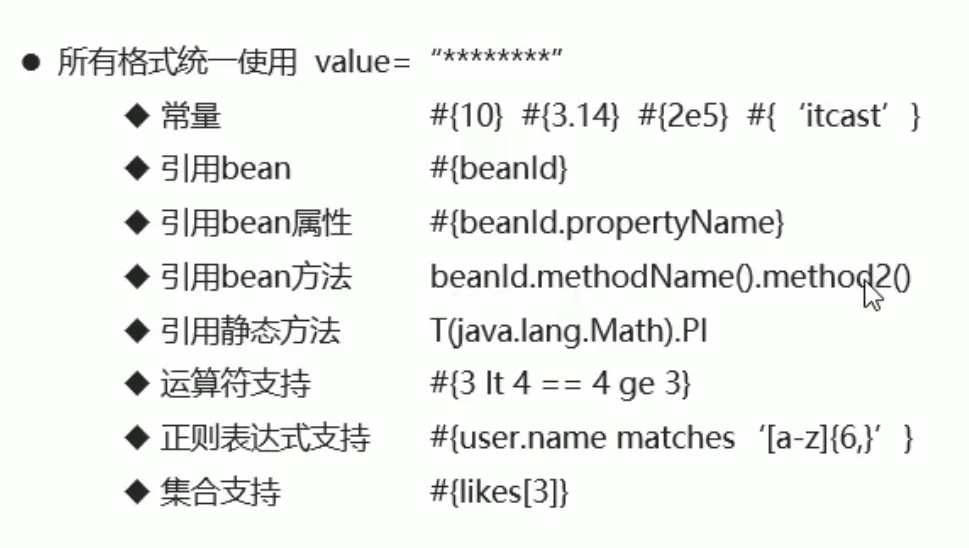
在 value 中书写 el 表达式
# properties 文件
增加属性 xmlns:context="http://www.springframework.org/schema/context"
并加上约束 http://www.springframework.org/schema/context https://www.springframework.org/schema/context/spring-context.xsd
<beans xmlns="http://www.springframework.org/schema/beans"
       xmlns:xsi="http://www.w3.org/2001/XMLSchema-instance"
       xmlns:p="http://www.springframework.org/schema/p"
       xmlns:context="http://www.springframework.org/schema/context"
       xsi:schemaLocation="
       http://www.springframework.org/schema/beans
        https://www.springframework.org/schema/beans/spring-beans.xsd
       http://www.springframework.org/schema/context
        https://www.springframework.org/schema/context/spring-context.xsd
">
2
3
4
5
6
7
8
9
10
加 context 命名空间的支持
    <!--   context命名空间 加载类路径下 所有的properties文件  加载后使用${属性名} -->
    <context:property-placeholder location="classpath:*.properties"/>
 <bean id="userService" class="com.itheima.service.impl.UserServiceImpl">
            <constructor-arg ref="userDao" />
            <constructor-arg name="num" value="${age}"/>
        </bean>-->
2
3
4
5
6
# import 团队开发
xml 中通过 <import> 标签我们可以引入外部的 IoC 配置
<impoprt>标签 引用外部 IoC 配置- resource 属性 配置文件名
# 容器运行时加载多个 IoC 配置
ApplicationContext ctx =new ClassPathXmlApplicationContext("applicationContext.xml","applicationContext2.xml");
# bean 注意事项
- id 是唯一的 同一文件中不允许存在相同 id 而不同文件中后定义覆盖前面的
- 导入配置文件可以理解为 将配置文件复制粘贴到对应位置
- 导入配置文件顺序不同可能导致程序运行结果不同
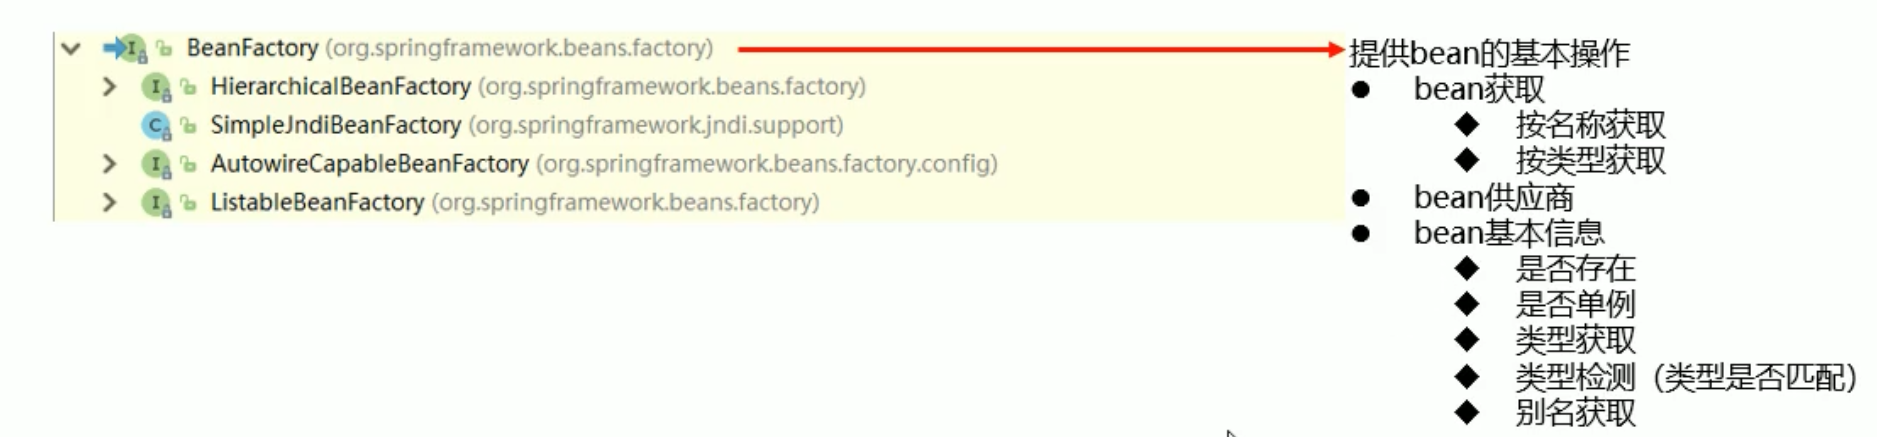
# ApplicationContext 对象

# 第三方资源 bean 配置
添加 druid 模块 druid 是阿里巴巴开发的 jdbc 连接池组件
        <dependency>
            <groupId>com.alibaba</groupId>
            <artifactId>druid</artifactId>
            <version>1.1.21</version>
        </dependency>
2
3
4
5
配置文件
    <bean id="dataSource" class="com.alibaba.druid.pool.DruidDataSource">
        <property name="driverClassName" value="com.mysql.jdbc.Driver"/>
        <property name="url" value="jdbc:mysql://localhost:3306/heima_mm"/>
        <property name="username" value="root"/>
        <property name="password" value="123456"/>
    </bean>
2
3
4
5
6
创建
ApplicationContext ctx =new ClassPathXmlApplicationContext("applicationContext.xml");
DruidDataSource dataSource = (DruidDataSource) ctx.getBean("dataSource");
System.out.println(dataSource);
2
3
看清楚 第三方类的类名 属性名 set 方法
# Spring+MyBatis
applicationContext.xml
<beans xmlns="http://www.springframework.org/schema/beans"
       xmlns:xsi="http://www.w3.org/2001/XMLSchema-instance"
       xmlns:p="http://www.springframework.org/schema/p"
       xmlns:context="http://www.springframework.org/schema/context"
       xsi:schemaLocation="
       http://www.springframework.org/schema/beans
        https://www.springframework.org/schema/beans/spring-beans.xsd
       http://www.springframework.org/schema/context
        https://www.springframework.org/schema/context/spring-context.xsd
">

    <context:property-placeholder location="classpath:*.properties"/>

    <bean id="dataSource" class="com.alibaba.druid.pool.DruidDataSource">
        <property name="driverClassName" value="${jdbc.driver}"/>
        <property name="url" value="${jdbc.url}"/>
        <property name="username" value="${jdbc.username}"/>
        <property name="password" value="${jdbc.password}"/>

    </bean>


    <!--    spring整合mybatis后控制创建连接用的对象-->
    <bean class="org.mybatis.spring.SqlSessionFactoryBean">
        <property name="dataSource" ref="dataSource"/>
        <property name="typeAliasesPackage" value="com.itheima.domain"/>
    </bean>

    <!--    加载mybatis映射配置扫描 将其作为spring的bean进行管理-->
    <bean class="org.mybatis.spring.mapper.MapperScannerConfigurer">
        <property name="basePackage" value="com.itheima.dao"/>
    </bean>
</beans>
2
3
4
5
6
7
8
9
10
11
12
13
14
15
16
17
18
19
20
21
22
23
24
25
26
27
28
29
30
31
32
33
pox.xml
<?xml version="1.0" encoding="UTF-8"?>
<project xmlns="http://maven.apache.org/POM/4.0.0"
         xmlns:xsi="http://www.w3.org/2001/XMLSchema-instance"
         xsi:schemaLocation="http://maven.apache.org/POM/4.0.0 http://maven.apache.org/xsd/maven-4.0.0.xsd">
    <modelVersion>4.0.0</modelVersion>

    <groupId>org.example</groupId>
    <artifactId>spring+mybatis</artifactId>
    <version>1.0-SNAPSHOT</version>

    <properties>
        <maven.compiler.source>8</maven.compiler.source>
        <maven.compiler.target>8</maven.compiler.target>
    </properties>
    <dependencies>
        <dependency>
            <groupId>org.mybatis</groupId>
            <artifactId>mybatis</artifactId>
            <version>3.5.3</version>
        </dependency>
        <dependency>
            <groupId>mysql</groupId>
            <artifactId>mysql-connector-java</artifactId>
            <version>5.1.47</version>
        </dependency>
        <dependency>
            <groupId>org.springframework</groupId>
            <artifactId>spring-context</artifactId>
            <version>5.1.9.RELEASE</version>
        </dependency>
        <dependency>
            <groupId>org.springframework</groupId>
            <artifactId>spring-jdbc</artifactId>
            <version>5.1.9.RELEASE</version>
        </dependency>
        <dependency>
            <groupId>com.alibaba</groupId>
            <artifactId>druid</artifactId>
            <version>1.1.21</version>
        </dependency>
        <dependency>
            <groupId>org.mybatis</groupId>
            <artifactId>mybatis-spring</artifactId>
            <version>2.0.3</version>
        </dependency>
    </dependencies>

</project>
2
3
4
5
6
7
8
9
10
11
12
13
14
15
16
17
18
19
20
21
22
23
24
25
26
27
28
29
30
31
32
33
34
35
36
37
38
39
40
41
42
43
44
45
46
47
48
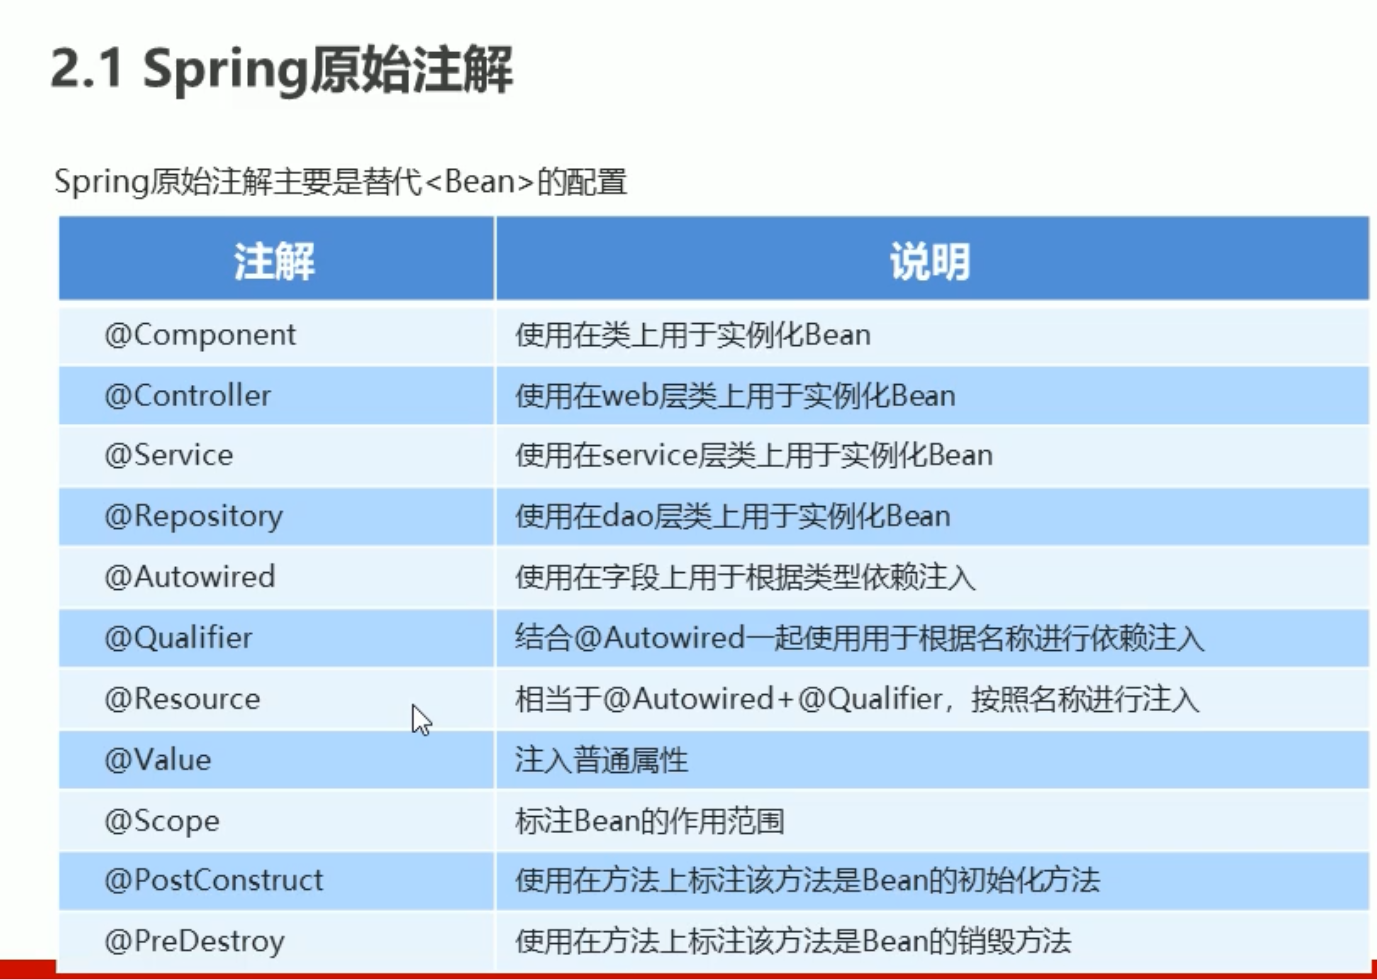
# 注解
注解代替 xml 配置可以简化配置 提供开发效率
https://www.cnblogs.com/alter888/p/9083963.html
并且要在 applicationContext.xml 中配置组件扫描
    <!--    配置组件扫描-->
    <context:component-scan base-package="com.itheima"/>
2
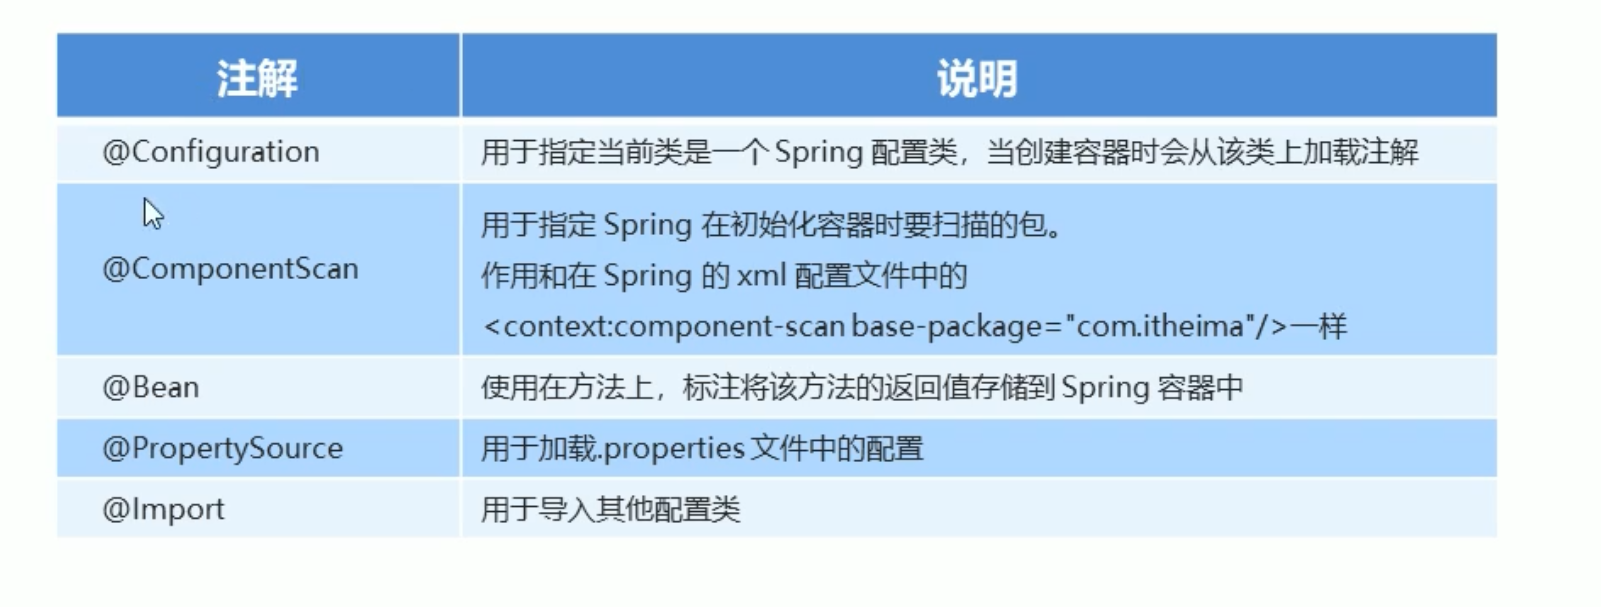
# 新注解
使用上面的注解还不能完全替代 xml 配置 如第三方的类
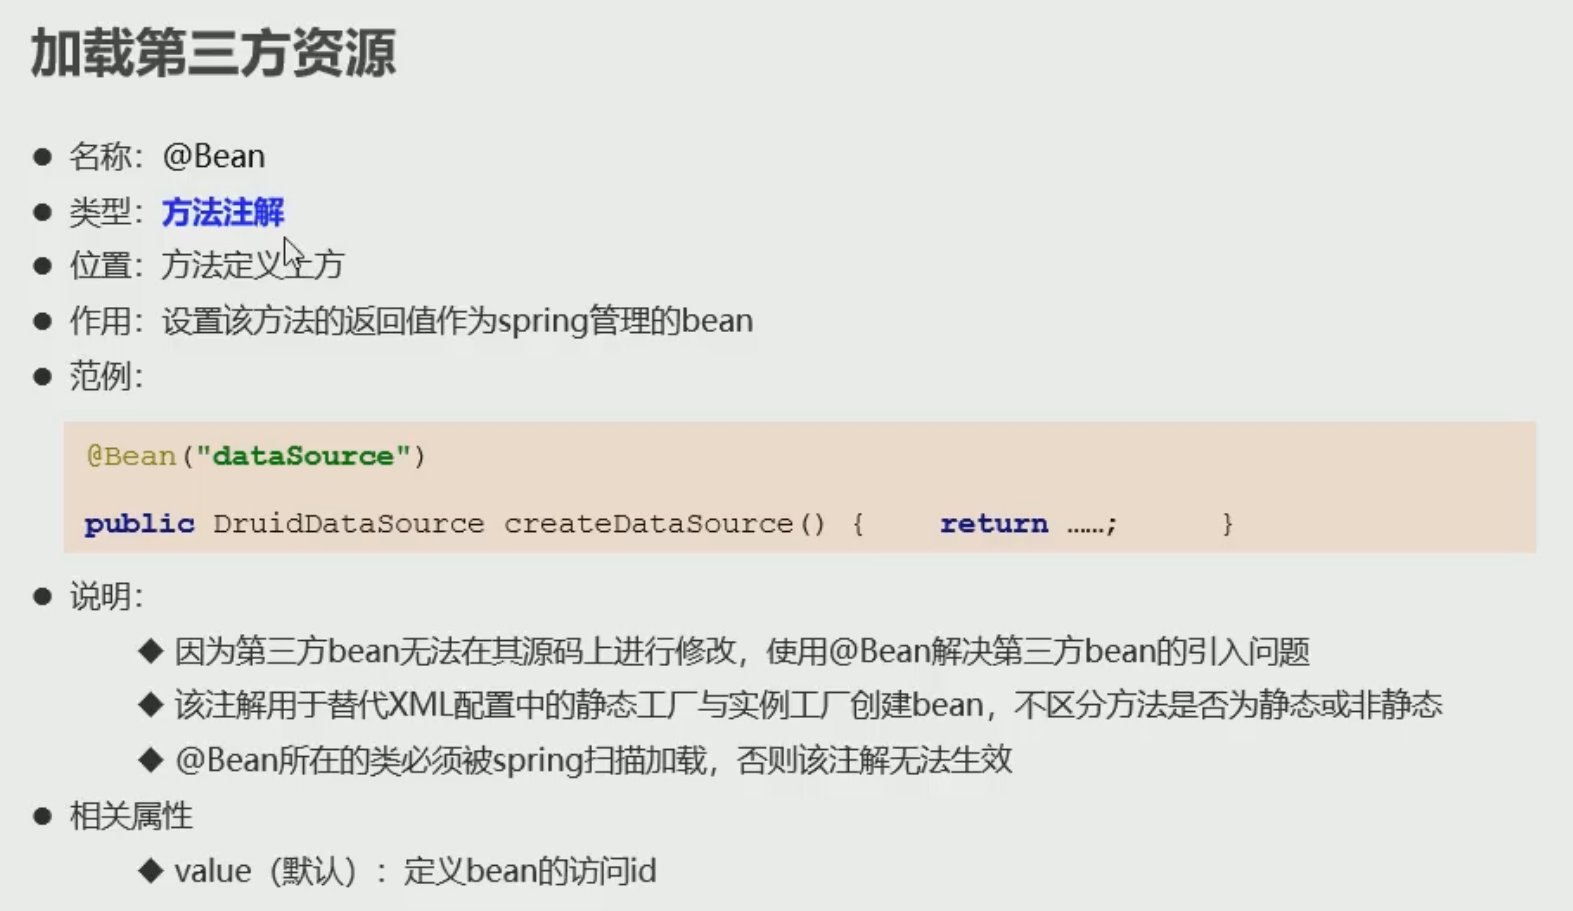
@Bean 标记第三方类
public class JDBCConfig {
    @Value("${jdbc.driver}")
    private String driver;
    @Value("${jdbc.url}")
    private String url;
    @Value("${jdbc.username}")
    private String userName;
    @Value("${jdbc.password}")
    private String password;

    @Bean("dataSource")
    public DataSource getDataSource(){
        DruidDataSource ds = new DruidDataSource();
        ds.setDriverClassName(driver);
        ds.setUrl(url);
        ds.setUsername(userName);
        ds.setPassword(password);
        return ds;
    }
}
2
3
4
5
6
7
8
9
10
11
12
13
14
15
16
17
18
19
20
21
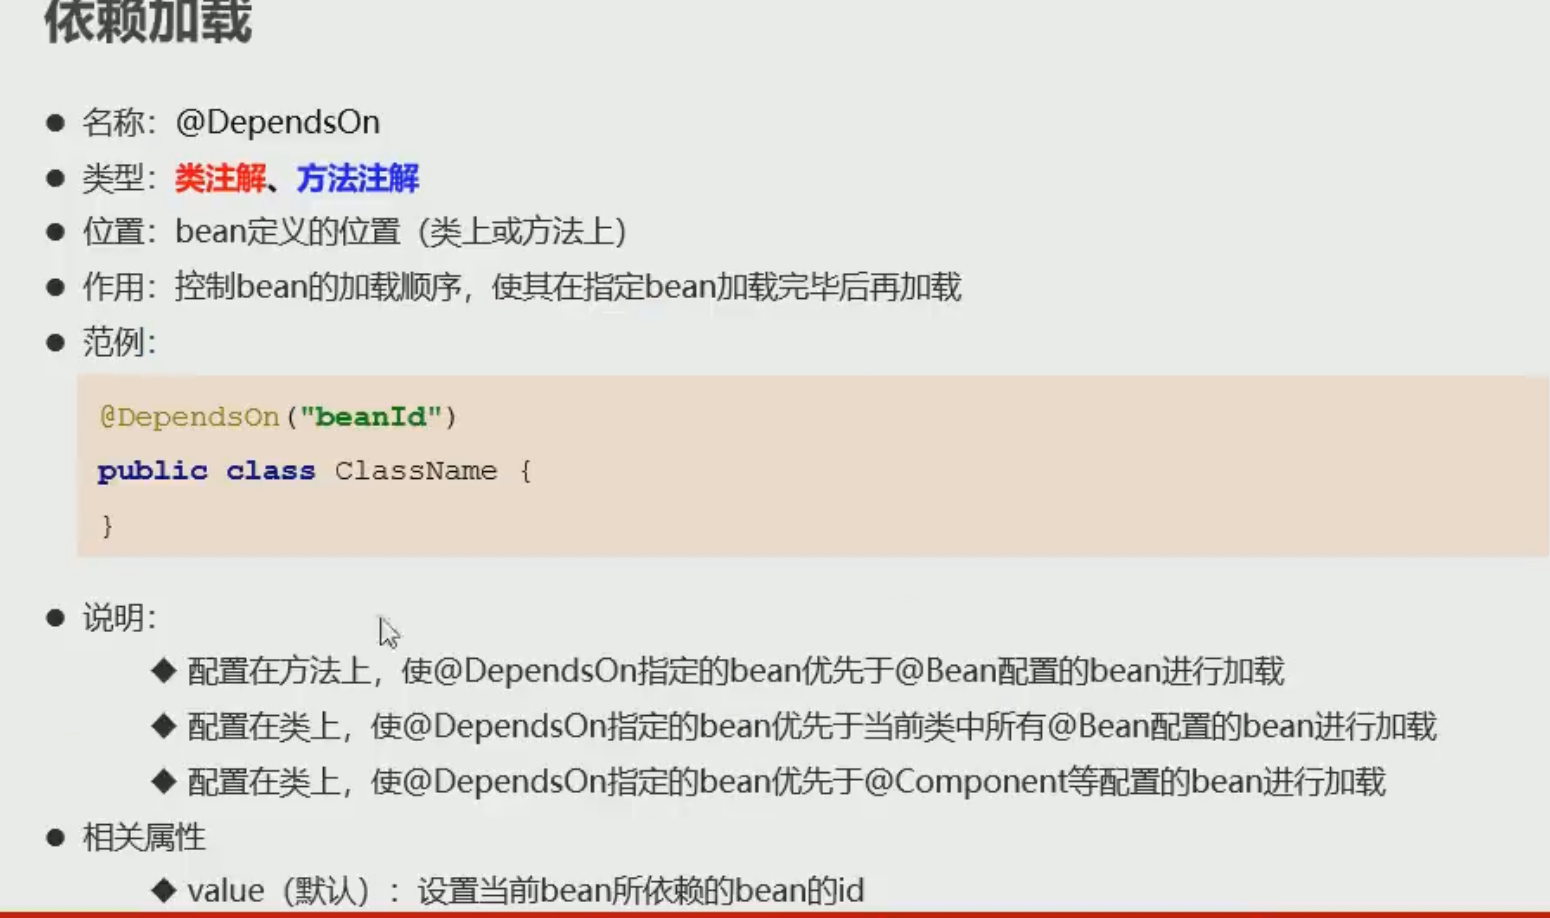
# 加载控制
@DependsOn("classname")
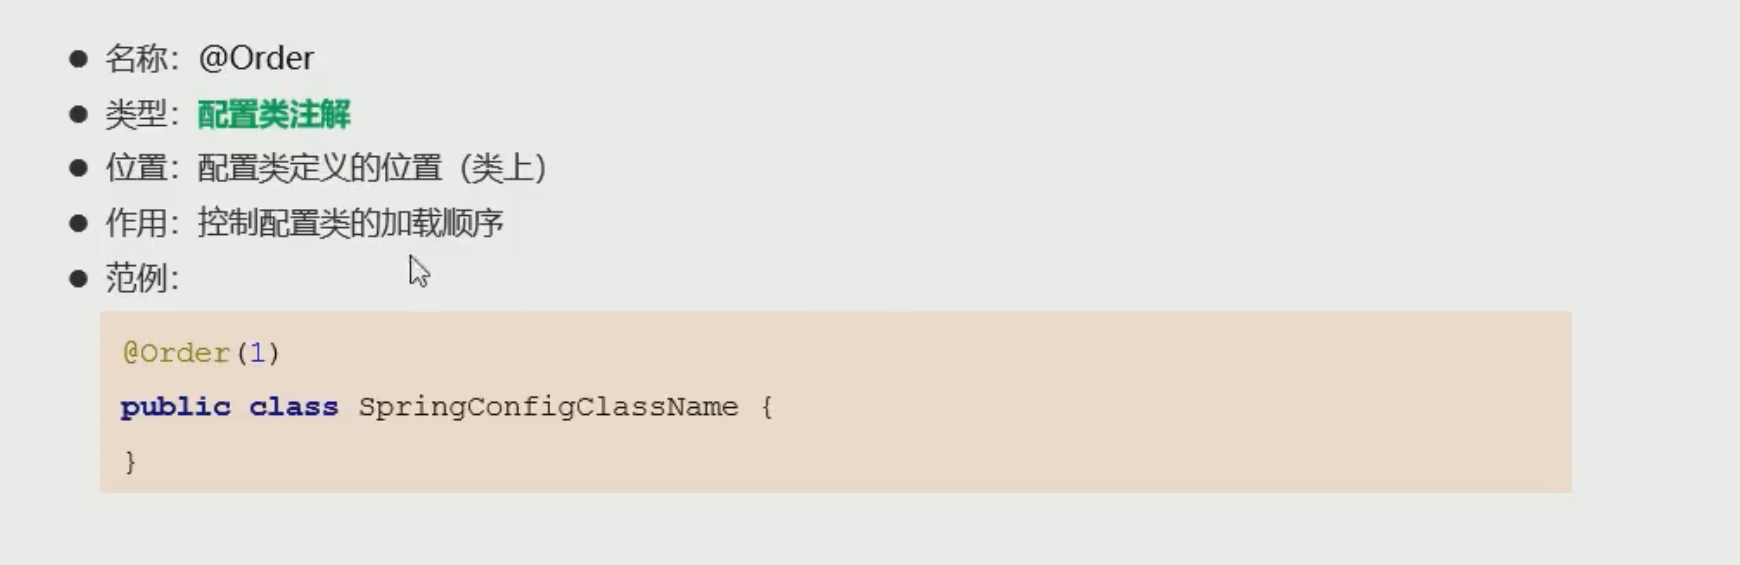
@Order (n) 控制加载顺序
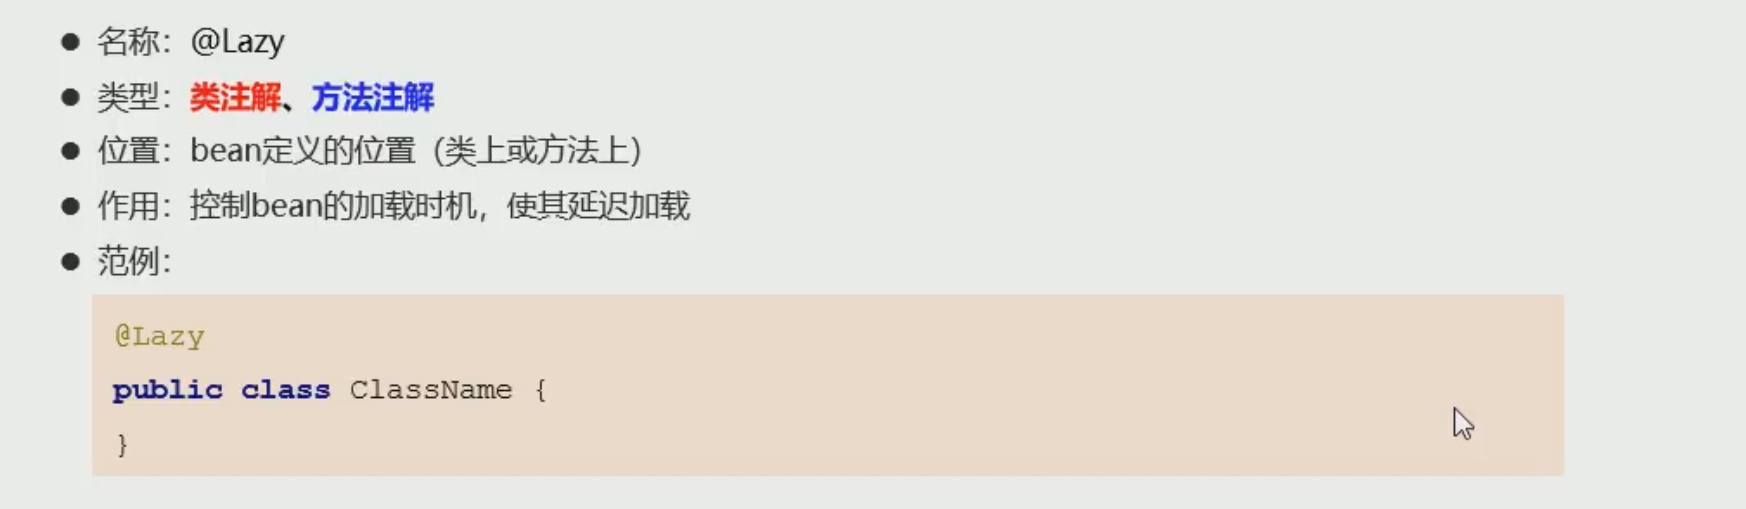
@Lazy 延迟加载
# 整合 Junit
在 Spring 中之前我们测试都需要获取容器 然后获取 bean
导入坐标
<dependency>
            <groupId>junit</groupId>
            <artifactId>junit</artifactId>
            <version>4.12</version>
            <scope>test</scope>
        </dependency>
        <dependency>
            <groupId>org.springframework</groupId>
            <artifactId>spring-test</artifactId>
            <version>5.1.9.RELEASE</version>
        </dependency>
2
3
4
5
6
7
8
9
10
11
测试样例
//设定spring专用的类加载器
@RunWith(SpringJUnit4ClassRunner.class)
//设定加载的spring上下文对应的配置
@ContextConfiguration(classes = SpringConfig.class)
public class UserServiceTest {

    @Autowired
    private AccountService accountService;

    @Test
    public void testFindById(){
        Account ac = accountService.findById(2);
//        System.out.println(ac);
        //assert 预计值  结果值  如果不一致则测试不通过
        Assert.assertEquals("Jock",ac.getName());
    }

    @Test
    public void testFindAll(){
        List<Account> list = accountService.findAll();
        Assert.assertEquals(2,list.size());
    }

}
2
3
4
5
6
7
8
9
10
11
12
13
14
15
16
17
18
19
20
21
22
23
24
# Ioc 底层核心原理


# 组件扫描过滤器
@ComponentScan 组件扫描器拥有过滤指定组件功能
- 按注解类型 过滤
- excludeFilters 设置排除性过滤器
- includeFilters 设置包含性过滤器
//所有的@Service注解被过滤
@ComponentScan(value = "com.itheima",excludeFilters = @ComponentScan.Filter(type = FilterType.ANNOTATION,classes = Service.class))
2
3
# 自定义组件过滤器
继承 TypeFilter 实现 match 方法 返回 false 则不过滤 返回 true 则过滤
package com.itheima.config.filter;

import org.springframework.core.type.classreading.MetadataReader;
import org.springframework.core.type.classreading.MetadataReaderFactory;
import org.springframework.core.type.filter.TypeFilter;

import java.io.IOException;

public class MyTypeFilter implements TypeFilter {


    public boolean match(MetadataReader metadataReader, MetadataReaderFactory metadataReaderFactory) throws IOException {
        ClassMetadata classMetadata = metadataReader.getClassMetadata();  //获取class的元数据
        String className = classMetadata.getClassName();  //获取类名
        System.out.println(className);
        if(className.equals("com.itheima.service.impl.AccountServiceImpl")){
            return true;
        }

        return false;
    }
}
2
3
4
5
6
7
8
9
10
11
12
13
14
15
16
17
18
19
20
21
22
- 按自定义过滤器 过滤
@ComponentScan(value = "com.itheima",excludeFilters = @ComponentScan.Filter(type = FilterType.CUSTOM,classes = MyTypeFilter.class))
# 自定义导入器
继承 ImportSelector 实现 selectImports 方法
package com.itheima.config.selector;

import org.springframework.context.annotation.ImportSelector;
import org.springframework.core.type.AnnotationMetadata;

import java.util.ResourceBundle;

public class MyImportSelector implements ImportSelector {

    public String[] selectImports(AnnotationMetadata importingClassMetadata) {

        //使用properties文件读取
        ResourceBundle bundle = ResourceBundle.getBundle("import");  //文件名
        String className = bundle.getString("className");  //属性名
        return new String[]{className};

//        return new String[]{"com.itheima.service.impl.AccountServiceImpl"}; //直接返回指定类不推荐使用
    }
}
2
3
4
5
6
7
8
9
10
11
12
13
14
15
16
17
18
19
导入指定的组件 不用需要 bean 绑定或者注解绑定
@Import(MyImportSelector.class)
# 自定义注册器
继承 ImportBeanDefinitionRegistrar 实现 registerBeanDefinitions 方法
package com.itheima.config.registrar;

import org.springframework.beans.factory.support.BeanDefinitionRegistry;
import org.springframework.context.annotation.ClassPathBeanDefinitionScanner;
import org.springframework.context.annotation.ImportBeanDefinitionRegistrar;
import org.springframework.core.type.AnnotationMetadata;
import org.springframework.core.type.classreading.MetadataReader;
import org.springframework.core.type.classreading.MetadataReaderFactory;
import org.springframework.core.type.filter.TypeFilter;

import java.io.IOException;

public class MyImportBeanDefinitionRegistrar implements ImportBeanDefinitionRegistrar {

    public void registerBeanDefinitions(AnnotationMetadata importingClassMetadata, BeanDefinitionRegistry registry) {
        ClassPathBeanDefinitionScanner scanner = new ClassPathBeanDefinitionScanner(registry,false);
        scanner.addIncludeFilter(new TypeFilter() {
            public boolean match(MetadataReader metadataReader, MetadataReaderFactory metadataReaderFactory) throws IOException {
                return true;
            }
        });
        scanner.scan("com.itheima");
    }
}
2
3
4
5
6
7
8
9
10
11
12
13
14
15
16
17
18
19
20
21
22
23
24
@Import(MyImportBeanDefinitionRegistrar.class) //自定义注册器
# bean 初始化过程

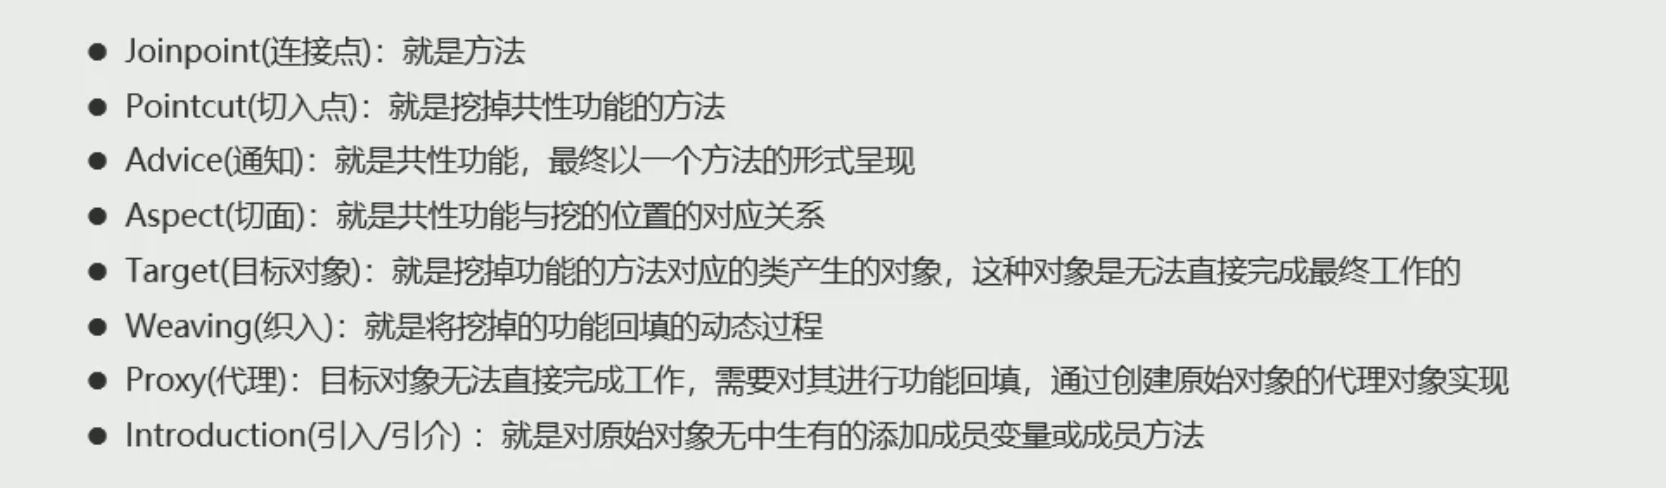
# AOP
Aspect Oriented Programming 面向切门编程 通过预编译方式和运行期动态代理实现程序功能的统一维护的一种技术
AOP 是 OOP (面向对象) 的延续
作用:在程序运行期间 在不修改源码的情况下对方法进行功能增强
优势:减少重复代码 提高开发效率 并且便于维护
# AOP 的动态代理对象
- JDK 代理:基于接口的动态代理技术
- cglib 代理:基于父类的动态代理技术
导入坐标
        <dependency>
            <groupId>org.aspectj</groupId>
            <artifactId>aspectjweaver</artifactId>
            <version>1.9.4</version>
        </dependency>
2
3
4
5
把共性的功能提前出来 并提供类和方法
# XML 配置
添加 aop 以下声明
xmlns:aop="http://www.springframework.org/schema/aop"
http://www.springframework.org/schema/aop
https://www.springframework.org/schema/aop/spring-aop.xsd
2
3
标签头
<beans xmlns="http://www.springframework.org/schema/beans"
       xmlns:xsi="http://www.w3.org/2001/XMLSchema-instance"
       xmlns:p="http://www.springframework.org/schema/p"
       xmlns:context="http://www.springframework.org/schema/context"
       xmlns:aop="http://www.springframework.org/schema/aop"
       xsi:schemaLocation="http://www.springframework.org/schema/beans
        https://www.springframework.org/schema/beans/spring-beans.xsd
        http://www.springframework.org/schema/context
        https://www.springframework.org/schema/context/spring-context.xsd
        http://www.springframework.org/schema/aop
        https://www.springframework.org/schema/aop/spring-aop.xsd">
2
3
4
5
6
7
8
9
10
11
绑定
    <!--3.开启AOP命名空间-->
    <bean id="userService" class="com.itheima.service.impl.UserServiceImpl"/>
    <!--2.配置共性功能成功spring控制的资源  共性功能的类-->
    <bean id="myAdvice" class="com.itheima.aop.AOPAdvice"/>

    <!--4.配置AOP-->
    <aop:config>
        <!--5.配置切入点-->
        <aop:pointcut id="pt" expression="execution(* *..*(..))"/>
        <!--6.配置切面(切入点与通知的关系)-->
        <aop:aspect ref="myAdvice">
            <!--7.配置具体的切入点对应通知中那个操作方法  pointcut-ref为pointcut对应的id-->
            <aop:before method="function" pointcut-ref="pt"/>
        </aop:aspect>
    </aop:config>
2
3
4
5
6
7
8
9
10
11
12
13
14
15
<aop:config>标签 aop 根标签 在 beans 可以拥有多个<aop:aspect>标签 可以在 aop:config 中配置多个- ref 属性 通知 (共性类) 所在的 bean 的 id
<aop:before>标签 切面- method 属性 通知中具体的方法
- pointcut-ref 属性 与 aop:pointcut 中的 id 要一致
- pointcut="execution(* ..(..))" 私有切入点 不能与 pointcut-ref 共存
<aop:pointcut>标签 也可以拥有多个 上级未 config 则为公共切入点 上级未 aspect 则为局部切入点- id 属性 名称 可以自定义
- expression 属性 切入点模式
# 切入点表达式
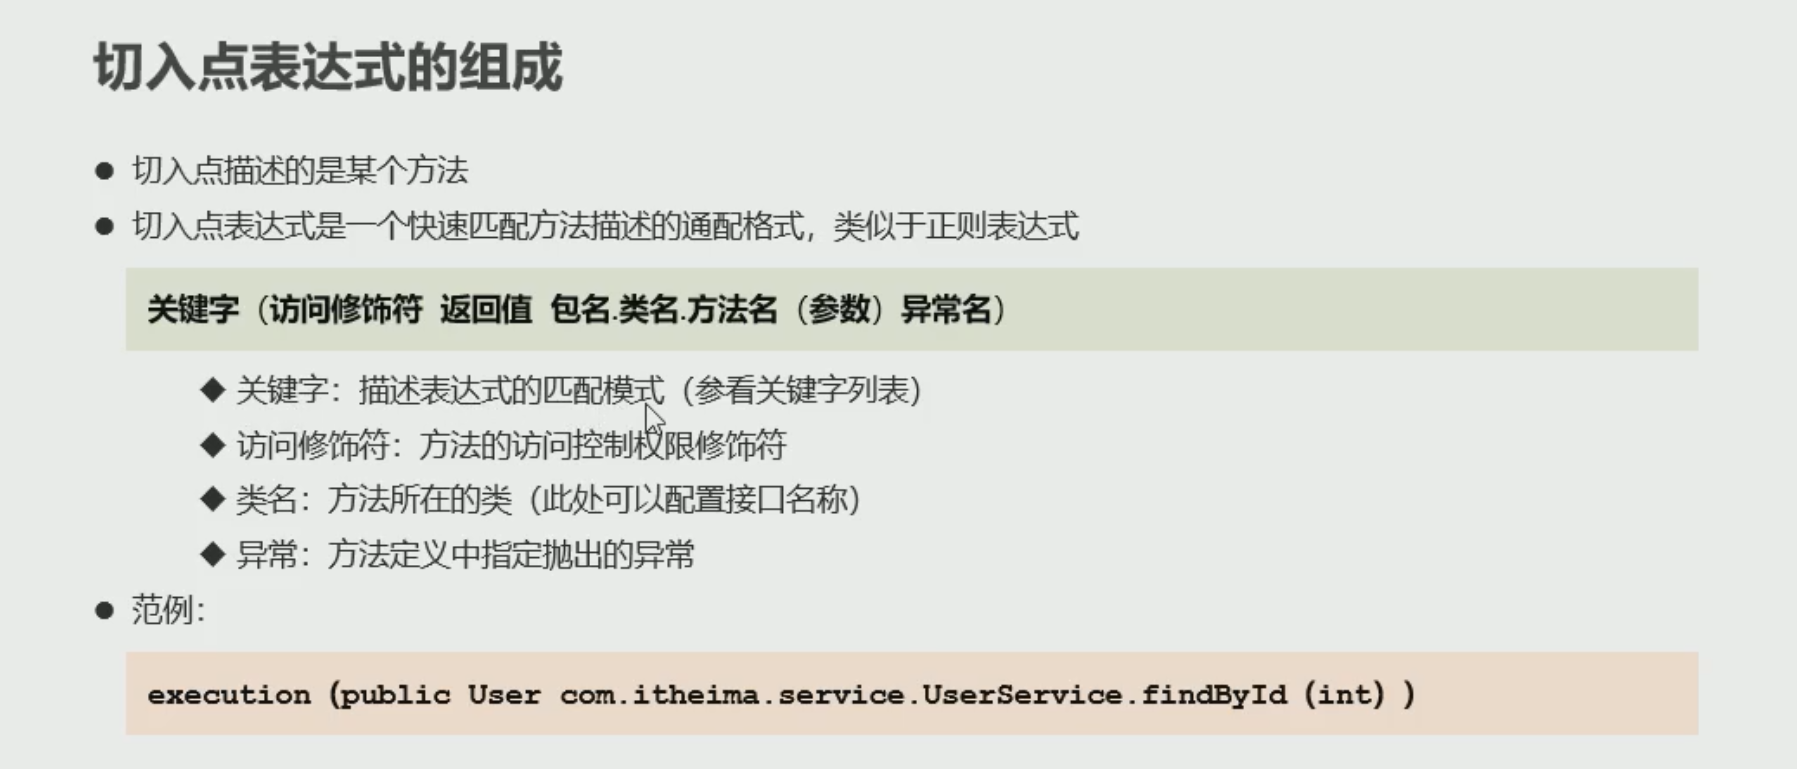
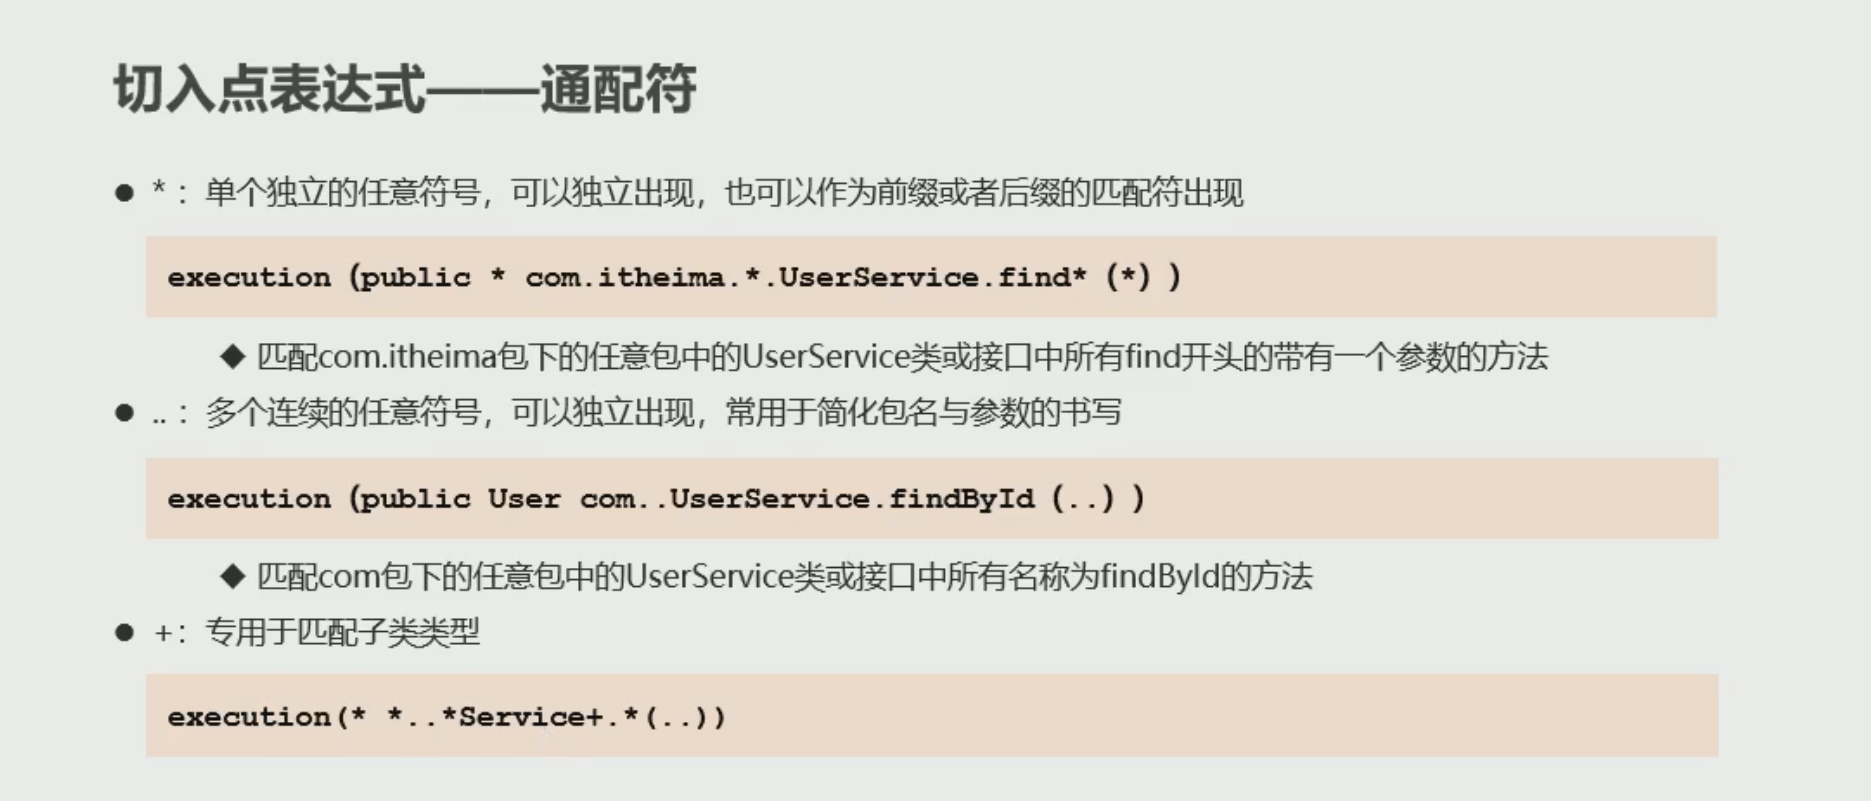
支持逻辑运算符 和非运算
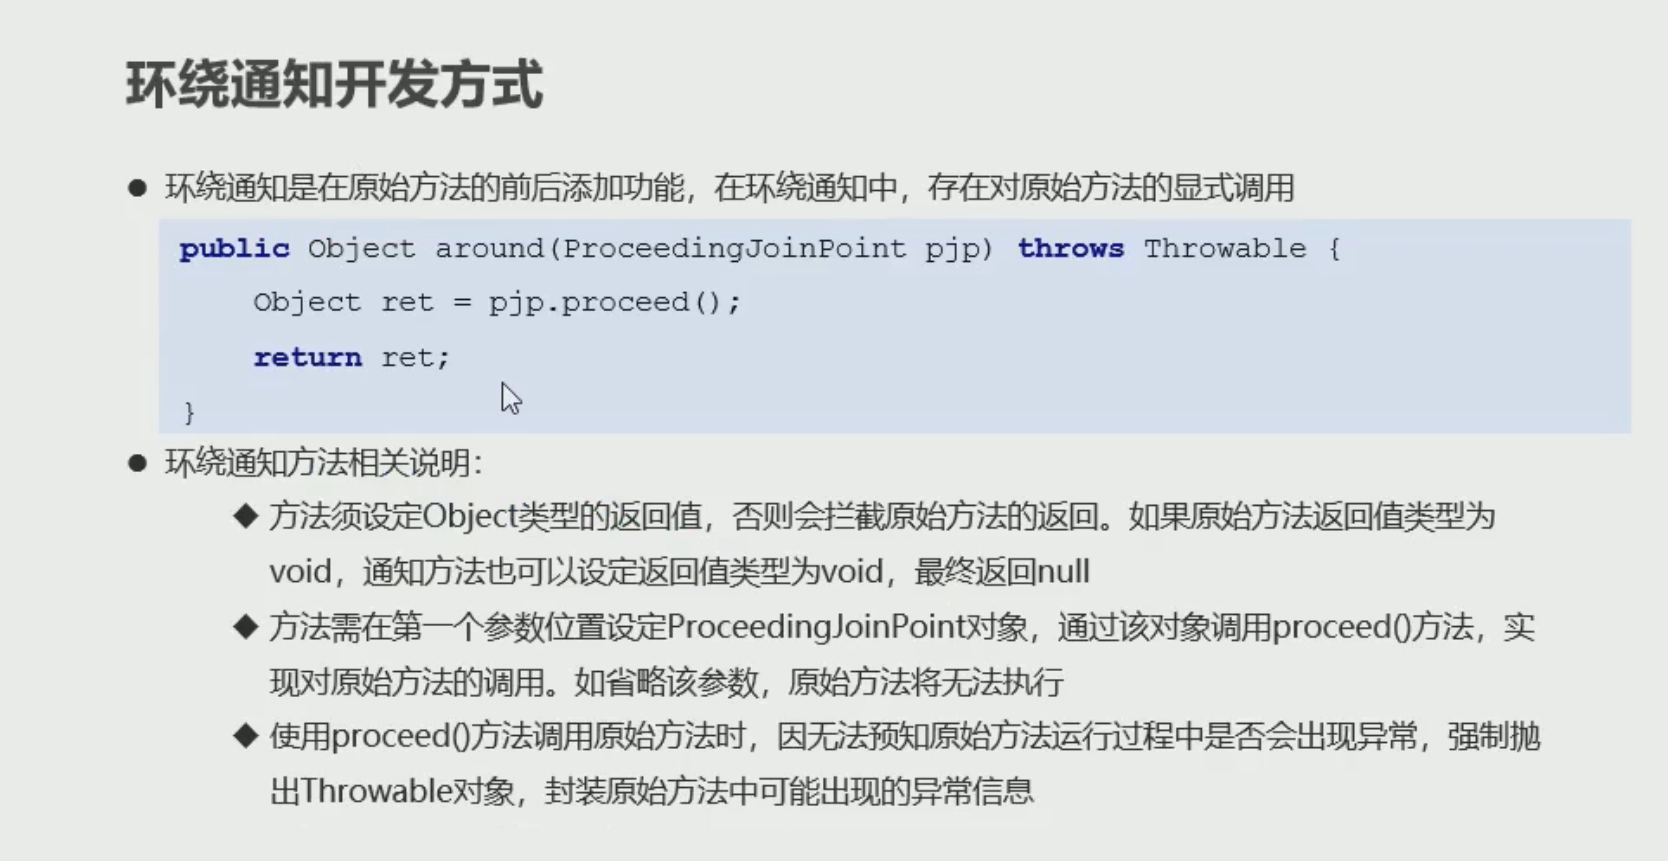
# 通知类型
<aop:before>前置通知 如果通知中抛出异常 则阻止原始方法运行<aop:after>后置通知 无论是否异常 都会执行通知<aop:after-running>运行通知 如果抛出异常无法通知<aop:after-throwing>异常通知 如果没有抛出异常无法通知<aop:around>环绕通知 在原始方法执行前后都有对应执行的执行,还可以阻止原始方法执行
# 通知顺序
当同一个切入点配置多个通知时,标签配置的顺序就是执行的顺序
# 通知获取数据
获取参数 所有的通知都可以获取参数
public void before(JoinPoint jp) throws  Throwable{
        Object[] args = jp.getArgs();
    }
1
2
3第二个方法
在通知方法中定义变量
public void before2(int a) {
        System.out.println(a);
    }
1
2
3
在 applicationContext.xml 配置 aop 传参
<!-- &是& args(a) 为aop通知方法中形参的名字 --> <aop:before method="before2" pointcut="execution(* *..*(..)) && args(a)"/>1
2
# 通知获取返回值
获取返回值 只有 around 和 after-returning 通知
public void before2(Object ret) {
        System.out.println(ret);
    }
1
2
3<!-- returning为通知方法形参的名字 此变量为原始方法的返回值 --> <aop:after-returning method="before2" pointcut-ref="pt" returning="ret"/>1
2第二种方法
    public Object around (ProceedingJoinPoint pjp) throws Throwable {
        //对原始方法的调用  返回原始方法的返回值
        Object proceed = pjp.proceed();
        System.out.println(proceed);
        //必须返回返回值 不然原始方法会异常
        return proceed;
    }
1
2
3
4
5
6
7<aop:around method="around" pointcut-ref="pt"/>1
2
# 获取异常
获取异常 around 和 after-throwing 通知获取
    public void afterThrowing(Throwable t){
        System.out.println(t.getMessage());
    }
1
2
3<!-- throwing为通知方法中形参的名称 用于获取异常 --> <aop:after-throwing method="afterThrowing" pointcut-ref="pt" throwing="t"/>1
2第二种方法
    public Object around (ProceedingJoinPoint pjp)  {
        //对原始方法的调用  返回原始方法的返回值
        Object proceed = null;
        try {
            proceed = pjp.proceed();
        } catch (Throwable e) {
            e.printStackTrace();
        }
        System.out.println(proceed);
        //必须返回返回值 不然原始方法会异常
        return proceed;
    }
1
2
3
4
5
6
7
8
9
10
11
12<aop:around method="around" pointcut-ref="pt"/>1
# 注解
开 aop 注解支持
<aop:aspectj-autoproxy/>1
在 AOP 类上加注解
@Component //bean绑定
@Aspect  //标记AOP 注解
public class AOPAdvice {
     @Pointcut("execution(* *..*(..))")  //定义一个空方法 并且绑定为aop id=pt
    public void pt(){}

     @Before("pt()")  //标记为aop-before方法 并且绑定空间名称 pt()
    public void before(JoinPoint jp) throws Throwable {
        Object[] args = jp.getArgs();
    }

        @After("pt()")
    public void function() {
        System.out.println("共性功能");
    }

        @Around("pt()")
    public Object around (ProceedingJoinPoint pjp)  {
        //对原始方法的调用  返回原始方法的返回值
        Object proceed = null;
        try {
            proceed = pjp.proceed();
        } catch (Throwable e) {
            e.printStackTrace();
        }
        System.out.println(proceed);
        //必须返回返回值 不然原始方法会异常
        return proceed;
    }

        @AfterReturning(value = "pt()", returning = "ret")
    public void before2(Object ret) {
        System.out.println(ret);
    }

    @AfterThrowing(value = "pt()", throwing = "t")
    public void afterThrowing(Throwable t) {
        System.out.println(t.getMessage());
    }

}
1
2
3
4
5
6
7
8
9
10
11
12
13
14
15
16
17
18
19
20
21
22
23
24
25
26
27
28
29
30
31
32
33
34
35
36
37
38
39
40
41
@Aspect 标记为 aop 在 AOP 类上 记得实例化并 @Component
@Pointcut 定义个一个空参无返回值的空方法 为此 aop 绑定空间名称 为方法名 如果在其他类中创建 则通知中调用要加上类名 如: aopconfig.pt ()
@After 后置通知
@Before 前置通知
# 注解通知执行顺序
- 与方法定义位置无关
- 如果通知类型同 与方法名自然排序来执行
- 如果是不同 AOP 的通知 是与 AOP 类名有关
- 在类上方 使用注解 @Order (n) 自定义顺序
# AOP 配置 (注解)
前面我们用 xml 配置注解
- @EnableAspectJAutoProxy 开启 aop 注解 在 spring 配置类中标记注解
# 静态代理
装饰者模式 (Decorator Pattern) 在不惊动原始设计的基础上,为其添加功能
创建一个新的类 并继承原接口 有参构造方法 形参为原始对象 调用原始方法
public class UseServiceImplDecorator implements UserService {

    private UserService userService;

    public UseServiceImplDecorator(UserService userService) {
        this.userService = userService;
    }

    @Override
    public void save() {
        userService.save();
        System.out.println("刮大白");
    }
}
2
3
4
5
6
7
8
9
10
11
12
13
14
# JDK 动态代理
public class UserServiceJDKProxy {
    public static UserService createUserServiceJDKProxy(UserService userService) {


        ClassLoader cl = userService.getClass().getClassLoader();  //获取加载类
        Class[] classes = userService.getClass().getInterfaces();  //获取类接口

        InvocationHandler ih = new InvocationHandler() {
            @Override
            public Object invoke(Object proxy, Method method, Object[] args) throws Throwable {
                Object invoke = method.invoke(userService, args);  //调用原始方法
                System.out.println("刮大白");   //不影响原始类下实现增强功能
                return invoke;
            }
        };
        UserService service = (UserService) Proxy.newProxyInstance(cl, classes, ih);
        return service;

    }
}
2
3
4
5
6
7
8
9
10
11
12
13
14
15
16
17
18
19
20
# CGLIB
CGLIB (Code Generation Library) Code 生成类库 不限定是否有具体接口 无需原始代理对象
public class UserServiceCglibProxy {

    public static UserService createUserServiceCglibProxy(Class claszz) {
        Enhancer enhancer = new Enhancer();
        enhancer.setSuperclass(claszz);   //设置enhancer的父类
        enhancer.setCallback(new MethodInterceptor() {
            @Override
            public Object intercept(Object o, Method method, Object[] objects, MethodProxy methodProxy) throws Throwable {
//                method.invoke(o,objects);
//                methodProxy.invoke(o,objects);
                System.out.println(method.getName());  //获取方法名
                Object ret = methodProxy.invokeSuper(o, objects);//原始方法调用 默认对所有方法做增强

                if (method.getName().equals("save")) {  //需要判断方法名
                    System.out.println("刮大白");
                }
                return ret;
            }
        });
        return (UserService) enhancer.create();
    }
}
2
3
4
5
6
7
8
9
10
11
12
13
14
15
16
17
18
19
20
21
22
测试类
    public static void main(String[] args) {
        UserService userService = UserServiceCglibProxy.createUserServiceCglibProxy(UserServiceImpl.class);
        userService.save();
    }
2
3
4
# AOP 底层 切换动态代理方式
AOP 底层使用的 JDK 的动态代理方式
我们可以配置为使用 CGLIB 方式 需要在 aop:config 中配置
 <!--XML配置AOP 默认为flase 为jdk动态代理 true为CGLIB代理 -->
<aop:config proxy-target-class="true">
    <!-- 注解配置AOP-->
<aop:aspectj-autoproxy proxy-target-class="false"/>
2
3
4
//注解驱动
@EnableAspectJAutoProxy(proxyTargetClass = true)
2
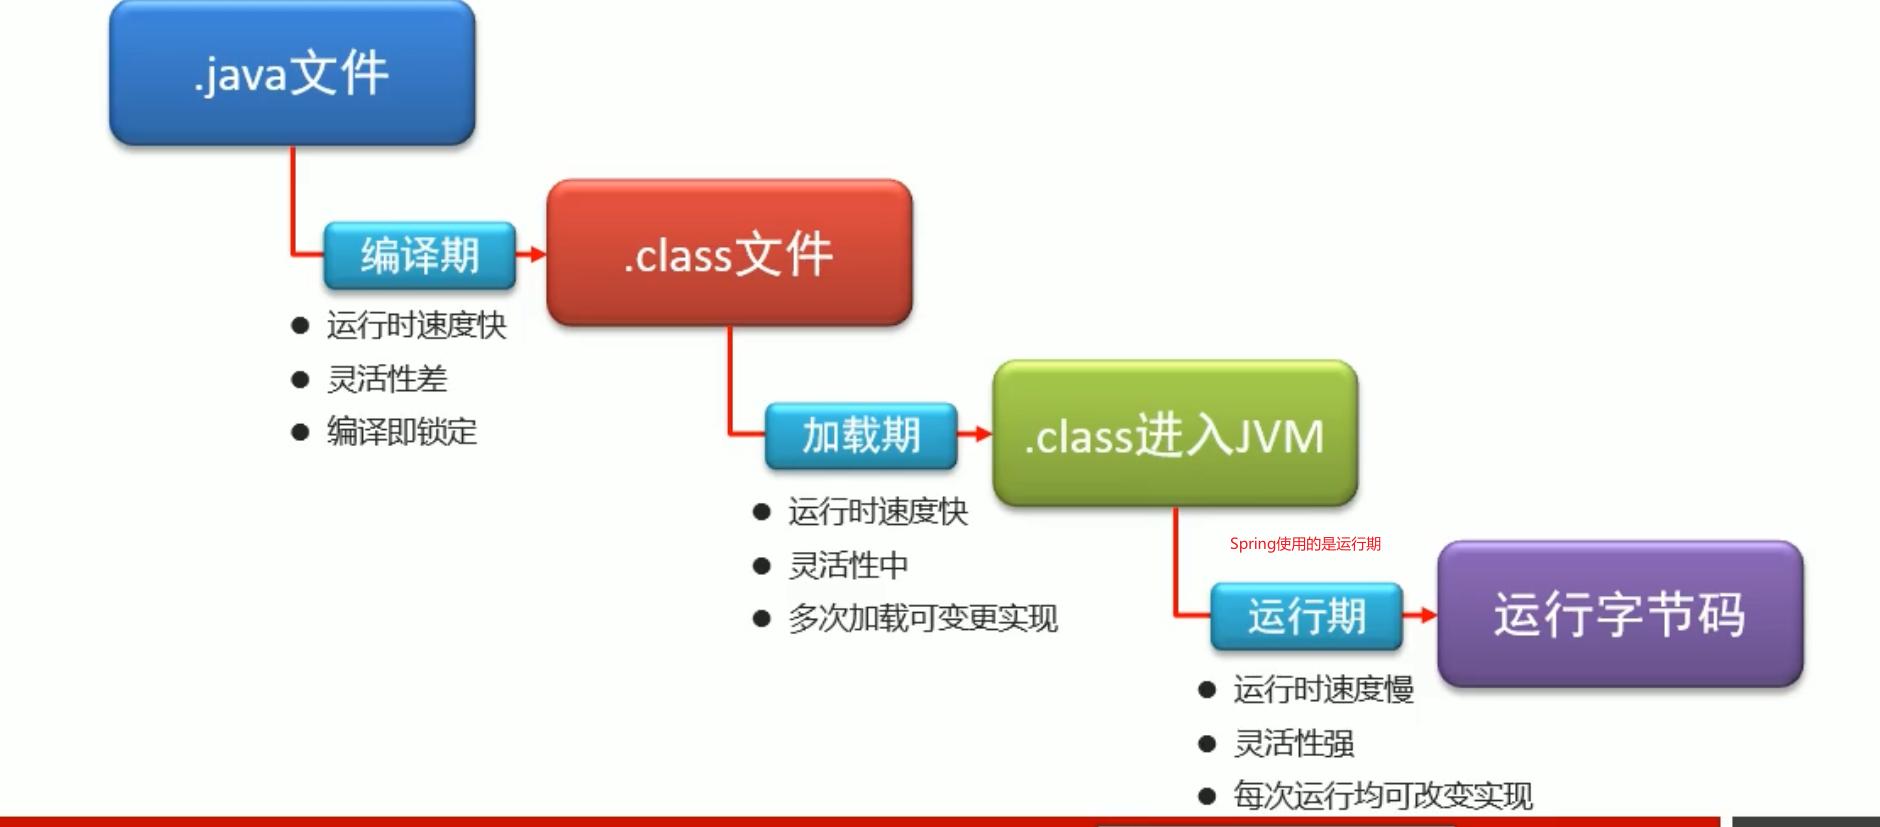
# 织入时机
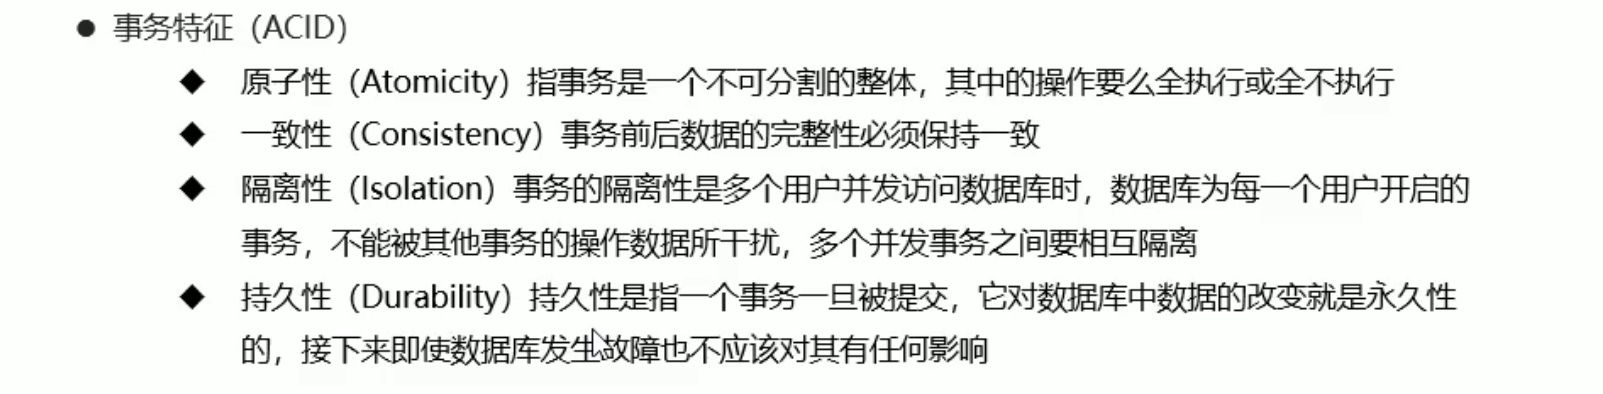
# 事务
事务指数据库中多个操作合并在一起形成的操作序列
- 当操作出现失败 回滚事务 保障数据的一致性
- 当并发访问数据库时 防止并发访问操作结果相互干扰
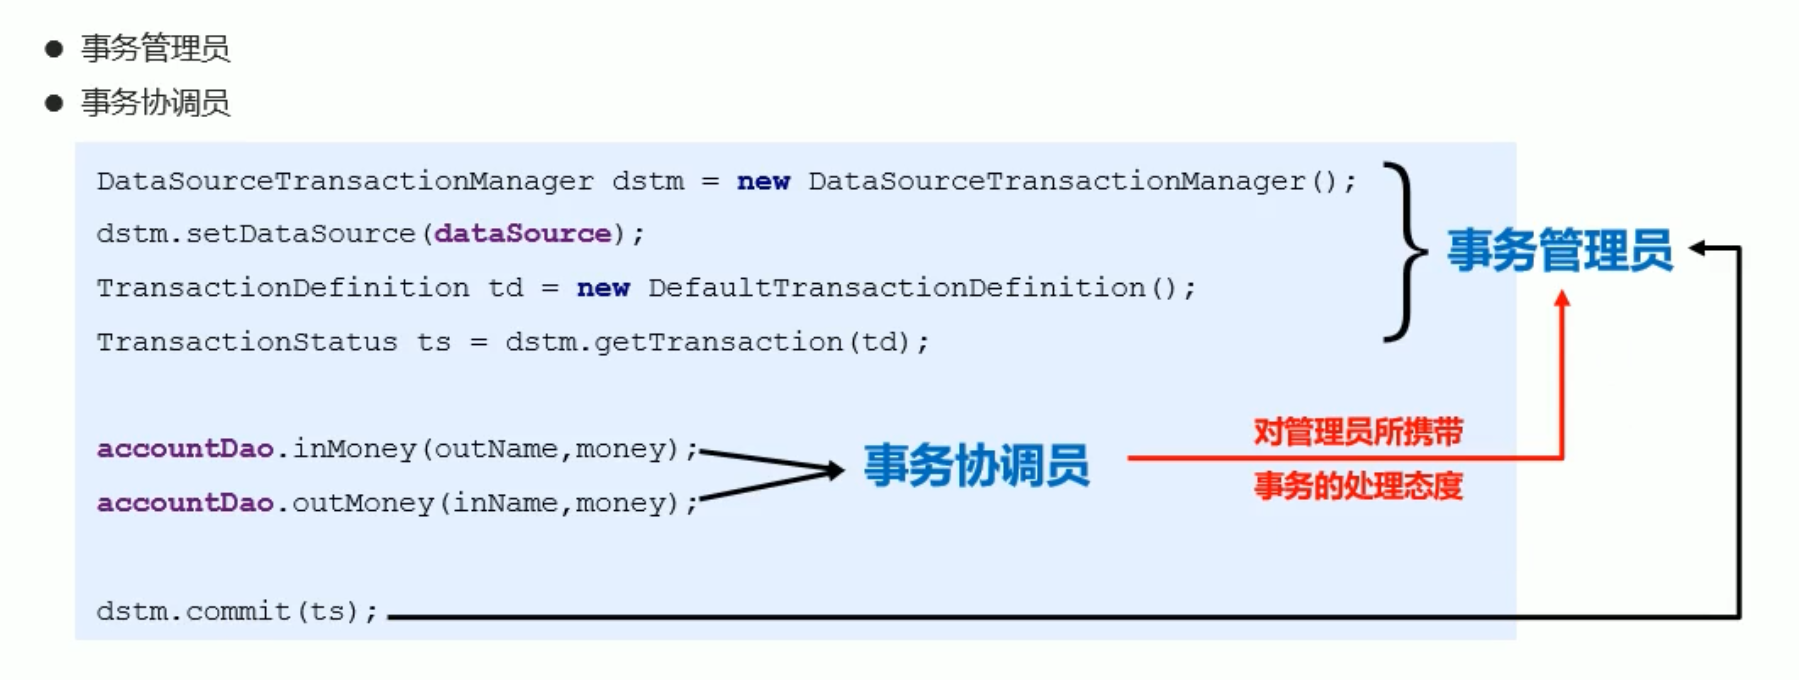
# 事务核心对象
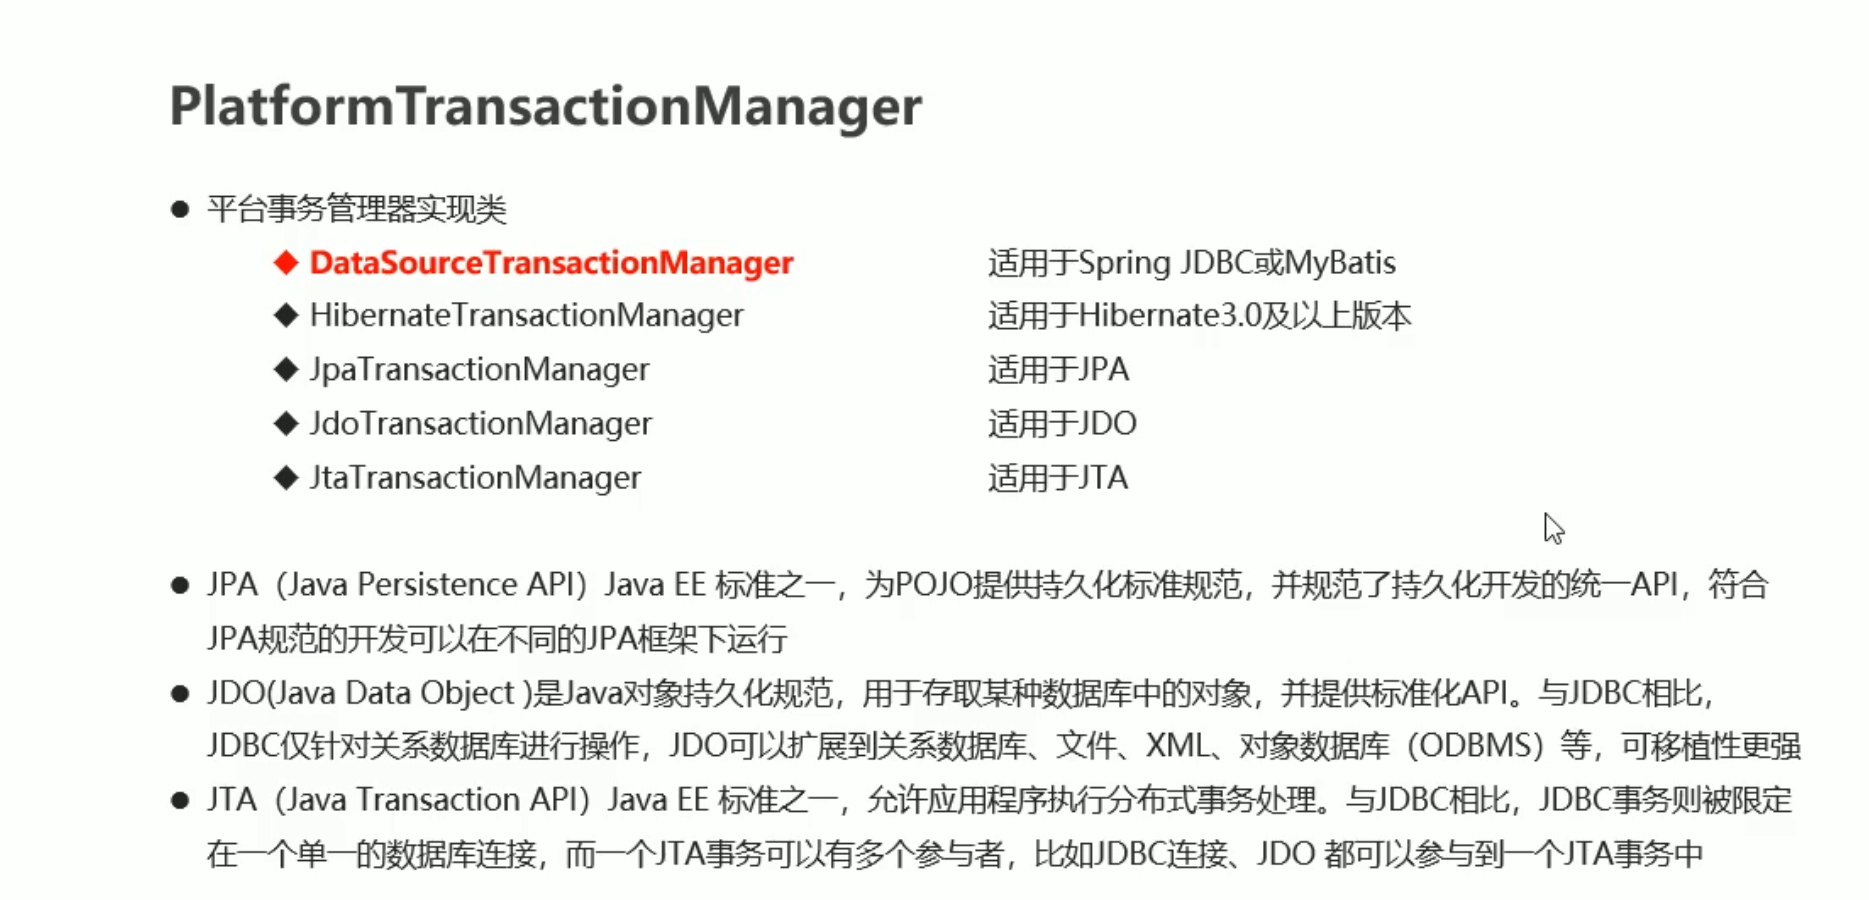
# 编程式事务
    private DataSource dataSource;
    public void setDataSource(DataSource dataSource) {
        this.dataSource = dataSource;
    }

//开启事务
        PlatformTransactionManager ptm = new DataSourceTransactionManager(dataSource);
        //事务定义
        TransactionDefinition td = new DefaultTransactionDefinition();
        //事务状态
        TransactionStatus ts = ptm.getTransaction(td);

        accountDao.inMoney(outName, money);
//        int i = 1 / 0;
        accountDao.outMoney(inName, money);

        //提交事务
        ptm.commit(ts);
2
3
4
5
6
7
8
9
10
11
12
13
14
15
16
17
18
业务层要注入 dataSource
    <bean id="accountService" class="com.itheima.service.impl.AccountServiceImpl">
        <property name="accountDao" ref="accountDao"/>
        <property name="dataSource" ref="dataSource"/>
    </bean>
2
3
4
# AOP 改造编程式事务
    private DataSource dataSource;
    public void setDataSource(DataSource dataSource) {
        this.dataSource = dataSource;
    }

    public Object transactionManager(ProceedingJoinPoint pjp) throws Throwable {
        //开启事务
        PlatformTransactionManager ptm = new DataSourceTransactionManager(dataSource);
        //事务定义
        TransactionDefinition td = new DefaultTransactionDefinition();
        //事务状态
        TransactionStatus ts = ptm.getTransaction(td);

        Object ret = pjp.proceed(pjp.getArgs());

        //提交事务
        ptm.commit(ts);

        return ret;

    }
2
3
4
5
6
7
8
9
10
11
12
13
14
15
16
17
18
19
20
21
    <bean id="txAdvice" class="com.itheima.aop.TxAdvice">
        <property name="dataSource" ref="dataSource"/>
    </bean>

    <aop:config>
        <aop:pointcut id="pt" expression="execution(* *..transfer(..))"/>
        <aop:aspect ref="txAdvice">
            <aop:around method="transactionManager" pointcut-ref="pt"/>
        </aop:aspect>
    </aop:config>
2
3
4
5
6
7
8
9
10
# 声明式事务
声明添加域
xmlns:tx="http://www.springframework.org/schema/tx"
http://www.springframework.org/schema/tx
https://www.springframework.org/schema/tx/spring-tx.xsd
<beans xmlns="http://www.springframework.org/schema/beans"
       xmlns:xsi="http://www.w3.org/2001/XMLSchema-instance"
       xmlns:context="http://www.springframework.org/schema/context"
       xmlns:aop="http://www.springframework.org/schema/aop"
       xmlns:tx="http://www.springframework.org/schema/tx"
       xsi:schemaLocation="http://www.springframework.org/schema/beans
        https://www.springframework.org/schema/beans/spring-beans.xsd
        http://www.springframework.org/schema/context
        https://www.springframework.org/schema/context/spring-context.xsd
        http://www.springframework.org/schema/tx
        https://www.springframework.org/schema/tx/spring-tx.xsd
        http://www.springframework.org/schema/aop
        https://www.springframework.org/schema/aop/spring-aop.xsd">
2
3
4
5
6
7
8
9
10
11
12
13
    <bean class="org.mybatis.spring.SqlSessionFactoryBean">
        <property name="dataSource" ref="dataSource"/>
        <property name="typeAliasesPackage" value="com.itheima.domain"/>
    </bean>


    <bean class="org.mybatis.spring.mapper.MapperScannerConfigurer">
        <property name="basePackage" value="com.itheima.dao"/>
    </bean>

    <bean id="accountService" class="com.itheima.service.impl.AccountServiceImpl">
        <property name="accountDao" ref="accountDao"/>
    </bean>


<!--    tx声明-->
    <bean id="txManager" class="org.springframework.jdbc.datasource.DataSourceTransactionManager">
        <property name="dataSource" ref="dataSource"/>
    </bean>

    <!--    定义事务管理的通知类-->
    <tx:advice id="txAdvice" transaction-manager="txManager">
        <!--定义要控制的事务-->
        <tx:attributes>
            <!--            指定方法控制事务 read-only 是否开启只读事务-->
            <!--            <tx:method name="transfer" read-only="false"/>-->
            <tx:method name="*" read-only="false"/>
            <tx:method name="get*" read-only="true"/>
            <tx:method name="find*" read-only="true"/>
        </tx:attributes>
    </tx:advice>

    <aop:config>
        <aop:pointcut id="pt" expression="execution(* com.itheima.service.*Service.*(..))"/>
        <!--      advice可以是普通类不实现接口或没有继承关系  advisor通知类必须实现通知接口  -->
        <aop:advisor advice-ref="txAdvice" pointcut-ref="pt"/>
    </aop:config>
2
3
4
5
6
7
8
9
10
11
12
13
14
15
16
17
18
19
20
21
22
23
24
25
26
27
28
29
30
31
32
33
34
35
36
37
38
# 事务传播行为
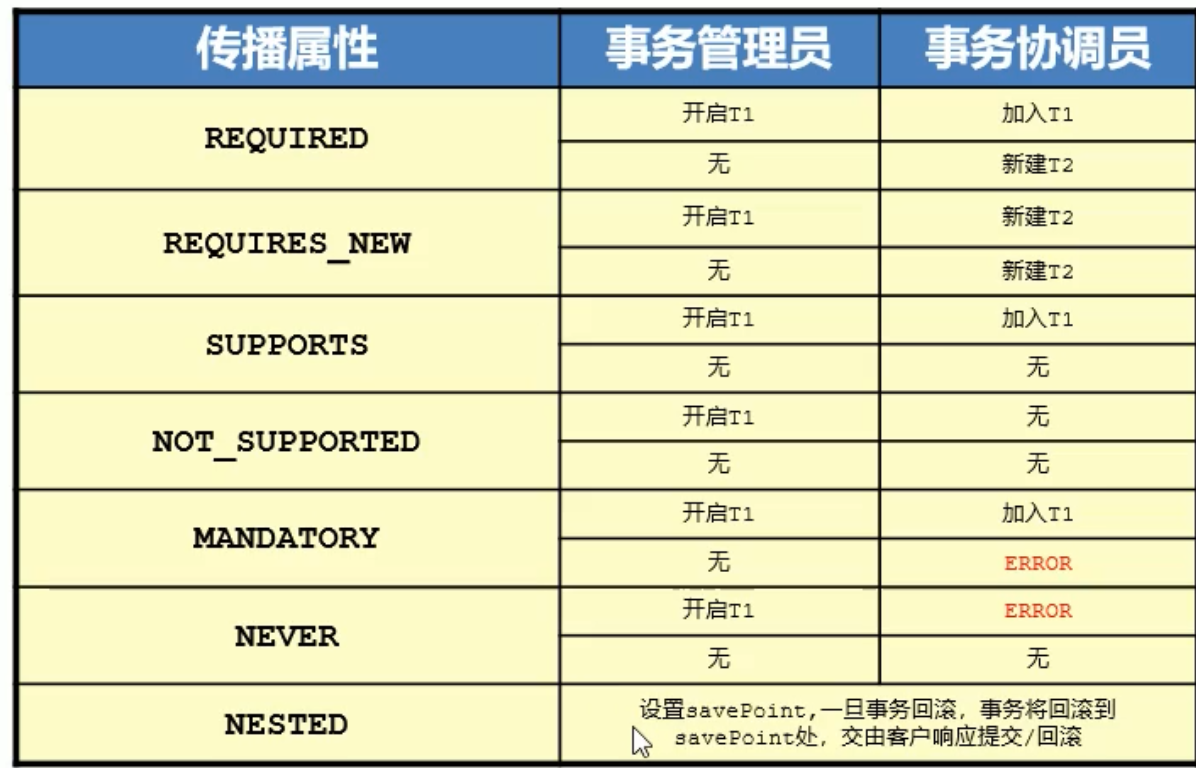
需要指定传播属性则在 tx:method 的 propagation 属性配置
 <tx:method name="a父" read-only="false" propagation="REQUIRED"/>
<tx:method name="b子" read-only="false" propagation="REQUIRED"/>
2
# 注解事务
在业务层 sql 操作接口 (全部抽象方法 推荐这个 或接口中的抽象方法)/ 类 (全部方法)/ 方法上都可以 上面加 @Transactional
    @Transactional(readOnly = false, timeout = -1, isolation = Isolation.DEFAULT, rollbackFor = {IOException.class},propagation = Propagation.REQUIRED)
    public void transfer(String outName, String inName, Double money);
2
- 开启 tx 注解驱动 xml 版
    <!--事务管理为事务注解绑定的方法-->
    <tx:annotation-driven transaction-manager="txManager"/>
2
- 注解版 注解驱动 在 springconfig 类上标记
@EnableTransactionManagement
并且配置事务核心对象
    @Bean
    public PlatformTransactionManager getTransactionManager(DataSource dataSource){
        return new DataSourceTransactionManager(dataSource);
    }
2
3
4