核心注解和整体架构
# 核心注解和整体架构
# 核心注解
| 注解 | 功能 |
|---|---|
| @Bean | 容器中注册组件 |
| @Primary | 同类组件如果有多个,标注主组件 |
| @DependsOn | 组件之间声明依赖关系 |
| @Lazy | 组件懒加载(最后使用的时候才创建) |
| @Scope | 声明组件的作用范围 (SCOPE_PROTOTYPE,SCOPE_SINGLETON) |
| @Configuration | 声明这是一个配置类,替换以前配置文件 |
| @Component | @Controller、@Service、@Repository |
| @Indexed | 加速注解,所有标注了 @Indexed 的组件,直接会启动快速加载 |
| @Order | 数字越小优先级越高,越先工作 |
| @ComponentScan | 包扫描 |
| @Conditional | 条件注入 |
| @Import | 导入第三方 jar 包中的组件,或定制批量导入组件逻辑 |
| @ImportResource | 导入以前的 xml 配置文件,让其生效 |
| @Profile | 基于多环境激活 |
| @PropertySource | 外部 properties 配置文件和 JavaBean 进行绑定。结合 ConfigurationProperties |
| @PropertySources | @PropertySource 组合注解 |
| @Autowired | 自动装配 |
| @Qualifier | 精确指定 |
| @Value | 取值、计算机环境变量、JVM 系统。xxxx。@Value (“${xx}”) |
| @Lookup | 单例组件依赖非单例组件,非单例组件获取需要使用方法 |
注:@Indexed 需要引入依赖
<dependency>
	<groupId>org.springframework</groupId>
	<artifactId>spring-context-indexer</artifactId>
	<optional>true</optional>
</dependency>
2
3
4
5
# @Import
# xml 版本
在 Spring 以前版本中我们通过书写 xml 来创建 bean
beans.xml
<?xml version="1.0" encoding="UTF-8"?>
<beans xmlns="http://www.springframework.org/schema/beans"
	   xmlns:xsi="http://www.w3.org/2001/XMLSchema-instance"
	   xsi:schemaLocation="http://www.springframework.org/schema/beans http://www.springframework.org/schema/beans/spring-beans.xsd http://www.springframework.org/schema/context https://www.springframework.org/schema/context/spring-context.xsd">

	<bean class="com.atguigu.spring.bean.Person" id="person" autowire="byType" >
		<property name="name" value="张三"/>
 	</bean>

</beans>
2
3
4
5
6
7
8
9
10
Person
public class Person {
	private String name;

	public void setName(String name) {
		this.name = name;
	}

	public String getName() {
		return name;
	}


}
2
3
4
5
6
7
8
9
10
11
12
13
然后通过启动类加载 beans.xml 文件进行创建
public class MainTest {

	public static void main(String[] args) {
		ClassPathXmlApplicationContext context = new ClassPathXmlApplicationContext("beans.xml");
		Person bean = context.getBean(Person.class);
		System.out.println(bean);
	}

}
2
3
4
5
6
7
8
9
# 注解版本
而注解版只是启动类加载的实现类不同而已
/**
 * 注解版Spring的用法
 */
public class AnnotationMainTest {

	public static void main(String[] args)
		ApplicationContext applicationContext =
				new AnnotationConfigApplicationContext(MainConfig.class);
    	Person bean = applicationContext.getBean(Person.class);
    	System.out.println(bean);
	}
}
2
3
4
5
6
7
8
9
10
11
12
并需要一个配置类 MainConfig 通过 @Bean 或者 @Import 的方式创建 bean
package com.atguigu.spring.config;

import com.atguigu.spring.bean.Person;
import org.springframework.context.annotation.*;

/**
 * 这是一个配置类
 */

@Import(Person.class)
@Configuration
public class MainConfig {


//  @Bean()
//  public Person person(){
//      Person person = new Person();
//      person.setName("李四");
//      return person;
//  }


}
2
3
4
5
6
7
8
9
10
11
12
13
14
15
16
17
18
19
20
21
22
23
bean
public class Person {
	private String name;

	public void setName(String name) {
		this.name = name;
	}

	public String getName() {
		return name;
	}


}
2
3
4
5
6
7
8
9
10
11
12
13
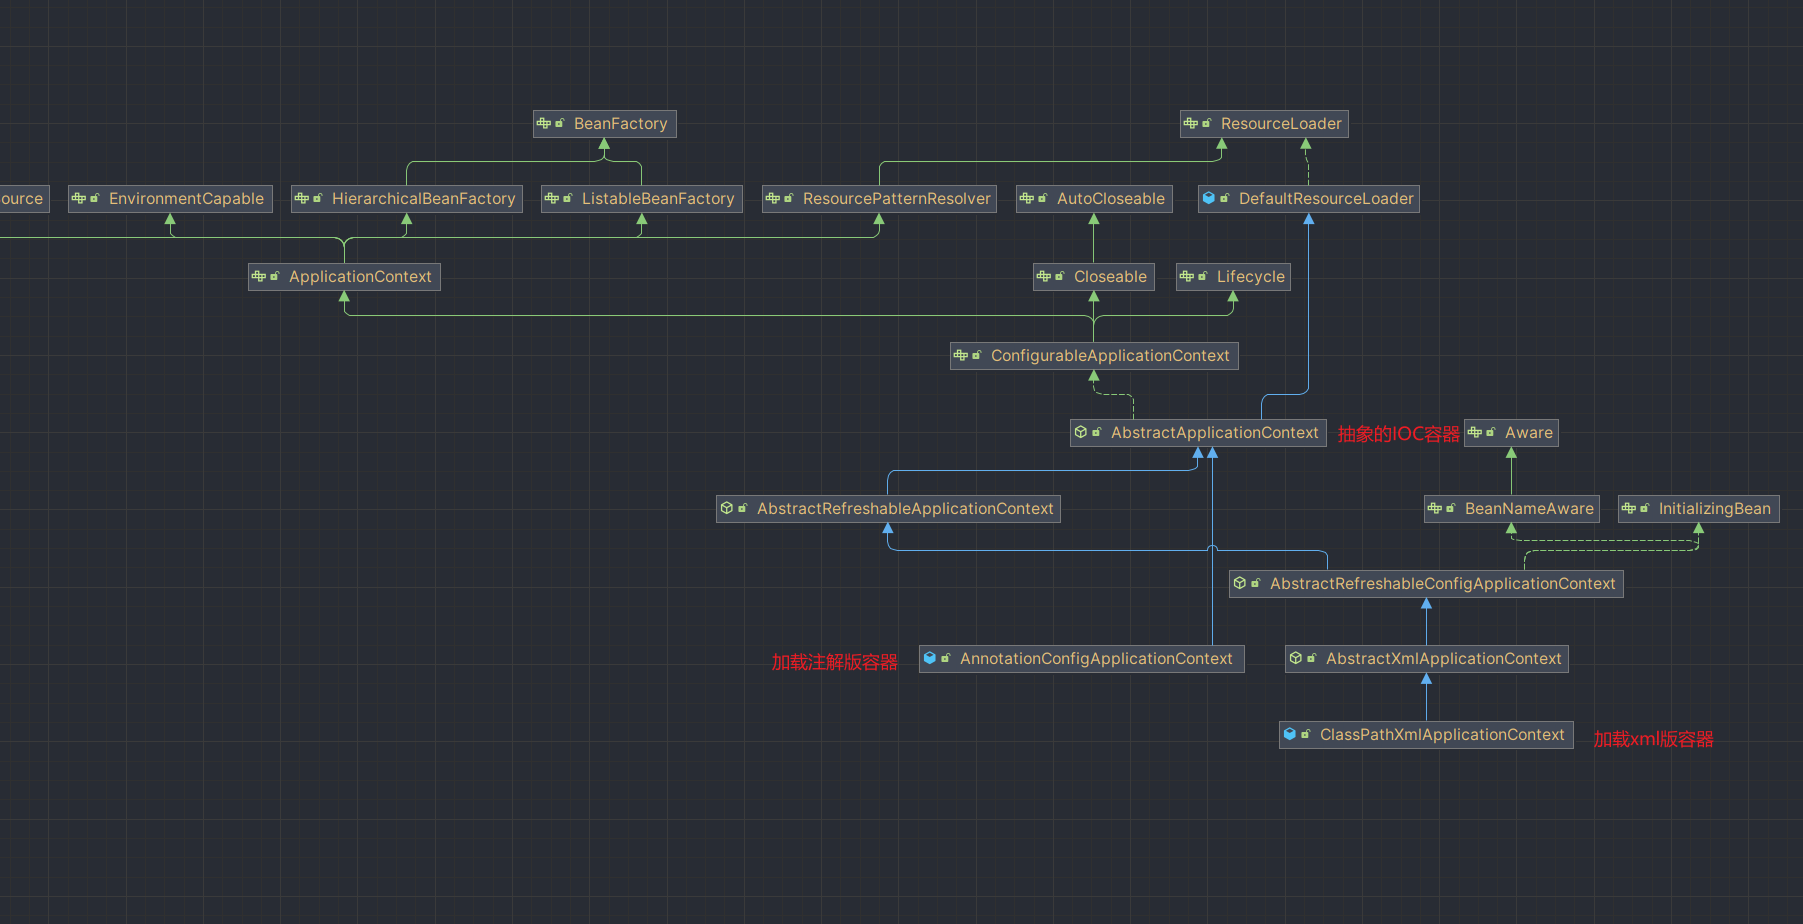
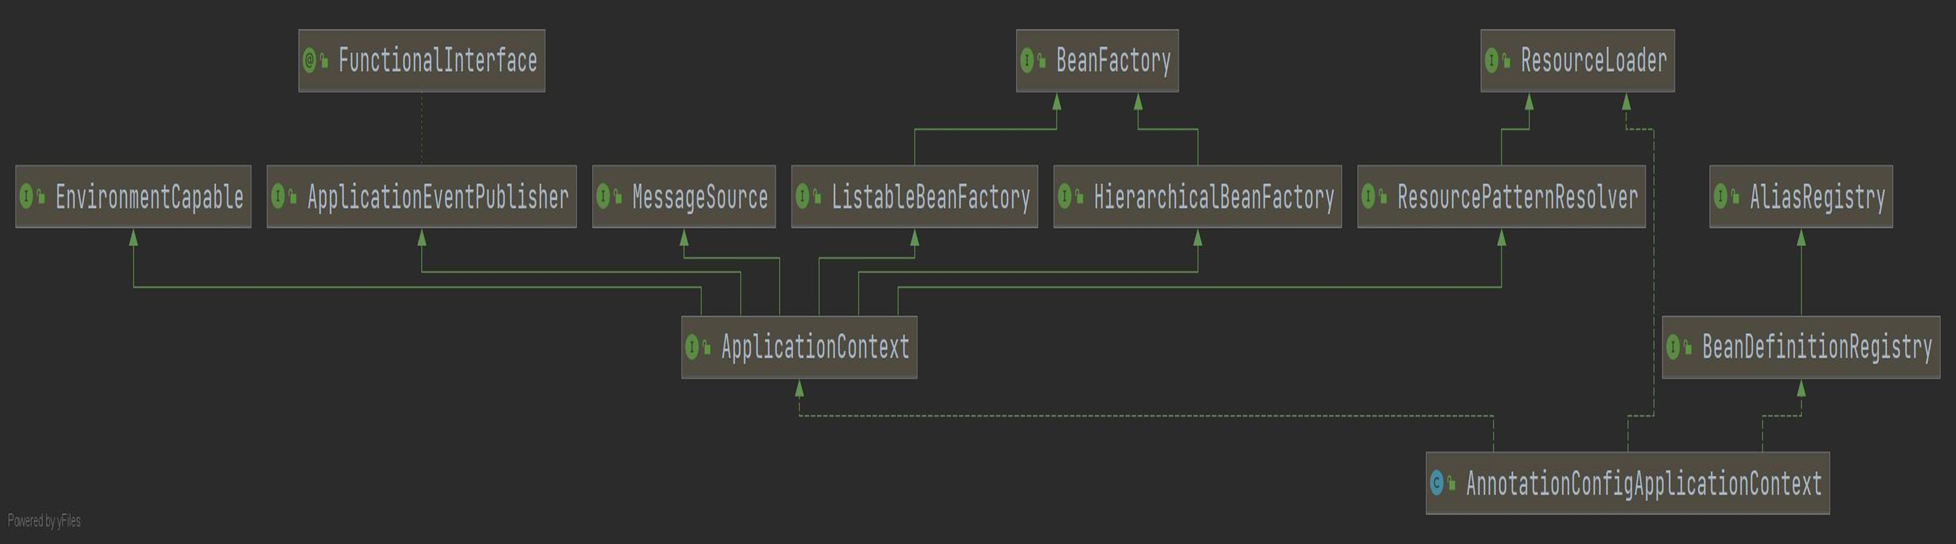
# 注解和 xml 有什么区别
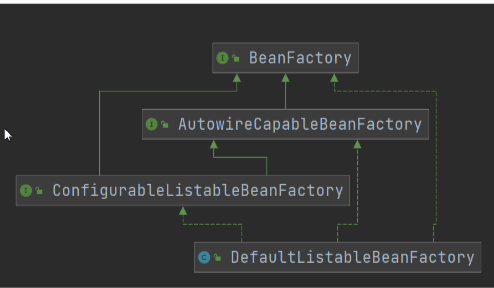
我们来看看注解版的容器和 xml 版容器有什么区别,从下图不难看出我们两个容器都是抽象 IOC 容器的实现类。
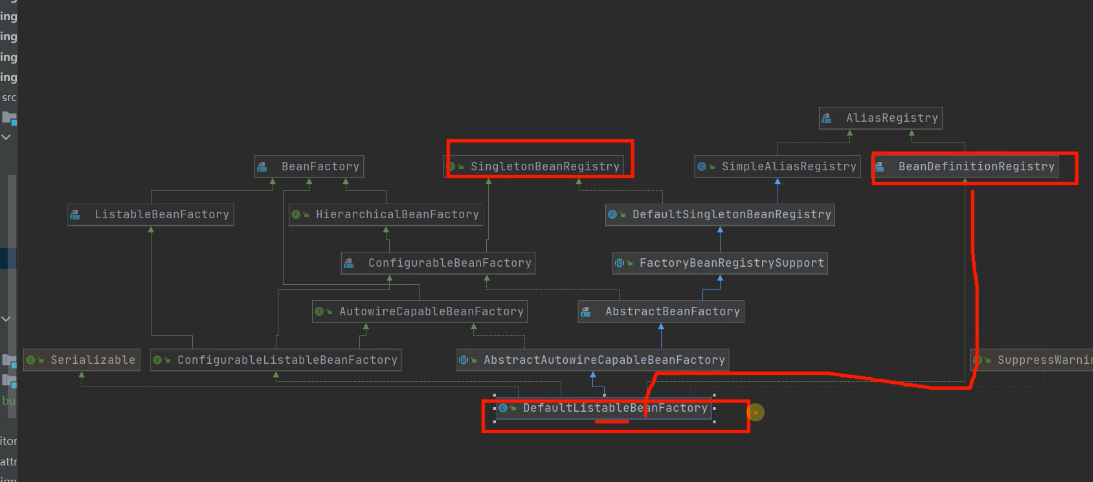
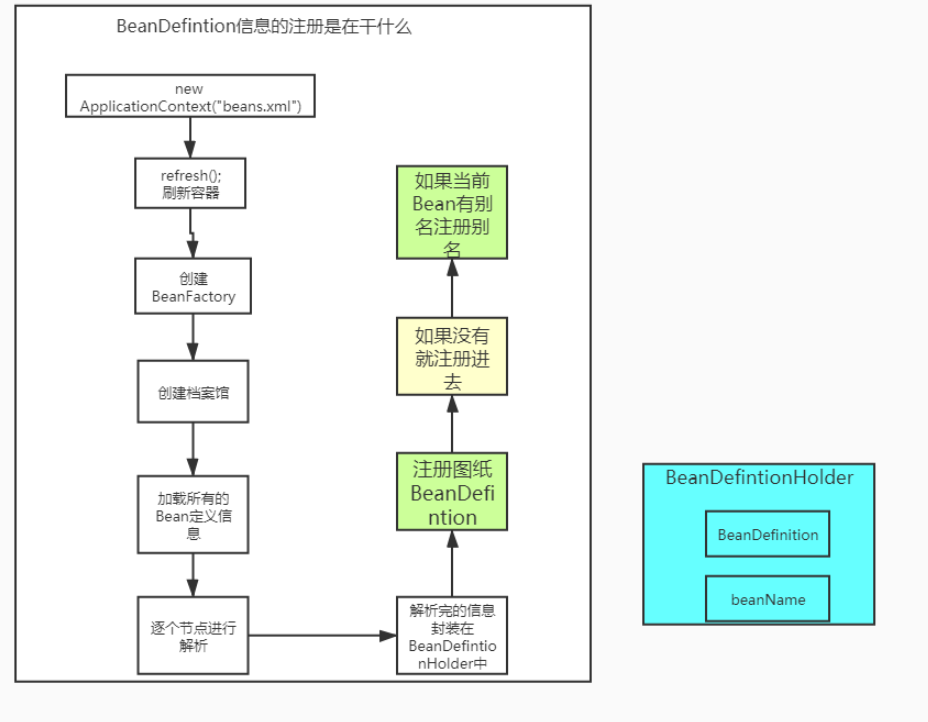
# BeanDefinitionRegistry
当然通过上述 @Import 直接引入 bean 是利用无参构造器创建出对象放在容器中,这个类里面的成员属性都为 null, @Import 原生为我们提供了三种方式导入,我们看看 @Import 注解类的内部编码
@Target(ElementType.TYPE)
@Retention(RetentionPolicy.RUNTIME)
@Documented
public @interface Import {

	/**
	 * 1、直接写Class:Person{name='null'};利用无参构造器创建出对象放在容器中
	 * 2、ImportSelector:
	 * 3、ImportBeanDefinitionRegistrar:
	 * {@link Configuration @Configuration}, {@link ImportSelector},
	 * {@link ImportBeanDefinitionRegistrar}, or regular component classes to import.
	 */
	Class<?>[] value();
}
2
3
4
5
6
7
8
9
10
11
12
13
14
我们尝试使用 ImportBeanDefinitionRegistrar 进行 bean 定义信息,我们创建多一个 cat 类
public class Cat {

	private String name;

	public String getName() {
		return name;
	}

	public void setName(String name) {
		this.name = name;
	}
}
2
3
4
5
6
7
8
9
10
11
12
回到我们配置类中实现 ImportBeanDefinitionRegistrar 中的 registerBeanDefinitions()
package com.atguigu.spring.config;


import com.atguigu.spring.aop.HelloService;
import com.atguigu.spring.bean.Cat;
import org.springframework.beans.factory.annotation.Autowired;
import org.springframework.beans.factory.support.BeanDefinitionRegistry;
import org.springframework.beans.factory.support.RootBeanDefinition;
import org.springframework.cglib.proxy.Enhancer;
import org.springframework.cglib.proxy.MethodInterceptor;
import org.springframework.cglib.proxy.MethodProxy;
import org.springframework.context.ApplicationEventPublisher;
import org.springframework.context.annotation.*;
import org.springframework.core.type.AnnotationMetadata;

import java.lang.reflect.Method;


/**
 * 这是一个配置类
 */
@Import({Person.class, MainConfig.MyImportRegistrar.class})
@Configuration
public class MainConfig {


//  @Bean(initMethod = "")
//  public Person person(){
//      Person person = new Person();
//      person.setName("李四");
//      return person;
//  }


    /**
     *      BeanDefinitionRegistry:Bean定义信息注册中心:图纸中心;
     *              它里面都是BeanDefinition
     *
     *
     */
    static class MyImportRegistrar implements ImportBeanDefinitionRegistrar {
        @Override
        public void registerBeanDefinitions(AnnotationMetadata importingClassMetadata,
                                            BeanDefinitionRegistry registry) {

            // BeanDefinition
            RootBeanDefinition catDefinition = new RootBeanDefinition();
            catDefinition.setBeanClass(Cat.class);
            //Spring 这个实例的类型,名字
            registry.registerBeanDefinition("tomCat", catDefinition);
        }
    }
}
2
3
4
5
6
7
8
9
10
11
12
13
14
15
16
17
18
19
20
21
22
23
24
25
26
27
28
29
30
31
32
33
34
35
36
37
38
39
40
41
42
43
44
45
46
47
48
49
50
51
52
53
54
55
启动类获取 IOC 容器中所有 bean 的名字
/**
 * 注解版Spring的用法
 */
public class AnnotationMainTest {

    public static void main(String[] args) {
//      new ClassPathXmlApplicationContext()

        ApplicationContext applicationContext =
                new AnnotationConfigApplicationContext(MainConfig.class);


//      Person bean = applicationContext.getBean(Person.class);

//      System.out.println(bean);


     String[] names = applicationContext.getBeanDefinitionNames();
     for (String name : names) {
         System.out.println(name);
     }

    }
}
2
3
4
5
6
7
8
9
10
11
12
13
14
15
16
17
18
19
20
21
22
23
24
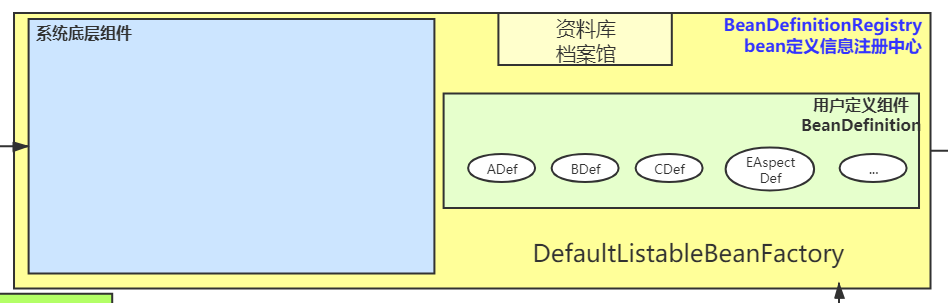
通过上述案例不难看出 BeanDefinitionRegistry 里面存放着我们所有 bean 的定义信息
org.springframework.context.annotation.internalConfigurationAnnotationProcessor
org.springframework.context.annotation.internalAutowiredAnnotationProcessor
org.springframework.context.event.internalEventListenerProcessor
org.springframework.context.event.internalEventListenerFactory
mainConfig
com.atguigu.spring.bean.Person
tomCat
2
3
4
5
6
7
# @Scope
# 原型
声明组件的作用范围原型还是单例
在 Cat 类添加 @Scope 以及 @Component 注解
@Scope(value = ConfigurableBeanFactory.SCOPE_PROTOTYPE)
@Component
public class Cat  {


    private String name;


    public void setName(String name) {
        this.name = name;
    }
    public String getName() {
        return name;
    }

}
2
3
4
5
6
7
8
9
10
11
12
13
14
15
16
配置添加扫描组件包下的类,并将 @import 中的 Cat 引用去掉
/**
 * 这是一个配置类
 */

// @Import({Person.class, MainConfig.MyImportRegistrar.class})
@ComponentScan("com.atguigu.spring")
@Configuration
public class MainConfig {


//  @Bean(initMethod = "")
//  public Person person(){
//      Person person = new Person();
//      person.setName("李四");
//      return person;
//  }


    /**
     *      BeanDefinitionRegistry:Bean定义信息注册中心:图纸中心;
     *              它里面都是BeanDefinition
     *
     *
     */
    static class MyImportRegistrar implements ImportBeanDefinitionRegistrar {
        @Override
        public void registerBeanDefinitions(AnnotationMetadata importingClassMetadata,
                                            BeanDefinitionRegistry registry) {

            // BeanDefinition
            RootBeanDefinition catDefinition = new RootBeanDefinition();
            catDefinition.setBeanClass(Cat.class);
            //Spring 这个实例的类型,名字
            registry.registerBeanDefinition("tomCat", catDefinition);
        }
    }
}
2
3
4
5
6
7
8
9
10
11
12
13
14
15
16
17
18
19
20
21
22
23
24
25
26
27
28
29
30
31
32
33
34
35
36
37
38
39
40
启动类测试判断 Cat 类作用范围是否为原型
/**
 * 注解版Spring的用法
 */
public class AnnotationMainTest {

    public static void main(String[] args) {
//      new ClassPathXmlApplicationContext()

        ApplicationContext applicationContext =
            new AnnotationConfigApplicationContext(MainConfig.class);


//      Person bean = applicationContext.getBean(Person.class);

//      System.out.println(bean);


        // String[] names = applicationContext.getBeanDefinitionNames();
        // for (String name : names) {
        //     System.out.println(name);
        // }

        Cat bean1 = applicationContext.getBean(Cat.class);

        Cat bean2 = applicationContext.getBean(Cat.class);

        System.out.println(bean1 == bean2);  //false

    }
}
2
3
4
5
6
7
8
9
10
11
12
13
14
15
16
17
18
19
20
21
22
23
24
25
26
27
28
29
30
# 另外一个 bean 引用的原型类还是原型吗
上述案例可以看见 IOC 为我们创建的 bean 确实为原型,如果我们在另外一个 bean 中自动装配 Cat 类,那么我们的 Cat 类还是原型吗?
在 Person 类中引入 Cat 类
public class Person  {

    @Autowired  // 依赖的组件是多实例就不能Autowired
    private Cat cat;

    private String name;
    public void setName(String name) {
        this.name = name;
    }

    public String getName() {
        return name;
    }

    public void setCat(Cat cat) {
        this.cat = cat;
    }

    public Cat getCat() {
        return cat;
    }


}
2
3
4
5
6
7
8
9
10
11
12
13
14
15
16
17
18
19
20
21
22
23
24
配置类通过 @Bean 加载 Person 类
/**
 * 这是一个配置类
 */

// @Import({Person.class, MainConfig.MyImportRegistrar.class})
@ComponentScan("com.atguigu.spring")
@Configuration
public class MainConfig {


    @Bean(initMethod = "")
    public Person person() {
        Person person = new Person();
        person.setName("李四");
        return person;
    }


    /**
     *      BeanDefinitionRegistry:Bean定义信息注册中心:图纸中心;
     *              它里面都是BeanDefinition
     *
     *
     */
    static class MyImportRegistrar implements ImportBeanDefinitionRegistrar {
        @Override
        public void registerBeanDefinitions(AnnotationMetadata importingClassMetadata,
                                            BeanDefinitionRegistry registry) {

            // BeanDefinition
            RootBeanDefinition catDefinition = new RootBeanDefinition();
            catDefinition.setBeanClass(Cat.class);
            //Spring 这个实例的类型,名字
            registry.registerBeanDefinition("tomCat", catDefinition);
        }
    }
}
2
3
4
5
6
7
8
9
10
11
12
13
14
15
16
17
18
19
20
21
22
23
24
25
26
27
28
29
30
31
32
33
34
35
36
37
38
39
40
启动类中进行测试判断
/**
 * 注解版Spring的用法
 */
public class AnnotationMainTest {

    public static void main(String[] args) {
//      new ClassPathXmlApplicationContext()

        ApplicationContext applicationContext =
            new AnnotationConfigApplicationContext(MainConfig.class);


//      Person bean = applicationContext.getBean(Person.class);

//      System.out.println(bean);


        // String[] names = applicationContext.getBeanDefinitionNames();
        // for (String name : names) {
        //     System.out.println(name);
        // }

        // Cat bean1 = applicationContext.getBean(Cat.class);

        // Cat bean2 = applicationContext.getBean(Cat.class);

        // System.out.println(bean1 == bean2);  //false

        Person bean1 = applicationContext.getBean(Person.class);

        Cat cat = bean1.getCat();

        Person bean2 = applicationContext.getBean(Person.class);

        Cat cat1 = bean2.getCat();
        System.out.println(cat1 == cat);  //true

    }
}
2
3
4
5
6
7
8
9
10
11
12
13
14
15
16
17
18
19
20
21
22
23
24
25
26
27
28
29
30
31
32
33
34
35
36
37
38
39
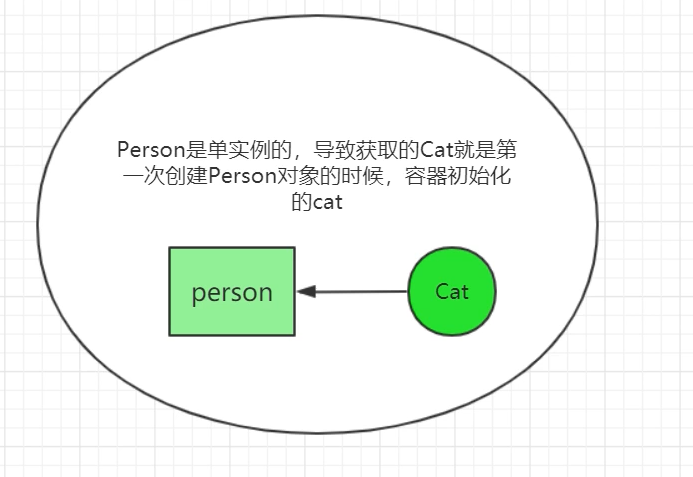
明明我们 Cat 类是原型的,为什么会创建出两个一样的 Cat 呢?
因为我们的 Person 是单例,导致获取的 Cat 都是 Person 第一次创建的时候,容器初始化创建的那个 Cat
# @Lookup
我们来看看 Lookup 注解内部
@Target(ElementType.METHOD)
@Retention(RetentionPolicy.RUNTIME)
@Documented
public @interface Lookup {

	/**
	 * This annotation attribute may suggest a target bean name to look up.
	 * If not specified, the target bean will be resolved based on the
	 * annotated method's return type declaration.
	 */
	String value() default "";

}
2
3
4
5
6
7
8
9
10
11
12
13
该注解只能标注在方法中,我们可以加到 get 方法中,当我们使用 get 方法时,它会先去容器找,如果有则返回该对象,但是我们如果该对象被标记为原型,则会 get 时再新建一个。
won't work on beans returned from {@code @Bean} methods in configuration classes;
并且 Lookup 注解不支持 @Bean 注解创建的类,无法处理从配置类中的 {@code@Bean} 方法返回的 Bean
@ComponentScan("com.atguigu.spring")
@Configuration
public class MainConfig {

//  @Bean(initMethod = "")
//  public Person person(){
//      Person person = new Person();
//      person.setName("李四");
//      return person;
//  }

}
2
3
4
5
6
7
8
9
10
11
12
Cat
@Scope(value = ConfigurableBeanFactory.SCOPE_PROTOTYPE)
@Component
public class Cat {

	private String name;

	public String getName() {
		return name;
	}

	public void setName(String name) {
		this.name = name;
	}
}
2
3
4
5
6
7
8
9
10
11
12
13
14
使用 @Component 注解放入容器,并在 get 方法中使用 Lookup 注解
@Component
public class Person {
	@Autowired  // 依赖的组件是多实例就不能Autowired
	private Cat cat;

	private String name;

	@Lookup // 去容器中找,使用@Bean的这种方式注册的Person @Lookup不生效
	public Cat getCat() {
		return cat;
	}


	public void setCat(Cat cat) {
		this.cat = cat;
	}

	public void setName(String name) {
		this.name = name;
	}

	public String getName() {
		return name;
	}

	@Override
	public String toString() {
		return "Person{" +
				"name='" + name + '\'' +
				'}';
	}
}
2
3
4
5
6
7
8
9
10
11
12
13
14
15
16
17
18
19
20
21
22
23
24
25
26
27
28
29
30
31
32
再运行测试
public class AnnotationMainTest {
	public static void main(String[] args) {
		ApplicationContext applicationContext =
				new AnnotationConfigApplicationContext(MainConfig.class);

		Person bean1 = applicationContext.getBean(Person.class);

		Cat cat = bean1.getCat();

		Person bean2 = applicationContext.getBean(Person.class);

		Cat cat1 = bean2.getCat();
		System.out.println(cat1 == cat);  //flase
	}
}
2
3
4
5
6
7
8
9
10
11
12
13
14
15
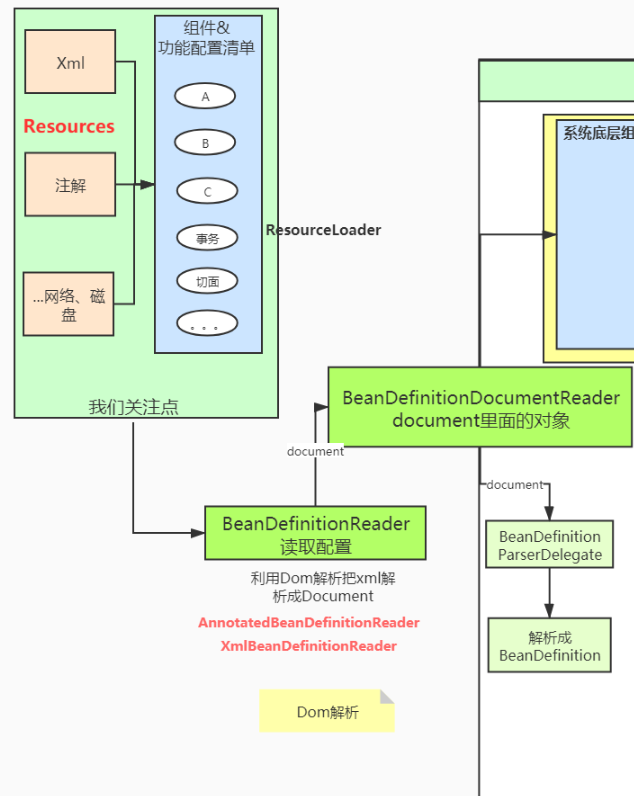
# 整体流程
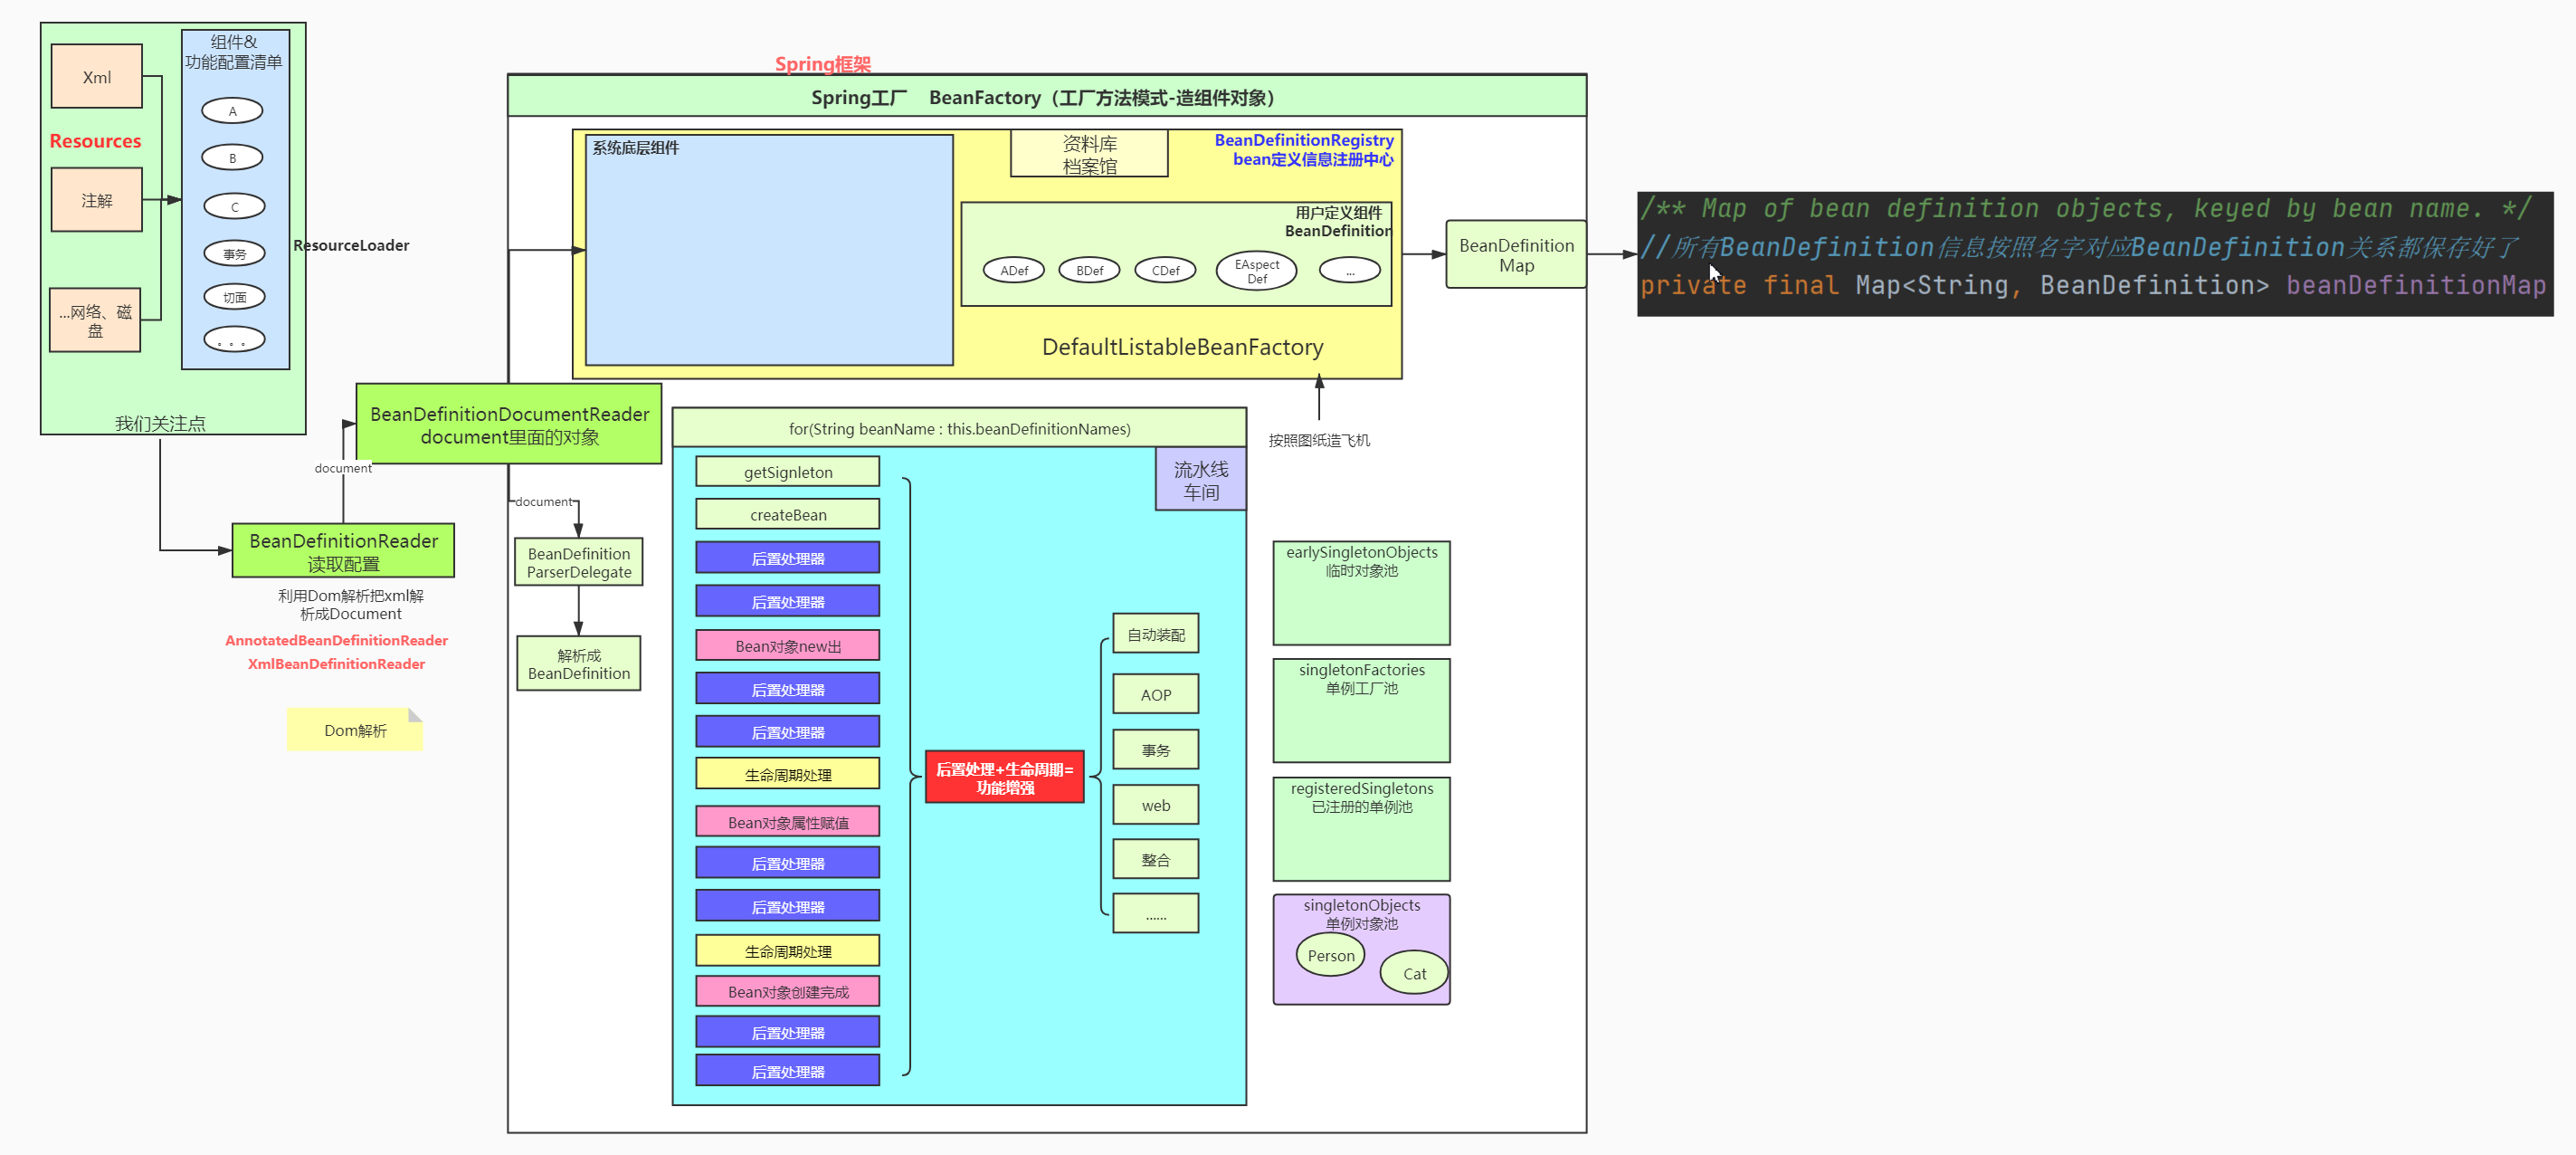
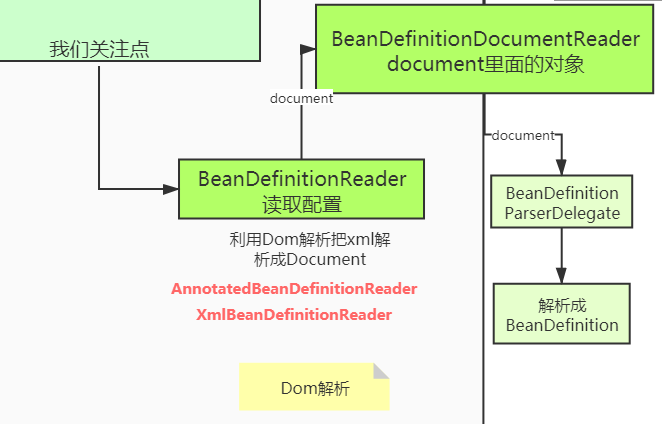
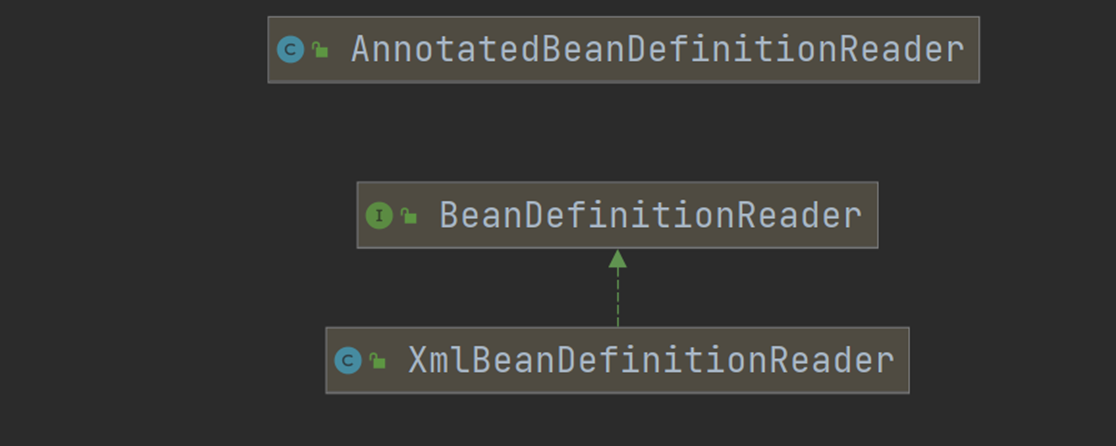
在 Spring 底层所有资源被叫为 Resources,通过 ResourceLoader 加载,比如 xml 配置文件,通过 BeanDefintionReader 读取我们的配置文件,加载到 BeanDefintion 中。
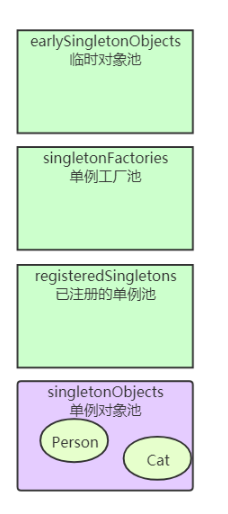
在 Spring 容器中,很多实例都单例,那么这些实例存储在哪?
Spring 中有不同的对象池来存放这些对象,这样我们获取单例对象就很方便
# 核心组件接口分析
- 基础接口
- Resource+ResourceLoader
- BeanFactory
- BeanDefinition
- BeanDefinitionReader
- BeanDefinitionRegistry
- SingletonBeanRegistry
- ApplicationContext
- Aware
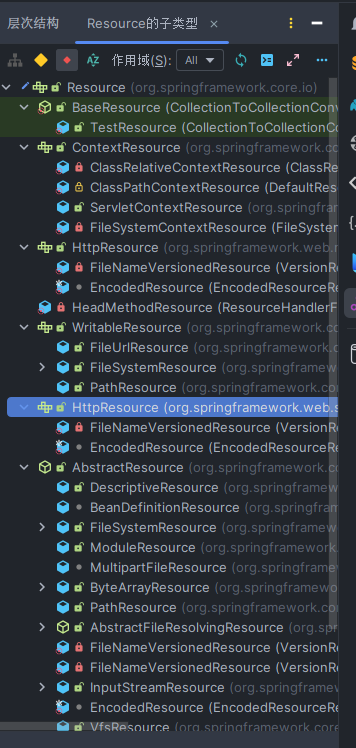
# Resource
Resource 接口有下列各种的实现类,比如从网络获取资源、从文件获取资源等等,实现类实现了各种方式的加载资源。
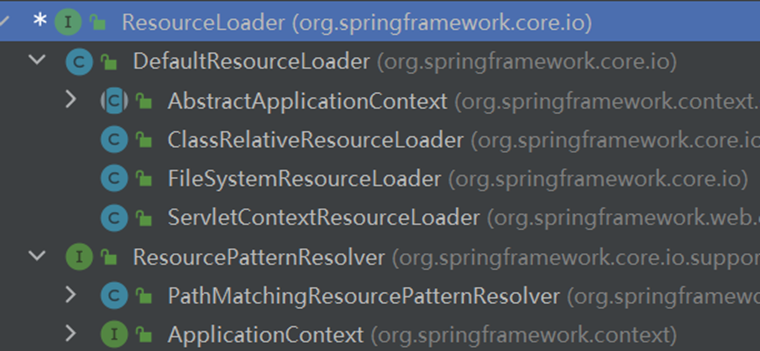
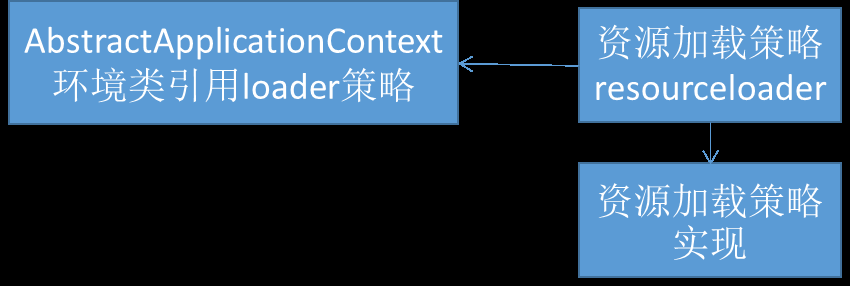
接下来我们看 ResourceLoader 这个接口,该接口的描述
Strategy interface for loading resources (e.g., class path or file system
resources). An {@link org.springframework.context.ApplicationContext}
is required to provide this functionality plus extended
{@link org.springframework.core.io.support.ResourcePatternResolver} support.
该接口是个一个策略接口,实现了不同方式的加载资源,我们只需要关心参数的传递即可
Must support fully qualified URLs, e.g. "file:C:/test.dat".
Must support classpath pseudo-URLs, e.g. "classpath:test.dat".
Should support relative file paths, e.g. "WEB-INF/test.dat".

# BeanFactory
首先我们分析 BeanFactory 这个接口,查看类图,首先我们只看它下面的所有接口,再看我们要用某个具体的实现。
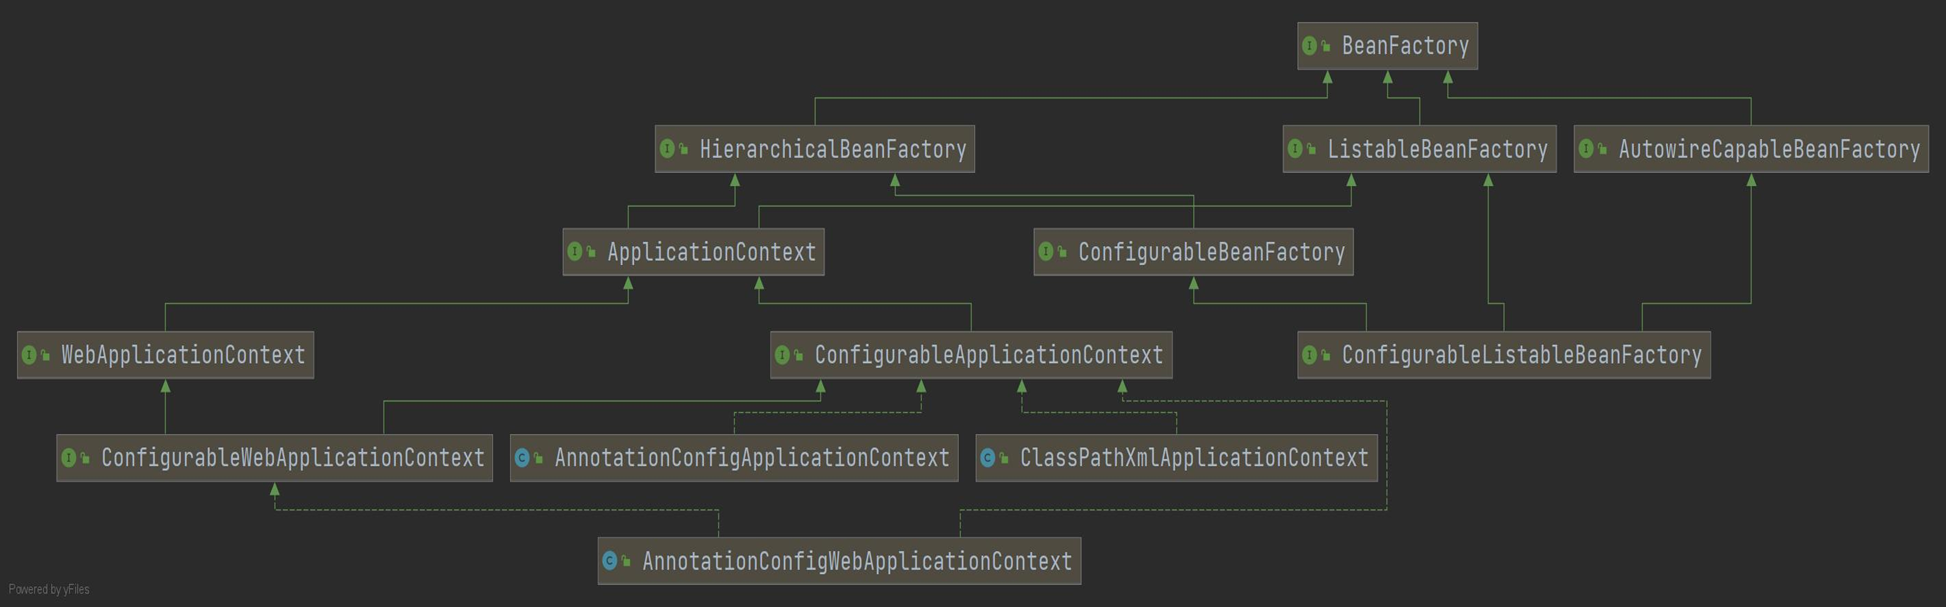
我们先看看 HierarchicalBeanFactory 这个子接口,新增了两个方法
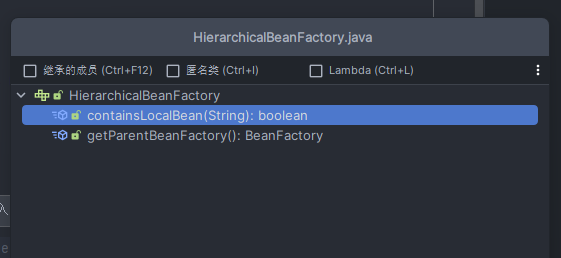
获取父子关系,该接口是定义工厂父子关系的一个抽象
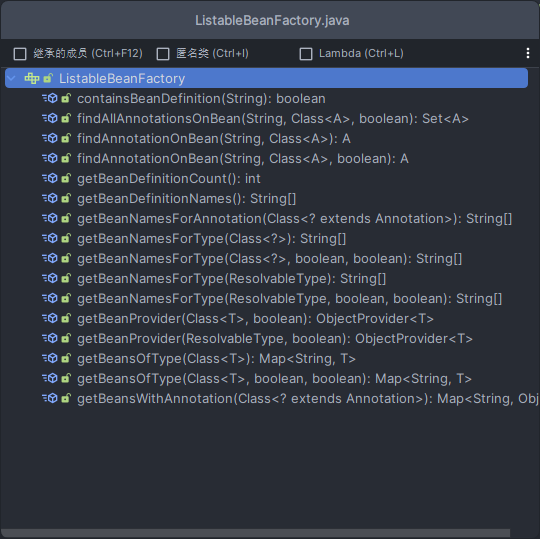
我们再看 ListableBeanFactory 这个接口,可以获取 Bean 信息,如获取 Bean 集合,根据类型获取 Bean 名称,获取 Bean 总和
我们看看这个接口它有哪些实现
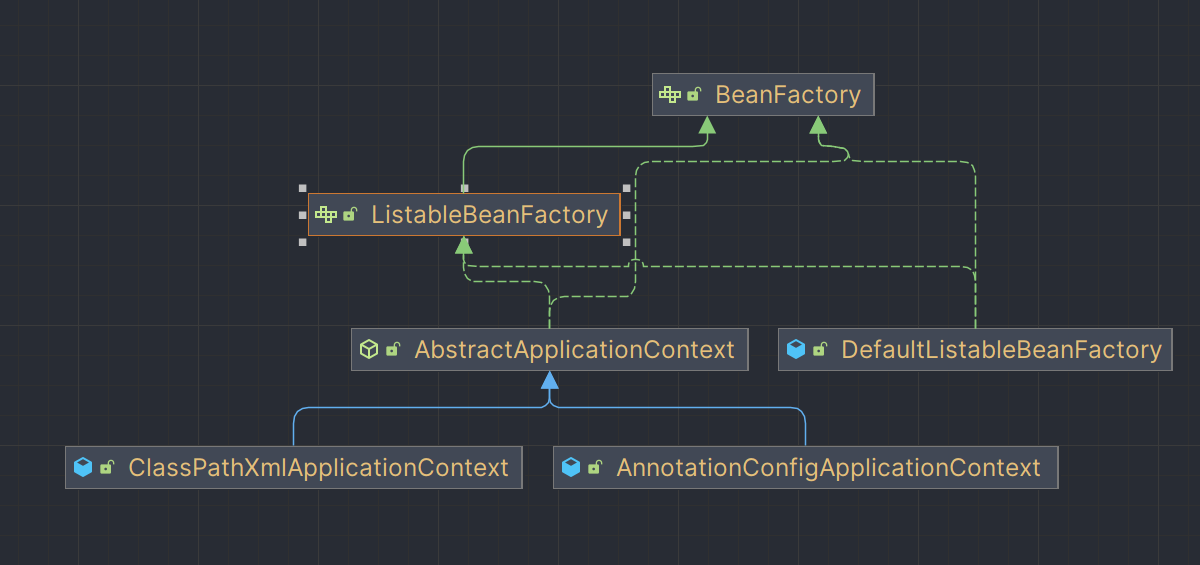
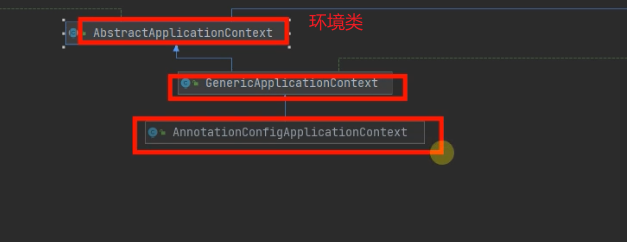
先看看 AbstractApplicationContext 这个抽象类
	/** ResourcePatternResolver used by this context. */
	// 策略模式的环境类,
	private final ResourcePatternResolver resourcePatternResolver;

	public AbstractApplicationContext() {
		this.resourcePatternResolver = getResourcePatternResolver();
	}
2
3
4
5
6
7
再看 DefaultListableBeanFactory 这个接口
/** Map from serialized id to factory instance. */
// 组合模式,Spring里面可以有很多工厂
	private static final Map<String, Reference<DefaultListableBeanFactory>> serializableFactories =
			new ConcurrentHashMap<>(8);

	/** Map of bean definition objects, keyed by bean name. */
	// 所有BeanDefinition信息 按照名字与对应BeanDefinition关系都保存好
	private final Map<String, BeanDefinition> beanDefinitionMap = new ConcurrentHashMap<>(256);

	/** Map of singleton-only bean names, keyed by dependency type. */
	// 按照类型找到Bean的名字的一个底层池
	private final Map<Class<?>, String[]> singletonBeanNamesByType = new ConcurrentHashMap<>(64);


/** List of bean definition names, in registration order. */
// 保存所有BeanDefinition的名字
	private volatile List<String> beanDefinitionNames = new ArrayList<>(256);
2
3
4
5
6
7
8
9
10
11
12
13
14
15
16
17
再看看 AutowireCapableBeanFactory 这个接口
// 创建bean
<T> T createBean(Class<T> beanClass) throws BeansException;

// 自动装配bean
void autowireBean(Object existingBean) throws BeansException;
2
3
4
5
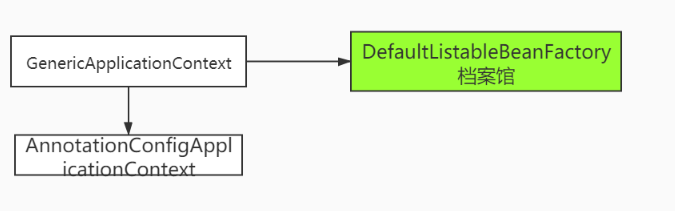
GenericApplicationContext
// 组合了DefaultListableBeanFactory
private final DefaultListableBeanFactory beanFactory;
2
BeanFactory
HierarchicalBeanFactory:定义父子工厂(父子容器)
ListableBeanFacotory:的实现是 DefaultListableBeanFactory,保存了 ioc 容器中的核心信息
AutowireCapableBeanFactory:提供自动装配能力 AnnotationApplicationContext 组合了档案馆,他有自动装配能力。
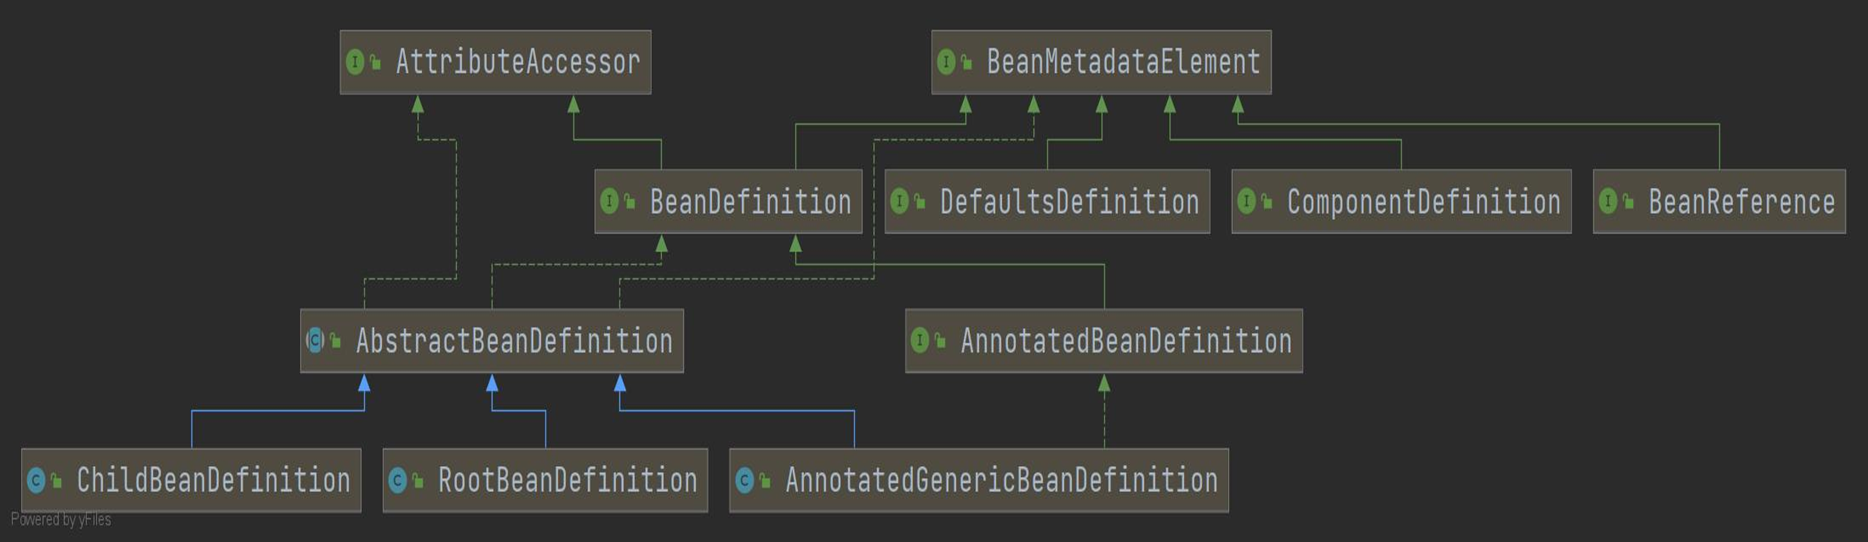
# BeanDefinition
# BeanDefinitionReader
# BeanDefinitionRegistry
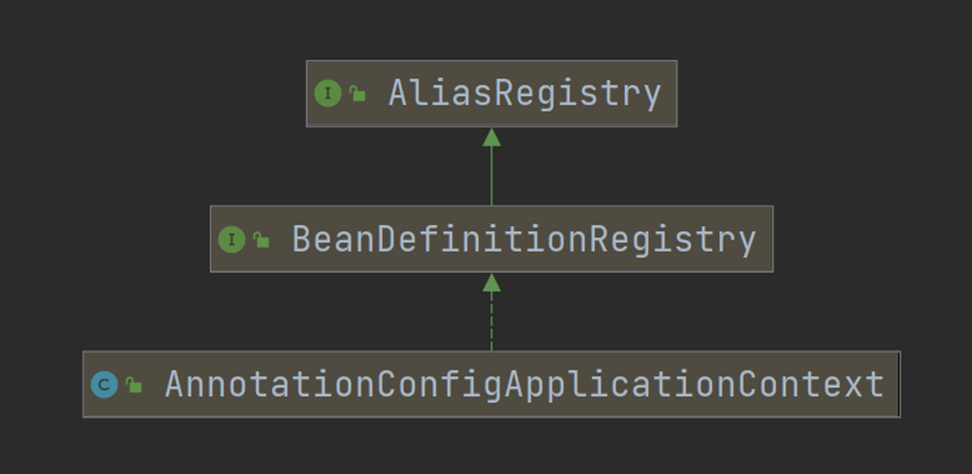
# ApplicationContext
- ApplicationEventPublisher:ioc 事件派发器
- MessageSource:国际化解析
- ListableBeanFactory:bean 工厂功能 --- 自动装配被组合进来的
- ResourcePatternResolver:资源解析功能
# Aware

Aware 接口帮我们装配 Spring 底层的一些组件
比如我们使用自动注入来装配 IOC 容器到 Person 类中
@Component
public class Person {

	@Autowired
	ApplicationContext context; // 可以要到ioc容器

	public ApplicationContext getContext() {
		return context;
	}

}
2
3
4
5
6
7
8
9
10
11
测试
public class AnnotationMainTest {
	public static void main(String[] args) {
		ApplicationContext applicationContext =
				new AnnotationConfigApplicationContext(MainConfig.class);

		Person bean = applicationContext.getBean(Person.class);
		ApplicationContext context = bean.getContext();
		System.out.println(context == applicationContext); // ture
	}
}
2
3
4
5
6
7
8
9
10
而现在我们同样可以实现一些组件的 Aware 接口来装配
@Component
public class Person implements ApplicationContextAware, MessageSourceAware {

	//	@Autowired
	ApplicationContext context; // 可以要到ioc容器
	MessageSource messageSource;

	public ApplicationContext getContext() {
		return context;
	}

    public MessageSource getMessageSource() {
		return messageSource;
	}


	@Override
	public void setApplicationContext(ApplicationContext applicationContext) throws BeansException {
		// 利用回调机制,把ioc容器传入
		this.context = applicationContext;
	}

	@Override
	public void setMessageSource(MessageSource messageSource) {
		this.messageSource = messageSource;
	}
}
2
3
4
5
6
7
8
9
10
11
12
13
14
15
16
17
18
19
20
21
22
23
24
25
26
27
测试
public class AnnotationMainTest {
	public static void main(String[] args) {
		ApplicationContext applicationContext =
				new AnnotationConfigApplicationContext(MainConfig.class);

		Person bean = applicationContext.getBean(Person.class);
		ApplicationContext context = bean.getContext();
		System.out.println(context == applicationContext); // ture
	}
}
2
3
4
5
6
7
8
9
10
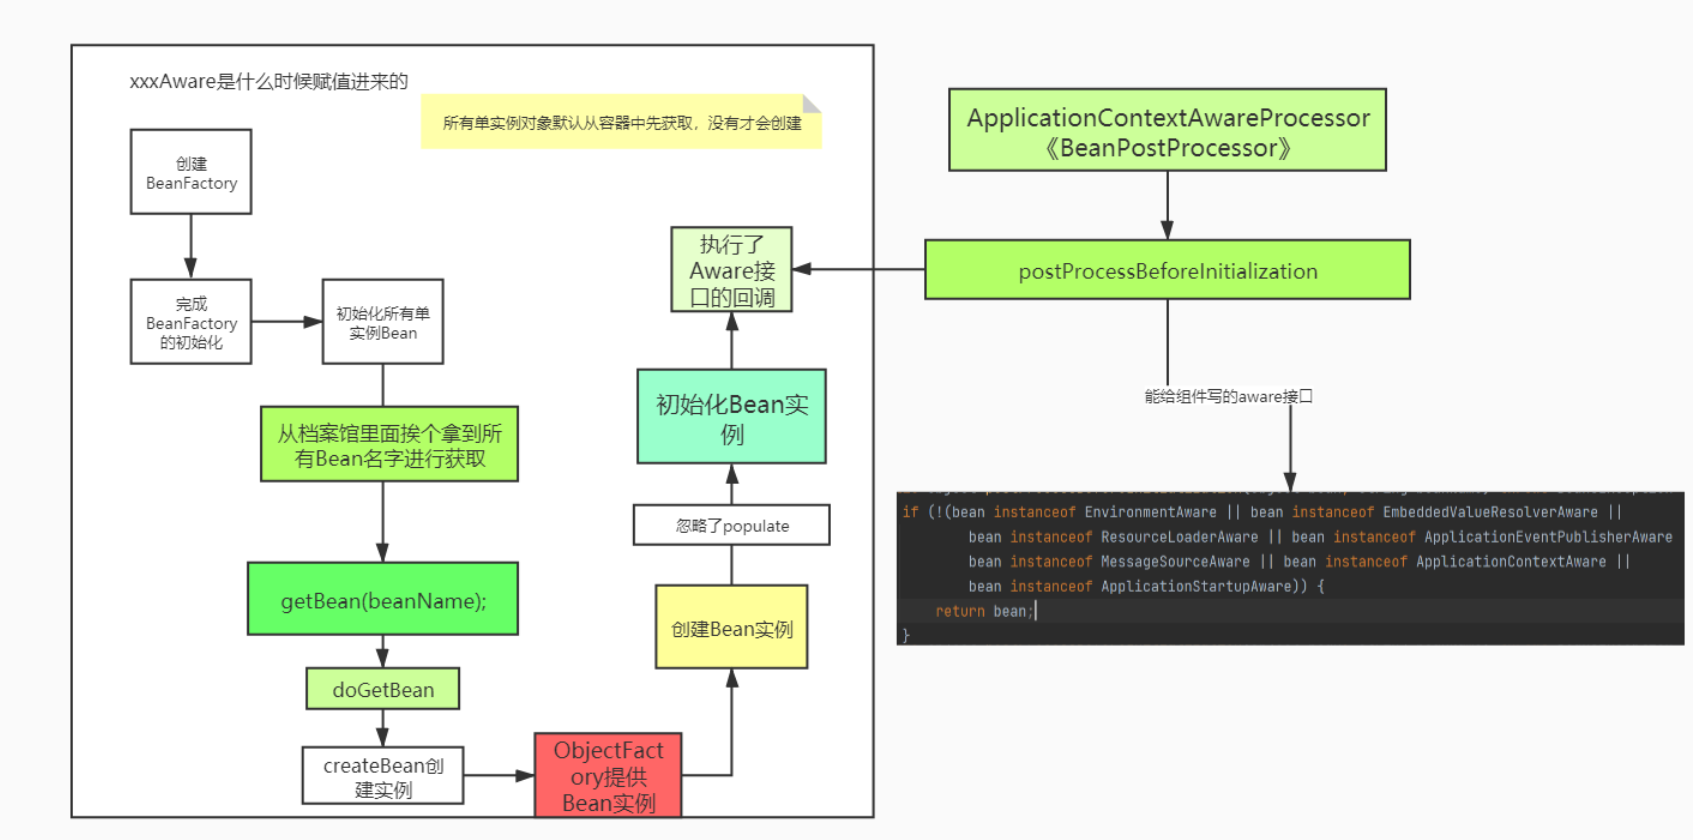
接下来我们看看自动装配是怎么个来法
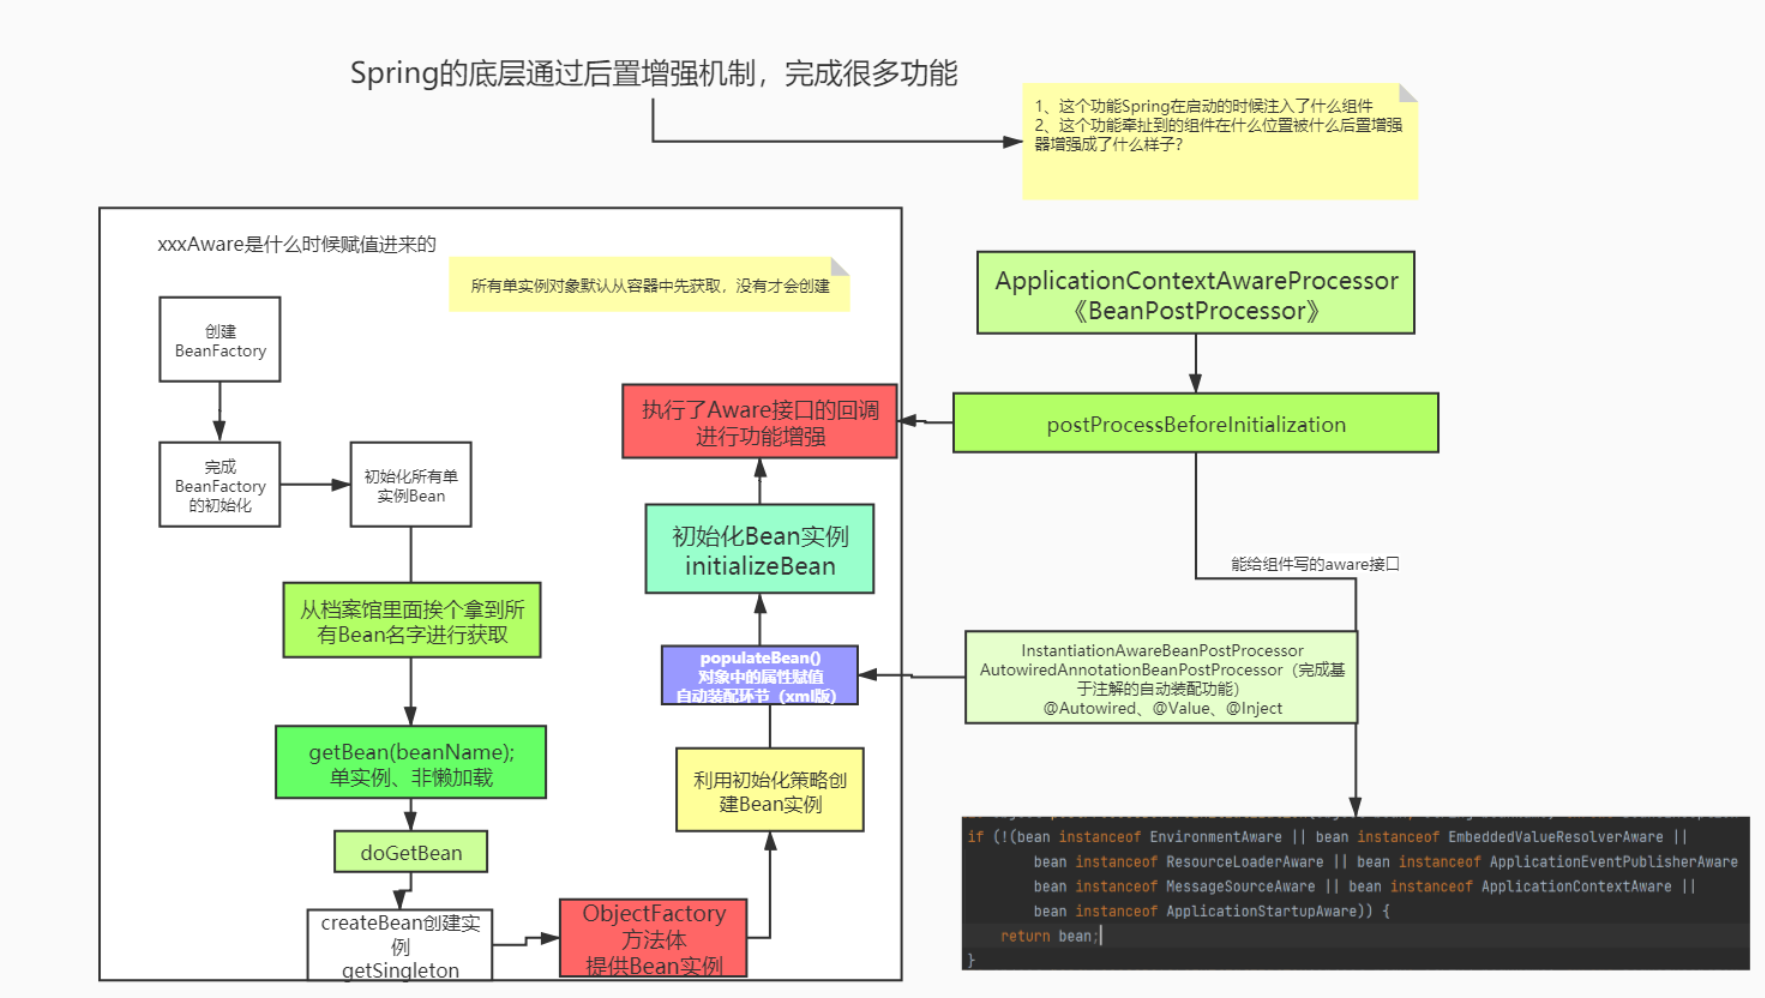
# 生命周期后置处器
生命周期 - 后置处理器
- BeanFactoryPostProcessor
- InitializingBean
- BeanPostProcessor
- SmartInitializingSingleton
# BeanFactoryPostProcessor
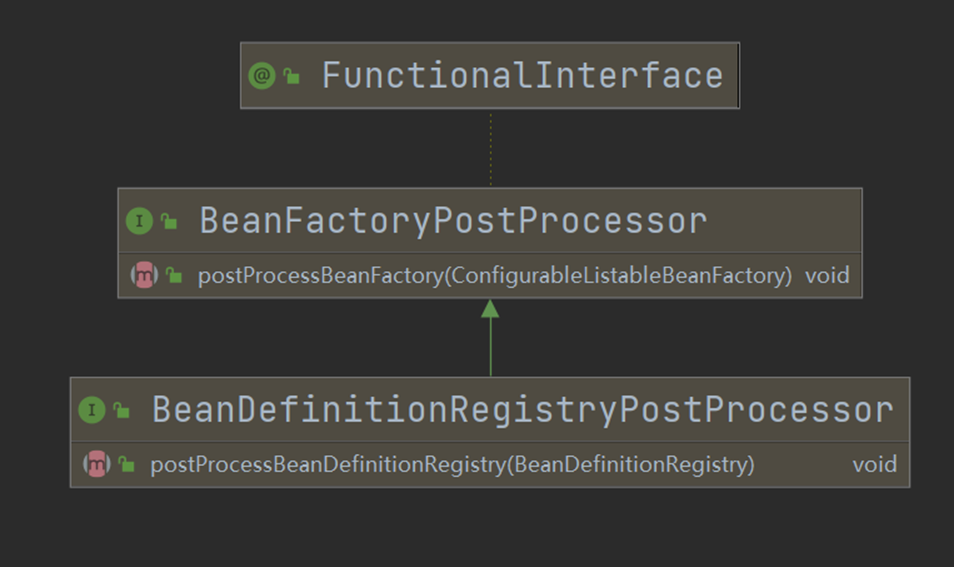
对 BeanFactory 进行后置增强
# InitializingBean、DisposableBean
Bean 组件初始化以后对组件进行后续设置
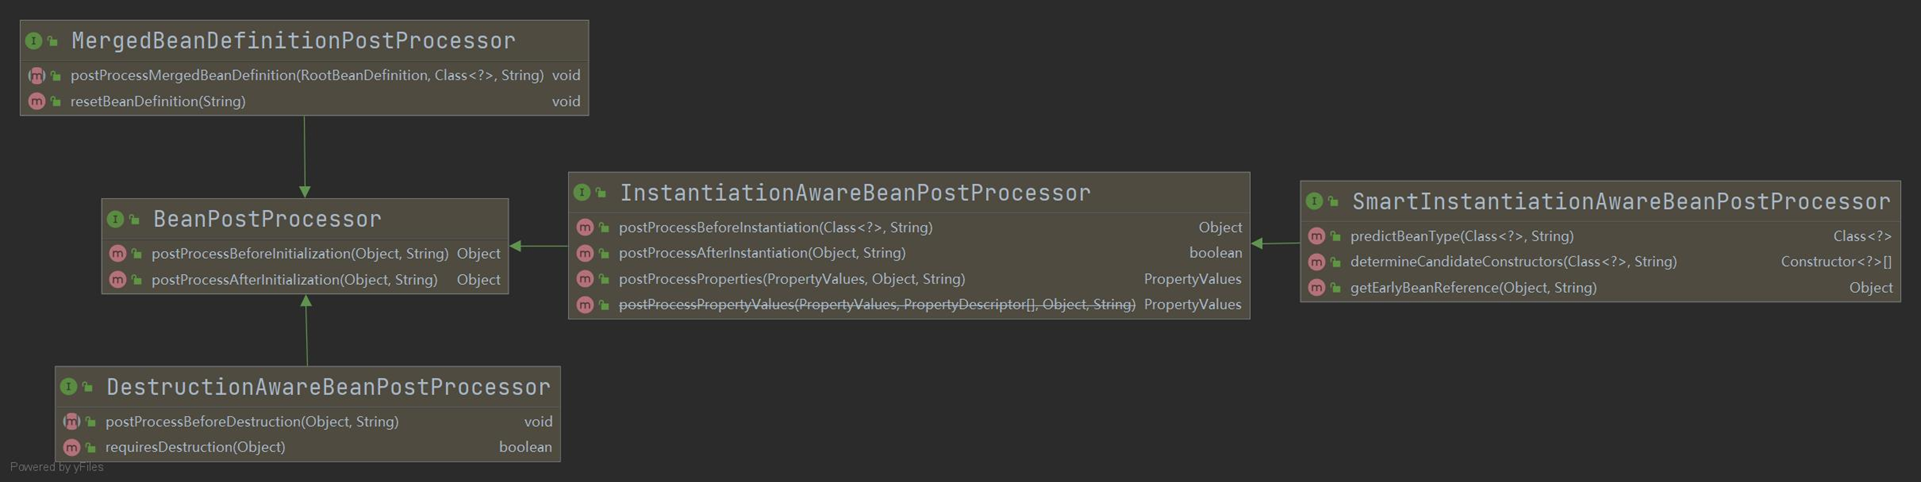
# BeanPostProcessor
后置增强组件,每个一个子接口的增强器在何时运行